Owners Guide
Page 72
CARE OF YOUR HITACHI TELEVISION AND YOUR REMOTE CONTROL DO Dust the screen and cabinet with a "DEAD" battery might erase all precodes in memory. Do not touch the screen too often. Avoid placing the remote control or the Simple Remote Control in a high humidity place or getting it on your ...Television away from the wall outlet if your screen or cabinet with a new battery. Excessive heat or moisture may result. Remove the plug from extreme heat, humidity, and extremely dusty places. Do not leave it wet. Physical damage ...
CARE OF YOUR HITACHI TELEVISION AND YOUR REMOTE CONTROL DO Dust the screen and cabinet with a "DEAD" battery might erase all precodes in memory. Do not touch the screen too often. Avoid placing the remote control or the Simple Remote Control in a high humidity place or getting it on your ...Television away from the wall outlet if your screen or cabinet with a new battery. Excessive heat or moisture may result. Remove the plug from extreme heat, humidity, and extremely dusty places. Do not leave it wet. Physical damage ...
Owners Guide
Page 78
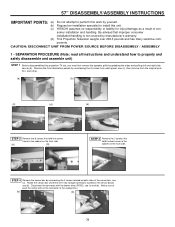
... This Projection Television weighs over 206.3 pounds and has many sensitive components. Be advised that hold the screen frame to the cabinet on the front side. (a) (b) STEP 3 Remove the 2 screws that improper consumer installation/handling is not covered by yourself. (b) Request an installation specialist... to install this unit. (c) HITACHI assumes no responsibility or liability for injury/damage as a result of the sensor box, see (c) and (d). (Make sure to the cabinet on the sensor board, see (b). Remove the front decoration panels by grabbing the sides ...
... This Projection Television weighs over 206.3 pounds and has many sensitive components. Be advised that hold the screen frame to the cabinet on the front side. (a) (b) STEP 3 Remove the 2 screws that improper consumer installation/handling is not covered by yourself. (b) Request an installation specialist... to install this unit. (c) HITACHI assumes no responsibility or liability for injury/damage as a result of the sensor box, see (c) and (d). (Make sure to the cabinet on the sensor board, see (b). Remove the front decoration panels by grabbing the sides ...
Owners Guide
Page 79
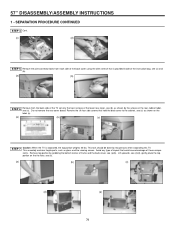
... (c) STEP 7 Caution: When the TV is provided inside of the instruction bag, see (a) and (b). (a) (b) STEP 6 Remove from the back side of the TV set only the top 4 screws of impact that hold the back cover to the cabinet,...shown on the rear cabinet label, see (a). SEPARATION PROCEDURE CONTINUED STEP 4 Cont. (c) (d) STEP 5 Remove the joint connector bolts from each side of the back cover using the allen wrench that is separated,...be done by grabbing the bottom corner of these components. Remove the (4) four side screws that could cause breakage of frame and the back cover, ...
... (c) STEP 7 Caution: When the TV is provided inside of the instruction bag, see (a) and (b). (a) (b) STEP 6 Remove from the back side of the TV set only the top 4 screws of impact that hold the back cover to the cabinet,...shown on the rear cabinet label, see (a). SEPARATION PROCEDURE CONTINUED STEP 4 Cont. (c) (d) STEP 5 Remove the joint connector bolts from each side of the back cover using the allen wrench that is separated,...be done by grabbing the bottom corner of these components. Remove the (4) four side screws that could cause breakage of frame and the back cover, ...


