
User Manual
Page 1
.... • Internet Explorer is subject to ensure the proper use of Microsoft Corporation. After reading them, store them in this manual is a trademark of this projector. Operating Guide Thank you for future reference. NOTE • The information in a safe place for purchasing this product. TEMP LAMP STANDBY/ON LENS SHIFT BNG...
.... • Internet Explorer is subject to ensure the proper use of Microsoft Corporation. After reading them, store them in this manual is a trademark of this projector. Operating Guide Thank you for future reference. NOTE • The information in a safe place for purchasing this product. TEMP LAMP STANDBY/ON LENS SHIFT BNG...
User Manual
Page 2
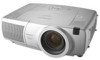
...finely adjust the picture position, use the original packing materials. Contact immediately your dealer if anything is available for reducing projector noise to project various computer signals as well as NTSC/PAL/SECAM video signals onto a screen. Use special caution ... the LENS SHIFT buttons. Preparation Please see the "Contents Of Package" of this projector can be shifted vertically. Projector Features This multimedia projector is used to achieve quieter operation. ●User Memory Function This projector can memorize 4 settings by using a UHB (ultra high brightness) lamp and a...
...finely adjust the picture position, use the original packing materials. Contact immediately your dealer if anything is available for reducing projector noise to project various computer signals as well as NTSC/PAL/SECAM video signals onto a screen. Use special caution ... the LENS SHIFT buttons. Preparation Please see the "Contents Of Package" of this projector can be shifted vertically. Projector Features This multimedia projector is used to achieve quieter operation. ●User Memory Function This projector can memorize 4 settings by using a UHB (ultra high brightness) lamp and a...

User Manual
Page 3
... Buttons 5 Remote control 5 Setting Up 6 Arrangement 6 Adjusting The Projector's Elevator 7 Using The Lens shift Buttons ʜʜ7 Connecting Your Devicesʜʜʜʜ8 Connecting The Power Supply ʜ11 Remote Control 12 About ...;ʜʜ38 Air Filter 39 Caring For The Air Filterʜʜʜʜ39 Other Care 40 Caring For The Inside Of The Projector 40 Caring For The Lens ʜʜʜʜʜ40 Caring For The Cabinet And Remote Control 40 Troubleshooting 41 Related Messages 41 Regarding...
... Buttons 5 Remote control 5 Setting Up 6 Arrangement 6 Adjusting The Projector's Elevator 7 Using The Lens shift Buttons ʜʜ7 Connecting Your Devicesʜʜʜʜ8 Connecting The Power Supply ʜ11 Remote Control 12 About ...;ʜʜ38 Air Filter 39 Caring For The Air Filterʜʜʜʜ39 Other Care 40 Caring For The Inside Of The Projector 40 Caring For The Lens ʜʜʜʜʜ40 Caring For The Cabinet And Remote Control 40 Troubleshooting 41 Related Messages 41 Regarding...

User Manual
Page 4
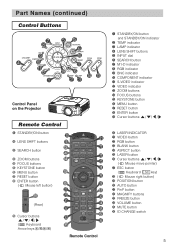
...NETWORK AUDIO IN2 RGB RGB OUT R/CR/PR G/Y B/CB/PB H V AUDIO OUT CR/PR Ca/Pa Y K BNC R-AUDIO IN-L VIDEO S-VIDEO C MI H J 9 0 Projector (Rear/Left) A RGB port B M1-D port C BNC port D AUDIO IN 1 port E AUDIO IN 2 port F CONTROL port G NETWORK port H AUDIO IN R/L port I... S-VIDEO port K COMPONENT port L RGB OUT port M AUDIO OUT port 7 REMOTE CONTROL port 8 DC OUT port 9 AC Inlet 0 Power switch - Part Names Projector TEMP LAMP STANDBY/ON VIDEO MENU 3 5 4 FOCUS ZOOM KEYSTONE SEARCH RESET M1-D INPUT INTER RGB LENS SHIFT BNG COMPONENT S-VIDEO 6 1 2 1 Elevator button 2...
...NETWORK AUDIO IN2 RGB RGB OUT R/CR/PR G/Y B/CB/PB H V AUDIO OUT CR/PR Ca/Pa Y K BNC R-AUDIO IN-L VIDEO S-VIDEO C MI H J 9 0 Projector (Rear/Left) A RGB port B M1-D port C BNC port D AUDIO IN 1 port E AUDIO IN 2 port F CONTROL port G NETWORK port H AUDIO IN R/L port I... S-VIDEO port K COMPONENT port L RGB OUT port M AUDIO OUT port 7 REMOTE CONTROL port 8 DC OUT port 9 AC Inlet 0 Power switch - Part Names Projector TEMP LAMP STANDBY/ON VIDEO MENU 3 5 4 FOCUS ZOOM KEYSTONE SEARCH RESET M1-D INPUT INTER RGB LENS SHIFT BNG COMPONENT S-VIDEO 6 1 2 1 Elevator button 2...
User Manual
Page 5
... 1 23 TEMP LAMP STANDBY/ON LENS SHIFT BNG COMPONENT S-VIDEO VIDEO MENU INTER RESET FOCUS ZOOM RGB M1-D INPUT KEYSTONE SEARCH Control Panel on the Projector Remote Control 1 STANDBY/ON button 4 LENS SHIFT buttons 6 SEARCH button q ZOOM buttons w FOCUS buttons e KEYSTONE button r MENU button t RESET button y ENTER button ( Mouse left button...
... 1 23 TEMP LAMP STANDBY/ON LENS SHIFT BNG COMPONENT S-VIDEO VIDEO MENU INTER RESET FOCUS ZOOM RGB M1-D INPUT KEYSTONE SEARCH Control Panel on the Projector Remote Control 1 STANDBY/ON button 4 LENS SHIFT buttons 6 SEARCH button q ZOOM buttons w FOCUS buttons e KEYSTONE button r MENU button t RESET button y ENTER button ( Mouse left button...
User Manual
Page 6
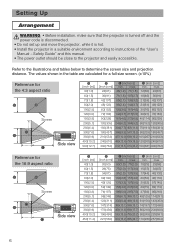
...(20.2) 98(249) 229(581) 221(560) 600(15.2) 895(22.7) 110(280) 257(654) 6 Refer to the illustrations and tables below to the projector and easily accessible. D [inch (cm)] min. The values shown in a suitable environment according to instructions of the "User's Manual - max. Setting Up... turned off and the power code is disconnected. • Do not set up and move the projector, while it is hot. • Install the projector in the table are calculated for a full size screen. (±10%) Reference for the 16:9 aspect ratio B A D B Screen Side view C A [inch (m)] 40...
...(20.2) 98(249) 229(581) 221(560) 600(15.2) 895(22.7) 110(280) 257(654) 6 Refer to the illustrations and tables below to the projector and easily accessible. D [inch (cm)] min. The values shown in a suitable environment according to instructions of the "User's Manual - max. Setting Up... turned off and the power code is disconnected. • Do not set up and move the projector, while it is hot. • Install the projector in the table are calculated for a full size screen. (±10%) Reference for the 16:9 aspect ratio B A D B Screen Side view C A [inch (m)] 40...

User Manual
Page 7
...forward exceeding 9 degrees. Exceeding these range could cause malfunction, and could shorten the lifetime of the consumables. • To prevent damaging the projector and injuring yourself, always hold in the elevator buttons. When you release the elevator buttons, the elevator feet will lock into position. 3 ... can be shifted vertically. When you want to finely adjust the picture position, use to 9 degrees. 1 Press and hold the projector whenever using the elevator buttons to the desired height and then release the elevator buttons. Elevator feet Using The Lens Shift Buttons The ...
...forward exceeding 9 degrees. Exceeding these range could cause malfunction, and could shorten the lifetime of the consumables. • To prevent damaging the projector and injuring yourself, always hold in the elevator buttons. When you release the elevator buttons, the elevator feet will lock into position. 3 ... can be shifted vertically. When you want to finely adjust the picture position, use to 9 degrees. 1 Press and hold the projector whenever using the elevator buttons to the desired height and then release the elevator buttons. Elevator feet Using The Lens Shift Buttons The ...
User Manual
Page 8
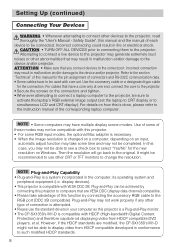
... screws on Windows. Safety Guide", this function by connecting this projector to computers that you may result in the computer, its operating system and peripheral equipment (i.e. ATTENTION • Make sure that are modified, the CP-SX1350's M1-D might be compatible with HDCP (High-bandwidth Digital...) and therefore capable od displaying video from HDCP compatible developed in your computer as this projector is a Plug-and-Play monitor. • The CP-SX1350's M1-D is compatible with this projector. • For some time and may generate extremely loud noises or other CRT or ...
... screws on Windows. Safety Guide", this function by connecting this projector to computers that you may result in the computer, its operating system and peripheral equipment (i.e. ATTENTION • Make sure that are modified, the CP-SX1350's M1-D might be compatible with HDCP (High-bandwidth Digital...) and therefore capable od displaying video from HDCP compatible developed in your computer as this projector is a Plug-and-Play monitor. • The CP-SX1350's M1-D is compatible with this projector. • For some time and may generate extremely loud noises or other CRT or ...

User Manual
Page 9
You can see the ports. Examples of the projector. Setting Up (continued) Please refer to mouse control) DVI port B M1-D USB port M1-D cable Audio out Stereo Mini cable D AUDIO IN 1 ■ If using a ... CR/PR Ca/Pa Y BNC R-AUDIO IN-L VIDEO S-VIDEO Computer RGB out RGB cable Audio out Stereo Mini cable RS-232C port RS-232C cable Projector A RGB E AUDIO IN 2 F CONTROL E AUDIO IN1 AUDIO IN2 A RGB REMOTE CONTROL FG CONTROL NETWORK RGB OUT AUDIO OUT CR/PR Ca/Pa Y R/CR/PR G/Y B/CB...
You can see the ports. Examples of the projector. Setting Up (continued) Please refer to mouse control) DVI port B M1-D USB port M1-D cable Audio out Stereo Mini cable D AUDIO IN 1 ■ If using a ... CR/PR Ca/Pa Y BNC R-AUDIO IN-L VIDEO S-VIDEO Computer RGB out RGB cable Audio out Stereo Mini cable RS-232C port RS-232C cable Projector A RGB E AUDIO IN 2 F CONTROL E AUDIO IN1 AUDIO IN2 A RGB REMOTE CONTROL FG CONTROL NETWORK RGB OUT AUDIO OUT CR/PR Ca/Pa Y R/CR/PR G/Y B/CB...

User Manual
Page 10
Setting Up (continued) Examples of connection with a VCR/DVD Player VCR/DVD Player Projector Audio out (R) Audio out (L) Video out R-AUDIO IN-L VIDEO R-AUDIO IN AUDIO IN-L H VIDEO IN I ■ If using a s-video signal S-video out S-video cable J S -VIDEO ...
Setting Up (continued) Examples of connection with a VCR/DVD Player VCR/DVD Player Projector Audio out (R) Audio out (L) Video out R-AUDIO IN-L VIDEO R-AUDIO IN AUDIO IN-L H VIDEO IN I ■ If using a s-video signal S-video out S-video cable J S -VIDEO ...

User Manual
Page 11
... S-VIDEO Connecting The Power Supply WARNING • Use extra caution when connecting the power cord as incorrect or faulty connections may result in RGB cable Projector L RGB OUT AUDIO IN1 AUDIO IN2 RGB L RGB OUT REMOTE CONTROL AUDIO OUT CR/PR Ca/Pa CONTROL Y NETWORK R/CR/PR G/Y B/CB/PB H...in fire and/or electrical shock. Safety Guide" and the following. • Only plug the power cord into outlets rated for use with the projector. Never attempt to the "User's manual - Please adhere to defeat the ground connection of the three-pronged plug. • Make sure that came...
... S-VIDEO Connecting The Power Supply WARNING • Use extra caution when connecting the power cord as incorrect or faulty connections may result in RGB cable Projector L RGB OUT AUDIO IN1 AUDIO IN2 RGB L RGB OUT REMOTE CONTROL AUDIO OUT CR/PR Ca/Pa CONTROL Y NETWORK R/CR/PR G/Y B/CB/PB H...in fire and/or electrical shock. Safety Guide" and the following. • Only plug the power cord into outlets rated for use with the projector. Never attempt to the "User's manual - Please adhere to defeat the ground connection of the three-pronged plug. • Make sure that came...

User Manual
Page 13
...send a remote signal to the sensor directly, please try. • Since the remote control uses infrared light to send signals to the projector (Class1 LED), be using the remote control for an extended period. approximately 3 meters FOCUS ZOOM 30 degrees 30 degrees 20 degrees 20 degrees... Remote Control (continued) Operating The Remote Control CAUTION • Do not disassemble the remote control. • Do not place the remote control near the projector's lens, fan, or vents. • Do not drop or otherwise expose the remote control to the item "IR REMOTE ID" of the section "...
...send a remote signal to the sensor directly, please try. • Since the remote control uses infrared light to send signals to the projector (Class1 LED), be using the remote control for an extended period. approximately 3 meters FOCUS ZOOM 30 degrees 30 degrees 20 degrees 20 degrees... Remote Control (continued) Operating The Remote Control CAUTION • Do not disassemble the remote control. • Do not place the remote control near the projector's lens, fan, or vents. • Do not drop or otherwise expose the remote control to the item "IR REMOTE ID" of the section "...
User Manual
Page 14
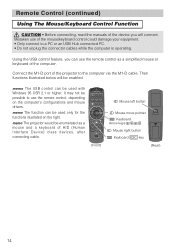
Mistaken use the remote control as a mouse and a keyboard of HID (Human Interface Device) class devices, after connecting cable. memo The projector would be used with Windows 95 OSR 2.1 or higher. BLANK ASPECT LASER PREVIOUS NEXT MOUSE ESC MENU POSITION RESET AUTO MAGNFY PinP VOLUME... Using the USB control feature, you will be possible to use the remote control, depending on the right. Connect the M1-D port of the projector to the computer via the M1-D cable. memo The function can be enumerated as a simplified mouse or keyboard of the computer. Then functions illustrated...
Mistaken use the remote control as a mouse and a keyboard of HID (Human Interface Device) class devices, after connecting cable. memo The projector would be used with Windows 95 OSR 2.1 or higher. BLANK ASPECT LASER PREVIOUS NEXT MOUSE ESC MENU POSITION RESET AUTO MAGNFY PinP VOLUME... Using the USB control feature, you will be possible to use the remote control, depending on the right. Connect the M1-D port of the projector to the computer via the M1-D cable. memo The function can be enumerated as a simplified mouse or keyboard of the computer. Then functions illustrated...
User Manual
Page 15
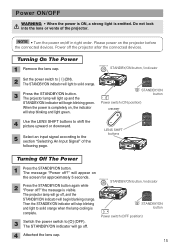
...buttons to shift the picture upward or downward. 5 Select an input signal according to the section "Selecting An Input Signal" of the projector. The STANDBY/ON indicator will begin blanking orange. LENS SHIFT COMPONENTBNG S-VIDEO RGB M1-D INPUT INTER KEYSTONE SEARCH RESET VIDEO STANDBY/ON.... STANDBY/ON STANDBY/ON button / indicator 2 Press the STANDBY/ON button again while "Power off the projector after the connected devices. The STANDBY/ON indicator will appear on the projector before the connected devices. Power off ?" Power ON/OFF WARNING • When the power is ON,...
...buttons to shift the picture upward or downward. 5 Select an input signal according to the section "Selecting An Input Signal" of the projector. The STANDBY/ON indicator will begin blanking orange. LENS SHIFT COMPONENTBNG S-VIDEO RGB M1-D INPUT INTER KEYSTONE SEARCH RESET VIDEO STANDBY/ON.... STANDBY/ON STANDBY/ON button / indicator 2 Press the STANDBY/ON button again while "Power off the projector after the connected devices. The STANDBY/ON indicator will appear on the projector before the connected devices. Power off ?" Power ON/OFF WARNING • When the power is ON,...
User Manual
Page 16
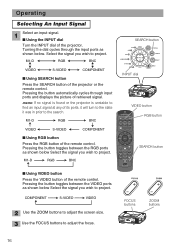
... Ca/Pa Y BNC R-AUDIO IN-L VIDEO S-VIDEO ZOOM buttons 16 Turning the dial cycles through input ports and displays the picture of the projector. Pressing the button toggles between the RGB ports as shown below . BLANK ASPECT LASER RGB button PREVIOUS NEXT MOUSE ESC MENU POSITION RESET AUTO ... Select the signal you wish to find an input signal at any of the remote control. memo If no signal is found or the projector is unstable to project. INPUT dial LENS SHIFT COMPONENTBNG S-VIDEO RGB M1-D INPUT INTER KEYSTONE SEARCH RESET VIDEO STANDBY/ON MENU TEMP LAMP ...
... Ca/Pa Y BNC R-AUDIO IN-L VIDEO S-VIDEO ZOOM buttons 16 Turning the dial cycles through input ports and displays the picture of the projector. Pressing the button toggles between the RGB ports as shown below . BLANK ASPECT LASER RGB button PREVIOUS NEXT MOUSE ESC MENU POSITION RESET AUTO ... Select the signal you wish to find an input signal at any of the remote control. memo If no signal is found or the projector is unstable to project. INPUT dial LENS SHIFT COMPONENTBNG S-VIDEO RGB M1-D INPUT INTER KEYSTONE SEARCH RESET VIDEO STANDBY/ON MENU TEMP LAMP ...
User Manual
Page 20
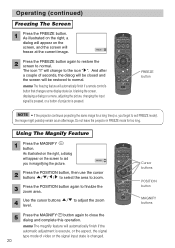
... this operation. blanking the screen, displaying a dialog or a menu, adjusting the picture, changing the input signal) is pressed, or a button of projector is changed. BLANK ASPECT LASER PREVIOUS NEXT MOUSE ESC MENU POSITION RESET AUTO MAGNFY PinP VOLUME ON FREEZE MUTE OFF KEYSTONE SEARCH 1 2 3 ID CHANGE... FREEZE button NOTE • If the projector continues projecting the same image for too long. Operating (continued) Freezing The Screen 1 Press the FREEZE button. Do not leave the...
... this operation. blanking the screen, displaying a dialog or a menu, adjusting the picture, changing the input signal) is pressed, or a button of projector is changed. BLANK ASPECT LASER PREVIOUS NEXT MOUSE ESC MENU POSITION RESET AUTO MAGNFY PinP VOLUME ON FREEZE MUTE OFF KEYSTONE SEARCH 1 2 3 ID CHANGE... FREEZE button NOTE • If the projector continues projecting the same image for too long. Operating (continued) Freezing The Screen 1 Press the FREEZE button. Do not leave the...
User Manual
Page 22
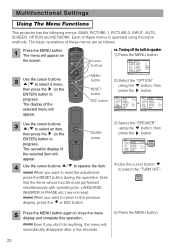
... VOLUME ON FREEZE MUTE OFF KEYSTONE SEARCH 1 2 3 ID CHANGE Cursor buttons MENU button RESET button ESC button ex. Multifunctional Settings Using The Menu Functions This projector has the following menus: MAIN, PICTURE-1, PICTURE-2, INPUT, AUTO, SCREEN, OPTION and NETWORK.
... VOLUME ON FREEZE MUTE OFF KEYSTONE SEARCH 1 2 3 ID CHANGE Cursor buttons MENU button RESET button ESC button ex. Multifunctional Settings Using The Menu Functions This projector has the following menus: MAIN, PICTURE-1, PICTURE-2, INPUT, AUTO, SCREEN, OPTION and NETWORK.

User Manual
Page 25
... "GAMMA" of the CUSTOM menu under the item "GAMMA" are collectively returned to perform the function.: LOAD1 LOAD2 LOAD3 LOAD4 SAVE1 SAVE2 SAVE3 SAVE4 This projector has 4 numbered memories for adjustment data. Performing the SAVE1, SAVE2, SAVE3 or SAVE4 puts the current adjustment data on the data. Multifunctional Settings (continued) PICTURE...
... "GAMMA" of the CUSTOM menu under the item "GAMMA" are collectively returned to perform the function.: LOAD1 LOAD2 LOAD3 LOAD4 SAVE1 SAVE2 SAVE3 SAVE4 This projector has 4 numbered memories for adjustment data. Performing the SAVE1, SAVE2, SAVE3 or SAVE4 puts the current adjustment data on the data. Multifunctional Settings (continued) PICTURE...
User Manual
Page 28
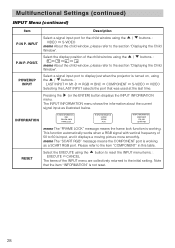
...". POWERUP INPUT Select a signal input port for the child window using the / buttons. : memo About the child window, please refer to display just when the projector is not reset. 28 Select the display position of the INPUT menu are collectively returned to 60 is working as illustrated below. Note that the...
...". POWERUP INPUT Select a signal input port for the child window using the / buttons. : memo About the child window, please refer to display just when the projector is not reset. 28 Select the display position of the INPUT menu are collectively returned to 60 is working as illustrated below. Note that the...
User Manual
Page 29
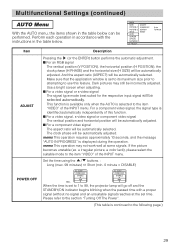
... time with the instructions in the table below can be performed. If the picture becomes unstable (ex. When the time is selected to 99, the projector lamp will be incorrectly adjusted. And the aspect ratio (ASPECT) will be automatically selected. This function is available only when the AUTO is set time...
... time with the instructions in the table below can be performed. If the picture becomes unstable (ex. When the time is selected to 99, the projector lamp will be incorrectly adjusted. And the aspect ratio (ASPECT) will be automatically selected. This function is available only when the AUTO is set time...


