User Manual
Page 2
..., My text display, My text writing Temporarily blanking the screen . . . 23 Using the menu function 24 Maintenance 58 Replacing the lamp 58 EASY MENU 26 Cleaning and replacing the air filter . . 60 Aspect, Auto keystone, Keystone, Other care 62 Picture mode, Eco mode, Mirror, Reset,... Filter time, Language, Advanced menu, Exit Troubleshooting 63 Related messages 63 Regarding the indicator lamps . . . . . 64 Resetting all settings ...
..., My text display, My text writing Temporarily blanking the screen . . . 23 Using the menu function 24 Maintenance 58 Replacing the lamp 58 EASY MENU 26 Cleaning and replacing the air filter . . 60 Aspect, Auto keystone, Keystone, Other care 62 Picture mode, Eco mode, Mirror, Reset,... Filter time, Language, Advanced menu, Exit Troubleshooting 63 Related messages 63 Regarding the indicator lamps . . . . . 64 Resetting all settings ...
User Manual
Page 13
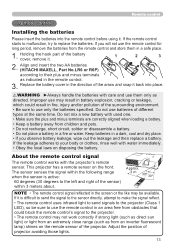
...Always handle the batteries with water immediately. • Obey the local laws on the front. Keep batteries in an area free from an inverter fluorescent lamp) shines on the remote sensor of the arrow and snap it . 1 2 3 2. If the remote control starts to malfunction, try to their... • Keep a battery away from the remote control and store them only as directed. Align and insert the two AA batteries (HITACHI MAXELL, Part No.LR6 or R6P) according to replace the batteries. Do not mix a new battery with the projector's remote sensor. Approx. 3 m 30º 30º NOTE ...
...Always handle the batteries with water immediately. • Obey the local laws on the front. Keep batteries in an area free from an inverter fluorescent lamp) shines on the remote sensor of the arrow and snap it . 1 2 3 2. If the remote control starts to malfunction, try to their... • Keep a battery away from the remote control and store them only as directed. Align and insert the two AA batteries (HITACHI MAXELL, Part No.LR6 or R6P) according to replace the batteries. Do not mix a new battery with the projector's remote sensor. Approx. 3 m 30º 30º NOTE ...
User Manual
Page 48
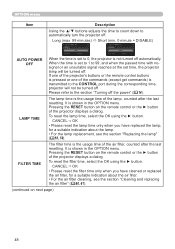
...the OK using the ► button. CANCEL OK • Please reset the lamp time only when you have replaced the lamp, for a suitable indication about the lamp. • For the lamp replacement, see the section "Cleaning and replacing the air filter" (60, 61). (continued on next page) 48 If one...using the ► button. CANCEL OK • Please reset the filter time only when you have cleaned or replaced the air filter, for a suitable indication about the air filter. • For the air filter cleaning, see the section "Replacing the lamp" (58, 59).
...the OK using the ► button. CANCEL OK • Please reset the lamp time only when you have replaced the lamp, for a suitable indication about the lamp. • For the lamp replacement, see the section "Cleaning and replacing the air filter" (60, 61). (continued on next page) 48 If one...using the ► button. CANCEL OK • Please reset the filter time only when you have cleaned or replaced the air filter, for a suitable indication about the air filter. • For the air filter cleaning, see the section "Replacing the lamp" (58, 59).
User Manual
Page 58
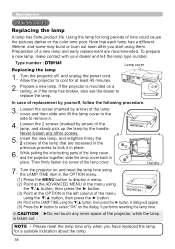
...MENU button to replace the lamp. Maintenance Maintenance Replacing the lamp A lamp has finite product life. Using the lamp for long periods of a new lamp and early replacement are loosened in the previous process to cool for a suitable indication about the lamp. 58 Type number : DT01141 Replacing the lamp 1. Insert the new lamp, and retighten...tone poor. Allow the projector to lock it . 4. Lamp cover In case of the lamp cover. Then firmly fasten the screw of replacement by arrow) of the lamp cover and then slide and lift the lamp cover to the 3 side to select "OK" on ...
...MENU button to replace the lamp. Maintenance Maintenance Replacing the lamp A lamp has finite product life. Using the lamp for long periods of a new lamp and early replacement are loosened in the previous process to cool for a suitable indication about the lamp. 58 Type number : DT01141 Replacing the lamp 1. Insert the new lamp, and retighten...tone poor. Allow the projector to lock it . 4. Lamp cover In case of the lamp cover. Then firmly fasten the screw of replacement by arrow) of the lamp cover and then slide and lift the lamp cover to the 3 side to select "OK" on ...
User Manual
Page 59
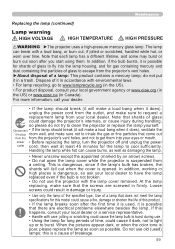
... , it in firmly. Dispose of breakage. 59 For more information, call your local dealer or a service representative. • Handle with the lamp cover removed. At the lamp replacing, make sure to request a replacement lamp from the projector's vent holes, and not to inhale the gas or fine particles that the screws are electrical problems elsewhere...
... , it in firmly. Dispose of breakage. 59 For more information, call your local dealer or a service representative. • Handle with the lamp cover removed. At the lamp replacing, make sure to request a replacement lamp from the projector's vent holes, and not to inhale the gas or fine particles that the screws are electrical problems elsewhere...
User Manual
Page 60
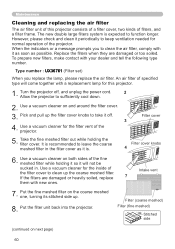
..., two kinds of filters, and a filter frame. If the filters are damaged or too soiled. Replace the filters when they are damaged or heavily soiled, replace 7 them with a replacement lamp for normal operation of the projector. Use a vacuum cleaner for the inside of the filter cover to...to clean the air filter, comply with your dealer and tell the following type number. When the indicators or a message prompts you replace the lamp, please replace the air filter. Filter cover 3 Filter cover knobs 4 6. Use a vacuum cleaner on the coarse meshed one, turning its stitched...
..., two kinds of filters, and a filter frame. If the filters are damaged or too soiled. Replace the filters when they are damaged or heavily soiled, replace 7 them with a replacement lamp for normal operation of the projector. Use a vacuum cleaner for the inside of the filter cover to...to clean the air filter, comply with your dealer and tell the following type number. When the indicators or a message prompts you replace the lamp, please replace the air filter. Filter cover 3 Filter cover knobs 4 6. Use a vacuum cleaner on the coarse meshed one, turning its stitched...
User Manual
Page 61
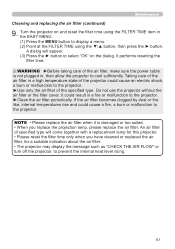
... cover. An air filter of the specified type. A dialog will come together with a replacement lamp for this projector. • Please reset the filter time only when you replace the projection lamp, please replace the air filter. WARNING ►Before taking care of the air filter, make sure the... power cable is damaged or too soiled. • When you have cleaned or replaced the air filter, for a suitable indication...
... cover. An air filter of the specified type. A dialog will come together with a replacement lamp for this projector. • Please reset the filter time only when you replace the projection lamp, please replace the air filter. WARNING ►Before taking care of the air filter, make sure the... power cable is damaged or too soiled. • When you have cleaned or replaced the air filter, for a suitable indication...
User Manual
Page 64
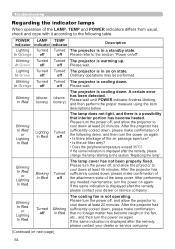
... Blinking In Red Turned off Ordinary operations may be performed. Please turn the power on again. Troubleshooting Regarding the indicator lamps When operation of the lamp cover. Lighting Turned Turned The projector is cooling down . A certain error has been detected. Please turn the power on... has sufficiently cooled down, please make confirmation of the attachment state of the LAMP, TEMP and POWER indicators differs from usual, check and cope with it according to the section "Replacing the lamp". Blinking In Orange Blinking In Red Blinking In Red or Lighting In Red ...
... Blinking In Red Turned off Ordinary operations may be performed. Please turn the power on again. Troubleshooting Regarding the indicator lamps When operation of the lamp cover. Lighting Turned Turned The projector is cooling down . A certain error has been detected. Please turn the power on... has sufficiently cooled down, please make confirmation of the attachment state of the LAMP, TEMP and POWER indicators differs from usual, check and cope with it according to the section "Replacing the lamp". Blinking In Orange Blinking In Red Blinking In Red or Lighting In Red ...
User Manual
Page 65
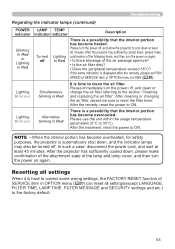
...in Red There is time to the factory default. 65 If the same indication is displayed after the remedy, please set FAN SPEED of the lamp and lamp cover, and then turn the power on again. After cleaning or changing the air filter, please be turned off. NOTE • When ...parameters (5°C to ON. After the treatment, reset the power to the section "Cleaning and replacing the air filter". Please turn the power off , and allow the projector to cool down , and the indicator lamps may also be sure to correct some wrong settings, the FACTORY RESET function of the air...
...in Red There is time to the factory default. 65 If the same indication is displayed after the remedy, please set FAN SPEED of the lamp and lamp cover, and then turn the power on again. After cleaning or changing the air filter, please be turned off. NOTE • When ...parameters (5°C to ON. After the treatment, reset the power to the section "Cleaning and replacing the air filter". Please turn the power off , and allow the projector to cool down , and the indicator lamps may also be sure to correct some wrong settings, the FACTORY RESET function of the air...
User Manual
Page 68
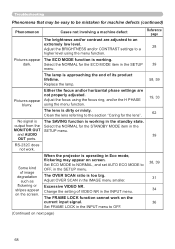
.... Some kind of image degradation such as flickering or stripes appear on the current input signal. The OVER SCAN ratio is dirty or misty. The lamp is operating in Eco mode, flickering may be easy to be mistaken for the ECO MODE item in the SETUP 39 menu. Either the focus..., and set AUTO ECO MODE to OFF. 38, 39 31 34 36 (Continued on screen. Troubleshooting Phenomena that may appear on next page) 68 Replace the lamp. 58, 59 Pictures appear blurry. RS-232C does not work on the screen. Set FRAME LOCK in the INPUT menu to OFF, in the SETUP...
.... Some kind of image degradation such as flickering or stripes appear on the current input signal. The OVER SCAN ratio is dirty or misty. The lamp is operating in Eco mode, flickering may be easy to be mistaken for the ECO MODE item in the SETUP 39 menu. Either the focus..., and set AUTO ECO MODE to OFF. 38, 39 31 34 36 (Continued on screen. Troubleshooting Phenomena that may appear on next page) 68 Replace the lamp. 58, 59 Pictures appear blurry. RS-232C does not work on the screen. Set FRAME LOCK in the INPUT menu to OFF, in the SETUP...


