User Manual
Page 2
...Temporarily muting the sound . . . . 18 OPTION Menu 38 Auto search, Auto off, Lamp time, Filter time, Service Selecting an input signal 18 Maintenance 40 Searcting an input signal 19 Lamp 40 Selecting an aspect ratio 19 Air filter 42 Adjusting the zoom and focus . ... 44 Using the automatic adjustment feature . 20 Troubleshooting 45 Adjusting the position 20 Related messages 45 Correcting the keystone distortions 21 Regarding the indicator lamps. . . . 46 Using the magnify feature 21 Phenomena that may easily be Freezing the screen 22 mistaken for machine defects . . ....
...Temporarily muting the sound . . . . 18 OPTION Menu 38 Auto search, Auto off, Lamp time, Filter time, Service Selecting an input signal 18 Maintenance 40 Searcting an input signal 19 Lamp 40 Selecting an aspect ratio 19 Air filter 42 Adjusting the zoom and focus . ... 44 Using the automatic adjustment feature . 20 Troubleshooting 45 Adjusting the position 20 Related messages 45 Correcting the keystone distortions 21 Regarding the indicator lamps. . . . 46 Using the magnify feature 21 Phenomena that may easily be Freezing the screen 22 mistaken for machine defects . . ....
User Manual
Page 3
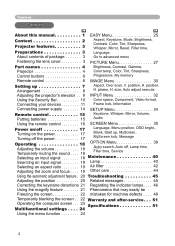
... • Keep the original packing materials for installation and gets a large image from short distance. High Brightness Newly developed 180W UHB (Ultra High Brightness) lamp gives you more options to the projector using the strap. For moving the projector, be sure to use it the lens cap to make your...
... • Keep the original packing materials for installation and gets a large image from short distance. High Brightness Newly developed 180W UHB (Ultra High Brightness) lamp gives you more options to the projector using the strap. For moving the projector, be sure to use it the lens cap to make your...

User Manual
Page 4
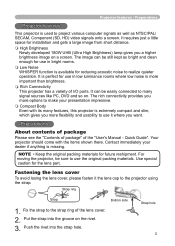
Part names Part names Projector Lamp cover (41) (Lamp unit is inside.) Zoom knob (19) Focus ring (19) Vent (7) Lens (17) Lens cover (3) Control buttons (6) Remote sensor (...;42) (Air filter and intake vent are inside.) Bottom side WARNING ►During use or immediately after use, do not touch around the lamp and vents of the projector. () It could cause a burn. 4
Part names Part names Projector Lamp cover (41) (Lamp unit is inside.) Zoom knob (19) Focus ring (19) Vent (7) Lens (17) Lens cover (3) Control buttons (6) Remote sensor (...;42) (Air filter and intake vent are inside.) Bottom side WARNING ►During use or immediately after use, do not touch around the lamp and vents of the projector. () It could cause a burn. 4

User Manual
Page 6
Part names Control buttons Cursor buttons 24) STANDBY/ON button (17) LAMP indicator (46, 47) TEMP indicator (46, 47) POWER indicator (17) INPUT button (18) Remote control SEARCH button (19) RGB button (&#...
Part names Control buttons Cursor buttons 24) STANDBY/ON button (17) LAMP indicator (46, 47) TEMP indicator (46, 47) POWER indicator (17) INPUT button (18) Remote control SEARCH button (19) RGB button (&#...

User Manual
Page 16
... store them in an area free from obstacles that could block the remote control's output signal to keep the light from an inverter fluorescent lamp), hit the projector's remote sensor, the remote control may be using the remote control for an extended period. • Replace the batteries whenever the remote...
... store them in an area free from obstacles that could block the remote control's output signal to keep the light from an inverter fluorescent lamp), hit the projector's remote sensor, the remote control may be using the remote control for an extended period. • Replace the batteries whenever the remote...
User Manual
Page 17
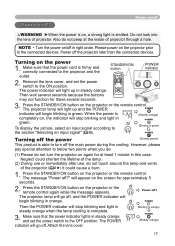
... (4 ) It could shorten the lifetime of projector through a hole. NOTE • Turn the power on/off in steady orange when the lamp cooling is complete. 3. Power off ?" STANDBY/ON button VIDEO RGB SEARCH ASPECT AUTO BLANK MAGNIFY ON HOME PAGE UP VOLUME OFF END PAGE DOWN MUTE... off the main power during the cooling. When the power is completely on, the indicator will appear on again for at the inside of the lamp. (2) During use or immediately after use, do not peep at least 1 minute in green) the section "Selecting an input signal" (18). Press...
... (4 ) It could shorten the lifetime of projector through a hole. NOTE • Turn the power on/off in steady orange when the lamp cooling is complete. 3. Power off ?" STANDBY/ON button VIDEO RGB SEARCH ASPECT AUTO BLANK MAGNIFY ON HOME PAGE UP VOLUME OFF END PAGE DOWN MUTE... off the main power during the cooling. When the power is completely on, the indicator will appear on again for at the inside of the lamp. (2) During use or immediately after use, do not peep at least 1 minute in green) the section "Selecting an input signal" (18). Press...

User Manual
Page 23
... will connect. In this remote control. It may not be possible to move the mouse pointer diagonally). • This function is not available while the lamp is warming up (the POWER indicator flashes green), and while adjusting the volume and display, correcting for trapezoidal distortion, zooming in pointing device (e.g. See...
... will connect. In this remote control. It may not be possible to move the mouse pointer diagonally). • This function is not available while the lamp is warming up (the POWER indicator flashes green), and while adjusting the volume and display, correcting for trapezoidal distortion, zooming in pointing device (e.g. See...
User Manual
Page 38
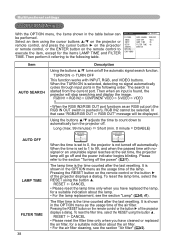
.... PICTURE AUTO SEARCH TURN OFF Select an item using the cursor buttons ▲/▼ on the projector or IMAGE INPUT AUTO OFF 0min LAMP TIME 0h remote control, and press the cursor button ► on the projector SETUP SCREEN FILTER TIME 0h SERVICE or remote control, or... the ENTER button on the remote control or the button ► of the lamp. It is selected, detecting no signal automatically cycles through input ports in the OPTION menu as the usage time of the projector displays a...
.... PICTURE AUTO SEARCH TURN OFF Select an item using the cursor buttons ▲/▼ on the projector or IMAGE INPUT AUTO OFF 0min LAMP TIME 0h remote control, and press the cursor button ► on the projector SETUP SCREEN FILTER TIME 0h SERVICE or remote control, or... the ENTER button on the remote control or the button ► of the lamp. It is selected, detecting no signal automatically cycles through input ports in the OPTION menu as the usage time of the projector displays a...
User Manual
Page 39
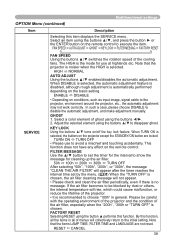
Select an item using the buttons ◄/►. 2. Note that the items LAMP TIME, FILTER TIME and LANGUAGE are locked. In such a case, please choose DISABLE to the initial setting. FILTER MESSAGE Use the ▲/▼ button to ...
Select an item using the buttons ◄/►. 2. Note that the items LAMP TIME, FILTER TIME and LANGUAGE are locked. In such a case, please choose DISABLE to the initial setting. FILTER MESSAGE Use the ▲/▼ button to ...

User Manual
Page 40
...'s vent holes. ►About disposal of the specified type. • If the lamp breaks soon after you start using them. For lamp recycling, go to request a replacement lamp from the ceiling. Disconnect • If the lamp should break (it will make sure that each lamp has a different lifetime, and some may burst or burn...
...'s vent holes. ►About disposal of the specified type. • If the lamp breaks soon after you start using them. For lamp recycling, go to request a replacement lamp from the ceiling. Disconnect • If the lamp should break (it will make sure that each lamp has a different lifetime, and some may burst or burn...
User Manual
Page 41
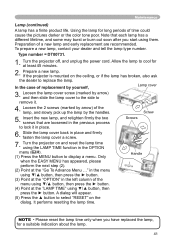
..., then press the ► button. (4) Point at the "LAMP TIME" using the LAMP TIME function in place. Maintenance Lamp (continued) A lamp has a finite product life. Type number = DT00731. 1. Loosen the lamp cover screw (marked by the handles. Slide the lamp cover back in the previous process to cool for at the "... the power cord. In the case of the lamp, and slowly pick up the lamp by arrow) and then slide the lamp cover to the side to replace the lamp. Insert the new lamp, and retighten firmly the two screws that each lamp has a different lifetime, and some may burst or...
..., then press the ► button. (4) Point at the "LAMP TIME" using the LAMP TIME function in place. Maintenance Lamp (continued) A lamp has a finite product life. Type number = DT00731. 1. Loosen the lamp cover screw (marked by the handles. Slide the lamp cover back in the previous process to cool for at the "... the power cord. In the case of the lamp, and slowly pick up the lamp by arrow) and then slide the lamp cover to the side to replace the lamp. Insert the new lamp, and retighten firmly the two screws that each lamp has a different lifetime, and some may burst or...
User Manual
Page 42
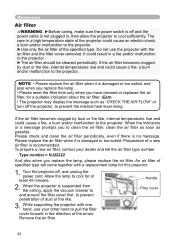
...61478;38) • The projector may display the message such as possible. While supporting the projector with one hand, use the projector with a replacement lamp for this projector. 1. If the air filter becomes clogged by dust or the like, internal temperatures rise and could result in a high ...rst, to prevent penetration of the arrow. If the air filter becomes clogged by dust or the like . 3. Preparation of the specified type. The care in a fire and/or malfunction to the projector. ►Use only the air filter of a new air fi...
...61478;38) • The projector may display the message such as possible. While supporting the projector with one hand, use the projector with a replacement lamp for this projector. 1. If the air filter becomes clogged by dust or the like, internal temperatures rise and could result in a high ...rst, to prevent penetration of the arrow. If the air filter becomes clogged by dust or the like . 3. Preparation of the specified type. The care in a fire and/or malfunction to the projector. ►Use only the air filter of a new air fi...
User Manual
Page 46
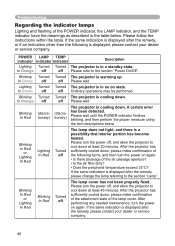
... allow the projector to the section "Power On/Off". After the projector has sufficiently cooled down at least 45 minutes. POWER LAMP TEMP indicator indicator indicator Description Lighting Turned Turned The projector is in an on state. In Green off off Please refer to cool down... projector has sufficiently cooled down at least 20 minutes. Please turn the power off , and allow the projector to the section "Lamp". In Orange off off Please wait. Blinking Turned Turned The projector is cooling down . If the same indication is cooling down . After ...
... allow the projector to the section "Power On/Off". After the projector has sufficiently cooled down at least 45 minutes. POWER LAMP TEMP indicator indicator indicator Description Lighting Turned Turned The projector is in an on state. In Green off off Please refer to cool down... projector has sufficiently cooled down at least 20 minutes. Please turn the power off , and allow the projector to the section "Lamp". In Orange off off Please wait. Blinking Turned Turned The projector is cooling down . If the same indication is cooling down . After ...
User Manual
Page 47
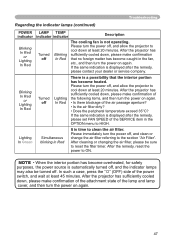
...in the fan, etc., and then turn the power on again. 47 In such a case, press the "" (OFF) side of the lamp and lamp cover, and then turn the power on again. • Is there blockage of the SERVICE item in the OPTION menu to HIGH. After the projector...also be sure to ON. If the same indication is not operating. Please immediately turn the power on again. Troubleshooting Regarding the indicator lamps (continued) POWER LAMP TEMP indicator indicator indicator Description Blinking In Red or Lighting In Red Turned off , and clean or change the air filter ...
...in the fan, etc., and then turn the power on again. 47 In such a case, press the "" (OFF) side of the lamp and lamp cover, and then turn the power on again. • Is there blockage of the SERVICE item in the OPTION menu to HIGH. After the projector...also be sure to ON. If the same indication is not operating. Please immediately turn the power on again. Troubleshooting Regarding the indicator lamps (continued) POWER LAMP TEMP indicator indicator indicator Description Blinking In Red or Lighting In Red Turned off , and clean or change the air filter ...
User Manual
Page 48
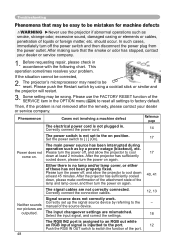
...may need to the manual of the source device. - Phenomenon Cases not involving a machine defect Reference page The electrical power cord is no lamp and/or lamp cover, or either of these has not been properly fixed. Correctly connect the power cord. 14 The power switch is not set ...switch to factory default. After the projector has sufficiently cooled down, please make confirmation of the attachment state of the lamp and lamp cover, and then turn the power on position. The input changeover settings are outputted. After making sure that may be easy to be ...
...may need to the manual of the source device. - Phenomenon Cases not involving a machine defect Reference page The electrical power cord is no lamp and/or lamp cover, or either of these has not been properly fixed. Correctly connect the power cord. 14 The power switch is not set ...switch to factory default. After the projector has sufficiently cooled down, please make confirmation of the attachment state of the lamp and lamp cover, and then turn the power on position. The input changeover settings are outputted. After making sure that may be easy to be ...
User Manual
Page 50
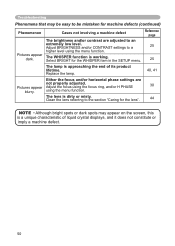
...machine defect The brightness and/or contrast are not properly adjusted. Select BRIGHT for machine defects (continued) Phenomenon Pictures appear dark. Replace the lamp. Clean the lens referring to a higher level using the menu function. Pictures appear blurry. Either the focus and/or horizontal phase settings ... for the WHISPER item in the SETUP menu. Adjust BRIGHTNESS and/or CONTRAST settings to the section "Caring for the lens". The lamp is approaching the end of liquid crystal displays, and it does not constitute or imply a machine defect. 50 The lens is working...
...machine defect The brightness and/or contrast are not properly adjusted. Select BRIGHT for machine defects (continued) Phenomenon Pictures appear dark. Replace the lamp. Clean the lens referring to a higher level using the menu function. Pictures appear blurry. Either the focus and/or horizontal phase settings ... for the WHISPER item in the SETUP menu. Adjust BRIGHTNESS and/or CONTRAST settings to the section "Caring for the lens". The lamp is approaching the end of liquid crystal displays, and it does not constitute or imply a machine defect. 50 The lens is working...

User Manual
Page 51
... crystal projector Liquid Crystal panel Panel size Drive system Pixels 1.5 cm (0.6 type) TFT active matrix ED-S8240 : 480,000 pixels (800 horizontal x 600 vertical) ED-X8250 : 786,432 pixels (1024 horizontal x 768 vertical) Lens Zoom lens F=1.7 ~ 1.9 f=18.9 ~ 22.6 mm Lamp 180W UHB Speaker 1W x 1 Power Supply AC100-120V/3.1A, AC220-240V/1.7A Power Consumption...
... crystal projector Liquid Crystal panel Panel size Drive system Pixels 1.5 cm (0.6 type) TFT active matrix ED-S8240 : 480,000 pixels (800 horizontal x 600 vertical) ED-X8250 : 786,432 pixels (1024 horizontal x 768 vertical) Lens Zoom lens F=1.7 ~ 1.9 f=18.9 ~ 22.6 mm Lamp 180W UHB Speaker 1W x 1 Power Supply AC100-120V/3.1A, AC220-240V/1.7A Power Consumption...
User Manual
Page 59
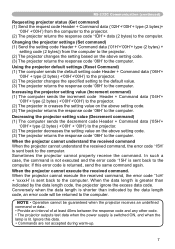
... the response code and any other code. • The projector outputs test data when the power supply is switched ON, and when the lamp is returned, send the same command again. Using the projector default settings (Reset Command) (1) The computer sends the default setting code Header ...+ Command data ('06H'+ '00H' + type (2 bytes) +'00H'+'00H') to the projector. (2) The projector changes the specified setting to the default value. (3) The projector returns the response code '06H' to the computer. Conversely when the data length is greater than indicated by...
... the response code and any other code. • The projector outputs test data when the power supply is switched ON, and when the lamp is returned, send the same command again. Using the projector default settings (Reset Command) (1) The computer sends the default setting code Header ...+ Command data ('06H'+ '00H' + type (2 bytes) +'00H'+'00H') to the projector. (2) The projector changes the specified setting to the default value. (3) The projector returns the response code '06H' to the computer. Conversely when the data length is greater than indicated by...

User Manual
Page 60
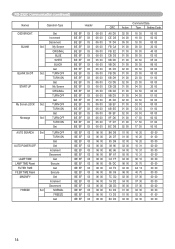
... 00 00 01 00 02 00 (Cover error) (Fan error) 05 00 06 00 (Air flow error) (Lamp time error) 09 00 10 00 (Filter missing error)(Inner Sencer error) 03 00 (Lamp error) 07 00 (Cool error) BE EF 03 06 00 89 D2 02 00 BE EF 03 06...
... 00 00 01 00 02 00 (Cover error) (Fan error) 05 00 06 00 (Air flow error) (Lamp time error) 09 00 10 00 (Filter missing error)(Inner Sencer error) 03 00 (Lamp error) 07 00 (Cool error) BE EF 03 06 00 89 D2 02 00 BE EF 03 06...
User Manual
Page 66
... Type OSD BRIGHT. BLANK Set BLANK On/Off Set START UP Set My Screen LOCK Set Message Set AUTO SEARCH Set AUTO POWER OFF LAMP TIME LAMP TIME Reset FILTER TIME FILER TIME Reset MAGNIFY FREEZE Set Get Increment Decrement My Screen ORIGINAL BLUE WHITE BLACK Get TURN OFF TURN ON Get...
... Type OSD BRIGHT. BLANK Set BLANK On/Off Set START UP Set My Screen LOCK Set Message Set AUTO SEARCH Set AUTO POWER OFF LAMP TIME LAMP TIME Reset FILTER TIME FILER TIME Reset MAGNIFY FREEZE Set Get Increment Decrement My Screen ORIGINAL BLUE WHITE BLACK Get TURN OFF TURN ON Get...


