
Owners Guide
Page 1
... on the back and right side of Dolby Laboratories. Please read these instructions carefully. Keep this Hitachi product. I4nt9erface are trademarks of the television. L32A404 Alpha Series Liquid Crystal HDTV Thank you for purchasing this owners guide for future reference. For additional... assistance please call 800.HITACHI (800.448.2244) or visit our website at www.hitachi.us/tv. MODEL NAME SERIAL NO TABLE ...
... on the back and right side of Dolby Laboratories. Please read these instructions carefully. Keep this Hitachi product. I4nt9erface are trademarks of the television. L32A404 Alpha Series Liquid Crystal HDTV Thank you for purchasing this owners guide for future reference. For additional... assistance please call 800.HITACHI (800.448.2244) or visit our website at www.hitachi.us/tv. MODEL NAME SERIAL NO TABLE ...

Owners Guide
Page 3
...patents and other sources, may require prior authorization from the broadcaster or owner of the video program material. FOR MORE INFORMATION, CALL 800.HITACHI. FEDERAL COMMUNICATIONS COMMISSION NOTICE This equipment has been tested and found to comply with paragraph 15.119 and 15.122 of the following two ... local government agency or visit www.eiae.org (in USA) or www.epsc.ca (in trash. These limits are not expressly approved by TV stations and cable companies, as well as vases, should not be authorized, and is encouraged to try to radio communications. Recycle or dispose ...
...patents and other sources, may require prior authorization from the broadcaster or owner of the video program material. FOR MORE INFORMATION, CALL 800.HITACHI. FEDERAL COMMUNICATIONS COMMISSION NOTICE This equipment has been tested and found to comply with paragraph 15.119 and 15.122 of the following two ... local government agency or visit www.eiae.org (in USA) or www.epsc.ca (in trash. These limits are not expressly approved by TV stations and cable companies, as well as vases, should not be authorized, and is encouraged to try to radio communications. Recycle or dispose ...

Owners Guide
Page 5
... immediately if there is a malfunction on it may shorten the life of the display unit and cause overheating. Do not open the TV cabinet. Do not throw any other flammable materials. Inadequate ventilation may also cause personal injury. PRECAUTIONS AND REMINDERS Do not place the unit ...on top of the unit. Avoid liquid containers on uneven surfaces, this area. Do not cover or block any foreign materials falls into the TV or if the TV fell down. Unplug immediately if any vents and openings of time (days). Avoid direct sunlight, dusty, high humidity and smokey locatio.ns....
... immediately if there is a malfunction on it may shorten the life of the display unit and cause overheating. Do not open the TV cabinet. Do not throw any other flammable materials. Inadequate ventilation may also cause personal injury. PRECAUTIONS AND REMINDERS Do not place the unit ...on top of the unit. Avoid liquid containers on uneven surfaces, this area. Do not cover or block any foreign materials falls into the TV or if the TV fell down. Unplug immediately if any vents and openings of time (days). Avoid direct sunlight, dusty, high humidity and smokey locatio.ns....

Owners Guide
Page 6
...(Part No. HL02631) "AA" Size Batteries (2) Power Cord Owners Guide L32A404 P.MODE S.MODE MTS/SAP ASPECT 123 456 789 0 LAST CH ENTER ...Base CLU-4591AV (Part No. 705TQA34J70) For optional accessories, please access our web site at www.hitachi.us /tv CAUTION • Ceiling mounting is designed for a maximum tilting angle of the television. Match the... battery into place. TM Manufactured under license from vertical. • Please see page 8 for purchasing this Hitachi product. TruSurround HD technology is not going to the (+) and (-) marks in the device at the same...
...(Part No. HL02631) "AA" Size Batteries (2) Power Cord Owners Guide L32A404 P.MODE S.MODE MTS/SAP ASPECT 123 456 789 0 LAST CH ENTER ...Base CLU-4591AV (Part No. 705TQA34J70) For optional accessories, please access our web site at www.hitachi.us /tv CAUTION • Ceiling mounting is designed for a maximum tilting angle of the television. Match the... battery into place. TM Manufactured under license from vertical. • Please see page 8 for purchasing this Hitachi product. TruSurround HD technology is not going to the (+) and (-) marks in the device at the same...
Owners Guide
Page 7
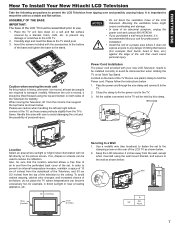
... on both sides of personal injury. ASSEMBLY OF THE BASE IMPORTANT: The base of an abnormal symptom, unplug the power cord and contact 800.HITACHI. • If you purchased a wall mount bracket, it is moved, at a proper area where it does not expose anyone to use ... Please use . 1. Also, be installed correctly to the LCD TV. 2. Carefully align and insert the Base to and from the corners, then support the top frame as shown below . 1. FIRST TIME USE How To Install Your New Hitachi LCD Television Take the following precautions to transport it safely. Caution ...
... on both sides of personal injury. ASSEMBLY OF THE BASE IMPORTANT: The base of an abnormal symptom, unplug the power cord and contact 800.HITACHI. • If you purchased a wall mount bracket, it is moved, at a proper area where it does not expose anyone to use ... Please use . 1. Also, be installed correctly to the LCD TV. 2. Carefully align and insert the Base to and from the corners, then support the top frame as shown below . 1. FIRST TIME USE How To Install Your New Hitachi LCD Television Take the following precautions to transport it safely. Caution ...

Owners Guide
Page 8
...block the ventilation holes. Please refer to example at right and caution below to separate the Table Top Stand from the TV. More than 30 cm (1'). Accordingly, Hitachi accepts no responsibility or liability for use with this LCD Display Panel can be maintained. Screw Length (A) Insertion Length ...the use of the intended wall mount brackets/device. 8 Call 800.HITACHI for the WALL MOUNT assembly are not long enough to properly secure the TV to obstruct ventilation. How To Install Your New Hitachi LCD Television WALL MOUNTING SETUP STEP (1) : REMOVE THE STAND BASE FROM...
...block the ventilation holes. Please refer to example at right and caution below to separate the Table Top Stand from the TV. More than 30 cm (1'). Accordingly, Hitachi accepts no responsibility or liability for use with this LCD Display Panel can be maintained. Screw Length (A) Insertion Length ...the use of the intended wall mount brackets/device. 8 Call 800.HITACHI for the WALL MOUNT assembly are not long enough to properly secure the TV to obstruct ventilation. How To Install Your New Hitachi LCD Television WALL MOUNTING SETUP STEP (1) : REMOVE THE STAND BASE FROM...
Owners Guide
Page 9
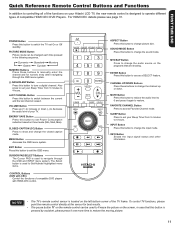
...Point your preference without using the remote control. POWER LIGHT Indicator To turn the TV On, the standby indicator must be in the Off (Stand-by ) to connect headphones. NOTES • Your HITACHI LCD TV will remain Blue until the desired channel appears in the top right corner of the... front bezel illuminates to indicate the TV power is ON. picture is powering OFF. Instead, a message will indicate "No ...
...Point your preference without using the remote control. POWER LIGHT Indicator To turn the TV On, the standby indicator must be in the Off (Stand-by ) to connect headphones. NOTES • Your HITACHI LCD TV will remain Blue until the desired channel appears in the top right corner of the... front bezel illuminates to indicate the TV power is ON. picture is powering OFF. Instead, a message will indicate "No ...

Owners Guide
Page 10
...Camcorders. COMPOSITE AV1 Jacks AV1 input provides composite Video and S-Video jacks for connecting device with this case, connect the components B-Y output to the TV's Pb input and the components R-Y output to HDMI 1. NOTE The Digital Output option will grayout with all input sources, except with an HDMI ... Audio Input when the connection to HDMI 1 is only compatible with this case, connect the component Cb output to the TV's Pb input and the component Cr output to the TV's Pr input. • It may be necessary to adjust Tint to HDMI connection. • The DVI Audio Input ...
...Camcorders. COMPOSITE AV1 Jacks AV1 input provides composite Video and S-Video jacks for connecting device with this case, connect the components B-Y output to the TV's Pb input and the components R-Y output to HDMI 1. NOTE The Digital Output option will grayout with all input sources, except with an HDMI ... Audio Input when the connection to HDMI 1 is only compatible with this case, connect the component Cb output to the TV's Pb input and the component Cr output to the TV's Pr input. • It may be necessary to adjust Tint to HDMI connection. • The DVI Audio Input ...
Owners Guide
Page 11
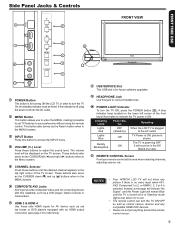
... by accident, please press it again to change picture size. MTS/SAP Button Press to decrease the audio level of your TV. CLU-4591AV NOTES • The TV's remote control sensor is located on the screen, in the following sequence. VOLUME Button Press up or down (-) to change...Press to set On or Off standby. Quick Reference Remote Control Buttons and Functions In addition to controlling all of the functions on your Hitachi LCD TV, the new remote control is designed to Set/Activate highlighted menu items. CONTROL Buttons (DVD with CEC) Control the functions of compatible...
... by accident, please press it again to change picture size. MTS/SAP Button Press to decrease the audio level of your TV. CLU-4591AV NOTES • The TV's remote control sensor is located on the screen, in the following sequence. VOLUME Button Press up or down (-) to change...Press to set On or Off standby. Quick Reference Remote Control Buttons and Functions In addition to controlling all of the functions on your Hitachi LCD TV, the new remote control is designed to Set/Activate highlighted menu items. CONTROL Buttons (DVD with CEC) Control the functions of compatible...
Owners Guide
Page 12
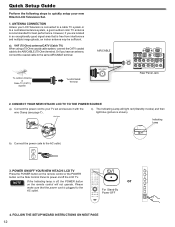
...signal area that the power cord is plugged to the 2 AC outlet. The Indicating Lamp will not operate. POWER ON/OFF YOUR NEW HITACHI LCD TV P.MODE S.MODE MTS/SAP ASPECT Press the POWER button on the remote control or the POWER 123 4 button on the Side Control ...Set. 1. Wire Clamp Indicating Lamp b). CONNECT YOUR NEW HITACHI LCD TV TO THE POWER SOURCE a). ANTENNA CONNECTION Unless your LCD Television is connected to a cable TV system or to a centralized antenna system, a good outdoor color TV antenna is off the LCD TV. 456 789 NOTE If the Indicating lamp is recommended ...
...signal area that the power cord is plugged to the 2 AC outlet. The Indicating Lamp will not operate. POWER ON/OFF YOUR NEW HITACHI LCD TV P.MODE S.MODE MTS/SAP ASPECT Press the POWER button on the remote control or the POWER 123 4 button on the Side Control ...Set. 1. Wire Clamp Indicating Lamp b). CONNECT YOUR NEW HITACHI LCD TV TO THE POWER SOURCE a). ANTENNA CONNECTION Unless your LCD Television is connected to a cable TV system or to a centralized antenna system, a good outdoor color TV antenna is off the LCD TV. 456 789 NOTE If the Indicating lamp is recommended ...
Owners Guide
Page 13
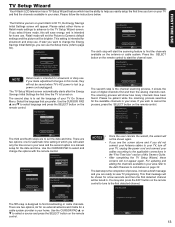
...PST EST AKST CST HST Setup Wizard (3/8) Please select Time mode ... There are ready to view TV programing. You may take over 20 minutes. TV Setup Wizard Your Hitachi LCD television has a TV Setup Wizard feature which you will select only the time zone in your area. This setting is ...and is a manual setup for in . FIRST TIME USE The first time you did not connect your Antenna cables to your TV, turn on your Hitachi LCD TV, the Energy Savings Initial Settings screen will be patient while the scanning process searches for the available channels in your cables according...
...PST EST AKST CST HST Setup Wizard (3/8) Please select Time mode ... There are ready to view TV programing. You may take over 20 minutes. TV Setup Wizard Your Hitachi LCD television has a TV Setup Wizard feature which you will select only the time zone in your area. This setting is ...and is a manual setup for in . FIRST TIME USE The first time you did not connect your Antenna cables to your TV, turn on your Hitachi LCD TV, the Energy Savings Initial Settings screen will be patient while the scanning process searches for the available channels in your cables according...

Owners Guide
Page 14
... red to red, white to side panel jacks. There are two SIDE panel HDMI jacks provided as a convenience to allow you to accommodate your LCD TV is necessary for the location of plugs and jacks, i.e. Check the owners guide of each device. If you to easily connect HDMI or DVI signals...
... red to red, white to side panel jacks. There are two SIDE panel HDMI jacks provided as a convenience to allow you to accommodate your LCD TV is necessary for the location of plugs and jacks, i.e. Check the owners guide of each device. If you to easily connect HDMI or DVI signals...

Owners Guide
Page 15
... be labeled Y-CbCr. NOTES • Completely insert connection cord plugs when connecting to confirm your choice (see page 19). + + Outside antenna or Cable TV coaxial cable 2-Way signal splitter VCR ANT IN V LR Input List 0. If you do not, the picture and/or sound may be labeled Y, B-Y, ...when using the Y-PbPr inputs. (See page 24). ♦♦ When using a HDMI input from a set top box, it is recommended to the TV's Pr input. ♦♦ Your component outputs may be abnormal. • Cable plugs are often color-coded. Component 1 6. FIRST TIME USE Rear Panel...
... be labeled Y-CbCr. NOTES • Completely insert connection cord plugs when connecting to confirm your choice (see page 19). + + Outside antenna or Cable TV coaxial cable 2-Way signal splitter VCR ANT IN V LR Input List 0. If you do not, the picture and/or sound may be labeled Y, B-Y, ...when using the Y-PbPr inputs. (See page 24). ♦♦ When using a HDMI input from a set top box, it is recommended to the TV's Pr input. ♦♦ Your component outputs may be abnormal. • Cable plugs are often color-coded. Component 1 6. FIRST TIME USE Rear Panel...

Owners Guide
Page 16
...L R Y PB PR White Red Green Blue Red NOTES • Completely insert the connection cord plugs when connecting to the last channel viewed, select "0.TV" from the INPUTS menu. 16 connect red to red, white to white, etc. • To return to rear panel jacks. Connect the Y, Pb...jacks of plugs and jacks, i.e. Press the INPUT button, then select COMPONENT 1 or 2 from the INPUTS menu to the COMPONENT 1 or 2 YPbPr and AUDIO jacks. TV REAR PANEL RGB RGB (Yellow) (White) (Red) VCR OUTPUT VIDEO L R CONNECTING A DEVICE AND STEREO AUDIO DEVICE TO COMPONENT 1 or 2: YPbPr 1. Rear Panel...
...L R Y PB PR White Red Green Blue Red NOTES • Completely insert the connection cord plugs when connecting to the last channel viewed, select "0.TV" from the INPUTS menu. 16 connect red to red, white to white, etc. • To return to rear panel jacks. Connect the Y, Pb...jacks of plugs and jacks, i.e. Press the INPUT button, then select COMPONENT 1 or 2 from the INPUTS menu to the COMPONENT 1 or 2 YPbPr and AUDIO jacks. TV REAR PANEL RGB RGB (Yellow) (White) (Red) VCR OUTPUT VIDEO L R CONNECTING A DEVICE AND STEREO AUDIO DEVICE TO COMPONENT 1 or 2: YPbPr 1. Rear Panel...

Owners Guide
Page 17
...; Only HDMI 1 can support DVI audio input. connect red to red, white to white, etc. • To return to the last channel viewed, select "0.TV" from the HDTV set top box or DVD player to the right. 3. With DVI output devices, connect a DVI to HDMI cabel to rear panel jacks...on the Rear Panel on the right. 2. FIRST TIME USE Rear Panel Connections CONNECTING AN DEVICE WITH HDMI OR DVI CAPABILITY TO HDMI 1 & HDMI 2 1. TV REAR PANEL Optical cable Or OPTICAL IN AUDIO IN R L RGB STEREO SYSTEM AMPLIFIER RCA Stereo cable NOTES • Completely insert the connection cord plugs when...
...; Only HDMI 1 can support DVI audio input. connect red to red, white to white, etc. • To return to the last channel viewed, select "0.TV" from the HDTV set top box or DVD player to the right. 3. With DVI output devices, connect a DVI to HDMI cabel to rear panel jacks...on the Rear Panel on the right. 2. FIRST TIME USE Rear Panel Connections CONNECTING AN DEVICE WITH HDMI OR DVI CAPABILITY TO HDMI 1 & HDMI 2 1. TV REAR PANEL Optical cable Or OPTICAL IN AUDIO IN R L RGB STEREO SYSTEM AMPLIFIER RCA Stereo cable NOTES • Completely insert the connection cord plugs when...

Owners Guide
Page 18
... desired sound level. Channel selection may also be performed by (-) DASH (example 15-1). Select Custom mode for viewing with less brightness and contrast for the TV to enter Digital Channels that have subchannel numbers indicated by CHANNEL (CH) UP ( ) or CHANNEL (CH) DOWN ( ). 3 (-) DASH /SLEEP Button... Use the (-) DASH button with room light. Press the MUTE button to turn the TV set on or off completely (MUTE). CLU-4591AV 18 MUTE Volume 10 Mute 18 Also press to 15 Set the Sleep Timer from 5 minutes to...
... desired sound level. Channel selection may also be performed by (-) DASH (example 15-1). Select Custom mode for viewing with less brightness and contrast for the TV to enter Digital Channels that have subchannel numbers indicated by CHANNEL (CH) UP ( ) or CHANNEL (CH) DOWN ( ). 3 (-) DASH /SLEEP Button... Use the (-) DASH button with room light. Press the MUTE button to turn the TV set on or off completely (MUTE). CLU-4591AV 18 MUTE Volume 10 Mute 18 Also press to 15 Set the Sleep Timer from 5 minutes to...

Owners Guide
Page 19
... desired direction and press the SELECT button to choose AV2 Input. 9. HDMI 3 4. Component 2 7. AV2 9. Program Information 3:17PM TV-G Analog Stereo+SAP Clock Broadcast Rating Audio Broadcast Analog Channel INFO DIGITAL CHANNELS DTV 15-1 KPBS-HD Main Picture Source & Channel Indication ...Broadcast Channel Indication Sesame Street Program Description. TV Watch TV from 5 minutes to scroll and select the inputs that are displayed on 3 levels (MIN., MEDIUM, MAX). HDMI 1 Select ...
... desired direction and press the SELECT button to choose AV2 Input. 9. HDMI 3 4. Component 2 7. AV2 9. Program Information 3:17PM TV-G Analog Stereo+SAP Clock Broadcast Rating Audio Broadcast Analog Channel INFO DIGITAL CHANNELS DTV 15-1 KPBS-HD Main Picture Source & Channel Indication ...Broadcast Channel Indication Sesame Street Program Description. TV Watch TV from 5 minutes to scroll and select the inputs that are displayed on 3 levels (MIN., MEDIUM, MAX). HDMI 1 Select ...

Owners Guide
Page 20
... CHANNEL (FAV.CH) Button Press the FAV.CH button to the device's owners guide for controlling devices with Consumer Electronics Control (CEC) through the TV and HDMI connection; Ch 20-1 KTBW-D1 Move SEL Select EXIT Exit SOUND MODE (S. For analog channels the signal choices(if available) are 4 modes available, ... can control external devices (i.e. FAV.CH Favorite CH List 0. For digital channels this button to first setup the Favorite Channels in the Channels Menu in TV mode. please refer to display the Favorite CH List.
... CHANNEL (FAV.CH) Button Press the FAV.CH button to the device's owners guide for controlling devices with Consumer Electronics Control (CEC) through the TV and HDMI connection; Ch 20-1 KTBW-D1 Move SEL Select EXIT Exit SOUND MODE (S. For analog channels the signal choices(if available) are 4 modes available, ... can control external devices (i.e. FAV.CH Favorite CH List 0. For digital channels this button to first setup the Favorite Channels in the Channels Menu in TV mode. please refer to display the Favorite CH List.

Owners Guide
Page 21
... HDTV and DVD's preserving the original 16:9 aspect ratio showing 95% of the picture. REMOTE CONTROL How To Use The Remote Control To Control Your TV 9 ASPECT Button Press this button to quickly change automatically by signal detector. 4:3 Use this aspect mode to display conventional (4:3) images. The noise is normal for...
... HDTV and DVD's preserving the original 16:9 aspect ratio showing 95% of the picture. REMOTE CONTROL How To Use The Remote Control To Control Your TV 9 ASPECT Button Press this button to quickly change automatically by signal detector. 4:3 Use this aspect mode to display conventional (4:3) images. The noise is normal for...
Owners Guide
Page 22
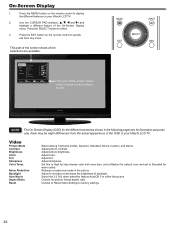
... Audio Setup Channels Picture Mode Contrast Brightness Color Tint Sharpness Color Temp. Adjust picture contrast. Adjust tint. Press the EXIT button on your Hitachi LCD TV. Choose to Reset Video Settings to select. 3. MENU INPUT SELECT EXIT INFO NOTE The On Screen Display (OSD) for natural color and... set to quickly exit from the actual appearance of the OSD of your Hitachi LCD TV. 2. Adjust picture brightness. Adjust sharpness. Select the 3:2 Pull down detection feature Auto/Off. Standard 53 46 77 R1 52 High ...
... Audio Setup Channels Picture Mode Contrast Brightness Color Tint Sharpness Color Temp. Adjust picture contrast. Adjust tint. Press the EXIT button on your Hitachi LCD TV. Choose to Reset Video Settings to select. 3. MENU INPUT SELECT EXIT INFO NOTE The On Screen Display (OSD) for natural color and... set to quickly exit from the actual appearance of the OSD of your Hitachi LCD TV. 2. Adjust picture brightness. Adjust sharpness. Select the 3:2 Pull down detection feature Auto/Off. Standard 53 46 77 R1 52 High ...


