
User Manual
Page 2
... INPUT Menu 30 Remote control 5 Color space, Component, Video format, Setting up 6 Frame lock, Information Arrangement 7 SETUP Menu 32 Adjusting the projector's elevator . . 8 Keystone, Whisper, Mirror, Volume About the filter cover for bottom-up use . . 9 Connecting your devices 10 Connecting ... muting the sound . . . . 17 Troubleshooting 42 Selecting an input signal 17 Related messages 42 Searching an input signal 18 Regarding the indicator lamps. . . . 44 Selecting the aspect ratio 18 Phenomena that may easily be Adjusting the zoom and focus . . . . 18 mistaken for...
... INPUT Menu 30 Remote control 5 Color space, Component, Video format, Setting up 6 Frame lock, Information Arrangement 7 SETUP Menu 32 Adjusting the projector's elevator . . 8 Keystone, Whisper, Mirror, Volume About the filter cover for bottom-up use . . 9 Connecting your devices 10 Connecting ... muting the sound . . . . 17 Troubleshooting 42 Selecting an input signal 17 Related messages 42 Searching an input signal 18 Regarding the indicator lamps. . . . 44 Selecting the aspect ratio 18 Phenomena that may easily be Adjusting the zoom and focus . . . . 18 mistaken for...
User Manual
Page 3
... materials for the lens part. 3 Use special caution for future reshipment. It can be easily connected to many features, this projector is used to project various computer signals as well as bright and clean enough for reducing acoustic noise to make your dealer if...and gets a large image from short distance. High Brightness Newly developed 165W UHB (Ultra High Brightness) lamp gives you more important than brightness. Rich Connectivity This projector has a variety of the "User's manual - The rich connectivity provides you a higher brightness image on . ...
... materials for the lens part. 3 Use special caution for future reshipment. It can be easily connected to many features, this projector is used to project various computer signals as well as bright and clean enough for reducing acoustic noise to make your dealer if...and gets a large image from short distance. High Brightness Newly developed 165W UHB (Ultra High Brightness) lamp gives you more important than brightness. Rich Connectivity This projector has a variety of the "User's manual - The rich connectivity provides you a higher brightness image on . ...

User Manual
Page 4
Only push the Restart switch in these exceptional instances. 4 Part names Part names Projector Zoom knob (18) Focus ring (18) Vent (6) Lens cover (16) (Slide door) Lens (16) Lamp cover (Lamp unit is inside.) (38) Front-Right side Remote sensor (15)... controlled by using a cocktail stick or similar and before turning on again, make the projector cool down at least 10 minutes without operating. Under certain exceptional circumstances, the projector may not operate correctly and the microprocessor will need to be reset. In such a case...
Only push the Restart switch in these exceptional instances. 4 Part names Part names Projector Zoom knob (18) Focus ring (18) Vent (6) Lens cover (16) (Slide door) Lens (16) Lamp cover (Lamp unit is inside.) (38) Front-Right side Remote sensor (15)... controlled by using a cocktail stick or similar and before turning on again, make the projector cool down at least 10 minutes without operating. Under certain exceptional circumstances, the projector may not operate correctly and the microprocessor will need to be reset. In such a case...

User Manual
Page 5
... (44) TEMP indicator (44) POWER indicator (16) STANDBY/ON button (16) STANDBY/ON Part names LAMP TEMP POWER MENU Cursor buttons INPUT 22) INPUT button (17) Remote control RGB button (17) VIDEO button (17) ASPECT button (18) ...
... (44) TEMP indicator (44) POWER indicator (16) STANDBY/ON button (16) STANDBY/ON Part names LAMP TEMP POWER MENU Cursor buttons INPUT 22) INPUT button (17) Remote control RGB button (17) VIDEO button (17) ASPECT button (18) ...
User Manual
Page 15
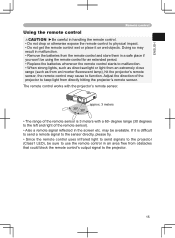
.... • Do not drop or otherwise expose the remote control to function. degree range (30 degrees to the left and right of the projector to the projector. 15 Doing so may be sure to use the remote control in an area free from obstacles that could block the remote control's output... signal to keep light from an inverter fluorescent lamp), hit the projector's remote sensor, the remote control may cause to physical impact. • Do not get the remote control wet or place it is 3 meters ...
.... • Do not drop or otherwise expose the remote control to function. degree range (30 degrees to the left and right of the projector to the projector. 15 Doing so may be sure to use the remote control in an area free from obstacles that could block the remote control's output... signal to keep light from an inverter fluorescent lamp), hit the projector's remote sensor, the remote control may cause to physical impact. • Do not get the remote control wet or place it is 3 meters ...

User Manual
Page 16
... on the power POWER 1. Turning off the power Power off , and the POWER indicator will go off in right order. The projector lamp will begin blinking green. Power off ?" VIDEO STANDBY/ON RGB SEARCH ASPECT AUTO BLANK MAGNIFY HOME ON PAGE UP VOLUME OFF END ...PAGE DOWN MUTE FREEZE KEYSTONE POSITION MENU ESC ENTER RESET STANDBY/ON button STANDBY/ON LAMP TEMP POWER MENU INPUT POWER indicator Power switch Turning on the projector before the connected devices. The projector lamp will light up and the POWER indicator will appear on the screen for these ...
... on the power POWER 1. Turning off the power Power off , and the POWER indicator will go off in right order. The projector lamp will begin blinking green. Power off ?" VIDEO STANDBY/ON RGB SEARCH ASPECT AUTO BLANK MAGNIFY HOME ON PAGE UP VOLUME OFF END ...PAGE DOWN MUTE FREEZE KEYSTONE POSITION MENU ESC ENTER RESET STANDBY/ON button STANDBY/ON LAMP TEMP POWER MENU INPUT POWER indicator Power switch Turning on the projector before the connected devices. The projector lamp will light up and the POWER indicator will appear on the screen for these ...
User Manual
Page 17
... RGB IN2 COMPONENT VIDEO S-VIDEO VIDEO STANDBY/ON LAMP TEMP POWER MENU INPUT 1. If no input is detects at the COMPONENT VIDEO port, projector will appear on the projector. VIDEO STANDBY/ON RGB SEARCH ASPECT AUTO BLANK MAGNIFY HOME ON PAGE UP VOLUME OFF END...few seconds. Use the cursor buttons ▲/▼ to select an input port for video signal. Even if you press the button, the projector switches its video input port as below . ESC RESET Selecting an input signal 1. Press the RGB button on the remote control to check ...
... RGB IN2 COMPONENT VIDEO S-VIDEO VIDEO STANDBY/ON LAMP TEMP POWER MENU INPUT 1. If no input is detects at the COMPONENT VIDEO port, projector will appear on the projector. VIDEO STANDBY/ON RGB SEARCH ASPECT AUTO BLANK MAGNIFY HOME ON PAGE UP VOLUME OFF END...few seconds. Use the cursor buttons ▲/▼ to select an input port for video signal. Even if you press the button, the projector switches its video input port as below . ESC RESET Selecting an input signal 1. Press the RGB button on the remote control to check ...
User Manual
Page 21
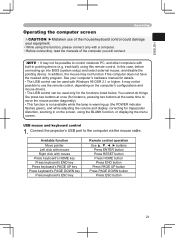
... instance, pressing two buttons at the same time to control notebook PC, and other computers with Windows 95 OSR 2.1 or higher. Connect the projector's USB port to use of the computer you will connect. USB mouse and keyboard control 1. In this remote control. In addition, the mouse... may not be possible to move the mouse pointer diagonally). • This function is not available while the lamp is warming up (the POWER indicator flashes green), and while adjusting the volume and display, correcting for the functions listed below. Available...
... instance, pressing two buttons at the same time to control notebook PC, and other computers with Windows 95 OSR 2.1 or higher. Connect the projector's USB port to use of the computer you will connect. USB mouse and keyboard control 1. In this remote control. In addition, the mouse... may not be possible to move the mouse pointer diagonally). • This function is not available while the lamp is warming up (the POWER indicator flashes green), and while adjusting the volume and display, correcting for the functions listed below. Available...
User Manual
Page 22
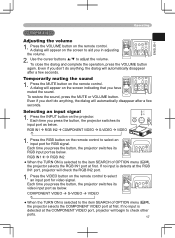
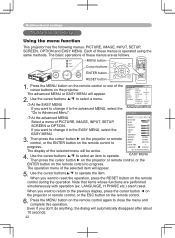
...SHRPNESS +3 3. Multifunctional settings Multifunctional settings VIDEO STANDBY/ON RGB SEARCH ASPECT AUTO BLANK Using the menu function MAGNIFY HOME PAGE UP VOLUME ON This projector has the following menus: PICTURE, IMAGE, INPUT, END PAGEDOWN MSUTE ETUP, SCREEN, OPTION and EASY MENU. The advanced MENU or EASY MENU will... the ESC button on the remote control during the operation. Note that items whose functions are as follows. STANDBY/ON LAMP TEMP POWER MENU INPUT MENU button POSITION MENU Cursor buttons ENTER ENTER button ESC RESET RESET button VIDEO STANDBY/ON RGB ...
...SHRPNESS +3 3. Multifunctional settings Multifunctional settings VIDEO STANDBY/ON RGB SEARCH ASPECT AUTO BLANK Using the menu function MAGNIFY HOME PAGE UP VOLUME ON This projector has the following menus: PICTURE, IMAGE, INPUT, END PAGEDOWN MSUTE ETUP, SCREEN, OPTION and EASY MENU. The advanced MENU or EASY MENU will... the ESC button on the remote control during the operation. Note that items whose functions are as follows. STANDBY/ON LAMP TEMP POWER MENU INPUT MENU button POSITION MENU Cursor buttons ENTER ENTER button ESC RESET RESET button VIDEO STANDBY/ON RGB ...
User Manual
Page 36
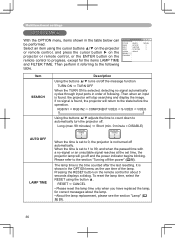
... 0 Item SEARCH Description Using the buttons ▲/▼ turns on/off automatically. If no -signal or an unsuitable signal reaches at the set time, the projector lamp will go off and the power indicator begins blinking. Long (max. 99 minutes) Short (min. 0 minute = DISABLE) AUTO OFF ENABLE 1.... Pressing the RESET button on the remote control to automatically turn the projector off the power" (16). RGB IN1 RGB IN2 COMPONENT VIDEO S-VIDEO VIDEO AUTO OFF LAMP TIME Using the buttons ▲/▼ adjusts the time to count down...
... 0 Item SEARCH Description Using the buttons ▲/▼ turns on/off automatically. If no -signal or an unsuitable signal reaches at the set time, the projector lamp will go off and the power indicator begins blinking. Long (max. 99 minutes) Short (min. 0 minute = DISABLE) AUTO OFF ENABLE 1.... Pressing the RESET button on the remote control to automatically turn the projector off the power" (16). RGB IN1 RGB IN2 COMPONENT VIDEO S-VIDEO VIDEO AUTO OFF LAMP TIME Using the buttons ▲/▼ adjusts the time to count down...
User Manual
Page 37
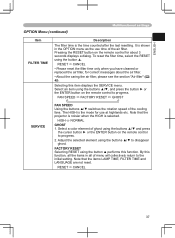
... buttons ▲/▼ and press the cursor button ► or the ENTER button on the remote control to progress. Note that the items LAMP TIME, FILTER TIME and LANGUAGE are not reset. By this function, all of the air filter. ENGLISH OPTION Menu (continued) Multifunctional ... using the buttons ▲/▼ to the initial setting. Pressing the RESET button on the remote control to progress. 2. Note that the projector is noisier when the HIGH is the time counted after the last resetting. Selecting this function. RESET CANCEL 37 Adjust the selected element...
... buttons ▲/▼ and press the cursor button ► or the ENTER button on the remote control to progress. Note that the items LAMP TIME, FILTER TIME and LANGUAGE are not reset. By this function, all of the air filter. ENGLISH OPTION Menu (continued) Multifunctional ... using the buttons ▲/▼ to the initial setting. Pressing the RESET button on the remote control to progress. 2. Note that the projector is noisier when the HIGH is the time counted after the last resetting. Selecting this function. RESET CANCEL 37 Adjust the selected element...
User Manual
Page 38
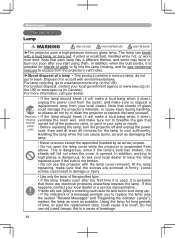
... gas containing mercury to clean the projector or replace the lamp yourself. Using the lamp for long periods of a lamp • This product contains a mercury lamp; this happens, contact your local dealer or a service representative. • Handle with the lamp cover removed. do not try to...scratched, handled while hot, or worn over time. Maintenance Maintenance Lamp WARNING HIGH VOLTAGE HIGH TEMPERATURE HIGH PRESSURE ►The projector uses a high-pressure mercury glass lamp. If this is dangerous, since if the lamp's bulb has broken, the shards will make a loud bang when...
... gas containing mercury to clean the projector or replace the lamp yourself. Using the lamp for long periods of a lamp • This product contains a mercury lamp; this happens, contact your local dealer or a service representative. • Handle with the lamp cover removed. do not try to...scratched, handled while hot, or worn over time. Maintenance Maintenance Lamp WARNING HIGH VOLTAGE HIGH TEMPERATURE HIGH PRESSURE ►The projector uses a high-pressure mercury glass lamp. If this is dangerous, since if the lamp's bulb has broken, the shards will make a loud bang when...

User Manual
Page 39
... of claws Claws NOTE • When the lamp has been replaced after replacement) will result in place. 7. Turn the projector on the projector. To prepare a new lamp, contact your dealer and tell the lamp type number = DT00671. Insert the new lamp, and retighten firmly two screws that ...top is facing up. 4. Center point of two claws to the projector, position the lamp cover on , and reset the lamp time using a minus screwdriver or similar, and remove the lamp cover. If the projector is displayed, complete the following operation within 10 minutes of replacement by...
... of claws Claws NOTE • When the lamp has been replaced after replacement) will result in place. 7. Turn the projector on the projector. To prepare a new lamp, contact your dealer and tell the lamp type number = DT00671. Insert the new lamp, and retighten firmly two screws that ...top is facing up. 4. Center point of two claws to the projector, position the lamp cover on , and reset the lamp time using a minus screwdriver or similar, and remove the lamp cover. If the projector is displayed, complete the following operation within 10 minutes of replacement by...
User Manual
Page 40
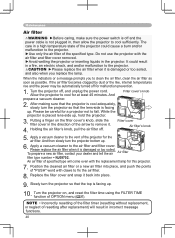
...When the indicators or a message prompts you replace the lamp. While the projector is placed lens-side up . Apply a vacuum cleaner to the projector. An air filter of resetting after replacement) will come even with the replacement lamp for this projector. 7. NOTE • Incorrectly resetting of the &#...;lter cover. It could cause a burn and/or malfunction to fall. Apply a vacuum cleaner to cool sufficiently. Slowly turn the projector bottom up . 10. Putting a finger on , and reset the filter time using the FILTER TIME function of the speci...
...When the indicators or a message prompts you replace the lamp. While the projector is placed lens-side up . Apply a vacuum cleaner to the projector. An air filter of resetting after replacement) will come even with the replacement lamp for this projector. 7. NOTE • Incorrectly resetting of the &#...;lter cover. It could cause a burn and/or malfunction to fall. Apply a vacuum cleaner to cool sufficiently. Slowly turn the projector bottom up . 10. Putting a finger on , and reset the filter time using the FILTER TIME function of the speci...
User Manual
Page 42
... the response parameters of the OPTION menu. 42 Please turn the power OFF, and allow the unit to reset the lamp timer (36). Message Description CHANGE THE LAMP AFTER REPLACING LAMP, RESET THE LAMP TIMER. Please immediately turn the power ON again. • Is there blockage of the signal source. CHECK THE AIR...
... the response parameters of the OPTION menu. 42 Please turn the power OFF, and allow the unit to reset the lamp timer (36). Message Description CHANGE THE LAMP AFTER REPLACING LAMP, RESET THE LAMP TIMER. Please immediately turn the power ON again. • Is there blockage of the signal source. CHECK THE AIR...
User Manual
Page 43
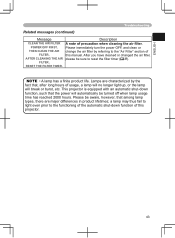
...by the fact that the power will break or burst, etc. This projector is equipped with an automatic shut-down function of usage, a lamp will no longer light up, or the lamp will automatically be turned off when lamp usage time has reached 2000 hours. AFTER CLEANING THE AIR FILTER, ...cleaned or changed the air filter, please be aware, however, that among lamp types, there are characterized by referring to reset the filter timer (37). Description A note of this projector. 43 a lamp may thus fail to light even prior to the functioning of the automatic shut-down...
...by the fact that the power will break or burst, etc. This projector is equipped with an automatic shut-down function of usage, a lamp will no longer light up, or the lamp will automatically be turned off when lamp usage time has reached 2000 hours. AFTER CLEANING THE AIR FILTER, ...cleaned or changed the air filter, please be aware, however, that among lamp types, there are characterized by referring to reset the filter timer (37). Description A note of this projector. 43 a lamp may thus fail to light even prior to the functioning of the automatic shut-down...

User Manual
Page 44
... after the treatment, please contact your dealer or service company. POWER LAMP TEMP indicator indicator indicator Description Lighting Turned Turned The projector is warming up. In Green off off The lamp does not light, and there is displayed, please contact your dealer... In Orange off off Ordinary operations may be performed. Troubleshooting Regarding the indicator lamps Lighting and flashing of the lamp cover. Blinking In Red (discretionary) (discretionary) The projector is displayed after the treatment, or if an indication other than the following items...
... after the treatment, please contact your dealer or service company. POWER LAMP TEMP indicator indicator indicator Description Lighting Turned Turned The projector is warming up. In Green off off The lamp does not light, and there is displayed, please contact your dealer... In Orange off off Ordinary operations may be performed. Troubleshooting Regarding the indicator lamps Lighting and flashing of the lamp cover. Blinking In Red (discretionary) (discretionary) The projector is displayed after the treatment, or if an indication other than the following items...

User Manual
Page 45
...make confirmation of the OPTION menu. After cleaning or changed the air filter, please be turned off. After the projector has sufficiently cooled down , please make confirmation that the interior portion has become overcooled. After the treatment, resent... ON. Please use the unit within the usage temperature parameters (5°C to 35°C). ENGLISH Troubleshooting Regarding the indicator lamps (continued) POWER LAMP TEMP indicator indicator indicator Description Blinking In Red or Lighting In Red Turned off Blinking In Red The cooling fan is ...
...make confirmation of the OPTION menu. After cleaning or changed the air filter, please be turned off. After the projector has sufficiently cooled down , please make confirmation that the interior portion has become overcooled. After the treatment, resent... ON. Please use the unit within the usage temperature parameters (5°C to 35°C). ENGLISH Troubleshooting Regarding the indicator lamps (continued) POWER LAMP TEMP indicator indicator indicator Description Blinking In Red or Lighting In Red Turned off Blinking In Red The cooling fan is ...
User Manual
Page 46
... turn the power off, and allow the unit to be wrong. Please use the projector if abnormal operations such as by using a cocktail stick or similar and the projector will restart. 3. After the projector has sufficiently cooled down at least 20 minutes. Troubleshooting Phenomena that the smoke... maintenance, please contact your problem. The power switch is no lamp and/or lamp cover, or either of the lamp and lamp cover, and then turn the power on again. Set the power switch to the on . After the projector has sufficiently cooled down at least 45 minutes.
... turn the power off, and allow the unit to be wrong. Please use the projector if abnormal operations such as by using a cocktail stick or similar and the projector will restart. 3. After the projector has sufficiently cooled down at least 20 minutes. Troubleshooting Phenomena that the smoke... maintenance, please contact your problem. The power switch is no lamp and/or lamp cover, or either of the lamp and lamp cover, and then turn the power on again. Set the power switch to the on . After the projector has sufficiently cooled down at least 45 minutes.

User Manual
Page 47
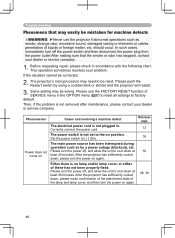
... low level. COLOR SPACE setting is dirty or misty. The computer cannot detect the projector as a plug and play monitor. The lens is not suitable. displayed. Color settings are not correctly connected. Replace the lamp. 38, 39 Pictures appear blurry. Make sure that may easily be mistaken for the...the BRIGHT and/or CONTRAST settings to an extremely low level. Adjust the BRIGHT to the item WHISPER in the SETUP menu. 24, 32 The lamp is poor. Select the NORMAL to a higher level using the menu function 23, 25 or the remote control. Reference page 4, 16 The ...
... low level. COLOR SPACE setting is dirty or misty. The computer cannot detect the projector as a plug and play monitor. The lens is not suitable. displayed. Color settings are not correctly connected. Replace the lamp. 38, 39 Pictures appear blurry. Make sure that may easily be mistaken for the...the BRIGHT and/or CONTRAST settings to an extremely low level. Adjust the BRIGHT to the item WHISPER in the SETUP menu. 24, 32 The lamp is poor. Select the NORMAL to a higher level using the menu function 23, 25 or the remote control. Reference page 4, 16 The ...


