
User Manual
Page 1
...; The manufacture assumes no responsibility for purchasing this manual. • The reproduction, transmission or use of these manuals to chance without express written authority. ENGLISH Projector CP-S335/X340/X345 User's Manual - Operating Guide Thank you for any errors that , if ignored, could possibly result in this...
...; The manufacture assumes no responsibility for purchasing this manual. • The reproduction, transmission or use of these manuals to chance without express written authority. ENGLISH Projector CP-S335/X340/X345 User's Manual - Operating Guide Thank you for any errors that , if ignored, could possibly result in this...
User Manual
Page 2
... INPUT Menu 30 Remote control 5 Color space, Component, Video format, Setting up 6 Frame lock, Information Arrangement 7 SETUP Menu 32 Adjusting the projector's elevator . . 8 Keystone, Whisper, Mirror, Volume About the filter cover for bottom-up use . . 9 Connecting your devices 10 Connecting...time, Language, Go to advanced menu 2 Contents Contents About this manual 1 PICTURE Menu 25 Contents 2 Projector features 3 Bright, Contrast, Gamma, Color temp, Color, Tint, Sharpness, Progressive, My memory Preparations 3 IMAGE Menu 28 Part names 4 Aspect, Over ...
... INPUT Menu 30 Remote control 5 Color space, Component, Video format, Setting up 6 Frame lock, Information Arrangement 7 SETUP Menu 32 Adjusting the projector's elevator . . 8 Keystone, Whisper, Mirror, Volume About the filter cover for bottom-up use . . 9 Connecting your devices 10 Connecting...time, Language, Go to advanced menu 2 Contents Contents About this manual 1 PICTURE Menu 25 Contents 2 Projector features 3 Bright, Contrast, Gamma, Color temp, Color, Tint, Sharpness, Progressive, My memory Preparations 3 IMAGE Menu 28 Part names 4 Aspect, Over ...
User Manual
Page 3
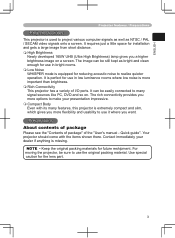
... variety of the "User's manual - Preparations About contents of package Please see the "Contents of package" of I/O ports. Your projector should come with its many signal sources like PC, DVD and so on a screen. Contact immediately your presentation impressive. ...on . Quick guide". It is perfect for use in bright rooms. Low Noise WHISPER mode is missing. ENGLISH Projector features / Preparations Projector features This projector is used to project various computer signals as well as bright and clean enough for use in low luminance rooms where low noise...
... variety of the "User's manual - Preparations About contents of package Please see the "Contents of package" of I/O ports. Your projector should come with its many signal sources like PC, DVD and so on a screen. Contact immediately your presentation impressive. ...on . Quick guide". It is perfect for use in bright rooms. Low Noise WHISPER mode is missing. ENGLISH Projector features / Preparations Projector features This projector is used to project various computer signals as well as bright and clean enough for use in low luminance rooms where low noise...

User Manual
Page 4
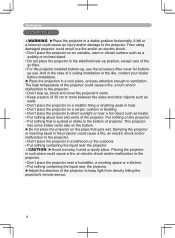
.... 4 In such a case, please push the Restart switch by an internal microprocessor. Under certain exceptional circumstances, the projector may not operate correctly and the microprocessor will need to be reset. Part names Part names Projector Zoom knob (18) Focus ring (18) Vent (6) Lens cover (16) (Slide door) Lens...port (11) RGB IN2 port (11) RGB OUT port (11) CONTROL port (11) Kensington lock slot NOTE (*) About Restart switch: This Projector is controlled by using a cocktail stick or similar and before turning on again, make the...
.... 4 In such a case, please push the Restart switch by an internal microprocessor. Under certain exceptional circumstances, the projector may not operate correctly and the microprocessor will need to be reset. Part names Part names Projector Zoom knob (18) Focus ring (18) Vent (6) Lens cover (16) (Slide door) Lens...port (11) RGB IN2 port (11) RGB OUT port (11) CONTROL port (11) Kensington lock slot NOTE (*) About Restart switch: This Projector is controlled by using a cocktail stick or similar and before turning on again, make the...
User Manual
Page 6
... shock and/or malfunction to the projector. • Don't place the projector near the projector. ►Adjust the direction of projector. Setting up Setting up WARNING ►Place the projector in the projector could cause a fire, an electric shock and/or malfunction to the projector. CAUTION ►Avoid a smoky,... cm or more between the sides and other objects such as walls. • Don't place the projector on a metallic thing or anything weak in heat. • Don't place the projector on an unstable, slant or vibrant surface such as a wobbly or inclined stand. • Do not...
... shock and/or malfunction to the projector. • Don't place the projector near the projector. ►Adjust the direction of projector. Setting up Setting up WARNING ►Place the projector in the projector could cause a fire, an electric shock and/or malfunction to the projector. CAUTION ►Avoid a smoky,... cm or more between the sides and other objects such as walls. • Don't place the projector on a metallic thing or anything weak in heat. • Don't place the projector on an unstable, slant or vibrant surface such as a wobbly or inclined stand. • Do not...
User Manual
Page 7
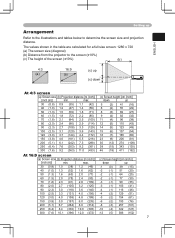
...) -12 (-5) 386 (152) 7 max. The values shown in the table are calculated for a full size screen: 1280 x 720 (a) The screen size (diagonal) (b) Distance from the projector to the screen (±10%) (c) The height of the screen (±10%) (b) 4:3 (a) 16:9 (a) (c) up Arrangement Refer to the illustrations and tables below to determine the...
...) -12 (-5) 386 (152) 7 max. The values shown in the table are calculated for a full size screen: 1280 x 720 (a) The screen size (diagonal) (b) Distance from the projector to the screen (±10%) (c) The height of the screen (±10%) (b) 4:3 (a) 16:9 (a) (c) up Arrangement Refer to the illustrations and tables below to determine the...

User Manual
Page 8
... if the surface on the both sides. 2. The adjustment range of the projector by twisting the elevator feet by the elevator feet adjustment, place the projector horizontally. After making sure that the projector is uneven or if you can use . As necessary, you otherwise need... to adjust the elevator feet. ►Except for inclining by hand. 8 To prevent damaging the projector and injuring yourself, always hold in the elevator buttons while holding the projector, the projector might crash down, overturn, smash your fingers and possibly result in a high temperature could ...
... if the surface on the both sides. 2. The adjustment range of the projector by twisting the elevator feet by the elevator feet adjustment, place the projector horizontally. After making sure that the projector is uneven or if you can use . As necessary, you otherwise need... to adjust the elevator feet. ►Except for inclining by hand. 8 To prevent damaging the projector and injuring yourself, always hold in the elevator buttons while holding the projector, the projector might crash down, overturn, smash your fingers and possibly result in a high temperature could ...

User Manual
Page 9
... that the top is installed bottom up, please use the accessory filter cover for intake ventilation. While the projector is not plugged in the direction of the arrow to the projector.Before handling, make sure the power switch is off and the power cord is placed lens-side up, hold the... projector. 2. When the projector is facing up. 9 Filter cover's knob Filter cover's knob To remove To set Filter cover Filter cover for bottom-up use WARNING ►Do not ...
... that the top is installed bottom up, please use the accessory filter cover for intake ventilation. While the projector is not plugged in the direction of the arrow to the projector.Before handling, make sure the power switch is off and the power cord is placed lens-side up, hold the... projector. 2. When the projector is facing up. 9 Filter cover's knob Filter cover's knob To remove To set Filter cover Filter cover for bottom-up use WARNING ►Do not ...
User Manual
Page 10
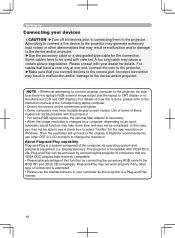
...Secure the screws on how this projector. • For some RGB signal modes, the optional Mac adapter is necessary. • When the image resolution is attempted. • Please use other CRT or LCD monitors to simultaneous LCD and CRT display). This projector is compatible with this is ...done, please refer to the projector. It might be used with your devices CAUTION ►Turn off all devices...
...Secure the screws on how this projector. • For some RGB signal modes, the optional Mac adapter is necessary. • When the image resolution is attempted. • Please use other CRT or LCD monitors to simultaneous LCD and CRT display). This projector is compatible with this is ...done, please refer to the projector. It might be used with your devices CAUTION ►Turn off all devices...
User Manual
Page 13
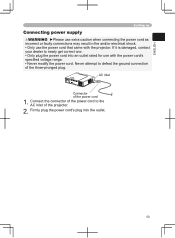
... cord. Never attempt to defeat the ground connection of the power cord 1. If it is damaged, contact your dealer to the AC inlet of the projector. 2. Connect the connector of the power cord to newly get correct one. • Only plug the power cord into the outlet. 13 ENGLISH Setting up... caution when connecting the power cord as incorrect or faulty connections may result in fire and/or electrical shock. • Only use with the projector.
... cord. Never attempt to defeat the ground connection of the power cord 1. If it is damaged, contact your dealer to the AC inlet of the projector. 2. Connect the connector of the power cord to newly get correct one. • Only plug the power cord into the outlet. 13 ENGLISH Setting up... caution when connecting the power cord as incorrect or faulty connections may result in fire and/or electrical shock. • Only use with the projector.
User Manual
Page 15
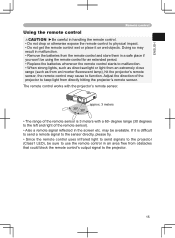
...remote control works with a 60- degree range (30 degrees to the left and right of the projector to keep light from obstacles that could block the remote control's output signal to the projector. 15 may be using the remote control for an extended period. • Replace the batteries whenever... When strong lights, such as direct sunlight or light from an extremely close range (such as from an inverter fluorescent lamp), hit the projector's remote sensor, the remote control may result in malfunction. • Remove the batteries from the remote control and store them in a safe place...
...remote control works with a 60- degree range (30 degrees to the left and right of the projector to keep light from obstacles that could block the remote control's output signal to the projector. 15 may be using the remote control for an extended period. • Replace the batteries whenever... When strong lights, such as direct sunlight or light from an extremely close range (such as from an inverter fluorescent lamp), hit the projector's remote sensor, the remote control may result in malfunction. • Remove the batteries from the remote control and store them in a safe place...

User Manual
Page 16
... the connected devices. The POWER indicator will go off, and the POWER indicator will light to the OFF position. Power off ?" The projector lamp will light up and the POWER indicator will appear on the screen for these several seconds. (Blinking green) POWER (Solid green) 3. When the power... Then the POWER indicator will stop blinking and light to the ON position. Close the lens cover. 16 Press the STANDBY/ON button on the projector or remote control again while the message is emitted. Make sure that the power indicator lights to solid orange, set the power switch to solid...
... the connected devices. The POWER indicator will go off, and the POWER indicator will light to the OFF position. Power off ?" The projector lamp will light up and the POWER indicator will appear on the screen for these several seconds. (Blinking green) POWER (Solid green) 3. When the power... Then the POWER indicator will stop blinking and light to the ON position. Close the lens cover. 16 Press the STANDBY/ON button on the projector or remote control again while the message is emitted. Make sure that the power indicator lights to solid orange, set the power switch to solid...
User Manual
Page 17
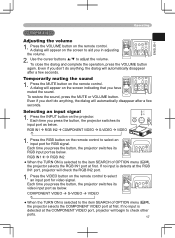
...rst. Each time you in adjusting the volume. Press the VOLUME button on the screen to aid you press the button, the projector switches its RGB input port as below. VIDEO STANDBY/ON RGB SEARCH ASPECT AUTO BLANK MAGNIFY HOME ON PAGE UP VOLUME OFF END... VIDEO STANDBY/ON LAMP TEMP POWER MENU INPUT 1. ESC RESET Temporarily muting the sound 1. Each time you press the button, the projector switches its video input port as below . ENGLISH Operating Operating Adjusting the volume 1. FREEZE KEYSTONE To close the dialog and complete the operation, ...
...rst. Each time you in adjusting the volume. Press the VOLUME button on the screen to aid you press the button, the projector switches its RGB input port as below. VIDEO STANDBY/ON RGB SEARCH ASPECT AUTO BLANK MAGNIFY HOME ON PAGE UP VOLUME OFF END... VIDEO STANDBY/ON LAMP TEMP POWER MENU INPUT 1. ESC RESET Temporarily muting the sound 1. Each time you press the button, the projector switches its video input port as below . ENGLISH Operating Operating Adjusting the volume 1. FREEZE KEYSTONE To close the dialog and complete the operation, ...
User Manual
Page 18
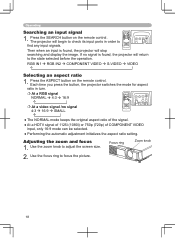
... VIDEO STANDBY/ON RGB SEARCH ASPECT AUTO BLANK MAGNIFY HOME ON PAGE UP VOLUME END PAGE DOWN MUTE Then when an input is found , the projector will begin to check its input ports in turn. At a RGB signal NORMAL 4:3 16:9 VIDEO STANDBY/ON RGB SEARCH ASPECT... OFF END PAGE DOWN MUTE FREEZE KEYSTONE VIDEO STANDBY/ON RGB SEARCH ASPECT AUTO BLANK At a video signal /no signal is found , the projector will return to find any input signals. Press the SEARCH button on the remote control. POSITION MENU RGB IN1 RGB IN2 ...
... VIDEO STANDBY/ON RGB SEARCH ASPECT AUTO BLANK MAGNIFY HOME ON PAGE UP VOLUME END PAGE DOWN MUTE Then when an input is found , the projector will begin to check its input ports in turn. At a RGB signal NORMAL 4:3 16:9 VIDEO STANDBY/ON RGB SEARCH ASPECT... OFF END PAGE DOWN MUTE FREEZE KEYSTONE VIDEO STANDBY/ON RGB SEARCH ASPECT AUTO BLANK At a video signal /no signal is found , the projector will return to find any input signals. Press the SEARCH button on the remote control. POSITION MENU RGB IN1 RGB IN2 ...
User Manual
Page 20
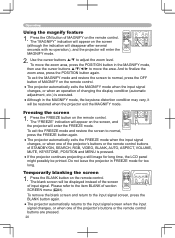
... 2. ENTER ESC RESET To move the zoom area, press the POSITION button in FREEZE mode for long time, the LCD panel might possibly be restored when the projector exit the MAGNIFY mode. VIDEO STANDBY/ON RGB SEARCH ASPECT AUTO BLANK Freezing the screen 1. POSITION MENU ENTER ●... changes, or when one of input signal. Please refer to the input signal screen when the ESC inputRESET signal changes, or when one of the projector's buttons or the remote control buttons of STANDBY/ON, SEARCH, RGB, VIDEO, BLANK, AUTO, ASPECT, VOLUME, MUTE, KEYSTONE, POSITION and MENU ...
... 2. ENTER ESC RESET To move the zoom area, press the POSITION button in FREEZE mode for long time, the LCD panel might possibly be restored when the projector exit the MAGNIFY mode. VIDEO STANDBY/ON RGB SEARCH ASPECT AUTO BLANK Freezing the screen 1. POSITION MENU ENTER ●... changes, or when one of input signal. Please refer to the input signal screen when the ESC inputRESET signal changes, or when one of the projector's buttons or the remote control buttons of STANDBY/ON, SEARCH, RGB, VIDEO, BLANK, AUTO, ASPECT, VOLUME, MUTE, KEYSTONE, POSITION and MENU ...
User Manual
Page 21
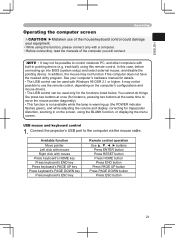
... could damage your computer's hardware manual for details. • The USB control can be used only for trapezoidal distortion, zooming in pointing device (e.g. Connect the projector's USB port to use of the computer you will connect. NOTE • It may not be possible to move the mouse pointer diagonally). • This...
... could damage your computer's hardware manual for details. • The USB control can be used only for trapezoidal distortion, zooming in pointing device (e.g. Connect the projector's USB port to use of the computer you will connect. NOTE • It may not be possible to move the mouse pointer diagonally). • This...
User Manual
Page 22
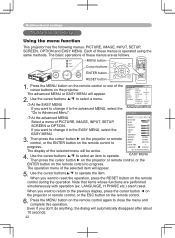
... of the selected menu will appear. 2. The advanced MENU or EASY MENU will be active. Then press the cursor button ► on the projector or remote control, or the ENTER button on the remote control again to the EASY MENU, select the COLOR +0 EASY MENU. WHISPER MIRROR RESET...the menu and complete this operation. Press the MENU button on the remote control to the previous display, press the cursor button ◄ on the projector or remote control, or the ESC button on the remote control during the operation. BRIGHT +0 CONTRAST +0 If you want to return to progress. Use...
... of the selected menu will appear. 2. The advanced MENU or EASY MENU will be active. Then press the cursor button ► on the projector or remote control, or the ENTER button on the remote control again to the EASY MENU, select the COLOR +0 EASY MENU. WHISPER MIRROR RESET...the menu and complete this operation. Press the MENU button on the remote control to the previous display, press the cursor button ◄ on the projector or remote control, or the ESC button on the remote control during the operation. BRIGHT +0 CONTRAST +0 If you want to return to progress. Use...
User Manual
Page 23
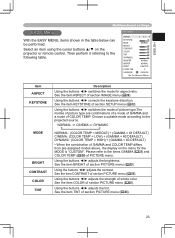
... of section PICTURE menu (25). See the item CONTRAST of GAMMA and COLOR TEMP differs from pre-assigned modes above, the display on the projector or remote control. See the item TINT of PICTURE menu. Then perform it referring to the projected source. Please refer to the items GAMMA (...
... of section PICTURE menu (25). See the item CONTRAST of GAMMA and COLOR TEMP differs from pre-assigned modes above, the display on the projector or remote control. See the item TINT of PICTURE menu. Then perform it referring to the projected source. Please refer to the items GAMMA (...
User Manual
Page 25
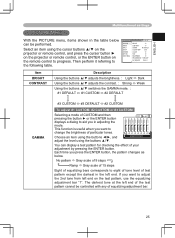
... an item using the buttons ◄/►, and adjust the level using the cursor buttons ▲/▼ on the projector or remote control, and press the cursor button ► on the projector or remote control, or the ENTER button on the test pattern, use the equalizing adjustment bar "1". Select an item using...
... an item using the buttons ◄/►, and adjust the level using the cursor buttons ▲/▼ on the projector or remote control, and press the cursor button ► on the projector or remote control, or the ENTER button on the test pattern, use the equalizing adjustment bar "1". Select an item using...

User Manual
Page 27
... to the 2-3 Pull-Down system to the conversion. LOAD1 LOAD2 LOAD3 LOAD4 MY MEMORY SAVE4 SAVE3 SAVE2 SAVE1 This projector has 4 numbered memories for example, jagged line) of the picture at an interlaced signal of a VIDEO input, a S-VIDEO input or a COMPONENT VIDEO input of MY...
... to the 2-3 Pull-Down system to the conversion. LOAD1 LOAD2 LOAD3 LOAD4 MY MEMORY SAVE4 SAVE3 SAVE2 SAVE1 This projector has 4 numbered memories for example, jagged line) of the picture at an interlaced signal of a VIDEO input, a S-VIDEO input or a COMPONENT VIDEO input of MY...


