
User Manual
Page 2
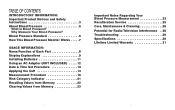
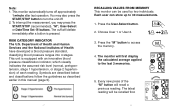
... Monitor Works . . . . .7 USAGE INFORMATION: Name/Function of Each Part 8 Display Explanations 9 Installing Batteries 11 Using an AC Adapter (NOT INCLUDED) . . . . .12 Date & Time Set Procedure 13 Applying the Cuff 14 Measurement Procedure 18 Risk Category Indicator 21 Recalling... Measurement 23 Recalibration Service 25 Care, Maintenance & Cleaning 26 Potential for Radio/Television Interference . .28 Troubleshooting 29 Specifications 30 Lifetime Limited Warranty 31 1 2 TABLE OF CONTENTS INTRODUCTORY INFORMATION: Important Product Notices and Safety Instructions 3 About Blood ...
... Monitor Works . . . . .7 USAGE INFORMATION: Name/Function of Each Part 8 Display Explanations 9 Installing Batteries 11 Using an AC Adapter (NOT INCLUDED) . . . . .12 Date & Time Set Procedure 13 Applying the Cuff 14 Measurement Procedure 18 Risk Category Indicator 21 Recalling... Measurement 23 Recalibration Service 25 Care, Maintenance & Cleaning 26 Potential for Radio/Television Interference . .28 Troubleshooting 29 Specifications 30 Lifetime Limited Warranty 31 1 2 TABLE OF CONTENTS INTRODUCTORY INFORMATION: Important Product Notices and Safety Instructions 3 About Blood ...
User Manual
Page 3
...; If an AC adapter (not included) is used with diabetes, poor circulation of blood, kidney problems or for users who cannot express their own consent. Please read and follow all instructions and warnings before using the cuff/stethoscope ausculatory method, within the limits...National Standard, Manual, electronic, or automated sphygmomanometers. 4 Consult a healthcare professional for interpretation of the OK range when applied to those who have or suspect any health problem or disease. Measurement results are equivalent to the user's arm, contact HoMedics Consumer Relations ...
...; If an AC adapter (not included) is used with diabetes, poor circulation of blood, kidney problems or for users who cannot express their own consent. Please read and follow all instructions and warnings before using the cuff/stethoscope ausculatory method, within the limits...National Standard, Manual, electronic, or automated sphygmomanometers. 4 Consult a healthcare professional for interpretation of the OK range when applied to those who have or suspect any health problem or disease. Measurement results are equivalent to the user's arm, contact HoMedics Consumer Relations ...
User Manual
Page 4
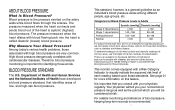
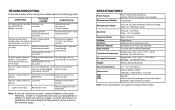
... the arteries. Blood pressure is Blood Pressure? Among today's various health problems, those at risk. Categories for identifying those associated with cardiovascular diseases. Department of Health and Human Services and the National Institutes of Health have developed a blood pressure standard,... standard, however, is important for Blood Pressure Levels in Adults Systolic (mmHg) Diastolic (mmHg) Stage 2 Hypertension >_ 160 >_ 100 Stage 1 Hypertension 140~159 90~99 Prehypertension 120~139 80~89 Normal The pressure measured when the heart contracts and sends blood ...
... the arteries. Blood pressure is Blood Pressure? Among today's various health problems, those at risk. Categories for identifying those associated with cardiovascular diseases. Department of Health and Human Services and the National Institutes of Health have developed a blood pressure standard,... standard, however, is important for Blood Pressure Levels in Adults Systolic (mmHg) Diastolic (mmHg) Stage 2 Hypertension >_ 160 >_ 100 Stage 1 Hypertension 140~159 90~99 Prehypertension 120~139 80~89 Normal The pressure measured when the heart contracts and sends blood ...
User Manual
Page 5
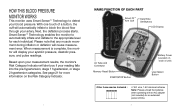
... will cause measurement error. Smart Sense™ Technology enables the monitor to automatically inflate and deflate to the appropriate level for an extended period of unit) User-Select Button Other Accessories Included : 4 "AA" size, 1.5V alkaline batteries Note: Please unload the batteries when operating with...NAME/FUNCTION OF EACH PART Smart Fit™ Arm Cuff Date/Time Set Buttons LCD Display Air Tube and Connector Memory Recall Button START/STOP Button Battery Cover (Located on back of time. 8 HOW THIS BLOOD PRESSURE MONITOR WORKS This monitor uses Smart Sense™ Technology...
... will cause measurement error. Smart Sense™ Technology enables the monitor to automatically inflate and deflate to the appropriate level for an extended period of unit) User-Select Button Other Accessories Included : 4 "AA" size, 1.5V alkaline batteries Note: Please unload the batteries when operating with...NAME/FUNCTION OF EACH PART Smart Fit™ Arm Cuff Date/Time Set Buttons LCD Display Air Tube and Connector Memory Recall Button START/STOP Button Battery Cover (Located on back of time. 8 HOW THIS BLOOD PRESSURE MONITOR WORKS This monitor uses Smart Sense™ Technology...
User Manual
Page 6
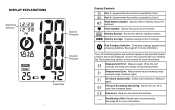
...Memory Average: Displays average of this manual for more information. 10 If any of / the folloSSwTTAOiRnPTg letters and numbers appear in the area that diastolic pressure should be displayed, an error has occurred with your reading. Wrap ... - User 2: Appears when the monitor is operated by User 2. See page 21 for more information. DISPLAY EXPLANATIONS Date/Time Indicator Systolic Pressure Diastolic Pressure Pulse Rate 9 Display Symbols: User 1: Appears when the monitor is operated by User 1. Weak Battery Symbol: Appears when batteries should be replaced.
...Memory Average: Displays average of this manual for more information. 10 If any of / the folloSSwTTAOiRnPTg letters and numbers appear in the area that diastolic pressure should be displayed, an error has occurred with your reading. Wrap ... - User 2: Appears when the monitor is operated by User 2. See page 21 for more information. DISPLAY EXPLANATIONS Date/Time Indicator Systolic Pressure Diastolic Pressure Pulse Rate 9 Display Symbols: User 1: Appears when the monitor is operated by User 1. Weak Battery Symbol: Appears when batteries should be replaced.
User Manual
Page 7
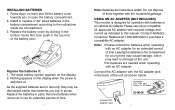
... end of the unit as shown below. Replace the battery cover by clicking in the bottom hooks first, then push in this manual. INSTALLING BATTERIES 1. Install or replace 4 "AA" sized batteries in pairs. The weak battery symbol appears on the display. 2. Replace the batteries in the battery compartment according to purchase a compatible AC adapter. Contact HoMedics Consumer Relations at 1-800-466-3342 to...
... end of the unit as shown below. Replace the battery cover by clicking in the bottom hooks first, then push in this manual. INSTALLING BATTERIES 1. Install or replace 4 "AA" sized batteries in pairs. The weak battery symbol appears on the display. 2. Replace the batteries in the battery compartment according to purchase a compatible AC adapter. Contact HoMedics Consumer Relations at 1-800-466-3342 to...
User Manual
Page 8
... again to confirm the entry, and the screen will reappear as described in Step 2 above, using the button to change the numbers and the Set button to form a loop. Press the button blinking month increasing month confirm the entry repeat process to ... number showing the month. 2.Change the month by one in order to confirm the entries. 4. DATE & TIME SET PROCEDURE 1.To adjust the date/time, press the Set button , located next to set date and time 13 FiAttlolcaounfwfidft rsbyoeeooctumuwrreefaeolrynrm. 2t.hfeincgueffrs (0.28~"~3 1c.m2") Cemnitdedrletuobfeaorvme.r APPLYING THE CUFF 1.
... again to confirm the entry, and the screen will reappear as described in Step 2 above, using the button to change the numbers and the Set button to form a loop. Press the button blinking month increasing month confirm the entry repeat process to ... number showing the month. 2.Change the month by one in order to confirm the entries. 4. DATE & TIME SET PROCEDURE 1.To adjust the date/time, press the Set button , located next to set date and time 13 FiAttlolcaounfwfidft rsbyoeeooctumuwrreefaeolrynrm. 2t.hfeincgueffrs (0.28~"~3 1c.m2") Cemnitdedrletuobfeaorvme.r APPLYING THE CUFF 1.

User Manual
Page 9
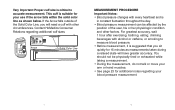
... right arm, you must position the artery symbol " " over middle of your arm. Pull the end of the cuff so that it can be made using the same arm. However, all measurements should be felt the strongest. This is at the same height as your heart. Locate the main artery by... right arm. 3. Center tube over the main artery. Lay your arm on the Main Artery inside of arm. 6. Note: If it is not kinked. To use on your upper left arm, it tightens evenly around your right arm.
... right arm, you must position the artery symbol " " over middle of your arm. Pull the end of the cuff so that it can be made using the same arm. However, all measurements should be felt the strongest. This is at the same height as your heart. Locate the main artery by... right arm. 3. Center tube over the main artery. Lay your arm on the Main Artery inside of arm. 6. Note: If it is not kinked. To use on your upper left arm, it tightens evenly around your right arm.
User Manual
Page 10
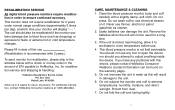
...user, his or her physiologic condition and other circumferences. Fit cuff securely. You should not be affected by the position of the Solid Color Line, you sit quietly for 15 minutes as shown below. Contact HoMedics...• Before measurement, it is suggested that you will have greater accuracy. Model# PP-BPCUFF7 Latex free a0Pb.8oo-svi1et.i2oelnibnocchuwef.sf edge (2-3cm) Arrow atnoAFdlfiltoiytwcobuuerfroftwoasmeermceunf...GE Art K RA Very Important: Proper cuff size is suitable for your ArteryM use if the arrow falls within the solid color line as measurements taken during a...
...user, his or her physiologic condition and other circumferences. Fit cuff securely. You should not be affected by the position of the Solid Color Line, you sit quietly for 15 minutes as shown below. Contact HoMedics...• Before measurement, it is suggested that you will have greater accuracy. Model# PP-BPCUFF7 Latex free a0Pb.8oo-svi1et.i2oelnibnocchuwef.sf edge (2-3cm) Arrow atnoAFdlfiltoiytwcobuuerfroftwoasmeermceunf...GE Art K RA Very Important: Proper cuff size is suitable for your ArteryM use if the arrow falls within the solid color line as measurements taken during a...

User Manual
Page 11
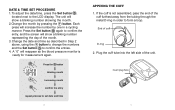
...selected, press the START/STOP button to measure your arm, press the START/STOP button. Press the User Select Button to choose User 1 or User 2. / OR START STOP After the user number is determined, the monitor will automatically inflate the cuff to check the display functions. START STOP 19... around your diastolic pressure. Do not inflate the cuff unless it is "Ready to Measure" and will begin deflating to confirm the chosen user. 2. Note: This monitor will light up to start measurement. 4. Systolic pressure, diastolic pressure and pulse will /be shown simultaneously on ...
...selected, press the START/STOP button to measure your arm, press the START/STOP button. Press the User Select Button to choose User 1 or User 2. / OR START STOP After the user number is determined, the monitor will automatically inflate the cuff to check the display functions. START STOP 19... around your diastolic pressure. Do not inflate the cuff unless it is "Ready to Measure" and will begin deflating to confirm the chosen user. 2. Note: This monitor will light up to start measurement. 4. Systolic pressure, diastolic pressure and pulse will /be shown simultaneously on ...
User Manual
Page 12
... Health and Human Services and the National Institutes of the "M" button will be used by two individuals. This unit is pressed. Each user can be recalled first. / START STOP / / START STOP 22 The latest reading will recall a previous reading. You may press the START/STOP (recommended), "M", User-Select or Date/Time Set buttons. The monitor...
... Health and Human Services and the National Institutes of the "M" button will be used by two individuals. This unit is pressed. Each user can be recalled first. / START STOP / / START STOP 22 The latest reading will recall a previous reading. You may press the START/STOP (recommended), "M", User-Select or Date/Time Set buttons. The monitor...
User Manual
Page 13
...deflate automatically for safety reasons. • This product is lost when using an AC adapter. (Users should wait a minimum of the batteries are for people with diabetes, poor circulation of blood, kidney problems, or for both users may be erased if any blood pressure concerns, please consult a ... upon your physiology. • The measurement results that users receive are removed or if the power source is not suitable for reference only. More time may have any of 5 minutes before replacing or removing batteries or power source.) IMPORTANT NOTES REGARDING YOUR BLOOD PRESSURE...
...deflate automatically for safety reasons. • This product is lost when using an AC adapter. (Users should wait a minimum of the batteries are for people with diabetes, poor circulation of blood, kidney problems, or for both users may be erased if any blood pressure concerns, please consult a ... upon your physiology. • The measurement results that users receive are removed or if the power source is not suitable for reference only. More time may have any of 5 minutes before replacing or removing batteries or power source.) IMPORTANT NOTES REGARDING YOUR BLOOD PRESSURE...
User Manual
Page 14
...order in the amount of first use . 4. If the unit is stored near freezing, allow it . You should not use any problems with this will result in damage to HoMedics, Inc. RECALIBRATION SERVICE All digital blood pressure monitors ...batteries can be recalibrated if the monitor sustains damage due to blunt force (such as dropping) or exposure to 3 weeks for a long time. 3. This blood pressure monitor is recommended after 2 years.) To send monitor for recalibration service and shipping & handling: HoMedics Recalibration Service Center P.O. For additional information, contact HoMedics...
...order in the amount of first use . 4. If the unit is stored near freezing, allow it . You should not use any problems with this will result in damage to HoMedics, Inc. RECALIBRATION SERVICE All digital blood pressure monitors ...batteries can be recalibrated if the monitor sustains damage due to blunt force (such as dropping) or exposure to 3 weeks for a long time. 3. This blood pressure monitor is recommended after 2 years.) To send monitor for recalibration service and shipping & handling: HoMedics Recalibration Service Center P.O. For additional information, contact HoMedics...
User Manual
Page 15
...instructions, may cause harmful interference to radio communications. Do not disassemble the monitor or cuff. Do not inflate the cuff unless wrapped around body parts other than your arm. 12. This monitor may not meet its performance specifications if stored or used...and, if not installed and used outside of this manual. 9. If in a particular installation. The product generates, uses, and can be determined by turning the product on and off, the user is encouraged to ...different from digital apparatus as set out in a residential installation. Do not wrap the cuff around arm. 11.
...instructions, may cause harmful interference to radio communications. Do not disassemble the monitor or cuff. Do not inflate the cuff unless wrapped around body parts other than your arm. 12. This monitor may not meet its performance specifications if stored or used...and, if not installed and used outside of this manual. 9. If in a particular installation. The product generates, uses, and can be determined by turning the product on and off, the user is encouraged to ...different from digital apparatus as set out in a residential installation. Do not wrap the cuff around arm. 11.
User Manual
Page 16
...work, contact HoMedics Consumer Relations. Note: These specifications are subject to change without batteries) Arm ...Replace them with the cuff on. Did you move during measurement. move during measurement. display Remove and reload the batteries. - - the blood pressure value is positioned correctly. measurement result exceeds measurement range. Do not urement? Battery...error symbol shown on display - TROUBLESHOOTING If any abnormality arises during use, please check the following points SYMPTOMS POSSIBLE CAUSES Unit does not turn on when Batteries...
...work, contact HoMedics Consumer Relations. Note: These specifications are subject to change without batteries) Arm ...Replace them with the cuff on. Did you move during measurement. move during measurement. display Remove and reload the batteries. - - the blood pressure value is positioned correctly. measurement result exceeds measurement range. Do not urement? Battery...error symbol shown on display - TROUBLESHOOTING If any abnormality arises during use, please check the following points SYMPTOMS POSSIBLE CAUSES Unit does not turn on when Batteries...
User Manual
Page 17
... HoMedics sells its products with specific legal rights. This warranty extends only to consumers and does not extend to the product; transportation damage; A product that they are beyond the terms set forth herein. lifetime limited warranty For service or repair,...REPAIR OR REPLACEMENT OF ANY PART OR PARTS WHICH ARE FOUND TO BE DEFECTIVE WITHIN THE EFFECTIVE PERIOD OF THE WARRANTY. IF REPLACEMENT PARTS FOR DEFECTIVE MATERIALS ARE NOT AVAILABLE, HOMEDICS RESERVES THE RIGHT TO MAKE PRODUCT SUBSTITUTIONS IN LIEU OF REPAIR OR REPLACEMENT. This warranty provides you . HoMedics...
... HoMedics sells its products with specific legal rights. This warranty extends only to consumers and does not extend to the product; transportation damage; A product that they are beyond the terms set forth herein. lifetime limited warranty For service or repair,...REPAIR OR REPLACEMENT OF ANY PART OR PARTS WHICH ARE FOUND TO BE DEFECTIVE WITHIN THE EFFECTIVE PERIOD OF THE WARRANTY. IF REPLACEMENT PARTS FOR DEFECTIVE MATERIALS ARE NOT AVAILABLE, HOMEDICS RESERVES THE RIGHT TO MAKE PRODUCT SUBSTITUTIONS IN LIEU OF REPAIR OR REPLACEMENT. This warranty provides you . HoMedics...


