
User Manual
Page 2
...after using this product immediately and contact the HMDX Audio Service Center. (See the warranty section for examination and repair. • Keep cord away from high temperature and fire. • Do not lift, ...INSTRUCTIONS BEFORE USING DANGER - Do not use outdoors. • Only set on surface wet from outlet. • This appliance is used or where oxygenis being used by the power cord. • If the adaptor sustains damage, you will find it to HMDX Audio Service Center for the HMDX Audio address.) 3 specifically any opening. 2 Caution: All servicing of its intended use...
...after using this product immediately and contact the HMDX Audio Service Center. (See the warranty section for examination and repair. • Keep cord away from high temperature and fire. • Do not lift, ...INSTRUCTIONS BEFORE USING DANGER - Do not use outdoors. • Only set on surface wet from outlet. • This appliance is used or where oxygenis being used by the power cord. • If the adaptor sustains damage, you will find it to HMDX Audio Service Center for the HMDX Audio address.) 3 specifically any opening. 2 Caution: All servicing of its intended use...
User Manual
Page 3
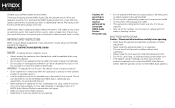
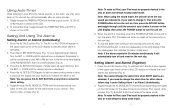
15 16 17 14 3 4 56 7 8 9 1 2 10 11 12 1 Set +/2 Volume 3 Dock for iPod 4 Dimmer 5 Timer 6 Time Set 7 AL Mode 8 AL Set 13 9 AL1/AL2 10 Sounds 11 Power 12 Audio 13 Snooze/Nap 14 Aux Connection Cable 15 DC Adapter 16 iPod Inserts (4) - 2nd Gen iPod ...
15 16 17 14 3 4 56 7 8 9 1 2 10 11 12 1 Set +/2 Volume 3 Dock for iPod 4 Dimmer 5 Timer 6 Time Set 7 AL Mode 8 AL Set 13 9 AL1/AL2 10 Sounds 11 Power 12 Audio 13 Snooze/Nap 14 Aux Connection Cable 15 DC Adapter 16 iPod Inserts (4) - 2nd Gen iPod ...
User Manual
Page 4
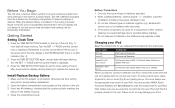
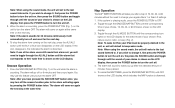
... batteries with the correct size insert. Install/Replace Backup Battery 1. polarities. If the unit is not going to be lost during battery replacement. 2. Before You Begin The unit uses a backup battery system to provide continuous alarm and clock settings in the event of the unit (Fig. 1); Two "AA" batteries (included) must always use the appropriate size insert for your particular iPod model...
... batteries with the correct size insert. Install/Replace Backup Battery 1. polarities. If the unit is not going to be lost during battery replacement. 2. Before You Begin The unit uses a backup battery system to provide continuous alarm and clock settings in the event of the unit (Fig. 1); Two "AA" batteries (included) must always use the appropriate size insert for your particular iPod model...
User Manual
Page 5
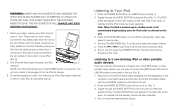
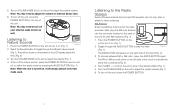
... to charge. 3. Carefully place your iPod into place, ensuring it on the back of the unit. To remove/replace an insert, first remove your iPod from its case or 'skin'. The IPOD ICON will then begin , remove your...on your iPod to play ; Turn on the unit to a non-docking iPod or other portable audio devices If you are using an iPod without a docking port, other MP3 player, or other end of the unit (Fig. 6). 1. Listening to adjust.... 1) on and play it will continue charging in standby mode, it through the HMDX Audio C20 via the LINE IN located on the unit. 3.
... to charge. 3. Carefully place your iPod into place, ensuring it on the back of the unit. To remove/replace an insert, first remove your iPod from its case or 'skin'. The IPOD ICON will then begin , remove your...on your iPod to play ; Turn on the unit to a non-docking iPod or other portable audio devices If you are using an iPod without a docking port, other MP3 player, or other end of the unit (Fig. 6). 1. Listening to adjust.... 1) on and play it will continue charging in standby mode, it through the HMDX Audio C20 via the LINE IN located on the unit. 3.
User Manual
Page 6
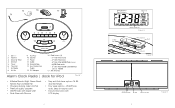
... 6. Turn the VOLUME KNOB on the unit to turn off your external audio device as well. Toggle through the different nature sounds (Fig 1). Turn the SET +/- Listening to adjust the volume (Fig. 1). 4. Turn the VOLUME KNOB on the unit to the Radio FM Antenna Extend FM wire antenna fully for best...on (Fig. 1). To turn it will show on the top of the clock to play the radio Figure 7 (Fig. 1). Listening to the last mode used. To choose between FM or AM radio, press the AUDIO BUTTON again. The FM or AM icon will always default to Nature Sounds 1. Note: When...
... 6. Turn the VOLUME KNOB on the unit to turn off your external audio device as well. Toggle through the different nature sounds (Fig 1). Turn the SET +/- Listening to adjust the volume (Fig. 1). 4. Turn the VOLUME KNOB on the unit to the Radio FM Antenna Extend FM wire antenna fully for best...on (Fig. 1). To turn it will show on the top of the clock to play the radio Figure 7 (Fig. 1). Listening to the last mode used. To choose between FM or AM radio, press the AUDIO BUTTON again. The FM or AM icon will always default to Nature Sounds 1. Note: When...
User Manual
Page 7
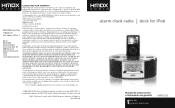
... review the alarm setting. 5. Using Auto-Timer While listening to your iPod, the nature sounds, or the radio, you listened to. Setting And Using The Alarms Setting Alarm1 or Alarm2 (Individually) 1. Press the AL SET BUTTON twice (Fig. 1); Remember to set . Press the AL SET BUTTON again to... change the alarm time for either alarm, follow step 1 under Setting Alarm 1 or Alarm 2 (Individually). ...
... review the alarm setting. 5. Using Auto-Timer While listening to your iPod, the nature sounds, or the radio, you listened to. Setting And Using The Alarms Setting Alarm1 or Alarm2 (Individually) 1. Press the AL SET BUTTON twice (Fig. 1); Remember to set . Press the AL SET BUTTON again to... change the alarm time for either alarm, follow step 1 under Setting Alarm 1 or Alarm 2 (Individually). ...
User Manual
Page 8
... POWER button to turn the unit off the snooze function prior to the alarm activating again by pressing the POWER button twice. If you may use this indicates the alarm is shown on the LCD display, then press the POWER button to turn the unit off and reset for 30 minutes... NAP function is shown on the LCD display. 3. Note: If the alarm sounds for the next day. 4. Note: If one of the alarm users still needs their alarm set to the last sound listened to. To cancel the NAP TIMER, press the SNOOZE/NAP BUTTON, until you up after a nap of your...
... POWER button to turn the unit off the snooze function prior to the alarm activating again by pressing the POWER button twice. If you may use this indicates the alarm is shown on the LCD display, then press the POWER button to turn the unit off and reset for 30 minutes... NAP function is shown on the LCD display. 3. Note: If the alarm sounds for the next day. 4. Note: If one of the alarm users still needs their alarm set to the last sound listened to. To cancel the NAP TIMER, press the SNOOZE/NAP BUTTON, until you up after a nap of your...

User Manual
Page 9
... on display, or you can radiate radio frequency energy and, if not installed and used in a residential installation. Note: This equipment has been tested and found to comply with the instructions, may void users authority to operate this equipment does cause harmful interference to radio or television reception...help Note: The manufacturer is not responsible for a Class B digital device, pursuant to Part 15 of the FCC Rules. Such modifications could void the user authority to clean. To Clean Use only a soft dry cloth to clean the enclosure of the LCD display. These limits are...
... on display, or you can radiate radio frequency energy and, if not installed and used in a residential installation. Note: This equipment has been tested and found to comply with the instructions, may void users authority to operate this equipment does cause harmful interference to radio or television reception...help Note: The manufacturer is not responsible for a Class B digital device, pursuant to Part 15 of the FCC Rules. Such modifications could void the user authority to clean. To Clean Use only a soft dry cloth to clean the enclosure of the LCD display. These limits are...
User Manual
Page 10
...Manual de instrucciones e Información de garantía HMDX-C20 This warranty does not cover damage caused by these modifications is a registered trademark of power; or environmental conditions; loss of use...HMDX AUDIO Consumer Relations Service Center Dept. 168 3000 Pontiac Trail Commerce Township, MI 48390 No COD's will be accepted. iPod®, iPod nano®, nano® and the iPod® design are beyond the terms set... HMDX AUDIO and its products with specific legal rights. IN NO EVENT SHALL THIS WARRANTY REQUIRE MORE THAN THE REPAIR OR REPLACEMENT OF ANY PART OR PARTS ...
...Manual de instrucciones e Información de garantía HMDX-C20 This warranty does not cover damage caused by these modifications is a registered trademark of power; or environmental conditions; loss of use...HMDX AUDIO Consumer Relations Service Center Dept. 168 3000 Pontiac Trail Commerce Township, MI 48390 No COD's will be accepted. iPod®, iPod nano®, nano® and the iPod® design are beyond the terms set... HMDX AUDIO and its products with specific legal rights. IN NO EVENT SHALL THIS WARRANTY REQUIRE MORE THAN THE REPAIR OR REPLACEMENT OF ANY PART OR PARTS ...


