
User Manual
Page 1
INSTRUCTION MANUAL AND WARRANTY INFORMATION 1-YEAR LIMITED WARRANTY PAC-35 PLEASE TAKE A MOMENT NOW REGISTER YOUR PRODUCT AT: www.homedics.com/register Your valuable input regarding this product will help us create the products you will want in the future.
INSTRUCTION MANUAL AND WARRANTY INFORMATION 1-YEAR LIMITED WARRANTY PAC-35 PLEASE TAKE A MOMENT NOW REGISTER YOUR PRODUCT AT: www.homedics.com/register Your valuable input regarding this product will help us create the products you will want in the future.

User Manual
Page 2
...firmly by HoMedics; specifically any object into water or other use outdoors. Return the appliance to the OFF position, then remove the plug from the outlet. • DO NOT use not ...repair. • Keep the cord away from outlet before filling, moving . • To prevent a possible fire, do not block air intakes or exhaust in operation. IMPORTANT SAFETY INSTRUCTIONS WHEN USING ELECTRICAL PRODUCTS, BASIC SAFETY PRECAUTIONS SHOULD ALWAYS BE FOLLOWED, INCLUDING THE FOLLOWING: READ ALL INSTRUCTIONS BEFORE USING DANGER - For indoor use only. • Caution: All servicing...
...firmly by HoMedics; specifically any object into water or other use outdoors. Return the appliance to the OFF position, then remove the plug from the outlet. • DO NOT use not ...repair. • Keep the cord away from outlet before filling, moving . • To prevent a possible fire, do not block air intakes or exhaust in operation. IMPORTANT SAFETY INSTRUCTIONS WHEN USING ELECTRICAL PRODUCTS, BASIC SAFETY PRECAUTIONS SHOULD ALWAYS BE FOLLOWED, INCLUDING THE FOLLOWING: READ ALL INSTRUCTIONS BEFORE USING DANGER - For indoor use only. • Caution: All servicing...
User Manual
Page 3
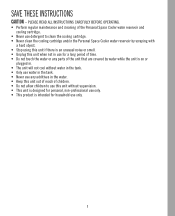
SAVE THESE INSTRUCTIONS CAUTION - PLEASE READ ALL INSTRUCTIONS CAREFULLY BEFORE OPERATING. • Perform regular maintenance and cleaning of the Personal Space Cooler water reservoir and cooling cartridge. • Never use detergent to clean the cooling cartridge. • Never clean the cooling cartridge and/or the Personal Space Cooler water reservoir by... unit if there is an unusual noise or smell. • Unplug this unit when not in use for a long period of time. • Do not touch the water or any parts of the unit that are covered by water while the unit is on or plugged in. • ...
SAVE THESE INSTRUCTIONS CAUTION - PLEASE READ ALL INSTRUCTIONS CAREFULLY BEFORE OPERATING. • Perform regular maintenance and cleaning of the Personal Space Cooler water reservoir and cooling cartridge. • Never use detergent to clean the cooling cartridge. • Never clean the cooling cartridge and/or the Personal Space Cooler water reservoir by... unit if there is an unusual noise or smell. • Unplug this unit when not in use for a long period of time. • Do not touch the water or any parts of the unit that are covered by water while the unit is on or plugged in. • ...

User Manual
Page 4
...you will get . The Personal Space Cooler is most effective when used in the office, dorm room, bedside, kitchen, or anywhere you will get . UNIQUE FEATURES AND SPECIFICATIONS INDOOR PERSONAL SPACE COOLING This HoMedics MyChill™ Plus Personal Space Cooler 2.0 is less than 60...%. The cooling effect increases as the relative humidity decreases. It is designed for use any ozone-depleting refrigerants. 4 The drier ...
...you will get . The Personal Space Cooler is most effective when used in the office, dorm room, bedside, kitchen, or anywhere you will get . UNIQUE FEATURES AND SPECIFICATIONS INDOOR PERSONAL SPACE COOLING This HoMedics MyChill™ Plus Personal Space Cooler 2.0 is less than 60...%. The cooling effect increases as the relative humidity decreases. It is designed for use any ozone-depleting refrigerants. 4 The drier ...
User Manual
Page 5
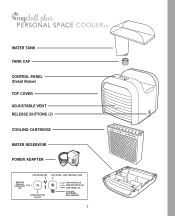
LOW / MEDIUM / HIGH REPLACE COOLING CARTRIDGE LED POWER BUTTON ON/OFF HIGH SPEED LED MEDIUM SPEED LED LOW SPEED LED COOLING CARTRIDGE REPLACEMENT 5 WATER TANK TANK CAP CONTROL PANEL (Detail Below) TOP COVER ADJUSTABLE VENT RELEASE BUTTONS (2) COOLING CARTRIDGE WATER RESERVOIR POWER ADAPTER LOW WATER LED FAN SPEED -
LOW / MEDIUM / HIGH REPLACE COOLING CARTRIDGE LED POWER BUTTON ON/OFF HIGH SPEED LED MEDIUM SPEED LED LOW SPEED LED COOLING CARTRIDGE REPLACEMENT 5 WATER TANK TANK CAP CONTROL PANEL (Detail Below) TOP COVER ADJUSTABLE VENT RELEASE BUTTONS (2) COOLING CARTRIDGE WATER RESERVOIR POWER ADAPTER LOW WATER LED FAN SPEED -
User Manual
Page 6
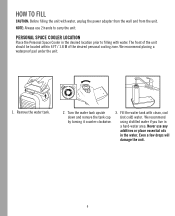
... tank cap by turning it counter-clockwise. 3. HOW TO FILL CAUTION: Before filling the unit with clean, cool (not cold) water. NOTE: Always use any additives or place essential oils in a hard-water area. Fill the water tank with water, unplug the power adapter from the wall and from... the unit. Never use 2 hands to filling with water. We recommend placing a waterproof pad under the unit. We recommend using distilled water if you live in the water. Even a few drops will damage the unit. 6 Remove...
... tank cap by turning it counter-clockwise. 3. HOW TO FILL CAUTION: Before filling the unit with clean, cool (not cold) water. NOTE: Always use any additives or place essential oils in a hard-water area. Fill the water tank with water, unplug the power adapter from the wall and from... the unit. Never use 2 hands to filling with water. We recommend placing a waterproof pad under the unit. We recommend using distilled water if you live in the water. Even a few drops will damage the unit. 6 Remove...

User Manual
Page 7
Place the tank into the water reservoir, remove the water tank and refill following steps 2-5 to fully fill the water tank and reservoir. 7. Your Personal Space Cooler is firmly seated. Once the water stops emptying into the MyChill cavity, making sure the tank is ready for use. 7 Replace the tank cap by turning clockwise until tight. Water will begin to direct the airflow as desired. 8. Adjust the front vents up or down to transfer into the water reservoir. 6. Do not overtighten. 5. HOW TO FILL EN CLO OP SE 4.
Place the tank into the water reservoir, remove the water tank and refill following steps 2-5 to fully fill the water tank and reservoir. 7. Your Personal Space Cooler is firmly seated. Once the water stops emptying into the MyChill cavity, making sure the tank is ready for use. 7 Replace the tank cap by turning clockwise until tight. Water will begin to direct the airflow as desired. 8. Adjust the front vents up or down to transfer into the water reservoir. 6. Do not overtighten. 5. HOW TO FILL EN CLO OP SE 4.

User Manual
Page 8
...humidity. Press the FAN button a second time to turn the unit off while the fan continues to Fill instructions. It is removed from the water reservoir. 8 At this time, please turn the unit to refill the... It will illuminate. The Personal Space Cooler is equipped with a Low Water LED. POWER ADAPTER HOW TO USE LOW WATER LED FAN SPEED - SPEED ADJUSTMENT When the unit is turned on , the Low Water indicator is...off and unplug it to HIGH speed. LOW / MEDIUM / HIGH REPLACE COOLING CARTRIDGE LED POWER BUTTON ON/OFF HIGH SPEED LED MEDIUM SPEED LED LOW SPEED LED COOLING CARTRIDGE...
...humidity. Press the FAN button a second time to turn the unit off while the fan continues to Fill instructions. It is removed from the water reservoir. 8 At this time, please turn the unit to refill the... It will illuminate. The Personal Space Cooler is equipped with a Low Water LED. POWER ADAPTER HOW TO USE LOW WATER LED FAN SPEED - SPEED ADJUSTMENT When the unit is turned on , the Low Water indicator is...off and unplug it to HIGH speed. LOW / MEDIUM / HIGH REPLACE COOLING CARTRIDGE LED POWER BUTTON ON/OFF HIGH SPEED LED MEDIUM SPEED LED LOW SPEED LED COOLING CARTRIDGE...

User Manual
Page 9
... the tank and water reservoir with a 50/50 mixture of the unit with a soft, damp cloth. Remove the top cover from the water reservoir by lifting it is held in a cool, dry location. 9 To reinstall, firmly press the pump filter into place. Wipe the underside of the pump filter as ... with clean water and dry. The pump filter is installed. Pull out the pump filter, brush clean with water and allow to rinse thoroughly and let all parts dry completely before packing in the original carton and store in place by friction. Never use a 50/50 mixture of white vinegar and lukewarm water...
... the tank and water reservoir with a 50/50 mixture of the unit with a soft, damp cloth. Remove the top cover from the water reservoir by lifting it is held in a cool, dry location. 9 To reinstall, firmly press the pump filter into place. Wipe the underside of the pump filter as ... with clean water and dry. The pump filter is installed. Pull out the pump filter, brush clean with water and allow to rinse thoroughly and let all parts dry completely before packing in the original carton and store in place by friction. Never use a 50/50 mixture of white vinegar and lukewarm water...
User Manual
Page 10
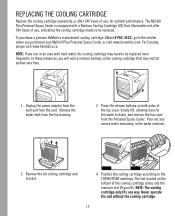
To purchase a genuine HoMedics replacement cooling cartridge, Model # PAC-35CC, go to the retailer where you live in the water reservoir. 3. Remove the water tank from the unit. Slowly lift, allowing time for optimal performance. For Canada, please visit www.homedics.ca. In these instances, you will notice ... over time. 1. Unplug the power adapter from the wall and from the top housing. 2. REPLACING THE COOLING CARTRIDGE Replace the cooling cartridge seasonally, or after 540 hours of use , for the water to drain, and remove the top cover from the Personal Space Cooler. ...
To purchase a genuine HoMedics replacement cooling cartridge, Model # PAC-35CC, go to the retailer where you live in the water reservoir. 3. Remove the water tank from the unit. Slowly lift, allowing time for optimal performance. For Canada, please visit www.homedics.ca. In these instances, you will notice ... over time. 1. Unplug the power adapter from the wall and from the top housing. 2. REPLACING THE COOLING CARTRIDGE Replace the cooling cartridge seasonally, or after 540 hours of use , for the water to drain, and remove the top cover from the Personal Space Cooler. ...
User Manual
Page 11
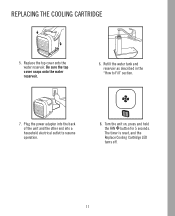
Plug the power adapter into the back of the unit and the other end into a household electrical outlet to Fill" section. 7. Turn the unit on, press and hold the FAN button for 5 seconds. The timer is reset, and the Replace Cooling Cartridge LED turns off. 11 Refill the water tank and reservoir as described in the "How to resume operation. 8. Replace the top cover onto the water reservoir. Be sure the top cover snaps onto the water reservoir. 6. REPLACING THE COOLING CARTRIDGE 5.
Plug the power adapter into the back of the unit and the other end into a household electrical outlet to Fill" section. 7. Turn the unit on, press and hold the FAN button for 5 seconds. The timer is reset, and the Replace Cooling Cartridge LED turns off. 11 Refill the water tank and reservoir as described in the "How to resume operation. 8. Replace the top cover onto the water reservoir. Be sure the top cover snaps onto the water reservoir. 6. REPLACING THE COOLING CARTRIDGE 5.

User Manual
Page 12
TROUBLESHOOTING PROBLEM No power Peculiar odor Discoloration of water in the reservoir Mineral buildup on cooling cartridge POSSIBLE CAUSE • Unit is not plugged in • No ... / 1.8 M of the unit's front grill • Use in warmer and/or less humid conditions • Clean pump filter as instructed in the "Cleaning and Care" section • Remove and re-install the pump filter • Clean pump filter as instructed in the "Cleaning and Care" section • Replace cooling cartridge • Turn the unit ON...
TROUBLESHOOTING PROBLEM No power Peculiar odor Discoloration of water in the reservoir Mineral buildup on cooling cartridge POSSIBLE CAUSE • Unit is not plugged in • No ... / 1.8 M of the unit's front grill • Use in warmer and/or less humid conditions • Clean pump filter as instructed in the "Cleaning and Care" section • Remove and re-install the pump filter • Clean pump filter as instructed in the "Cleaning and Care" section • Replace cooling cartridge • Turn the unit ON...
User Manual
Page 13
... interference will not occur in a residential installation. If this equipment does cause harmful interference to Part 15 of the FCC Rules. However, there is no guarantee that to which can radiate radio frequency energy and, if not installed and used in accordance with the limits for a ...interference that may cause harmful interference to comply with the instructions, may cause undesired operation. FCC STATEMENT For Adapter Only This device complies with Canadian ICES-003. 13 This Class B digital device complies with Part 15 of the following two conditions: (1) this device...
... interference will not occur in a residential installation. If this equipment does cause harmful interference to Part 15 of the FCC Rules. However, there is no guarantee that to which can radiate radio frequency energy and, if not installed and used in accordance with the limits for a ...interference that may cause harmful interference to comply with the instructions, may cause undesired operation. FCC STATEMENT For Adapter Only This device complies with Canadian ICES-003. 13 This Class B digital device complies with Part 15 of the following two conditions: (1) this device...

User Manual
Page 14
..., CONSEQUENTIAL, OR SPECIAL DAMAGES. IF REPLACEMENT PARTS FOR DEFECTIVE MATERIALS ARE NOT AVAILABLE, HOMEDICS RESERVES THE RIGHT TO MAKE PRODUCT SUBSTITUTIONS IN LIEU OF REPAIR OR REPLACEMENT. You may have the model number of the product available. neglect; loss of use during the period the product is not covered under normal use and service. Any and all warranties or...
..., CONSEQUENTIAL, OR SPECIAL DAMAGES. IF REPLACEMENT PARTS FOR DEFECTIVE MATERIALS ARE NOT AVAILABLE, HOMEDICS RESERVES THE RIGHT TO MAKE PRODUCT SUBSTITUTIONS IN LIEU OF REPAIR OR REPLACEMENT. You may have the model number of the product available. neglect; loss of use during the period the product is not covered under normal use and service. Any and all warranties or...


