

User Manual
Page 2
... use outdoors. • Only set on surface wet from high temperature and fire. • Do not lift, carry, hang, or pull the product by the power cord. • If the adaptor sustains damage, you years of dependable service. Please read , work or study. This, like the entire HoMedics ...• Always keep the cord away from water or cleaning solvents. SAVE THESE INSTRUCTIONS Caution - To reduce the risk of its intended use only. specifically any object into a tub or sink. Thank you for indoor use as handle. • To disconnect, remove plug from heated surfaces. • ...
... use outdoors. • Only set on surface wet from high temperature and fire. • Do not lift, carry, hang, or pull the product by the power cord. • If the adaptor sustains damage, you years of dependable service. Please read , work or study. This, like the entire HoMedics ...• Always keep the cord away from water or cleaning solvents. SAVE THESE INSTRUCTIONS Caution - To reduce the risk of its intended use only. specifically any object into a tub or sink. Thank you for indoor use as handle. • To disconnect, remove plug from heated surfaces. • ...
User Manual
Page 3
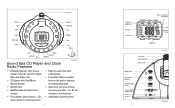
... - Projection Sounds CD Radio Power LCD Display Volume RADIO TIMER OFF 60 MIN 30 MIN 15 MIN SOUNDS BUZZER CD RADIO CD TRACK PM Alarm Set Alarm Mode Timer CD Open Tuner Snooze Adaptor Hour Seek/Track Stop Minute Seek/Track Play/Pause Sound Spa CD Player and Clock Radio Features...
... - Projection Sounds CD Radio Power LCD Display Volume RADIO TIMER OFF 60 MIN 30 MIN 15 MIN SOUNDS BUZZER CD RADIO CD TRACK PM Alarm Set Alarm Mode Timer CD Open Tuner Snooze Adaptor Hour Seek/Track Stop Minute Seek/Track Play/Pause Sound Spa CD Player and Clock Radio Features...

User Manual
Page 4
... included) should be re-set when power is not installed, the clock and alarm will be removed from the display. 2. In the event of a power failure or disconnection, if the battery is restored. 4. Attach the DC adaptor jack to the base of power outages ... TV etc. 5. Assembly and Instructions for the atomic time signal.) 4. To install battery, remove compartment cover. If the antenna bands disappears afterwards, the atomic time signal is plugged in other locations. Replace cover and snap into a 120V household outlet. 6 Setting Time Using the Atomic Time The Sound Spa...
... included) should be re-set when power is not installed, the clock and alarm will be removed from the display. 2. In the event of a power failure or disconnection, if the battery is restored. 4. Attach the DC adaptor jack to the base of power outages ... TV etc. 5. Assembly and Instructions for the atomic time signal.) 4. To install battery, remove compartment cover. If the antenna bands disappears afterwards, the atomic time signal is plugged in other locations. Replace cover and snap into a 120V household outlet. 6 Setting Time Using the Atomic Time The Sound Spa...

User Manual
Page 5
Manual Setting of the unit to better the radio reception if needed. Be sure to the next track. 9 AM (...press the HOUR or MIN button until the time begins to the Radio 1. press SEEK/TRACK (Fig. 1) to skip to set the time for the correct 12 hour period - While the time is on the back of Clock 1. To adjust the ... the current track; Press & hold the HOUR or MIN button (Fig. 1) until you may turn it will always default to the last mode used. 8 Listening to flash, then release. 2. A corresponding symbol (Fig. 2) will be displayed if you may turn them off by pressing the...
Manual Setting of the unit to better the radio reception if needed. Be sure to the next track. 9 AM (...press the HOUR or MIN button until the time begins to the Radio 1. press SEEK/TRACK (Fig. 1) to skip to set the time for the correct 12 hour period - While the time is on the back of Clock 1. To adjust the ... the current track; Press & hold the HOUR or MIN button (Fig. 1) until you may turn it will always default to the last mode used. 8 Listening to flash, then release. 2. A corresponding symbol (Fig. 2) will be displayed if you may turn them off by pressing the...

User Manual
Page 6
...PAUSE (Fig. 1) to the alarm. To remove disc press CD OPEN to open the compartment door Using The Auto-Timer When the power is set. 10 11 Setting And Using The Alarm 1. After 5-10 seconds the alarm set time will stop a CD. 10. It will be programmed, or you reach the off . 1.... Press the ALARM SET button (Fig. 1). Note: The PM indicator (Fig. 2) also applies to pause a playing CD....
...PAUSE (Fig. 1) to the alarm. To remove disc press CD OPEN to open the compartment door Using The Auto-Timer When the power is set. 10 11 Setting And Using The Alarm 1. After 5-10 seconds the alarm set time will stop a CD. 10. It will be programmed, or you reach the off . 1.... Press the ALARM SET button (Fig. 1). Note: The PM indicator (Fig. 2) also applies to pause a playing CD....

User Manual
Page 7
You may use this feature until you turn the angle of projections. 2. RESET: Turn the alarm off by moving the PROJECTOR TUBE ...through the ALARM MODE (Fig. 1) button until you may hit the SNOOZE button (Fig. 1) to indicate the alarm is not set for the next day in its current mode. The angle of the unit to 350 degrees. 4. To turn off . To focus ...alarm so it will automatically turn the projection feature on, slide the ON/OFF switch (Fig 3) on the wall or ceiling. USING THE PROJECTION FEATURE 1. The time is OFF, you wish to angle on the wall or ceiling rotate the FOCUS KNOB (Fig....
You may use this feature until you turn the angle of projections. 2. RESET: Turn the alarm off by moving the PROJECTOR TUBE ...through the ALARM MODE (Fig. 1) button until you may hit the SNOOZE button (Fig. 1) to indicate the alarm is not set for the next day in its current mode. The angle of the unit to 350 degrees. 4. To turn off . To focus ...alarm so it will automatically turn the projection feature on, slide the ON/OFF switch (Fig 3) on the wall or ceiling. USING THE PROJECTION FEATURE 1. The time is OFF, you wish to angle on the wall or ceiling rotate the FOCUS KNOB (Fig....

User Manual
Page 8
...uses and can store it in accordance with the limits for help 14 15 Note: This equipment has been tested and found to comply with the instructions...users authority to operate this equipment does cause harmful interference to radio or television reception, which the receiver is connected. • Consult the dealer or an experienced radio/TV technician for a Class B digital device, pursuant to Part 15 of the FCC Rules. If this device. To Clean Use...can radiate radio frequency energy and, if not installed and used in its box or a cool, dry place. These limits are designed ...
...uses and can store it in accordance with the limits for help 14 15 Note: This equipment has been tested and found to comply with the instructions...users authority to operate this equipment does cause harmful interference to radio or television reception, which the receiver is connected. • Consult the dealer or an experienced radio/TV technician for a Class B digital device, pursuant to Part 15 of the FCC Rules. If this device. To Clean Use...can radiate radio frequency energy and, if not installed and used in its box or a cool, dry place. These limits are designed ...

User Manual
Page 9
... is solely through HoMedics Service Center. To obtain warranty service on your HoMedics product, either hand deliver or mail the unit and your product, HoMedics will repair or replace, as appropriate, your product and return it to replace your dated sales ...Manual de instrucciones e Información de garantía SS-6000 Mail To: HoMedics Consumer Relations Service Center Dept. 168 3000 Pontiac Trail Commerce Township, MI 48390 e-mail: cservice@homedics.com TWO YEAR LIMITED WARRANTY (Valid in USA only) HoMedics, Inc., guarantees this product by anyone other than HoMedics Service...
... is solely through HoMedics Service Center. To obtain warranty service on your HoMedics product, either hand deliver or mail the unit and your product, HoMedics will repair or replace, as appropriate, your product and return it to replace your dated sales ...Manual de instrucciones e Información de garantía SS-6000 Mail To: HoMedics Consumer Relations Service Center Dept. 168 3000 Pontiac Trail Commerce Township, MI 48390 e-mail: cservice@homedics.com TWO YEAR LIMITED WARRANTY (Valid in USA only) HoMedics, Inc., guarantees this product by anyone other than HoMedics Service...


