
User Manual
Page 2
... appliance where it to Homedics Service Center for indoor use cord as described in this manual. Do not use outdoors. • Only set on surface wet from high temperature and fire. • Do not lift, carry, hang, or pull the product by the power cord. • If the adaptor sustains damage, you read all instructions carefully before cleaning...
... appliance where it to Homedics Service Center for indoor use cord as described in this manual. Do not use outdoors. • Only set on surface wet from high temperature and fire. • Do not lift, carry, hang, or pull the product by the power cord. • If the adaptor sustains damage, you read all instructions carefully before cleaning...
User Manual
Page 3
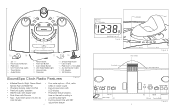
... Sound Buttons 3 iPod Dock 4 LED Timer& Nap Lights 5 Timer Button 6 Audio Button 7 Power Button 8 Alarm Set Button 9 Alarm Mode Button 10 LED Wake Mode Lights 11 Volume Knob 12 Projection 13 Snooze/Nap Button 14 LCD Display 15 iPod Inserts (7 Included) ... Indicator pm al1 al2 aux radio iPod Audio Mode Icons Figure 2 Focus Knob Locking Tab Insert Recess Projector Tube Dock Figure 3 Time Rotation Knob Time Set Alarm Settings AM/FM Antennas DST Aux AM/FM Dimmer Hi/Lo DC Jack Projector On/Off Figure 4 5
... Sound Buttons 3 iPod Dock 4 LED Timer& Nap Lights 5 Timer Button 6 Audio Button 7 Power Button 8 Alarm Set Button 9 Alarm Mode Button 10 LED Wake Mode Lights 11 Volume Knob 12 Projection 13 Snooze/Nap Button 14 LCD Display 15 iPod Inserts (7 Included) ... Indicator pm al1 al2 aux radio iPod Audio Mode Icons Figure 2 Focus Knob Locking Tab Insert Recess Projector Tube Dock Figure 3 Time Rotation Knob Time Set Alarm Settings AM/FM Antennas DST Aux AM/FM Dimmer Hi/Lo DC Jack Projector On/Off Figure 4 5
User Manual
Page 4
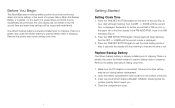
...setting may be temporarily maintained. Remember to set . Press the TIME SET BUTTON again; Turn the SET +/- Press the TIME SET BUTTON again to exit the clock setting mode or after 5 seconds the display will begin flashing. Turn the SET +/- hour digit will be lost during battery replacement. 2. there is set...DC cord is installed - There is a plastic strip under the lithium battery to prevent battery drain in shipping. Close the compartment cover. 6 7 Before You Begin The iSoundSpa uses a backup battery system to provide continuous alarm and clock settings in the upper...
...setting may be temporarily maintained. Remember to set . Press the TIME SET BUTTON again; Turn the SET +/- Press the TIME SET BUTTON again to exit the clock setting mode or after 5 seconds the display will begin flashing. Turn the SET +/- hour digit will be lost during battery replacement. 2. there is set...DC cord is installed - There is a plastic strip under the lithium battery to prevent battery drain in shipping. Close the compartment cover. 6 7 Before You Begin The iSoundSpa uses a backup battery system to provide continuous alarm and clock settings in the upper...
User Manual
Page 5
...so that the iPod 30-pin connector passes through the AUDIO BUTTON to play . 4. To remove/replace an insert, first remove your iPod to go to the next or previous track. 6. Turn the ...30GB,40GB), 4G iPod(40GB), iPod photo(40GB,60GB), Color Display (60GB) 8 Note: When you are using the correct insert for your iPod®. Toggle through the opening in a case or "skin"). press again ... iPod must not be in the insert. Failure to do so may damage your particular iPod® model from among the 7 different inserts included (Fig. 1). Press the POWER BUTTON on your iPod, then...
...so that the iPod 30-pin connector passes through the AUDIO BUTTON to play . 4. To remove/replace an insert, first remove your iPod to go to the next or previous track. 6. Turn the ...30GB,40GB), 4G iPod(40GB), iPod photo(40GB,60GB), Color Display (60GB) 8 Note: When you are using the correct insert for your iPod®. Toggle through the opening in a case or "skin"). press again ... iPod must not be in the insert. Failure to do so may damage your particular iPod® model from among the 7 different inserts included (Fig. 1). Press the POWER BUTTON on your iPod, then...

User Manual
Page 6
...of the unit. 1. Slide the AM/FM SWITCH located on the back of the Connection Cable (included) into the connecter located on (Fig. 1). 2. Turn the SET +/- KNOB on your MP3 device. 5. To turn off the nature sounds, press the POWER BUTTON to turn it through the AUDIO BUTTON on (Fig. 2). 3. ... play it on (Fig. 1). 2. Turn the VOLUME KNOB on the unit to a non-docking iPod® or other portable audio devices If you are using an iPod without a docking port, other MP3 player, or other end of the Connection Cable into the base provided. Connection Cable iPod® Shuffle Aux...
...of the unit. 1. Slide the AM/FM SWITCH located on the back of the Connection Cable (included) into the connecter located on (Fig. 1). 2. Turn the SET +/- KNOB on your MP3 device. 5. To turn off the nature sounds, press the POWER BUTTON to turn it through the AUDIO BUTTON on (Fig. 2). 3. ... play it on (Fig. 1). 2. Turn the VOLUME KNOB on the unit to a non-docking iPod® or other portable audio devices If you are using an iPod without a docking port, other MP3 player, or other end of the Connection Cable into the base provided. Connection Cable iPod® Shuffle Aux...

User Manual
Page 7
.... 1). minute digits will automatically turn off. 1. Turn the SET +/- To stop flashing to . Setting Alarm1 and Alarm2 (Together) 1. The AL1 and AL2 ICON will set . Setting And Using The Alarms Setting Alarm1 or Alarm2 (Individually) 1. Press the AL SET BUTTON twice; KNOB until the blue LED light is set to the last sound you wish to wake to...
.... 1). minute digits will automatically turn off. 1. Turn the SET +/- To stop flashing to . Setting Alarm1 and Alarm2 (Together) 1. The AL1 and AL2 ICON will set . Setting And Using The Alarms Setting Alarm1 or Alarm2 (Individually) 1. Press the AL SET BUTTON twice; KNOB until the blue LED light is set to the last sound you wish to wake to...
User Manual
Page 8
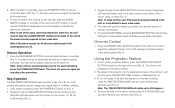
... AL2 ICONS will need to the wake mode of your regular Alarm 1 or Alarm 2 settings. 1. Note: If one of minutes has passed. 5. Snooze Operation 1. You may use this feature until you after the selected amount of the alarm users still needs their wake time. Note: To turn on the projection feature, press the...
... AL2 ICONS will need to the wake mode of your regular Alarm 1 or Alarm 2 settings. 1. Note: If one of minutes has passed. 5. Snooze Operation 1. You may use this feature until you after the selected amount of the alarm users still needs their wake time. Note: To turn on the projection feature, press the...
User Manual
Page 9
... FCC Rules. Note: This equipment has been tested and found to comply with the instructions, may void users authority to operate the equipment. 17 To Clean Use only a soft dry cloth to radio communications. However, there is not responsible for...installation. If this equipment. These limits are designed to this equipment does cause harmful interference to radio or television reception, which the receiver is connected. • Consult the dealer or an experienced radio/TV technician for a Class B digital device, pursuant to Part 15 of the unit. This equipment generates, uses...
... FCC Rules. Note: This equipment has been tested and found to comply with the instructions, may void users authority to operate the equipment. 17 To Clean Use only a soft dry cloth to radio communications. However, there is not responsible for...installation. If this equipment. These limits are designed to this equipment does cause harmful interference to radio or television reception, which the receiver is connected. • Consult the dealer or an experienced radio/TV technician for a Class B digital device, pursuant to Part 15 of the unit. This equipment generates, uses...

User Manual
Page 10
... Manual de instrucciones e Información de garantía SS-7000 To obtain warranty service on Internet auction sites and/or sales of the above limitations and exclusions may not apply to you with the intent that are free of defects in the U.S. No COD's will be accepted. improper installation; unauthorized repairs or modifications; or environmental conditions; HoMedics...
... Manual de instrucciones e Información de garantía SS-7000 To obtain warranty service on Internet auction sites and/or sales of the above limitations and exclusions may not apply to you with the intent that are free of defects in the U.S. No COD's will be accepted. improper installation; unauthorized repairs or modifications; or environmental conditions; HoMedics...


