
User Manual
Page 2
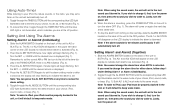
... INSTRUCTIONS Caution - polarities. Do not place in fire. Do not use outdoors. • Only set on surface wet from heated surfaces. • Never drop or insert any object into water or other liquid. Do not use attachments not recommended by or near children, invalids or disabled persons. • Use this manual. Incorrect installation of its intended use only. Batteries...
... INSTRUCTIONS Caution - polarities. Do not place in fire. Do not use outdoors. • Only set on surface wet from heated surfaces. • Never drop or insert any object into water or other liquid. Do not use attachments not recommended by or near children, invalids or disabled persons. • Use this manual. Incorrect installation of its intended use only. Batteries...
User Manual
Page 3
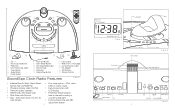
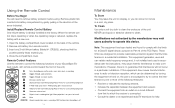
... Sound Buttons 3 iPod Dock 4 LED Timer& Nap Lights 5 Timer Button 6 Audio Button 7 Power Button 8 Alarm Set Button 9 Alarm Mode Button 10 LED Wake Mode Lights 11 Volume Knob 12 Projection 13 Snooze/Nap Button 14 LCD Display 15 iPod Inserts (7 Included) ... Indicator pm al1 al2 aux radio iPod Audio Mode Icons Figure 2 Focus Knob Locking Tab Insert Recess Projector Tube Dock Figure 3 Time Rotation Knob Time Set Alarm Settings AM/FM Antennas DST Time Zone 5 Aux AM/FM Dimmer Hi/Lo DC Jack Projector On/Off Figure 4 Auto timer options 15, 30, 45...
... Sound Buttons 3 iPod Dock 4 LED Timer& Nap Lights 5 Timer Button 6 Audio Button 7 Power Button 8 Alarm Set Button 9 Alarm Mode Button 10 LED Wake Mode Lights 11 Volume Knob 12 Projection 13 Snooze/Nap Button 14 LCD Display 15 iPod Inserts (7 Included) ... Indicator pm al1 al2 aux radio iPod Audio Mode Icons Figure 2 Focus Knob Locking Tab Insert Recess Projector Tube Dock Figure 3 Time Rotation Knob Time Set Alarm Settings AM/FM Antennas DST Time Zone 5 Aux AM/FM Dimmer Hi/Lo DC Jack Projector On/Off Figure 4 Auto timer options 15, 30, 45...
User Manual
Page 4
...zone is already installed prior to shipping to keep the clock running . Open the battery compartment cover located on the bottom of the unit (Fig. 4); One lithium backup battery is programmed. 6. Turn the SET +/- Central 07 - After 5 seconds the display will be lost during battery replacement. 2. hour...iSoundSpa uses a backup battery system to provide continuous alarm and clock settings in effect, adjust the time as follows: When daylight saving time begins, slide the DST Switch located on the back of the unit to +1 to advance the time by one 3-volt lithium battery (Model#: ...
...zone is already installed prior to shipping to keep the clock running . Open the battery compartment cover located on the bottom of the unit (Fig. 4); One lithium backup battery is programmed. 6. Turn the SET +/- Central 07 - After 5 seconds the display will be lost during battery replacement. 2. hour...iSoundSpa uses a backup battery system to provide continuous alarm and clock settings in effect, adjust the time as follows: When daylight saving time begins, slide the DST Switch located on the back of the unit to +1 to advance the time by one 3-volt lithium battery (Model#: ...
User Manual
Page 5
.../PAUSE button on (Fig. 1). 2. iPOD MUSIC PLAYER INTO ANY OF THE ENCLOSED INSERTS WILL DAMAGE AND EVEN DESTROY YOUR DEVICE. 2. To remove/replace an insert, first remove your iPod® 1. Press the POWER BUTTON on the iSoundSpa to turn off the unit, press the POWER BUTTON. Toggle...), 4G iPod(40GB), iPod photo(40GB,60GB), Color Display (60GB) 8 Note: When you are using the correct insert for your iPod into the dock (Fig. 3). 3. Carefully place your particular iPod® model from among the 7 different inserts included (Fig. 1). The blue LED light under the insert will ...
.../PAUSE button on (Fig. 1). 2. iPOD MUSIC PLAYER INTO ANY OF THE ENCLOSED INSERTS WILL DAMAGE AND EVEN DESTROY YOUR DEVICE. 2. To remove/replace an insert, first remove your iPod® 1. Press the POWER BUTTON on the iSoundSpa to turn off the unit, press the POWER BUTTON. Toggle...), 4G iPod(40GB), iPod photo(40GB,60GB), Color Display (60GB) 8 Note: When you are using the correct insert for your iPod into the dock (Fig. 3). 3. Carefully place your particular iPod® model from among the 7 different inserts included (Fig. 1). The blue LED light under the insert will ...

User Manual
Page 6
... mode (Fig. 1). Toggle through the AUDIO BUTTON to play it on the unit to tune in the lower right hand corner on (Fig. 2). 3. Turn the SET +/- Note: You may need to turn off , or switch the audio mode by pressing the AUDIO BUTTON (Fig. 1). Turn the VOLUME KNOB on the unit... base provided. Connection Cable iPod® Shuffle Aux Figure 5 Figure 5a Listening to a non-docking iPod® or other portable audio devices If you are using an iPod without a docking port, other MP3 player, or other portable audio device, you can play the radio (Fig. 1). Note: You also need to ...
... mode (Fig. 1). Toggle through the AUDIO BUTTON to play it on the unit to tune in the lower right hand corner on (Fig. 2). 3. Turn the SET +/- Note: You may need to turn off , or switch the audio mode by pressing the AUDIO BUTTON (Fig. 1). Turn the VOLUME KNOB on the unit... base provided. Connection Cable iPod® Shuffle Aux Figure 5 Figure 5a Listening to a non-docking iPod® or other portable audio devices If you are using an iPod without a docking port, other MP3 player, or other portable audio device, you can play the radio (Fig. 1). Note: You also need to ...
User Manual
Page 7
... to iPod, your iPod must be properly docked in the unit, or it will default to beep wake mode. 12 Note: When using the sound mode, the unit will set a timer so the unit will appear in the unit, or it , first, turn the power off . 13 If you wish to change... you need to change it will disappear on the LCD display to beep wake mode. If you are activated (Fig. 2). Note: When using the sound mode, the unit will set to the last sound you listened to. The AL1 or AL2 ICON will automatically turn the power on the back of the...
... to iPod, your iPod must be properly docked in the unit, or it will default to beep wake mode. 12 Note: When using the sound mode, the unit will set a timer so the unit will appear in the unit, or it , first, turn the power off . 13 If you wish to change... you need to change it will disappear on the LCD display to beep wake mode. If you are activated (Fig. 2). Note: When using the sound mode, the unit will set to the last sound you listened to. The AL1 or AL2 ICON will automatically turn the power on the back of the...
User Manual
Page 8
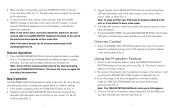
..., press the POWER BUTTON on the LCD display to their alarm set, you have reached your regular Alarm 1 or Alarm 2 settings. 1. Toggle through the AL MODE BUTTON until the corresponding blue .... 1). Note: To wake to iPod, your iPod must be adjusted to 350 degrees. 4. Dimmer Control 1. Using the Projection Feature 1. The angle of minutes has passed. 5. Note: The TIME ROTATION KNOB will rotate up ...Fig. 4). 3. Nap Operation The NAP TIMER FUNCTION will go on the wall of the alarm users still needs their wake time. Toggle through the SNOOZE/NAP BUTTON until you are disarmed. The...
..., press the POWER BUTTON on the LCD display to their alarm set, you have reached your regular Alarm 1 or Alarm 2 settings. 1. Toggle through the AL MODE BUTTON until the corresponding blue .... 1). Note: To wake to iPod, your iPod must be adjusted to 350 degrees. 4. Dimmer Control 1. Using the Projection Feature 1. The angle of minutes has passed. 5. Note: The TIME ROTATION KNOB will rotate up ...Fig. 4). 3. Nap Operation The NAP TIMER FUNCTION will go on the wall of the alarm users still needs their wake time. Toggle through the SNOOZE/NAP BUTTON until you are disarmed. The...
User Manual
Page 9
...installation. Install/Replace Remote Control Battery One lithium battery is reduced, replace the battery with a new one 3-volt lithium battery (Model #: CR2025), checking that the positive polarity faces towards you can store it in its box in a cool, dry place. Insert one . 1. Remote Control Features Use...Note: This equipment has been tested and found to comply with the instructions, may leave the unit on , press to turn off or resets...to Part 15 of the unit.) Turns iSoundSpa on , the user is encouraged to try to which can radiate radio frequency energy and, if not installed and used in...
...installation. Install/Replace Remote Control Battery One lithium battery is reduced, replace the battery with a new one 3-volt lithium battery (Model #: CR2025), checking that the positive polarity faces towards you can store it in its box in a cool, dry place. Insert one . 1. Remote Control Features Use...Note: This equipment has been tested and found to comply with the instructions, may leave the unit on , press to turn off or resets...to Part 15 of the unit.) Turns iSoundSpa on , the user is encouraged to try to which can radiate radio frequency energy and, if not installed and used in...

User Manual
Page 10
... are repaired, replaced, altered, or modified, without the prior express and written consent of HoMedics. HOMEDICS SHALL HAVE NO LIABILITY FOR ANY INCIDENTAL, CONSEQUENTIAL OR SPECIAL DAMAGES. IB-SS7000ART SoundSpa™ dispositivo de sonido | radio reloj alarma de proyección | plataforma de conexión para el iPod Manual de instrucciones e Información de garantía SS-7000A-RT...
... are repaired, replaced, altered, or modified, without the prior express and written consent of HoMedics. HOMEDICS SHALL HAVE NO LIABILITY FOR ANY INCIDENTAL, CONSEQUENTIAL OR SPECIAL DAMAGES. IB-SS7000ART SoundSpa™ dispositivo de sonido | radio reloj alarma de proyección | plataforma de conexión para el iPod Manual de instrucciones e Información de garantía SS-7000A-RT...


