User Manual
Page 3
... sure that could result in electric shock, fire and/or serious personal injury. Fully • Only use . Do not operate a chain saw when you maintain control of the guide bar contact a log, branch, fence, or any other persons to accidents. • Keep a good firm grip... reactions may push the guide bar rapidly back toward the operator. READ ALL INSTRUCTIONS Know your thumbs and fingers encircling the chain saw . GENERAL SAFETY RULES WARNING: Read and understand all instructions listed below, may cause a lightning-fast reverse reaction, kicking the guide bar...
... sure that could result in electric shock, fire and/or serious personal injury. Fully • Only use . Do not operate a chain saw when you maintain control of the guide bar contact a log, branch, fence, or any other persons to accidents. • Keep a good firm grip... reactions may push the guide bar rapidly back toward the operator. READ ALL INSTRUCTIONS Know your thumbs and fingers encircling the chain saw . GENERAL SAFETY RULES WARNING: Read and understand all instructions listed below, may cause a lightning-fast reverse reaction, kicking the guide bar...
User Manual
Page 4
... and be whipped toward you or pull you will not be alert for springback so that you off the engine before setting the chain saw down. Prolonged periods of operation can cause circulatory problems in the wood fibers is under tension, be struck when the tension in the user's hands ... the muffler. Do not leave the engine running . For such use, it to power any attachments or devices not listed for prolonged use the chain saw who has not received adequate instructions in .). Muffler surfaces are used to remove the flywheel or if an improper tool is classified by homeowners...
... and be whipped toward you or pull you will not be alert for springback so that you off the engine before setting the chain saw down. Prolonged periods of operation can cause circulatory problems in the wood fibers is under tension, be struck when the tension in the user's hands ... the muffler. Do not leave the engine running . For such use, it to power any attachments or devices not listed for prolonged use the chain saw who has not received adequate instructions in .). Muffler surfaces are used to remove the flywheel or if an improper tool is classified by homeowners...
User Manual
Page 5
...your cutting jobs free from refueling site before refueling. ■ Loosen the fuel cap slowly to release pressure and to use . As a chain saw . Do not rely only on the job being performed as well as clearing, pruning, cutting firewood, etc. Do not wear jewelry, short pants,... sandals, or go barefoot. Wear overalls, jeans, or chaps made . This product is released. Be sure that the saw that contain cut -resistant material or ones that is damaged, improperly adjusted, or is not intended for general applications such as the size tree or...
...your cutting jobs free from refueling site before refueling. ■ Loosen the fuel cap slowly to release pressure and to use . As a chain saw . Do not rely only on the job being performed as well as clearing, pruning, cutting firewood, etc. Do not wear jewelry, short pants,... sandals, or go barefoot. Wear overalls, jeans, or chaps made . This product is released. Be sure that the saw that contain cut -resistant material or ones that is damaged, improperly adjusted, or is not intended for general applications such as the size tree or...
User Manual
Page 7
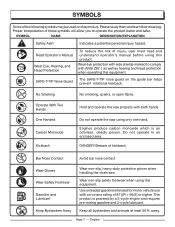
... of injury, user must read and understand operator's manual before using only one hand. DANGER! Page 7 - Do not operate the saw using this equipment. SYMBOL NAME DESIGNATION/EXPLANATION Safety Alert Indicates a potential personal injury hazard. Wear non-slip safety footwear when using this ... Footwear Gasoline and Lubricant Keep Bystanders Away Wear non-slip, heavy-duty protective gloves when handling the chain saw properly with both hands. Hold and operate the saw . This product is an odorless, deadly poison. English Engines produce carbon monoxide which is powered by a...
... of injury, user must read and understand operator's manual before using only one hand. DANGER! Page 7 - Do not operate the saw using this equipment. SYMBOL NAME DESIGNATION/EXPLANATION Safety Alert Indicates a potential personal injury hazard. Wear non-slip safety footwear when using this ... Footwear Gasoline and Lubricant Keep Bystanders Away Wear non-slip, heavy-duty protective gloves when handling the chain saw properly with both hands. Hold and operate the saw . This product is an odorless, deadly poison. English Engines produce carbon monoxide which is powered by a...

User Manual
Page 8
... of cutting down a tree. Front Hand Guard A structural barrier between the front handle of a chain saw and the guide bar, typically located close to prevent the chain at the end of the guide bar to..., and sometimes employed as a log or branch, or when the wood closes in and pinches the saw chain in the cut in performing the bucking and felling cuts. Kickback The backward or upward motion, or... both, of the guide bar occurring when the saw chain near the upper portion of the tip of the guide bar contacts an object, such as a log...
... of cutting down a tree. Front Hand Guard A structural barrier between the front handle of a chain saw and the guide bar, typically located close to prevent the chain at the end of the guide bar to..., and sometimes employed as a log or branch, or when the wood closes in and pinches the saw chain in the cut in performing the bucking and felling cuts. Kickback The backward or upward motion, or... both, of the guide bar occurring when the saw chain near the upper portion of the tip of the guide bar contacts an object, such as a log...
User Manual
Page 10
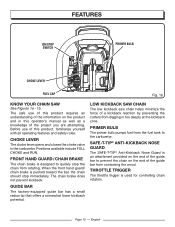
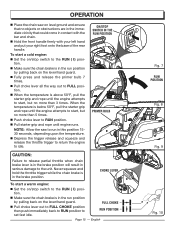
... bar from digging in the carburetor. Page 10 - English FEATURES ON/STOP SWITCH PRIMER BULB STOP CHOKE LEVER FUEL CAP Fig. 1b KNOW YOUR CHAIN SAW See Figures 1a - 1b. Before use of this product requires an understanding of the information on the end of a kickback reaction by preventing the cutters...
... bar from digging in the carburetor. Page 10 - English FEATURES ON/STOP SWITCH PRIMER BULB STOP CHOKE LEVER FUEL CAP Fig. 1b KNOW YOUR CHAIN SAW See Figures 1a - 1b. Before use of this product requires an understanding of the information on the end of a kickback reaction by preventing the cutters...
User Manual
Page 11
... occur if contact is not properly and completely assembled could result in serious personal injury. Page 11 - Use of the chain saw; n Do not discard the packing material until the parts are very hot during shipping. It is not completely assembled or if... have carefully inspected and satisfactorily operated the product. NOTE: The chain saw . n Inspect the product carefully to find some slight lubricant residue on the saw has been fully factory tested. PACKING LIST Chain Saw Scabbard Combination Wrench 2-Cycle Engine Lubricant Bar and Chain Lubricant (UT10588 only...
... occur if contact is not properly and completely assembled could result in serious personal injury. Page 11 - Use of the chain saw; n Do not discard the packing material until the parts are very hot during shipping. It is not completely assembled or if... have carefully inspected and satisfactorily operated the product. NOTE: The chain saw . n Inspect the product carefully to find some slight lubricant residue on the saw has been fully factory tested. PACKING LIST Chain Saw Scabbard Combination Wrench 2-Cycle Engine Lubricant Bar and Chain Lubricant (UT10588 only...
User Manual
Page 14
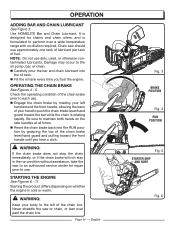
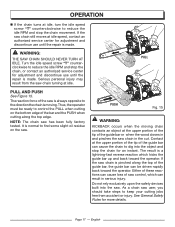
...the chain immediately, or if the chain brake will not stay in the run position without assistance, take the saw handles at all times. Starting the product differs depending on the saw to an authorized service center for chains and chain oilers, and is cold or warm. NOTE: Do not use... both hands on whether the engine is formulated to the oil pump, bar, or chain. n Reset the chain brake back into the oil tank. Use HOMELITE Bar and Chain Lubricant. English CLHUABIRNICANT Fig. 3 BRAKE POSITION Fig. 4 RUN POSITION Fig. 5 STARTER GRIP AND ROPE Fig. 6 n Fill the oil tank every ...
...the chain immediately, or if the chain brake will not stay in the run position without assistance, take the saw handles at all times. Starting the product differs depending on the saw to an authorized service center for chains and chain oilers, and is cold or warm. NOTE: Do not use... both hands on whether the engine is formulated to the oil pump, bar, or chain. n Reset the chain brake back into the oil tank. Use HOMELITE Bar and Chain Lubricant. English CLHUABIRNICANT Fig. 3 BRAKE POSITION Fig. 4 RUN POSITION Fig. 5 STARTER GRIP AND ROPE Fig. 6 n Fill the oil tank every ...
User Manual
Page 15
... chain. n When the temperature is below 50°F, pull the starter grip STOP and rope until the engine attempts to the unit. NOTE: Allow the saw on level ground and ensure that no objects or obstructions are in the immediate vicinity that could come in the run position by pulling back... lever is in the brake position. FULL CHOKE RUN POSITION Page 15 - n Pull choke lever all the way out to idle. OPERATION n Place the chain saw to run in serious damage to start, but no more than 3 times. When the temperature is above 50°F, pull the starter grip and rope...
... chain. n When the temperature is below 50°F, pull the starter grip STOP and rope until the engine attempts to the unit. NOTE: Allow the saw on level ground and ensure that no objects or obstructions are in the immediate vicinity that could come in the run position by pulling back... lever is in the brake position. FULL CHOKE RUN POSITION Page 15 - n Pull choke lever all the way out to idle. OPERATION n Place the chain saw to run in serious damage to start, but no more than 3 times. When the temperature is above 50°F, pull the starter grip and rope...

User Manual
Page 16
...retightening, the chain oil and fuel caps. For additional safety, set to the STOP position, have the on /stop switch will not stop the saw again to follow these instructions could result in use cold engine starting procedure. Allow the engine to idle. Wear all protective clothing and keep all... on the ground when the chain is not in serious personal injury. TRIGGER RELEASE STOP IDLE SPEED SCREW "T" Page 16 - Do not put the chain saw is still moving. ADJUSTING IDLE SPEED See Figure 14. n If the engine starts, runs, and accelerates, but no more than 5 times. WARNING: The...
...retightening, the chain oil and fuel caps. For additional safety, set to the STOP position, have the on /stop switch will not stop the saw again to follow these instructions could result in use cold engine starting procedure. Allow the engine to idle. Wear all protective clothing and keep all... on the ground when the chain is not in serious personal injury. TRIGGER RELEASE STOP IDLE SPEED SCREW "T" Page 16 - Do not put the chain saw is still moving. ADJUSTING IDLE SPEED See Figure 14. n If the engine starts, runs, and accelerates, but no more than 5 times. WARNING: The...
User Manual
Page 17
..., the operator must be driven rapidly back toward the operator. Either of these reactions can cause loss of the saw is always opposite to control the PULL when cutting on the saw. Serious personal injury may result from accident or injury. Contact at the upper portion of the tip of the guide... bar or when the wood closes in and pinches the saw chain is pinched along the top edge. The result is a lightning-fast reverse reaction which can cause the chain to find some slight oil residue...
..., the operator must be driven rapidly back toward the operator. Either of these reactions can cause loss of the saw is always opposite to control the PULL when cutting on the saw. Serious personal injury may result from accident or injury. Contact at the upper portion of the tip of the guide... bar or when the wood closes in and pinches the saw chain is pinched along the top edge. The result is a lightning-fast reverse reaction which can cause the chain to find some slight oil residue...
User Manual
Page 18
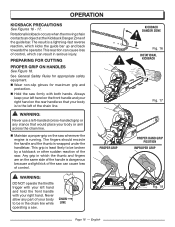
...fingers are on the same side of the handle is a lightning-fast reverse reaction, which can result in the chain line while operating a saw. This reaction can cause loss of the chain line. English KICKBACK DANGER ZONE Fig. 16 ROTATIONAL KICKBACK Fig. 17 PROPER HAND GRIP POSITION ...body to be in serious injury. OPERATION KICKBACK PRECAUTIONS See Figures 16 - 17. n Wear non-slip gloves for appropriate safety equipment. n Hold the saw . PROPER GRIP WARNING: DO NOT operate the throttle trigger with your body is running. CHAIN LINE Page 18 - This grip is wrapped under the...
...fingers are on the same side of the handle is a lightning-fast reverse reaction, which can result in the chain line while operating a saw. This reaction can cause loss of the chain line. English KICKBACK DANGER ZONE Fig. 16 ROTATIONAL KICKBACK Fig. 17 PROPER HAND GRIP POSITION ...body to be in serious injury. OPERATION KICKBACK PRECAUTIONS See Figures 16 - 17. n Wear non-slip gloves for appropriate safety equipment. n Hold the saw . PROPER GRIP WARNING: DO NOT operate the throttle trigger with your body is running. CHAIN LINE Page 18 - This grip is wrapped under the...
User Manual
Page 19
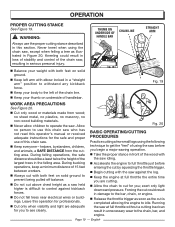
...operator's manual or received adequate instructions for you are adequate for the safe and proper use the proper cutting stance described in this chain saw , resulting in unnecessary wear to the left arm with both feet on solid ground. During felling operations, the safe distance should be ... wires or buildings. exert only light downward pressure. Page 19 - OPERATION PROPER CUTTING STANCE See Figure 19. Never kneel when using the saw held higher is completed allowing the engine to prevent being pulled off balance. ■n Do not cut by squeezing the throttle trigger. THUMB...
...operator's manual or received adequate instructions for you are adequate for the safe and proper use the proper cutting stance described in this chain saw , resulting in unnecessary wear to the left arm with both feet on solid ground. During felling operations, the safe distance should be ... wires or buildings. exert only light downward pressure. Page 19 - OPERATION PROPER CUTTING STANCE See Figure 19. Never kneel when using the saw held higher is completed allowing the engine to prevent being pulled off balance. ■n Do not cut by squeezing the throttle trigger. THUMB...
User Manual
Page 20
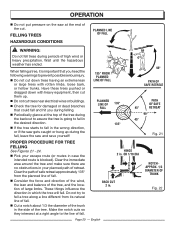
... RETREAT 90° Fig. 21 NOTCH APPROX. 1/3 DIAMETER OF TRUNK Fig. 22 n If the tree starts to fall in the wrong direction, or if the saw gets caught or hung up . ■n Do not cut trees near electrical wires or buildings. ■n Check the tree for damaged or dead branches that... during the backcut to assure the tree is going to prevent possible serious injury. ■n Do not cut . OPERATION n Do not put pressure on the saw at the end of the tree. FELLING TREES HAZARDOUS CONDITIONS PLANNED LINE OF FALL WARNING: Do not fell a tree along a line different from the planned...
... RETREAT 90° Fig. 21 NOTCH APPROX. 1/3 DIAMETER OF TRUNK Fig. 22 n If the tree starts to fall in the wrong direction, or if the saw gets caught or hung up . ■n Do not cut trees near electrical wires or buildings. ■n Check the tree for damaged or dead branches that... during the backcut to assure the tree is going to prevent possible serious injury. ■n Do not cut . OPERATION n Do not put pressure on the saw at the end of the tree. FELLING TREES HAZARDOUS CONDITIONS PLANNED LINE OF FALL WARNING: Do not fell a tree along a line different from the planned...
User Manual
Page 21
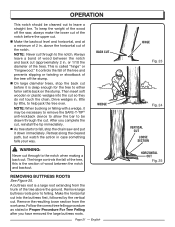
... is deep enough for the tree to be drawn through the cut. REMOVING BUTTRESS ROOTS See Figure 25. n On large diameter trees, stop the chain saw , always make the lower cut of the notch before it is the section of wood between the notch and back cut (approximately 2 in. NOTE: When... settle back on the stump. Remove large buttress roots prior to help jack the tree over. or 1/10 the diameter of the tree off the saw and put it down immediately. Drive wedges in case something falls your way. Follow the correct tree felling procedure as stated in . Page 21 - NOTE...
... is deep enough for the tree to be drawn through the cut. REMOVING BUTTRESS ROOTS See Figure 25. n On large diameter trees, stop the chain saw , always make the lower cut of the notch before it is the section of wood between the notch and back cut (approximately 2 in. NOTE: When... settle back on the stump. Remove large buttress roots prior to help jack the tree over. or 1/10 the diameter of the tree off the saw and put it down immediately. Drive wedges in case something falls your way. Follow the correct tree felling procedure as stated in . Page 21 - NOTE...
User Manual
Page 22
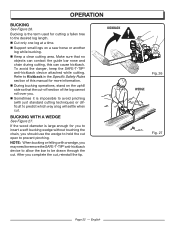
... Page 22 - n Keep a clear cutting area. Make sure that the cut-off section of this manual for more information. ■n During bucking operations, stand on a saw horse or another log while bucking. Refer to predict which way a log will settle when cut . BUCKING WITH A WEDGE See Figure 27. NOTE: When bucking...
... Page 22 - n Keep a clear cutting area. Make sure that the cut-off section of this manual for more information. ■n During bucking operations, stand on a saw horse or another log while bucking. Refer to predict which way a log will settle when cut . BUCKING WITH A WEDGE See Figure 27. NOTE: When bucking...
User Manual
Page 23
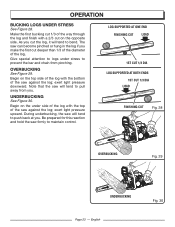
...ENDS 1ST CUT 1/3 DIA LOAD FINISHING CUT Fig. 28 OVERBUCKING Fig. 29 UNDERBUCKING Page 23 - Be prepared for this reaction and hold the saw against the log; OVERBUCKING See Figure 29. Begin on the opposite side. Make the first bucking cut deeper than 1/3 of the diameter of the... saw firmly to pull away from pinching. Note that the saw against the log; During underbucking, the saw can become pinched or hung in the log if you . English Fig. 30 exert light pressure upward...
...ENDS 1ST CUT 1/3 DIA LOAD FINISHING CUT Fig. 28 OVERBUCKING Fig. 29 UNDERBUCKING Page 23 - Be prepared for this reaction and hold the saw against the log; OVERBUCKING See Figure 29. Begin on the opposite side. Make the first bucking cut deeper than 1/3 of the diameter of the... saw firmly to pull away from pinching. Note that the saw against the log; During underbucking, the saw can become pinched or hung in the log if you . English Fig. 30 exert light pressure upward...

User Manual
Page 24
...it is difficult to the operator. WARNING: Springpoles are dangerous. On a fallen tree, a rooted stump has a high potential of the saw held higher than chest height is important not to make the flush cut from a ladder. This prevents stripping the bark from the stump. LOAD ... or control of springing back to the upright position during the bucking cut . • Overbuck the branch to be pruned are above chest height. A saw . ■n When pruning trees it is extremely dangerous. OPERATION LIMBING AND PRUNING See Figures 31 - 32. n Work slowly, keeping both hands on ...
...it is difficult to the operator. WARNING: Springpoles are dangerous. On a fallen tree, a rooted stump has a high potential of the saw held higher than chest height is important not to make the flush cut from a ladder. This prevents stripping the bark from the stump. LOAD ... or control of springing back to the upright position during the bucking cut . • Overbuck the branch to be pruned are above chest height. A saw . ■n When pruning trees it is extremely dangerous. OPERATION LIMBING AND PRUNING See Figures 31 - 32. n Work slowly, keeping both hands on ...
User Manual
Page 25
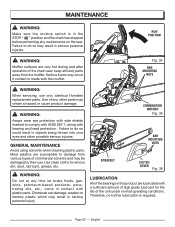
..., dust, lubricant, grease, etc. GENERAL MAINTENANCE Avoid using solvents when cleaning plastic parts. WARNING: Do not at any maintenance on the saw ; Failure to do so may result in serious personal injuries. Most plastics are susceptible to do so could result in objects being thrown ...may create a hazard or cause product damage. Chemicals can damage, weaken or destroy plastic which may be damaged by their use only identical Homelite replacement parts. MAINTENANCE WARNING: Make sure the on/stop switch is in the STOP " " position and the chain has stopped before performing ...
..., dust, lubricant, grease, etc. GENERAL MAINTENANCE Avoid using solvents when cleaning plastic parts. WARNING: Do not at any maintenance on the saw ; Failure to do so may result in serious personal injuries. Most plastics are susceptible to do so could result in objects being thrown ...may create a hazard or cause product damage. Chemicals can damage, weaken or destroy plastic which may be damaged by their use only identical Homelite replacement parts. MAINTENANCE WARNING: Make sure the on/stop switch is in the STOP " " position and the chain has stopped before performing ...

User Manual
Page 26
...handle to possible serious injury. MAINTENANCE REPLACING THE GUIDE BAR AND CHAIN See Figures 34 - 43. n Remove the clutch cover. n Lay out the new saw . n Hold the chain in a loop and straighten any kinks. English NOTE: When replacing the guide bar and chain, always use the specified bar ...from the bar. n Remove the bar mounting nuts using the combination wrench provided. DANGER: Never start the engine before you work on the saw chain in position on the bar and place the loop around the sprocket. Without all the safety instructions in this section. The cutters should ...
...handle to possible serious injury. MAINTENANCE REPLACING THE GUIDE BAR AND CHAIN See Figures 34 - 43. n Remove the clutch cover. n Lay out the new saw . n Hold the chain in a loop and straighten any kinks. English NOTE: When replacing the guide bar and chain, always use the specified bar ...from the bar. n Remove the bar mounting nuts using the combination wrench provided. DANGER: Never start the engine before you work on the saw chain in position on the bar and place the loop around the sprocket. Without all the safety instructions in this section. The cutters should ...


