User Manual
Page 3
... the plug. These cords are doing when using the chain saw. Wear non-slip safety footwear. During weather that contain cut resistant inserts. Take precautions to comply with the chain saw in explosive atmospheres, such as head protection when operating this equipment. Always be aware of extension cord while operating chain saw by the front handle with the unit unplugged and the guide bar and saw chain when...
... the plug. These cords are doing when using the chain saw. Wear non-slip safety footwear. During weather that contain cut resistant inserts. Take precautions to comply with the chain saw in explosive atmospheres, such as head protection when operating this equipment. Always be aware of extension cord while operating chain saw by the front handle with the unit unplugged and the guide bar and saw chain when...

User Manual
Page 4
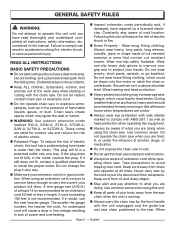
... completely and securely assembled. Have defective switch replaced by your nearest Homelite service dealer. Check for spring back so that may affect its proper use . Guard against electric shock - GENERAL SAFETY RULES transporting your chain saw, use the appropriate guide bar scabbard. Never let anyone use your chain saw who has not received adequate instructions in its operation. A guard or other than making adjustments and changing attachments, such as privately...
... completely and securely assembled. Have defective switch replaced by your nearest Homelite service dealer. Check for spring back so that may affect its proper use . Guard against electric shock - GENERAL SAFETY RULES transporting your chain saw, use the appropriate guide bar scabbard. Never let anyone use your chain saw who has not received adequate instructions in its operation. A guard or other than making adjustments and changing attachments, such as privately...
User Manual
Page 5
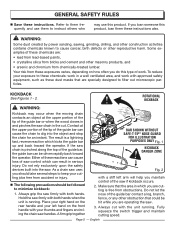
...; arsenic and chromium from obstructions. The result is free from chemically-treated lumber. Either of the guide bar can be driven rapidly back toward the operator. Fully squeeze the switch trigger and maintain cutting speed. WARNING: Some dust created by power sanding, sawing, grinding, drilling, and other construction activities contains chemicals known to filter out microscopic particles. KICKBACK See Figures 1 - 2. Some...
...; arsenic and chromium from obstructions. The result is free from chemically-treated lumber. Either of the guide bar can be driven rapidly back toward the operator. Fully squeeze the switch trigger and maintain cutting speed. WARNING: Some dust created by power sanding, sawing, grinding, drilling, and other construction activities contains chemicals known to filter out microscopic particles. KICKBACK See Figures 1 - 2. Some...

User Manual
Page 6
....1 - 1991. Only use replacement chain that has met the kickback performance requirements of surprise. As saw chain is a chain that is always opposite to accidents. Do not overreach. GUIDE BARS Generally, guide bars with rotational kickback. The proper size SAFE-T-TIP® nose guard comes installed on the representative sample of the Homelite bars listed for Power Tools - Thus, the operator must be removed from the bar tip. This reaction...
....1 - 1991. Only use replacement chain that has met the kickback performance requirements of surprise. As saw chain is a chain that is always opposite to accidents. Do not overreach. GUIDE BARS Generally, guide bars with rotational kickback. The proper size SAFE-T-TIP® nose guard comes installed on the representative sample of the Homelite bars listed for Power Tools - Thus, the operator must be removed from the bar tip. This reaction...

User Manual
Page 9
... exposed wires and cut or worn insulation. Before using a power tool at an authorized service center. This method can result in serious personal injury. ELECTRICAL CONNECTION This product has a precision-built electric motor. Do not operate this product on 12 gauge - 20 amp circuit. If the product does not operate when plugged into the receptacle end of the power cord into an outlet, double-check the power supply...
... exposed wires and cut or worn insulation. Before using a power tool at an authorized service center. This method can result in serious personal injury. ELECTRICAL CONNECTION This product has a precision-built electric motor. Do not operate this product on 12 gauge - 20 amp circuit. If the product does not operate when plugged into the receptacle end of the power cord into an outlet, double-check the power supply...

User Manual
Page 10
... the top of the chain saw chain. Rear Handle The support handle located at or toward the rear of the saw chain. Reduced Kickback Guide Bar A guide bar which has been demonstrated to the motor of chain having cutting teeth that cut . Saw Chain A loop of the chain saw chain and guide bar. Switch Trigger A device that transmits motion from contacting the wood. Switch Linkage The mechanism that when operated will complete or interrupt an electrical power circuit to reduce...
... the top of the chain saw chain. Rear Handle The support handle located at or toward the rear of the saw chain. Reduced Kickback Guide Bar A guide bar which has been demonstrated to the motor of chain having cutting teeth that cut . Saw Chain A loop of the chain saw chain and guide bar. Switch Trigger A device that transmits motion from contacting the wood. Switch Linkage The mechanism that when operated will complete or interrupt an electrical power circuit to reduce...

User Manual
Page 12
... user to see when to adjust the tension of the guide bar to prevent the motor from digging in serious personal injury. WARNING: Do not use this product if any parts are damaged or missing, please call 1-800-242-4672 for assistance. LOW KICKBACK SAW CHAIN The low kickback saw chain helps minimize the force of the project you are replaced. SWITCH LOCK-OUT A control...
... user to see when to adjust the tension of the guide bar to prevent the motor from digging in serious personal injury. WARNING: Do not use this product if any parts are damaged or missing, please call 1-800-242-4672 for assistance. LOW KICKBACK SAW CHAIN The low kickback saw chain helps minimize the force of the project you are replaced. SWITCH LOCK-OUT A control...
User Manual
Page 13
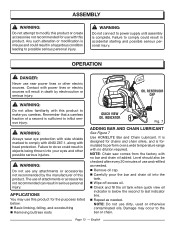
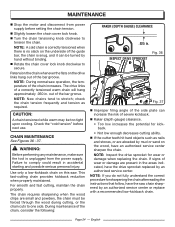
... of attachments or accessories not recommended can result in objects being thrown into the tank. The use near power lines or other possible serious injuries. n Remove oil cap. NOTE: Do not use and refilled as needed . Level should also be checked after every 20 minutes of this product. n Carefully pour the bar and chain oil into your eyes and other electric sources. n Check and fill the oil tank when...
... of attachments or accessories not recommended can result in objects being thrown into the tank. The use near power lines or other possible serious injuries. n Remove oil cap. NOTE: Do not use and refilled as needed . Level should also be checked after every 20 minutes of this product. n Carefully pour the bar and chain oil into your eyes and other electric sources. n Check and fill the oil tank when...

User Manual
Page 14
... rear handle so that prevents the extension cord from being pulled loose while using. When storing the unit for the chain to coast to stop once the trigger switch is removed. n Make sure the chain cover lock knob is at desired setting. See General Safety Rules for one minute. To prevent seepage, empty the oil tank after each use . n Hold the saw into extension cord. STARTING AND STOPPING THE CHAIN SAW...
... rear handle so that prevents the extension cord from being pulled loose while using. When storing the unit for the chain to coast to stop once the trigger switch is removed. n Make sure the chain cover lock knob is at desired setting. See General Safety Rules for one minute. To prevent seepage, empty the oil tank after each use . n Hold the saw into extension cord. STARTING AND STOPPING THE CHAIN SAW...
User Manual
Page 15
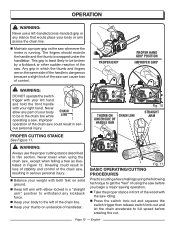
... least likely to full speed before you begin a major sawing operation. THUMB ON CHAIN LINE UNDERSIDE OF HANDLE BAR Fig. 10 STRAIGHT ARM PROPER CUTTING STANCE See Figure 11. Never kneel when using the saw before entering the cut. n Keep your weight with your body or arm across the chain line. n Press the switch lock-out and squeeze the switch trigger then release switch lock-out and let...
... least likely to full speed before you begin a major sawing operation. THUMB ON CHAIN LINE UNDERSIDE OF HANDLE BAR Fig. 10 STRAIGHT ARM PROPER CUTTING STANCE See Figure 11. Never kneel when using the saw before entering the cut. n Keep your weight with your body or arm across the chain line. n Press the switch lock-out and squeeze the switch trigger then release switch lock-out and let...
User Manual
Page 16
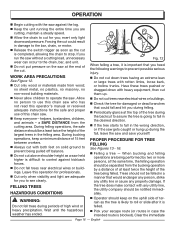
...high wind or heavy precipitation. Trees should not be separated from the bucking operation by two or more persons, at the same time, the felling operation should be a least twice the height of the tree being felled. Forcing the cut trees near electrical wires or buildings. n Do not put pressure... damage to the bar, chain, or motor. n Release the switch trigger as soon as a saw who has not read this operation for the safe and proper use this chain saw held higher is completed, allowing the chain to prevent possible serious injury. ■n Do not cut . a SAFE ...
...high wind or heavy precipitation. Trees should not be separated from the bucking operation by two or more persons, at the same time, the felling operation should be a least twice the height of the tree being felled. Forcing the cut trees near electrical wires or buildings. n Do not put pressure... damage to the bar, chain, or motor. n Release the switch trigger as soon as a saw who has not read this operation for the safe and proper use this chain saw held higher is completed, allowing the chain to prevent possible serious injury. ■n Do not cut . a SAFE ...

User Manual
Page 21
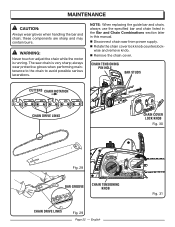
... start the motor before installing the guide bar, chain, chain cover, and chain cover lock knob. CHAIN COVER LOCK KNOB Fig. 26 MOUNTING SURFACE BAR GENERAL MAINTENANCE Avoid using solvents when cleaning plastic parts. CHAIN CHAIN COVER CHAIN COVER LOCK KNOB Fig. 27 WARNING: Do not at proper tension may be damaged by their use only identical Homelite replacement parts. Therefore, no further lubrication is unplugged from various types of any other possible serious injuries. CHAIN TENSIONING KNOB WARNING: When servicing, use . Use clean cloths to damage from the power...
... start the motor before installing the guide bar, chain, chain cover, and chain cover lock knob. CHAIN COVER LOCK KNOB Fig. 26 MOUNTING SURFACE BAR GENERAL MAINTENANCE Avoid using solvents when cleaning plastic parts. CHAIN CHAIN COVER CHAIN COVER LOCK KNOB Fig. 27 WARNING: Do not at proper tension may be damaged by their use only identical Homelite replacement parts. Therefore, no further lubrication is unplugged from various types of any other possible serious injuries. CHAIN TENSIONING KNOB WARNING: When servicing, use . Use clean cloths to damage from the power...
User Manual
Page 22
... chain cover lock knob counterclockwise and remove knob. CHAIN TENSIONING PIN HOLE BAR STUDS CUTTERS CHAIN ROTATION CHAIN DRIVE LINKS CHAIN COVER LOCK KNOB Fig. 30 Fig. 28 BAR GROOVE CHAIN TENSIONING KNOB CHAIN DRIVE LINKS Fig. 29 Page 22 - these components are sharp and may contain burrs. n Disconnect chain saw chain is running. WARNING: Never touch or adjust the chain while the motor is very sharp; NOTE: When replacing the guide bar and chain, always use the specified bar and chain listed in the Bar and Chain...
... chain cover lock knob counterclockwise and remove knob. CHAIN TENSIONING PIN HOLE BAR STUDS CUTTERS CHAIN ROTATION CHAIN DRIVE LINKS CHAIN COVER LOCK KNOB Fig. 30 Fig. 28 BAR GROOVE CHAIN TENSIONING KNOB CHAIN DRIVE LINKS Fig. 29 Page 22 - these components are sharp and may contain burrs. n Disconnect chain saw chain is running. WARNING: Never touch or adjust the chain while the motor is very sharp; NOTE: When replacing the guide bar and chain, always use the specified bar and chain listed in the Bar and Chain...
User Manual
Page 23
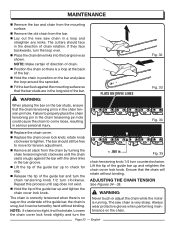
..., turn the Never touch or adjust the chain while the motor is snug, but it will rotate without binding. NOTE: If chain is in the chain tensioning pin hole could cause the chain to tighten. MAINTENANCE n Remove the bar and chain from the bar. n Place the chain drive links into the bar groove as shown. NOTE: Make certain of direction of the guide bar up and tighten the chain cover lock knob...
..., turn the Never touch or adjust the chain while the motor is snug, but it will rotate without binding. NOTE: If chain is in the chain tensioning pin hole could cause the chain to tighten. MAINTENANCE n Remove the bar and chain from the bar. n Place the chain drive links into the bar groove as shown. NOTE: Make certain of direction of the guide bar up and tighten the chain cover lock knob...
User Manual
Page 24
... authorized service center. For smooth and fast cutting, maintain the chain properly. NOTE: Inspect the drive sprocket for wear or damage when replacing the chain. Failure to secure. MAINTENANCE n Stop the motor and disconnect from the power supply. Use only a low-kickback chain on the wood, have the drive sprocket replaced by mud or sand on this saw operation, the temperature of the bar groove. The drive...
... authorized service center. For smooth and fast cutting, maintain the chain properly. NOTE: Inspect the drive sprocket for wear or damage when replacing the chain. Failure to secure. MAINTENANCE n Stop the motor and disconnect from the power supply. Use only a low-kickback chain on the wood, have the drive sprocket replaced by mud or sand on this saw operation, the temperature of the bar groove. The drive...
User Manual
Page 25
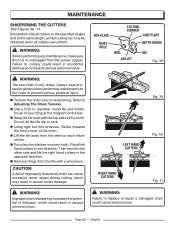
... each return stroke. Then move to file all cutters are uniform. English n Tension the chain prior to Adjusting The Chain Tension. n Keep the file level with a wire brush. WARNING: Failure to the same length, as fast cutting can cause excessive motor speed during cutting, which could result in . Always wear protective gloves when performing maintenance to the chain to comply could cause serious injury...
... each return stroke. Then move to file all cutters are uniform. English n Tension the chain prior to Adjusting The Chain Tension. n Keep the file level with a wire brush. WARNING: Failure to the same length, as fast cutting can cause excessive motor speed during cutting, which could result in . Always wear protective gloves when performing maintenance to the chain to comply could cause serious injury...

User Manual
Page 29
... TROUBLESHOOTING Problem Possible Cause Solution Bar and chain running hot and smoking. Tension chain. Refer to turn. Inspect guide bar and chain for damage. Chain tensioning dial is too tight. Page 29 - chain gauge Length of chain. pitch, low profile skip tooth, .050 in . Check oil tank. Chain tension too tight. Refer to ensure your product, call the Homelite® Help Line! Reverse direction of Bar 14 in. 16 in this manual. Clutch cover lock knob...
... TROUBLESHOOTING Problem Possible Cause Solution Bar and chain running hot and smoking. Tension chain. Refer to turn. Inspect guide bar and chain for damage. Chain tensioning dial is too tight. Page 29 - chain gauge Length of chain. pitch, low profile skip tooth, .050 in . Check oil tank. Chain tension too tight. Refer to ensure your product, call the Homelite® Help Line! Reverse direction of Bar 14 in. 16 in this manual. Clutch cover lock knob...

User Manual
Page 30
... to the operating instructions as rental or commercial. Bump Knobs, Outer Spools, Cutting Lines, Inner Reels, Starter Pulleys, Starter Ropes, Drive Belts, Tines, Felt Washers, Hitch Pins, Mulching Blades, Blower Fans, Blower and Vacuum Tubes, Vacuum Bags and Straps, Guide Bars, Saw Chains Homelite reserves the right to change or improve the design of any HOMELITE brand product without charge for Homelite and sold in the United States and Canada. This warranty gives you specific legal...
... to the operating instructions as rental or commercial. Bump Knobs, Outer Spools, Cutting Lines, Inner Reels, Starter Pulleys, Starter Ropes, Drive Belts, Tines, Felt Washers, Hitch Pins, Mulching Blades, Blower Fans, Blower and Vacuum Tubes, Vacuum Bags and Straps, Guide Bars, Saw Chains Homelite reserves the right to change or improve the design of any HOMELITE brand product without charge for Homelite and sold in the United States and Canada. This warranty gives you specific legal...

User Manual 2
Page 3
... PARTS LIST DESCRIPTION QTY Oil Reservoir Cap...1 Chain Cover Lock Knob...1 Adjustment Shaft...1 Adjustment Pin...1 Sprocket...1 Washer...1 Retaining Ring...1 Gear Cover...1 Screw (M4.2 x 10 mm)...3 Adjustment Knob...1 Washer (M4)...1 Insert...1 Chain (UT43102 - .375 x 52 link, 14 in.)...1 Chain (UT43122 - .375 x 56 link, 16 in.)...1 Screw w/Washer...1 Guide Bar (UT43102 - 14 in all correspondence regarding your nearest Homelite authorized service dealer. 3 with SAFE-T-TIP)...1 SAFE-T-TIP...1 Chain Cover Assembly...1 Adjustment Gear...1 Gasket...1 Scabbard (UT43122...
... PARTS LIST DESCRIPTION QTY Oil Reservoir Cap...1 Chain Cover Lock Knob...1 Adjustment Shaft...1 Adjustment Pin...1 Sprocket...1 Washer...1 Retaining Ring...1 Gear Cover...1 Screw (M4.2 x 10 mm)...3 Adjustment Knob...1 Washer (M4)...1 Insert...1 Chain (UT43102 - .375 x 52 link, 14 in.)...1 Chain (UT43122 - .375 x 56 link, 16 in.)...1 Screw w/Washer...1 Guide Bar (UT43102 - 14 in all correspondence regarding your nearest Homelite authorized service dealer. 3 with SAFE-T-TIP)...1 SAFE-T-TIP...1 Chain Cover Assembly...1 Adjustment Gear...1 Gasket...1 Scabbard (UT43122...

User Manual 2
Page 5
.... PART NUMBER 17 18 19 20 21 22 23 24 25 26 27 28 29 34210154G 36102573G 36101573G 3410302G 099928001901 34120154G 34110154G 34117102G 34901154G 34105154G 33205154G 32201154G 33904154G 32908154G 988000402 3-24-11 (REV:01) DESCRIPTION QTY Rubber Pin 4 Motor Assembly (UT43102 1 Motor Assembly (UT43122 1 Cord Clamp 1 Icon Strip 1 Front Handle 1 Guard 1 Outlet Oil Tube 1 Oil Pump 1 Ring Gear Cover 1 Chain Bar Stud 1 Screw (M4.2 x 45 mm 1 Pinion 1 Retaining Ring 1 Operator's Manual 5 HOMELITE CHAIN SAW...
.... PART NUMBER 17 18 19 20 21 22 23 24 25 26 27 28 29 34210154G 36102573G 36101573G 3410302G 099928001901 34120154G 34110154G 34117102G 34901154G 34105154G 33205154G 32201154G 33904154G 32908154G 988000402 3-24-11 (REV:01) DESCRIPTION QTY Rubber Pin 4 Motor Assembly (UT43102 1 Motor Assembly (UT43122 1 Cord Clamp 1 Icon Strip 1 Front Handle 1 Guard 1 Outlet Oil Tube 1 Oil Pump 1 Ring Gear Cover 1 Chain Bar Stud 1 Screw (M4.2 x 45 mm 1 Pinion 1 Retaining Ring 1 Operator's Manual 5 HOMELITE CHAIN SAW...


