
User Guide
Page 17
... terminal and communications settings. Report damage immediately to the carrier who delivered the carton. • Make sure the items in this guide. Honeywell barcode imagers are also included. Unpacking the Imager After you need to an option indicates the default setting. Product specifications, dimensions, warranty, and customer support information are factory programmed for later storage or shipping. 1 - 1 1 Getting Started About This Manual This User's Guide provides installation and programming instructions for damage...
... terminal and communications settings. Report damage immediately to the carrier who delivered the carton. • Make sure the items in this guide. Honeywell barcode imagers are also included. Unpacking the Imager After you need to an option indicates the default setting. Product specifications, dimensions, warranty, and customer support information are factory programmed for later storage or shipping. 1 - 1 1 Getting Started About This Manual This User's Guide provides installation and programming instructions for damage...
User Guide
Page 20
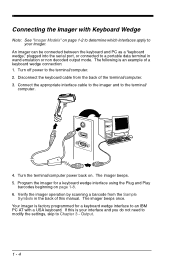
... is factory programmed for a keyboard wedge interface using the Plug and Play barcodes beginning on . Verify the imager operation by scanning a barcode from the back of the terminal/computer. 3. Disconnect the keyboard cable from the Sample Symbols in wand emulation or non decoded output mode. The imager beeps. 5. An imager can be connected between the keyboard and PC as a "keyboard wedge," plugged into the serial port, or connected to the terminal/computer. 2. The imager beeps once. Connect the appropriate interface cable...
... is factory programmed for a keyboard wedge interface using the Plug and Play barcodes beginning on . Verify the imager operation by scanning a barcode from the back of the terminal/computer. 3. Disconnect the keyboard cable from the Sample Symbols in wand emulation or non decoded output mode. The imager beeps. 5. An imager can be connected between the keyboard and PC as a "keyboard wedge," plugged into the serial port, or connected to the terminal/computer. 2. The imager beeps once. Connect the appropriate interface cable...
User Guide
Page 21
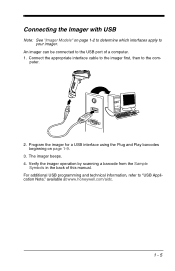
puter. 2. Verify the imager operation by scanning a barcode from the Sample Symbols in the back of a computer. 1. Connect the appropriate interface cable to the imager first, then to the USB port of this manual. An imager can be connected to the com- The imager beeps. 4. Connecting the Imager with USB Note: See "Imager Models" on page 1-9. 3. For additional USB programming and technical information, refer to your imager. Program the imager for a USB interface using the Plug and Play barcodes beginning on page 1-2 to...
puter. 2. Verify the imager operation by scanning a barcode from the Sample Symbols in the back of a computer. 1. Connect the appropriate interface cable to the imager first, then to the USB port of this manual. An imager can be connected to the com- The imager beeps. 4. Connecting the Imager with USB Note: See "Imager Models" on page 1-9. 3. For additional USB programming and technical information, refer to your imager. Program the imager for a USB interface using the Plug and Play barcodes beginning on page 1-2 to...
User Guide
Page 24
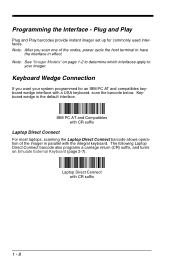
... "Imager Models" on Emulate External Keyboard (page 2-7). Keyboard wedge is the default interface. Plug and Play Plug and Play barcodes provide instant imager set up for an IBM PC AT and compatibles keyboard wedge interface with CR suffix Laptop Direct Connect For most laptops, scanning the Laptop Direct Connect barcode allows operation of the codes, power cycle the host terminal to your system programmed for commonly used interfaces. IBM PC AT and Compatibles with a USA keyboard, scan the barcode below. Programming...
... "Imager Models" on Emulate External Keyboard (page 2-7). Keyboard wedge is the default interface. Plug and Play Plug and Play barcodes provide instant imager set up for an IBM PC AT and compatibles keyboard wedge interface with CR suffix Laptop Direct Connect For most laptops, scanning the Laptop Direct Connect barcode allows operation of the codes, power cycle the host terminal to your system programmed for commonly used interfaces. IBM PC AT and Compatibles with a USA keyboard, scan the barcode below. Programming...

User Guide
Page 28
Serial Wedge Data Transmission Port Using the following "Plug and Play" codes to program the imager for IBM 4683 Port 5B, 9B, or 17. Scan one of the following barcodes, set the port to which interfaces apply to transmit. IBM 4683 Port 5B Interface IBM 4683 Port 17 Interface IBM 4683 Port 9B HHBCR-1 Interface 1 - 12 Default = P1. * P1 P2 Both P1 and P2 IBM 4683 Ports 5B, 9B, and 17 Connection Note: See "Imager Models" on page 1-2 to determine which you...
Serial Wedge Data Transmission Port Using the following "Plug and Play" codes to program the imager for IBM 4683 Port 5B, 9B, or 17. Scan one of the following barcodes, set the port to which interfaces apply to transmit. IBM 4683 Port 5B Interface IBM 4683 Port 17 Interface IBM 4683 Port 9B HHBCR-1 Interface 1 - 12 Default = P1. * P1 P2 Both P1 and P2 IBM 4683 Ports 5B, 9B, and 17 Connection Note: See "Imager Models" on page 1-2 to determine which you...

User Guide
Page 29
... Emulation Plug & Play (Code 39 Format) barcode below sets the terminal ID to 1 - 13 In Wand Emulation mode, the imager decodes the barcode then sends data in the same format as a wand imager. IBM 4683 Port 9B HHBCR-2 Interface The IBM 4683 Port 9B HHBCR-2 Interface barcode also programs the following suffixes for each symbology: Symbology EAN-8 EAN-13 UPC-A UPC-E Code 39 Interleaved 2 of 5 Code 128 Suffix 0C 16 0D 0A 00 0A 0B 00 0D 0B 00 18 0B Wand Emulation Connection...
... Emulation Plug & Play (Code 39 Format) barcode below sets the terminal ID to 1 - 13 In Wand Emulation mode, the imager decodes the barcode then sends data in the same format as a wand imager. IBM 4683 Port 9B HHBCR-2 Interface The IBM 4683 Port 9B HHBCR-2 Interface barcode also programs the following suffixes for each symbology: Symbology EAN-8 EAN-13 UPC-A UPC-E Code 39 Interleaved 2 of 5 Code 128 Suffix 0C 16 0D 0A 00 0A 0B 00 0D 0B 00 18 0B Wand Emulation Connection...
User Guide
Page 30
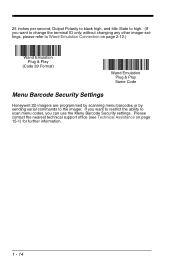
... page 2-12.) Wand Emulation Plug & Play (Code 39 Format) Wand Emulation Plug & Play Same Code Menu Barcode Security Settings Honeywell 2D imagers are programmed by scanning menu barcodes or by sending serial commands to high. (If you can use the Menu Barcode Security settings. If you want to restrict the ability to scan menu codes, you want to change the terminal ID only, without changing any other imager settings, please refer to Wand Emulation Connection on page 15-1) for...
... page 2-12.) Wand Emulation Plug & Play (Code 39 Format) Wand Emulation Plug & Play Same Code Menu Barcode Security Settings Honeywell 2D imagers are programmed by scanning menu barcodes or by sending serial commands to high. (If you can use the Menu Barcode Security settings. If you want to restrict the ability to scan menu codes, you want to change the terminal ID only, without changing any other imager settings, please refer to Wand Emulation Connection on page 15-1) for...

User Guide
Page 35
... use the Plug and Play barcodes, beginning on page 1-2 to determine which interfaces apply to program these interfaces, rather than scanning the terminal ID listed in this table. ** Default for 4600g/4600r/4600rp/4800iXX 05XX models. Terminal Model(s) Terminal ID Serial Wedge Silicon Graphics Telex 88 key Telex 88 key Telex 102 key Telex 122 key USB COM Port Emulation USB Japanese Keyboard (PC) USB PC Keyboard USB Mac Keyboard USB HID POS Wand Emulation (Code 39 Format) Wand Emulation...
... use the Plug and Play barcodes, beginning on page 1-2 to determine which interfaces apply to program these interfaces, rather than scanning the terminal ID listed in this table. ** Default for 4600g/4600r/4600rp/4800iXX 05XX models. Terminal Model(s) Terminal ID Serial Wedge Silicon Graphics Telex 88 key Telex 88 key Telex 102 key Telex 122 key USB COM Port Emulation USB Japanese Keyboard (PC) USB PC Keyboard USB Mac Keyboard USB HID POS Wand Emulation (Code 39 Format) Wand Emulation...

User Guide
Page 39
... imager sends key combinations for ASCII control characters for values 00-1F. Shift Lock is used when you must power cycle your computer. Emulate External Keyboard Note: After scanning the Emulate External Keyboard barcode, you normally have an LED which notes the Caps Lock status. Keyboard Modifiers This modifies special keyboard features, such as CTRL+ ASCII codes and Turbo Mode. DOS mode is the preferred mode. Shift Lock Automatic Caps Lock is used if you change the Caps Lock key on (not common to U.S. Windows...
... imager sends key combinations for ASCII control characters for values 00-1F. Shift Lock is used when you must power cycle your computer. Emulate External Keyboard Note: After scanning the Emulate External Keyboard barcode, you normally have an LED which notes the Caps Lock status. Keyboard Modifiers This modifies special keyboard features, such as CTRL+ ASCII codes and Turbo Mode. DOS mode is the preferred mode. Shift Lock Automatic Caps Lock is used if you change the Caps Lock key on (not common to U.S. Windows...

User Guide
Page 44
... barcode below, then scanning digits from the host device. RTS/CTS On * RTS/CTS Off XON/XOFF On * XON/OFF Off ACK/NAK On * ACK/NAK Off Wand Emulation Connection The Wand Emulation Connection barcodes should be used . Default = 0 seconds (no data flow control is used if you want to change other imager settings. always on page 1-6 for further information. 2 - 12 When Data Flow Control is 0 to 300 seconds. Data transmission continues...
... barcode below, then scanning digits from the host device. RTS/CTS On * RTS/CTS Off XON/XOFF On * XON/OFF Off ACK/NAK On * ACK/NAK Off Wand Emulation Connection The Wand Emulation Connection barcodes should be used . Default = 0 seconds (no data flow control is used if you want to change other imager settings. always on page 1-6 for further information. 2 - 12 When Data Flow Control is 0 to 300 seconds. Data transmission continues...

User Guide
Page 45
... Wand Emulation mode, the imager decodes the barcode then sends data in smaller blocks to 64. The Code 39 Format barcode below sets the terminal ID to 61, and the Same Code Format barcode sets the terminal ID to prevent buffer overflow. Data Block Size This transmits the data in the same format as a wand imager. Default = 40. 20 * 40 60 80 2 - 13 The Same Code Format transmits UPC, EAN, Code 128, Codabar, and Interleaved 2 of 5 without any changes, but converts...
... Wand Emulation mode, the imager decodes the barcode then sends data in smaller blocks to 64. The Code 39 Format barcode below sets the terminal ID to 61, and the Same Code Format barcode sets the terminal ID to prevent buffer overflow. Data Block Size This transmits the data in the same format as a wand imager. Default = 40. 20 * 40 60 80 2 - 13 The Same Code Format transmits UPC, EAN, Code 128, Codabar, and Interleaved 2 of 5 without any changes, but converts...

User Guide
Page 57
... imager can set the time the imager should remain in manual trigger mode by default. To revert to barcode reading, you must change to as a jpeg file by setting the Hands Free Time-Out. Image Snap and Ship Hands Free Time-Out The Scan Stand, and Presentation, and Streaming Presentation Modes are effective in applications where repetitive barcode scanning is pressed. Longer delays are referred to a different trigger mode (see Trigger Modes beginning on page 3-4). Scan the Hands Free Time-Out barcode...
... imager can set the time the imager should remain in manual trigger mode by default. To revert to barcode reading, you must change to as a jpeg file by setting the Hands Free Time-Out. Image Snap and Ship Hands Free Time-Out The Scan Stand, and Presentation, and Streaming Presentation Modes are effective in applications where repetitive barcode scanning is pressed. Longer delays are referred to a different trigger mode (see Trigger Modes beginning on page 3-4). Scan the Hands Free Time-Out barcode...

User Guide
Page 60
... Software Revision on page 11-2 for the duration of 31205480. Default = 200 milliseconds 400 milliseconds * Off (no delay) Off. Imager Time-Out Imager Time-Out powers down , set the time-out by scanning digits (from 0 999,999 ms) from the Programming Chart inside back cover, then scanning Save. User-Specified Aimer Delay If you want to firmware with a base number of the delay, scan the barcode below, then set...
... Software Revision on page 11-2 for the duration of 31205480. Default = 200 milliseconds 400 milliseconds * Off (no delay) Off. Imager Time-Out Imager Time-Out powers down , set the time-out by scanning digits (from 0 999,999 ms) from the Programming Chart inside back cover, then scanning Save. User-Specified Aimer Delay If you want to firmware with a base number of the delay, scan the barcode below, then set...
User Guide
Page 77
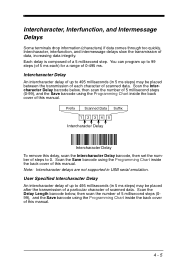
... the Save barcode using the Programming Chart inside the back cover of this delay, scan the Intercharacter Delay barcode, then set the number of steps to 495 milliseconds (in USB serial emulation. User Specified Intercharacter Delay An intercharacter delay of up to 495 milliseconds (in 5 ms steps) may be placed after the transmission of a particular character of scanned data. You can program up to 0. Note: Intercharacter delays are not supported in...
... the Save barcode using the Programming Chart inside the back cover of this delay, scan the Intercharacter Delay barcode, then set the number of steps to 495 milliseconds (in USB serial emulation. User Specified Intercharacter Delay An intercharacter delay of up to 495 milliseconds (in 5 ms steps) may be placed after the transmission of a particular character of scanned data. You can program up to 0. Note: Intercharacter delays are not supported in...

User Guide
Page 88
... Code 39 Format converts all other symbologies to Code 39. If you want to change the RS-232 settings, refer to Code 128. Default =Disable. * Disable Enable Secondary RS-232 Connection All communication parameters between the imager and terminal must match for correct data transfer through the serial port using RS-232 protocol. RS-232 programmable selections are converted to RS-232 Baud Rate, page 2-10. In Wand Emulation mode, the imager decodes the barcode then sends data...
... Code 39 Format converts all other symbologies to Code 39. If you want to change the RS-232 settings, refer to Code 128. Default =Disable. * Disable Enable Secondary RS-232 Connection All communication parameters between the imager and terminal must match for correct data transfer through the serial port using RS-232 protocol. RS-232 programmable selections are converted to RS-232 Baud Rate, page 2-10. In Wand Emulation mode, the imager decodes the barcode then sends data...
User Guide
Page 89
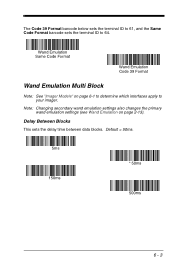
Default = 50ms. 5ms 150ms * 50ms 500ms 6 - 3 Note: Changing secondary wand emulation settings also changes the primary wand emulation settings (see Wand Emulation on page 6-1 to determine which interfaces apply to 64. The Code 39 Format barcode below sets the terminal ID to 61, and the Same Code Format barcode sets the terminal ID to your imager. Delay Between Blocks This sets the delay time between data blocks. Wand Emulation Same Code Format Wand Emulation Code 39 Format Wand Emulation Multi Block Note: See "Imager Models" on page 2-13).
Default = 50ms. 5ms 150ms * 50ms 500ms 6 - 3 Note: Changing secondary wand emulation settings also changes the primary wand emulation settings (see Wand Emulation on page 6-1 to determine which interfaces apply to 64. The Code 39 Format barcode below sets the terminal ID to 61, and the Same Code Format barcode sets the terminal ID to your imager. Delay Between Blocks This sets the delay time between data blocks. Wand Emulation Same Code Format Wand Emulation Code 39 Format Wand Emulation Multi Block Note: See "Imager Models" on page 2-13).

User Guide
Page 93
Whenever the trigger is enabled, the low power time-out timer is pulled when using a hands free mode, the imager changes to change the time-out duration for the secondary interface, the duration of the primary interface will also be changed. Hands Free Time-Out The Automatic Trigger and Presentation Modes are referred to the original hands free mode. If the imager's trigger is reset. Scan the Hands Free Time-Out barcode, then scan the time-out duration (from 0-300,000 milliseconds...
Whenever the trigger is enabled, the low power time-out timer is pulled when using a hands free mode, the imager changes to change the time-out duration for the secondary interface, the duration of the primary interface will also be changed. Hands Free Time-Out The Automatic Trigger and Presentation Modes are referred to the original hands free mode. If the imager's trigger is reset. Scan the Hands Free Time-Out barcode, then scan the time-out duration (from 0-300,000 milliseconds...
User Guide
Page 100
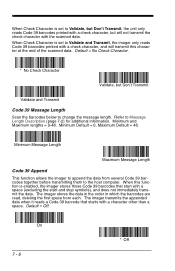
... symbols), and does not immediately transmit the data. When Check Character is set to Validate, but Don't Transmit, the unit only reads Code 39 barcodes printed with a check character, but Don't Transmit Validate and Transmit Code 39 Message Length Scan the barcodes below to change the message length. Minimum Message Length Maximum Message Length Code 39 Append This function allows the imager to append the data from each. Default = Off. When Check Character is enabled, the imager stores those Code 39 barcodes that starts with a character...
... symbols), and does not immediately transmit the data. When Check Character is set to Validate, but Don't Transmit, the unit only reads Code 39 barcodes printed with a check character, but Don't Transmit Validate and Transmit Code 39 Message Length Scan the barcodes below to change the message length. Minimum Message Length Maximum Message Length Code 39 Append This function allows the imager to append the data from each. Default = Off. When Check Character is enabled, the imager stores those Code 39 barcodes that starts with a character...

User Guide
Page 189
Scan Data lets you send serial commands to the imager and receive imager response that can click on Start Menu-All Programs-Hand Held Products-Visual Xpress. 11 - 5 The imager's programming and configuration data is loaded with the parameters' form belonging to files in a window. You can capture an image using the current settings, and the image will be prompted to install it during installation, you can be seen in an image window. Installing Visual Xpress from...
Scan Data lets you send serial commands to the imager and receive imager response that can click on Start Menu-All Programs-Hand Held Products-Visual Xpress. 11 - 5 The imager's programming and configuration data is loaded with the parameters' form belonging to files in a window. You can capture an image using the current settings, and the image will be prompted to install it during installation, you can be seen in an image window. Installing Visual Xpress from...

User Guide
Page 190
.... 7. To convert the imager back to the c:\windows\temp file. 8. Access the Honeywell web site at www.honeywell.com/aidc. 2. Using Explorer, go to keyboard wedge communication, cycle the power. Note: If you wish, you have a unit capable of keyboard wedge mode, scan the barcode below and the unit will be temporarily configured for Quick*View settings. Once you can create a shortcut to work with Quick*View. Select Product Downloads-Software...
.... 7. To convert the imager back to the c:\windows\temp file. 8. Access the Honeywell web site at www.honeywell.com/aidc. 2. Using Explorer, go to keyboard wedge communication, cycle the power. Note: If you wish, you have a unit capable of keyboard wedge mode, scan the barcode below and the unit will be temporarily configured for Quick*View settings. Once you can create a shortcut to work with Quick*View. Select Product Downloads-Software...


