User Guide
Page 3
... Connecting the Power and Communication Cables 3-4 USB Cable ...3-4 Standard RS-232 Cable ...3-5 RS-232 Pass-Through Cable ...3-5 Power Cable...3-6 Rebooting the Device...3-7 Warm Boot ...3-7 Cold Boot...3-7 Hard Boot ...3-7 Using the Reset Switch...3-7 Using the Magnetic Stripe Reader ...3-8 Swiping a Card With the MSR Demo 3-8 MSR Demo Options ...3-9 Screen Protector Replacement ...3-10 Maintenance ...3-11 Image Kiosk Technical Specifications 3-12 Chapter 4 - Getting Started Image Kiosk Models ...2-1 Boot the Image Kiosk...2-1 Desktop ...2-2 Setting the Time and Date...2-3 Adjusting...
... Connecting the Power and Communication Cables 3-4 USB Cable ...3-4 Standard RS-232 Cable ...3-5 RS-232 Pass-Through Cable ...3-5 Power Cable...3-6 Rebooting the Device...3-7 Warm Boot ...3-7 Cold Boot...3-7 Hard Boot ...3-7 Using the Reset Switch...3-7 Using the Magnetic Stripe Reader ...3-8 Swiping a Card With the MSR Demo 3-8 MSR Demo Options ...3-9 Screen Protector Replacement ...3-10 Maintenance ...3-11 Image Kiosk Technical Specifications 3-12 Chapter 4 - Getting Started Image Kiosk Models ...2-1 Boot the Image Kiosk...2-1 Desktop ...2-2 Setting the Time and Date...2-3 Adjusting...
User Guide
Page 4
... Bar Codes ...6-3 Depth of Focus (DOF) Specifications 6-3 Scan Demo...6-4 Chapter 7 - Mounting Overview ...7-1 Back Panel Mounting Dimensions ...7-1 Connector Slots...7-2 Side Panel Dimensions ...7-2 Chapter 8 - Customer Support Product Service and Repair ...8-1 Online Product Service and Repair Assistance 8-1 Technical Assistance ...8-2 Online Technical Assistance ...8-2 Limited Warranty ...8-3 iv Rev B Image Kiosk 8560/8570 User's 3/1/07 Guide Wireless LAN with 802.11b Overview ...5-1 Configuring the 802.11b Radio ...5-1 Opening the Client...5-1 Main Window ...5-2 Setup Windows...
... Bar Codes ...6-3 Depth of Focus (DOF) Specifications 6-3 Scan Demo...6-4 Chapter 7 - Mounting Overview ...7-1 Back Panel Mounting Dimensions ...7-1 Connector Slots...7-2 Side Panel Dimensions ...7-2 Chapter 8 - Customer Support Product Service and Repair ...8-1 Online Product Service and Repair Assistance 8-1 Technical Assistance ...8-2 Online Technical Assistance ...8-2 Limited Warranty ...8-3 iv Rev B Image Kiosk 8560/8570 User's 3/1/07 Guide Wireless LAN with 802.11b Overview ...5-1 Configuring the 802.11b Radio ...5-1 Opening the Client...5-1 Main Window ...5-2 Setup Windows...
User Guide
Page 6
... the entire 2.400-2.4835 GHz 1 - 2 Rev B Image Kiosk 8560/8570 User's Guide 3/1/07 Operation is likely to cause harmful interference, in which case the user will not occur in France are designed to provide reasonable protection against harmful interference when the equipment is subject to the following two conditions: (1) this device may not cause harmful interference, and...
... the entire 2.400-2.4835 GHz 1 - 2 Rev B Image Kiosk 8560/8570 User's Guide 3/1/07 Operation is likely to cause harmful interference, in which case the user will not occur in France are designed to provide reasonable protection against harmful interference when the equipment is subject to the following two conditions: (1) this device may not cause harmful interference, and...

User Guide
Page 9
....11b wireless radio Connect the Power and Communication Cables The Image Kiosks have a number of power and communication cables. The warm boot completes on the Desktop (see Warm Boot on page 3-7). 5. Image Kiosk 8560/8570 User's Guide Rev B 2 - 1 3/1/07 An Image Kiosk with European RF frequencies pre-programmed into the 802.11b radio. Use one to apply power to the device. The software version numbers for each program that loads. A status bar appears for...
....11b wireless radio Connect the Power and Communication Cables The Image Kiosks have a number of power and communication cables. The warm boot completes on the Desktop (see Warm Boot on page 3-7). 5. Image Kiosk 8560/8570 User's Guide Rev B 2 - 1 3/1/07 An Image Kiosk with European RF frequencies pre-programmed into the 802.11b radio. Use one to apply power to the device. The software version numbers for each program that loads. A status bar appears for...

User Guide
Page 10
... this button returns you to the Start menu. The pop-up menu that appears will also show two programs or windows currently open. 2 - 2 Rev B 3/1/07 Image Kiosk 8560/8570 User's Guide Displays the Soft Input Panel (SIP); Wired ethernet cable is connected. Task Tray Icons Icon Description Opens the Start menu. The communication cable is not connected. Tapping this icon displays the cable type and connection status. Wired ethernet cable is connected...
... this button returns you to the Start menu. The pop-up menu that appears will also show two programs or windows currently open. 2 - 2 Rev B 3/1/07 Image Kiosk 8560/8570 User's Guide Displays the Soft Input Panel (SIP); Wired ethernet cable is connected. Task Tray Icons Icon Description Opens the Start menu. The communication cable is not connected. Tapping this icon displays the cable type and connection status. Wired ethernet cable is connected...
User Guide
Page 11
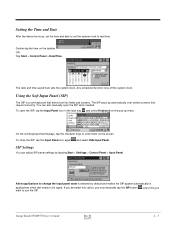
... also manually open the SIP, tap the Input Panel icon in applications when text needs to use the SIP. Setting the Time and Date After the device boots up menu. To close the SIP, tap the Input Panel icon again and select Hide Input Panel. Image Kiosk 8560/8570 User's Guide Rev B 2 - 3 3/1/07 Double-tap the time on the taskbar OR Tap Start > Control...
... also manually open the SIP, tap the Input Panel icon in applications when text needs to use the SIP. Setting the Time and Date After the device boots up menu. To close the SIP, tap the Input Panel icon again and select Hide Input Panel. Image Kiosk 8560/8570 User's Guide Rev B 2 - 3 3/1/07 Double-tap the time on the taskbar OR Tap Start > Control...

User Guide
Page 12
...-select the Enable Backlight option. Selecting Programs To launch a program, tap Start > Programs and select a program from the list. 2 - 4 Rev B Image Kiosk 8560/8570 User's Guide 3/1/07 Using Windows Explorer You can 't be selected accurately. Adjusting the Backlight Tap Start > Settings > Control Panel > Display > Backlight tab > Advanced. To turn off the backlight, except for test purposes. Adjusting the Contrast On the Backlight Options window, use the commands on by default (and enabled after each re...
...-select the Enable Backlight option. Selecting Programs To launch a program, tap Start > Programs and select a program from the list. 2 - 4 Rev B Image Kiosk 8560/8570 User's Guide 3/1/07 Using Windows Explorer You can 't be selected accurately. Adjusting the Backlight Tap Start > Settings > Control Panel > Display > Backlight tab > Advanced. To turn off the backlight, except for test purposes. Adjusting the Contrast On the Backlight Options window, use the commands on by default (and enabled after each re...
User Guide
Page 15
This connector powers the device (by plugging a USB HUB into the USB Host port. Image Kiosk 8560/8570 User's Guide Rev B 3 - 3 3/1/07 For more information, see Wired Ethernet Communication-IK8560EE, IK8570E, & IK8570EUE on page 4-10. All power cables have a connector that are backwards compatible with USB 1.1 may be purchased separately. Cable must be connected to this pin configuration. For more information, see Microsoft ActiveSync on these models is not functional. USB 2.0 devices that matches this...
This connector powers the device (by plugging a USB HUB into the USB Host port. Image Kiosk 8560/8570 User's Guide Rev B 3 - 3 3/1/07 For more information, see Wired Ethernet Communication-IK8560EE, IK8570E, & IK8570EUE on page 4-10. All power cables have a connector that are backwards compatible with USB 1.1 may be purchased separately. Cable must be connected to this pin configuration. For more information, see Microsoft ActiveSync on these models is not functional. USB 2.0 devices that matches this...

User Guide
Page 16
...) supports USB 1.1. Plug the USB connector into a power 4 outlet. Host 2 Hardware installation is turned off on and autoconfigures to USB. Connecting the Power and Communication Cables The Image Kiosks have standard power cables that connect to a number of communication cables to run. If you will occur 1.1 speeds. This cable features a single, 15-pin male connector that are backwards compatible with USB 1.1 with an AC power adapter to convert the voltage from the power source to power the device...
...) supports USB 1.1. Plug the USB connector into a power 4 outlet. Host 2 Hardware installation is turned off on and autoconfigures to USB. Connecting the Power and Communication Cables The Image Kiosks have standard power cables that connect to a number of communication cables to run. If you will occur 1.1 speeds. This cable features a single, 15-pin male connector that are backwards compatible with USB 1.1 with an AC power adapter to convert the voltage from the power source to power the device...

User Guide
Page 17
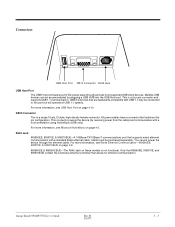
...: Make sure the power switch is useful for upgrading the firmware on your host device. Plug the 9-pin connector (DB9) of the serial cable into the other source. Plug the AC power supply into an available serial port on your host device. 1 1 Host 2 3 1 4 2 Host 3 Image Kiosk 8560/8570 User's Guide Rev B 3 - 5 3/1/07 Plug the 15-pin connector (HDB15) of the serial cable into a power outlet. Installation is now complete. You may need to obtain a 25-pin to multiple devices but does not support...
...: Make sure the power switch is useful for upgrading the firmware on your host device. Plug the 9-pin connector (DB9) of the serial cable into the other source. Plug the AC power supply into an available serial port on your host device. 1 1 Host 2 3 1 4 2 Host 3 Image Kiosk 8560/8570 User's Guide Rev B 3 - 5 3/1/07 Plug the 15-pin connector (HDB15) of the serial cable into a power outlet. Installation is now complete. You may need to obtain a 25-pin to multiple devices but does not support...

User Guide
Page 19
...-installs the CAB files stored in RAM memory. see Using the Reset Switch on the top panel. Image Kiosk 8560/8570 User's Guide Rev B 3 - 7 3/1/07 Using the Reset Switch The reset switch appears in the Autoinstall folder. Rebooting the Device There are three types of a straightened paper clip to cold boot the device without erasing data and applications stored in the Autoinstall folder. Use the end...
...-installs the CAB files stored in RAM memory. see Using the Reset Switch on the top panel. Image Kiosk 8560/8570 User's Guide Rev B 3 - 7 3/1/07 Using the Reset Switch The reset switch appears in the Autoinstall folder. Rebooting the Device There are three types of a straightened paper clip to cold boot the device without erasing data and applications stored in the Autoinstall folder. Use the end...

User Guide
Page 20
... the card from the prior swipe.) 6. MSR Demo reads the card, beeps, and displays the data according to swipe cards and read "Ready for MSR Swipe." 2. To close the MSR Demo, tap File > Exit. 3 - 8 Rev B Image Kiosk 8560/8570 User's Guide 3/1/07 Fortunately, all prior card reads, tap File > Clear. 7. To use the MSR, you must have an application installed on page 3-9. 5.
... the card from the prior swipe.) 6. MSR Demo reads the card, beeps, and displays the data according to swipe cards and read "Ready for MSR Swipe." 2. To close the MSR Demo, tap File > Exit. 3 - 8 Rev B Image Kiosk 8560/8570 User's Guide 3/1/07 Fortunately, all prior card reads, tap File > Clear. 7. To use the MSR, you must have an application installed on page 3-9. 5.
User Guide
Page 24
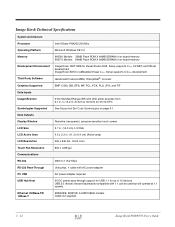
... PC USB USB Hub Host Using Aux. Cable not supplied. 3 - 12 Rev B 3/1/07 Image Kiosk 8560/8570 User's Guide Ethernet 100Base-TX/ 10Base-T IK8560EE, IK8570E, & IK8570EUE models. Image Kiosk Technical Specifications System Architecture Processor Intel XScale PXA255 200 Mhz Operating Platform Microsoft Windows CE 5.0 Memory IK8560 Models: 32MB Flash ROM X 64MB SDRAM of on-board memory IK8570 Models: 64MB Flash ROM X 64MB SDRAM of on page 6-1. Setup supports C/C++ development Third Party Software Hand Held Products...
... PC USB USB Hub Host Using Aux. Cable not supplied. 3 - 12 Rev B 3/1/07 Image Kiosk 8560/8570 User's Guide Ethernet 100Base-TX/ 10Base-T IK8560EE, IK8570E, & IK8570EUE models. Image Kiosk Technical Specifications System Architecture Processor Intel XScale PXA255 200 Mhz Operating Platform Microsoft Windows CE 5.0 Memory IK8560 Models: 32MB Flash ROM X 64MB SDRAM of on-board memory IK8570 Models: 64MB Flash ROM X 64MB SDRAM of on page 6-1. Setup supports C/C++ development Third Party Software Hand Held Products...
User Guide
Page 27
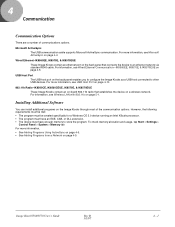
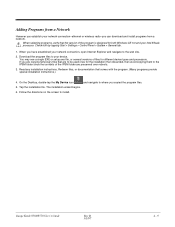
... 4-8. USB Host Port The USB host port on the Image Kiosks through most of communications options. For more information, • See Adding Programs Using ActiveSync on page 4-6. • See Adding Programs from a Network on the back panel that establishes the device on page 5-1. 4 Communication Communication Options There are a number of the communication options. Installing Additional Software You can install additional programs on the back panel enables you to configure...
... 4-8. USB Host Port The USB host port on the Image Kiosks through most of communications options. For more information, • See Adding Programs Using ActiveSync on page 4-6. • See Adding Programs from a Network on the back panel that establishes the device on page 5-1. 4 Communication Communication Options There are a number of the communication options. Installing Additional Software You can install additional programs on the back panel enables you to configure...

User Guide
Page 32
... a USB jump (flash) drive and then insert the jump drive into the USB host port on the device. Depending on the application, the software must be several versions of the Autoinstall that installs to install it . 4 - 6 Rev B Image Kiosk 8560/8570 User's Guide 3/1/07 one that occurs after every cold boot, place the program file in Windows Explorer. The installation process includes transferring the software to the host workstation...
... a USB jump (flash) drive and then insert the jump drive into the USB host port on the device. Depending on the application, the software must be several versions of the Autoinstall that installs to install it . 4 - 6 Rev B Image Kiosk 8560/8570 User's Guide 3/1/07 one that occurs after every cold boot, place the program file in Windows Explorer. The installation process includes transferring the software to the host workstation...
User Guide
Page 35
... device. Image Kiosk 8560/8570 User's Guide Rev B 4 - 9 3/1/07 When you are copying temporary files that are to be used once for the installation then discarded, then avoid copying them to the IPSM folder since the contents of the IPSM folder are preserved over reboots. 3. Read any installation instructions, Redeem files, or documentation that the version of files for both by tapping Start > Settings > Control...
... device. Image Kiosk 8560/8570 User's Guide Rev B 4 - 9 3/1/07 When you are copying temporary files that are to be used once for the installation then discarded, then avoid copying them to the IPSM folder since the contents of the IPSM folder are preserved over reboots. 3. Read any installation instructions, Redeem files, or documentation that the version of files for both by tapping Start > Settings > Control...

User Guide
Page 41
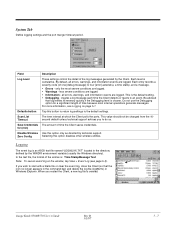
... configuration windows are enabling and disabling the authentication established here. To be deleted, a profile cannot be grayed out if not relevant to the selected protocol. Setup Windows Use the following navigation aid to examine the configuration options for each set of configuration windows: Configuring Client Authentication (see page 5-5) • User Tab (see page 5-5) • System Tab (see page 5-7) • Server Tab (see page 5-8) Configuring a Port (see page 5-9) • Wireless...
... configuration windows are enabling and disabling the authentication established here. To be deleted, a profile cannot be grayed out if not relevant to the selected protocol. Setup Windows Use the following navigation aid to examine the configuration options for each set of configuration windows: Configuring Client Authentication (see page 5-5) • User Tab (see page 5-5) • System Tab (see page 5-7) • Server Tab (see page 5-8) Configuring a Port (see page 5-9) • Wireless...
User Guide
Page 43
..., and a message. • Errors - By default, all errors, warnings, and information events are logged. • Information - For more information, see page 5-3). Image Kiosk 8560/8570 User's Guide Rev B 5 - 7 3/1/07 only the most internal operations generate messages. Be advised that the icon no longer appears in the command bar) and delete the log file (log8021x) in the directory defined by technical support.
..., and a message. • Errors - By default, all errors, warnings, and information events are logged. • Information - For more information, see page 5-3). Image Kiosk 8560/8570 User's Guide Rev B 5 - 7 3/1/07 only the most internal operations generate messages. Be advised that the icon no longer appears in the command bar) and delete the log file (log8021x) in the directory defined by technical support.

User Guide
Page 55
... following linear bar code symbologies: • UPC-A • UPC-E • EAN/JAN • Code 128 • Interleaved 2 of 5 • Code 39 • Codabar • MSI • PDF417 • Plessey Code • RSS-14 Image Kiosk 8560/8570 User's Guide Rev B 6 - 1 3/1/07 The included Scan Demo (see page 6-4) enables the image engine for the 5100SR image engine; When the Image Kiosk is powered the external illumination LEDs are always enabled providing the required illumination for use Adaptus Imaging Technology...
... following linear bar code symbologies: • UPC-A • UPC-E • EAN/JAN • Code 128 • Interleaved 2 of 5 • Code 39 • Codabar • MSI • PDF417 • Plessey Code • RSS-14 Image Kiosk 8560/8570 User's Guide Rev B 6 - 1 3/1/07 The included Scan Demo (see page 6-4) enables the image engine for the 5100SR image engine; When the Image Kiosk is powered the external illumination LEDs are always enabled providing the required illumination for use Adaptus Imaging Technology...

User Guide
Page 58
... scanning capabilities of the device. Scan Demo Image Kiosks ship with a sample application called Scan Demo that can customize the interval time by tapping the Scan button. Tap Start > Programs > Demos and double-tap the Scan Demo icon engine is the default interval; Slide a bar code under the illumination cone by tapping Setup > Auto Scan Delay. 6 - 4 Rev B Image Kiosk 8560/8570 User's Guide 3/1/07 The Scan Demo window opens and the image Illumination Cone 3. Automatic Scan Automatic scan activates the image...
... scanning capabilities of the device. Scan Demo Image Kiosks ship with a sample application called Scan Demo that can customize the interval time by tapping the Scan button. Tap Start > Programs > Demos and double-tap the Scan Demo icon engine is the default interval; Slide a bar code under the illumination cone by tapping Setup > Auto Scan Delay. 6 - 4 Rev B Image Kiosk 8560/8570 User's Guide 3/1/07 The Scan Demo window opens and the image Illumination Cone 3. Automatic Scan Automatic scan activates the image...


