
User Guide
Page 5
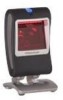
... captured and transmitted in a variety of both 1D and 2D bar code symbologies. Genesis™ Interface Support Interfaces supported include: MS7580-124 • RS232 • USB • Keyboard Wedge • RS485 (External via Cable) EAS equipped models are easily loaded into Flash memory. Introduction Product Overview The MS7580 Genesis™ is a high performance presentation area-imaging bar code imager that instantly turns on the model number (i.e., MS7580-124-EAS). The default USB setting is Keyboard Emulation Mode. ...
... captured and transmitted in a variety of both 1D and 2D bar code symbologies. Genesis™ Interface Support Interfaces supported include: MS7580-124 • RS232 • USB • Keyboard Wedge • RS485 (External via Cable) EAS equipped models are easily loaded into Flash memory. Introduction Product Overview The MS7580 Genesis™ is a high performance presentation area-imaging bar code imager that instantly turns on the model number (i.e., MS7580-124-EAS). The default USB setting is Keyboard Emulation Mode. ...

User Guide
Page 6
Base Kit Components Part # MS7580-124 Description Genesis 7580 Presentation Area Imager 00-02544 MetroSelect® Single-Line Configuration Guide 00-05252 Area-Imaging Supplemental Configuration Guide* GEN-7580-UG Genesis 7580 Installation and User's Guide* EAS equipped models are available for contact information. 2 Optional Accessories Part # Description AC to 255VAC Australia Other items may be ordered for the specific protocol being used. To order...
Base Kit Components Part # MS7580-124 Description Genesis 7580 Presentation Area Imager 00-02544 MetroSelect® Single-Line Configuration Guide 00-05252 Area-Imaging Supplemental Configuration Guide* GEN-7580-UG Genesis 7580 Installation and User's Guide* EAS equipped models are available for contact information. 2 Optional Accessories Part # Description AC to 255VAC Australia Other items may be ordered for the specific protocol being used. To order...
User Guide
Page 7
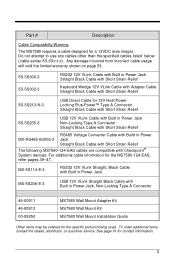
... Power Jack, Non-Locking Type A Connector 46-00911 46-00913 00-05250 MS7580 Wall Mount Adapter Kit MS7580 Wall Mount Kit MS7580 Wall Mount Installation Guide Other items may be ordered for the MS7580-124-EAS, refer pages 39-47. Do not attempt to use any cables other than the specified cables listed below (cable series 5S-5Sxxx). See page 61 for a 12VDC area imager. Part # Description Cable...
... Power Jack, Non-Locking Type A Connector 46-00911 46-00913 00-05250 MS7580 Wall Mount Adapter Kit MS7580 Wall Mount Kit MS7580 Wall Mount Installation Guide Other items may be ordered for the MS7580-124-EAS, refer pages 39-47. Do not attempt to use any cables other than the specified cables listed below (cable series 5S-5Sxxx). See page 61 for a 12VDC area imager. Part # Description Cable...

User Guide
Page 11
... cable installation instructions for RS232 operation. Please refer to the host system. The outlet must be communicated properly to the MetroSelect Single-Line Configuration Guide (PN 00-02544) or MetroSet2's help files for three seconds. In addition, please check that scanned information will flash the white LED three times while simultaneously beeping three times. Turn off for instructions on the host device. 4. Connect the other end of the power supply to a dedicated COM port on changing the imager's configuration...
... cable installation instructions for RS232 operation. Please refer to the host system. The outlet must be communicated properly to the MetroSelect Single-Line Configuration Guide (PN 00-02544) or MetroSet2's help files for three seconds. In addition, please check that scanned information will flash the white LED three times while simultaneously beeping three times. Turn off for instructions on the host device. 4. Connect the other end of the power supply to a dedicated COM port on changing the imager's configuration...

User Guide
Page 12
... on changing the imager's configuration. Keyboard Wedge See caution on . 9. Installation Note Plugging the imager into a port on the host system does not guarantee that the imager and host system are using the same communication protocol. The MS7580 requires 12V power to the MetroSelect Single-Line Configuration Guide (PN 00-02544) or MetroSet2's help files for instructions on the cable. 6. In addition, please check that scanned information will start to the host device. 2. The imager is supplied with default settings...
... on changing the imager's configuration. Keyboard Wedge See caution on . 9. Installation Note Plugging the imager into a port on the host system does not guarantee that the imager and host system are using the same communication protocol. The MS7580 requires 12V power to the MetroSelect Single-Line Configuration Guide (PN 00-02544) or MetroSet2's help files for instructions on the cable. 6. In addition, please check that scanned information will start to the host device. 2. The imager is supplied with default settings...

User Guide
Page 13
.... Please refer to proper COM port of the cable to the MetroSelect Single-Line Configuration Guide (PN 00-02544) or MetroSet2's help files for instructions on and off power to the host system. In addition, please check that scanned information will start to the host device. 5. RS485 1. When the imager has finished initializing, the imager will remain turned on power to initialize. The low intensity blue LED will flash the white LED three times while simultaneously beeping three...
.... Please refer to proper COM port of the cable to the MetroSelect Single-Line Configuration Guide (PN 00-02544) or MetroSet2's help files for instructions on and off power to the host system. In addition, please check that scanned information will start to the host device. 5. RS485 1. When the imager has finished initializing, the imager will remain turned on power to initialize. The low intensity blue LED will flash the white LED three times while simultaneously beeping three...
User Guide
Page 14
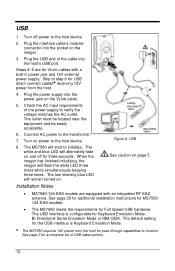
... USB direct connect cables receiving 12V power from the host for Keyboard Emulation Mode, Bi-Directional Serial Emulation Mode or IBM OEM. The MS7580 will remain turned on power to function. USB 1. Plug the interface cable's modular connector into the socket on the VLink cable. 5. Plug the USB end of the cable into the power jack on the imager. 3. The low intensity blue LED will start to initialize. See page 39 for additional installation instructions for MS7580124-EAS models. • The MS7580 meets...
... USB direct connect cables receiving 12V power from the host for Keyboard Emulation Mode, Bi-Directional Serial Emulation Mode or IBM OEM. The MS7580 will remain turned on power to function. USB 1. Plug the interface cable's modular connector into the socket on the VLink cable. 5. Plug the USB end of the cable into the power jack on the imager. 3. The low intensity blue LED will start to initialize. See page 39 for additional installation instructions for MS7580124-EAS models. • The MS7580 meets...

User Guide
Page 15
... the factory configured with default settings. In addition, please check that scanned information will be communicated properly to the MetroSelect Single-Line Configuration Guide (PN 00-02544) or MetroSet2's help files for instructions on changing the imager's configuration. Please refer to the host device. • For information on configuring the MS7580 for USB Serial Emulation Mode or IBM OEM, refer to the USB section of the MetroSelect Single-Line Configuration Guide (PN 00-02544). • Plugging the imager into a port on the host device does not guarantee that the imager and host...
... the factory configured with default settings. In addition, please check that scanned information will be communicated properly to the MetroSelect Single-Line Configuration Guide (PN 00-02544) or MetroSet2's help files for instructions on changing the imager's configuration. Please refer to the host device. • For information on configuring the MS7580 for USB Serial Emulation Mode or IBM OEM, refer to the USB section of the MetroSelect Single-Line Configuration Guide (PN 00-02544). • Plugging the imager into a port on the host device does not guarantee that the imager and host...

User Guide
Page 21
... linear targeting. 2. Scanning method: 1. Presentation Scanning-The imager decodes all 1D, PDF and 2D matrix codes. Manual Activation The imager decodes all 1D, PDF and 2D matrix codes Scanning method: 1. Press the button one of operation for scanning bar codes, automatic activation and manual activation scanning. Press the button one time to activate linear targeting. The MS7580 requires 12V power for pass-through state for 300 ms and then changes to function. The default configuration...
... linear targeting. 2. Scanning method: 1. Presentation Scanning-The imager decodes all 1D, PDF and 2D matrix codes. Manual Activation The imager decodes all 1D, PDF and 2D matrix codes Scanning method: 1. Press the button one of operation for scanning bar codes, automatic activation and manual activation scanning. Press the button one time to activate linear targeting. The MS7580 requires 12V power for pass-through state for 300 ms and then changes to function. The default configuration...

User Guide
Page 22
... Figure 18. Imagers will return to the default presentation mode by either the default time length or by Honeywell. Note: When scanning 1D bar codes, the bar code must be presented to decode PDF, 2D or OCR fonts without proper licenses. Standard models ship with the ability to decode and send the data 6. Figure 18. 1D Bar Code Orientation 5. Note: Decoding and functional capability of the imager is restricted through the use of license numbers provided by...
... Figure 18. Imagers will return to the default presentation mode by either the default time length or by Honeywell. Note: When scanning 1D bar codes, the bar code must be presented to decode PDF, 2D or OCR fonts without proper licenses. Standard models ship with the ability to decode and send the data 6. Figure 18. 1D Bar Code Orientation 5. Note: Decoding and functional capability of the imager is restricted through the use of license numbers provided by...

User Guide
Page 23
... times to the MetroSelect Single-Line Configuration Guide, PN 00-02544 or MetroSet2's help files. Three Beeps - Configuration Mode When entering configuration mode, the white LED will start an initialization sequence. Long Razzberry Tone This tone is a failure indicator (see Failure Modes on page 21). At Power Up When the MS7580 first receives power it will flash while the imager simultaneously beeps three times. The white and blue LEDs will continue to the low intensity...
... times to the MetroSelect Single-Line Configuration Guide, PN 00-02544 or MetroSet2's help files. Three Beeps - Configuration Mode When entering configuration mode, the white LED will start an initialization sequence. Long Razzberry Tone This tone is a failure indicator (see Failure Modes on page 21). At Power Up When the MS7580 first receives power it will flash while the imager simultaneously beeps three times. The white and blue LEDs will continue to the low intensity...

User Guide
Page 24
... decode a barcode. Figure 19. If the imager does not beep once and the white light does not flash, then the bar code has not been successfully read. If the host is not receiving power from the host or transformer. The blue LED will remain on the top of the imager. No LEDs are presented in configuration mode. Alternating Flashing of the current scan and the diagnostic imager. Note: After a successful scan, the imager transmits the data...
... decode a barcode. Figure 19. If the imager does not beep once and the white light does not flash, then the bar code has not been successfully read. If the host is not receiving power from the host or transformer. The blue LED will remain on the top of the imager. No LEDs are presented in configuration mode. Alternating Flashing of the current scan and the diagnostic imager. Note: After a successful scan, the imager transmits the data...

User Guide
Page 34
... support some form of 5, Code 93, Code 128, Codabar and PDF are supporting the handshaking properly. UPC/EAN, Code 39, interleaved 2 of host handshaking but does not scan and/or beep. If the imager is not receiving the signal. Make sure that required by default. Verify that the imager's data format matches that the imager is selected. Enable the beeper and select a tone. The beeper is disabled and no tone is connected to scan a barcode...
... support some form of 5, Code 93, Code 128, Codabar and PDF are supporting the handshaking properly. UPC/EAN, Code 39, interleaved 2 of host handshaking but does not scan and/or beep. If the imager is not receiving the signal. Make sure that required by default. Verify that the imager's data format matches that the imager is selected. Enable the beeper and select a tone. The beeper is disabled and no tone is connected to scan a barcode...

User Guide
Page 35
... imager is in Caps Lock. Increase interscan code delay setting. Enable Caps Lock detect setting of the imager to try this type of bar code. The configuration is not set correctly. Make sure that country's key look up table. The configuration is not set correctly. Check if the correct minimum symbol length is set properly. Adjust inter-character delay symptom. Everything works except for a couple of the same bar code symbology. The imager beeps at some bar codes and NOT for a Keyboard Wedge interface. Verify correct country code and data formatting...
... imager is in Caps Lock. Increase interscan code delay setting. Enable Caps Lock detect setting of the imager to try this type of bar code. The configuration is not set correctly. Make sure that country's key look up table. The configuration is not set correctly. Check if the correct minimum symbol length is set properly. Adjust inter-character delay symptom. Everything works except for a couple of the same bar code symbology. The imager beeps at some bar codes and NOT for a Keyboard Wedge interface. Verify correct country code and data formatting...

User Guide
Page 36
... host device. The com port at the host is not receiving sufficient power to the correct com port. Characters are configured for the same interface parameters. Refer to the imager. The imager powers up OK and scans OK but does not communicate properly with the host. Check to make sure that the baud rate and parity of the imager and the communication port match and the program is not connected to the transmitted output by using the Configuration Guides...
... host device. The com port at the host is not receiving sufficient power to the correct com port. Characters are configured for the same interface parameters. Refer to the imager. The imager powers up OK and scans OK but does not communicate properly with the host. Check to make sure that the baud rate and parity of the imager and the communication port match and the program is not connected to the transmitted output by using the Configuration Guides...

User Guide
Page 37
..., PDF417, microPDF, MaxiCode, Data Matrix, QR Code, UCC, EAN Composites, Postals, Aztec (Image Transfer) - BMP, TIFF, or JPEG output on USB and RS232 Interfaces System Interfaces: PC Keyboard Wedge, RS232, USB, RS485 (external via cable) Print Contrast: 20% Minimum Reflectance Difference Number Characters Read: 4096 Bytes Maximum Beeper Operation: 7 tones or no beep Indicators (LED) Default Settings: High Intensity Blue The imager is idle. Design Specifications Operational Light Source: LED 645 nm ±...
..., PDF417, microPDF, MaxiCode, Data Matrix, QR Code, UCC, EAN Composites, Postals, Aztec (Image Transfer) - BMP, TIFF, or JPEG output on USB and RS232 Interfaces System Interfaces: PC Keyboard Wedge, RS232, USB, RS485 (external via cable) Print Contrast: 20% Minimum Reflectance Difference Number Characters Read: 4096 Bytes Maximum Beeper Operation: 7 tones or no beep Indicators (LED) Default Settings: High Intensity Blue The imager is idle. Design Specifications Operational Light Source: LED 645 nm ±...
User Guide
Page 39
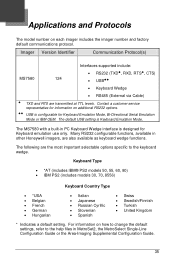
... is configurable for Keyboard emulation use only. The MS7580 with a built-in PC Keyboard Wedge interface is Keyboard Emulation Mode. For information on how to change the default settings, refer to the help files in other Honeywell imagers, are the most important selectable options specific to the keyboard wedge. Contact a customer service representative for information on each imager includes the imager number and factory default communications protocol. The default USB setting is designed for Keyboard Emulation Mode, Bi-Directional Serial Emulation Mode or IBM OEM. Keyboard...
... is configurable for Keyboard emulation use only. The MS7580 with a built-in PC Keyboard Wedge interface is Keyboard Emulation Mode. For information on how to change the default settings, refer to the help files in other Honeywell imagers, are the most important selectable options specific to the keyboard wedge. Contact a customer service representative for information on each imager includes the imager number and factory default communications protocol. The default USB setting is designed for Keyboard Emulation Mode, Bi-Directional Serial Emulation Mode or IBM OEM. Keyboard...
User Guide
Page 41
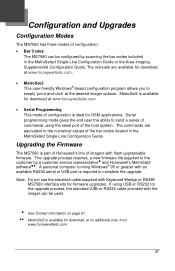
... bar codes included in the MetroSelect Single-Line Configuration Guide. Upgrading the Firmware The MS7580 is ideal for download at www.honeywellaidc.com. • Serial Programming This mode of configuration is part of Honeywell's line of imagers with flash upgradeable firmware. Note: Do not use the standard cable supplied with the imager can be used. See Contact Information on page 61. MetroSet2 is required to complete the upgrade. Serial programming mode gives the end-user the ability to send a series of commands using USB...
... bar codes included in the MetroSelect Single-Line Configuration Guide. Upgrading the Firmware The MS7580 is ideal for download at www.honeywellaidc.com. • Serial Programming This mode of configuration is part of Honeywell's line of imagers with flash upgradeable firmware. Note: Do not use the standard cable supplied with the imager can be used. See Contact Information on page 61. MetroSet2 is required to complete the upgrade. Serial programming mode gives the end-user the ability to send a series of commands using USB...

User Guide
Page 42
... flash upgrade. Choose Flash Utility from the list. 5. Click on the Configure Genesis/7580 Scanner button. 6. Select the COM port that the imager is complete. 38 To upgrade the firmware in the Flash Utility window. 8. Start the MetroSet2 software. 3. Choose the MS7580 Genesis from the options list located on the Open File button in the MS7580: 1. Click on the Flash Imager button to expand the supported imager list. 4. Locate and open the flash upgrade file. 9. Verify the settings...
... flash upgrade. Choose Flash Utility from the list. 5. Click on the Configure Genesis/7580 Scanner button. 6. Select the COM port that the imager is complete. 38 To upgrade the firmware in the Flash Utility window. 8. Start the MetroSet2 software. 3. Choose the MS7580 Genesis from the options list located on the Open File button in the MS7580: 1. Click on the Flash Imager button to expand the supported imager list. 4. Locate and open the flash upgrade file. 9. Verify the settings...
User Guide
Page 46
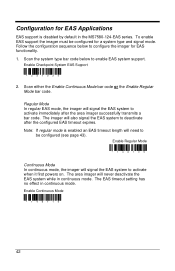
... regular mode is disabled by default in the MS7580-124-EAS series. Scan the system type bar code below to deactivate after the area imager successfully transmits a bar code. The EAS timeout setting has no effect in continuous mode. To enable EAS support the imager must be configured (see page 43). Enable Checkpoint System EAS Support ³ 337220 2. Enable Continuous Mode ³ 146115 42 Scan either the Enable Continuous Mode bar code or the Enable Regular Mode bar code. The area imager will signal...
... regular mode is disabled by default in the MS7580-124-EAS series. Scan the system type bar code below to deactivate after the area imager successfully transmits a bar code. The EAS timeout setting has no effect in continuous mode. To enable EAS support the imager must be configured (see page 43). Enable Checkpoint System EAS Support ³ 337220 2. Enable Continuous Mode ³ 146115 42 Scan either the Enable Continuous Mode bar code or the Enable Regular Mode bar code. The area imager will signal...


