
User Guide
Page 5
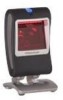
... The MS7580 Genesis™ is a high performance presentation area-imaging bar code imager that instantly turns on the model number (i.e., MS7580-124-EAS). Decoding and functional capability is limited and imagers will ...MS7580-124 • RS232 • USB • Keyboard Wedge • RS485 (External via Cable) EAS equipped models are easily loaded into Flash memory. Genesis utilizes custom decoder software, for superior image quality. If you wish to decode PDF, 2D or OCR fonts without proper limited use licenses provided by Honeywell...
... The MS7580 Genesis™ is a high performance presentation area-imaging bar code imager that instantly turns on the model number (i.e., MS7580-124-EAS). Decoding and functional capability is limited and imagers will ...MS7580-124 • RS232 • USB • Keyboard Wedge • RS485 (External via Cable) EAS equipped models are easily loaded into Flash memory. Genesis utilizes custom decoder software, for superior image quality. If you wish to decode PDF, 2D or OCR fonts without proper limited use licenses provided by Honeywell...

User Guide
Page 6
... for the specific protocol being used. Base Kit Components Part # MS7580-124 Description Genesis 7580 Presentation Area Imager 00-02544 MetroSelect® Single-Line Configuration Guide 00-05252 Area-Imaging Supplemental Configuration Guide* GEN-7580-UG Genesis 7580 Installation and User's Guide* EAS equipped models are... DC Power Transformer - See pages 39-47 for additional product information. Manuals are indicated with an EAS extension on the model number (i.e., MS7580-124-EAS).
... for the specific protocol being used. Base Kit Components Part # MS7580-124 Description Genesis 7580 Presentation Area Imager 00-02544 MetroSelect® Single-Line Configuration Guide 00-05252 Area-Imaging Supplemental Configuration Guide* GEN-7580-UG Genesis 7580 Installation and User's Guide* EAS equipped models are... DC Power Transformer - See pages 39-47 for additional product information. Manuals are indicated with an EAS extension on the model number (i.e., MS7580-124-EAS).
User Guide
Page 10
... and apply pressure to the MS7580-124-EAS Genesis with integrated RF EAS antenna. 6 Pull gently on the cable strain relief to disconnect the cable from the imager. Insert the cable's modular connector into the shape shown below. 3. Locate the small pinhole on the imager. 2. Disconnecting the Cable MS7580-124-EAS Model Note See... Turn the host power off and disconnect the power supply from the cable before attempting to ensure the cable is not fully latched, the imager may power intermittently. Pull gently on the strain-relief of the cable to remove the cable from the...
... and apply pressure to the MS7580-124-EAS Genesis with integrated RF EAS antenna. 6 Pull gently on the cable strain relief to disconnect the cable from the imager. Insert the cable's modular connector into the shape shown below. 3. Locate the small pinhole on the imager. 2. Disconnecting the Cable MS7580-124-EAS Model Note See... Turn the host power off and disconnect the power supply from the cable before attempting to ensure the cable is not fully latched, the imager may power intermittently. Pull gently on the strain-relief of the cable to remove the cable from the...

User Guide
Page 11
... and easily accessible. 6. Installation Notes • MS7580-124-EAS models are using the external power supply shipped with the MS7580. 7 Honeywell recommends using the same communication protocol. The MS7580 requires 12V power to a dedicated COM port on... the cable. 5. Plug the interface cable's modular connector into the power jack on the host device. 4. Turn on power to the MetroSelect Single-Line Configuration Guide (PN 00-02544) or MetroSet2's help files for EAS equipped Genesis models. • Plugging the imager...
... and easily accessible. 6. Installation Notes • MS7580-124-EAS models are using the external power supply shipped with the MS7580. 7 Honeywell recommends using the same communication protocol. The MS7580 requires 12V power to a dedicated COM port on... the cable. 5. Plug the interface cable's modular connector into the power jack on the host device. 4. Turn on power to the MetroSelect Single-Line Configuration Guide (PN 00-02544) or MetroSet2's help files for EAS equipped Genesis models. • Plugging the imager...
User Guide
Page 42
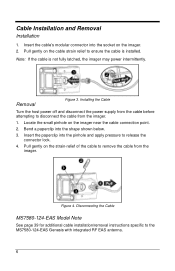
...Choose Flash Utility from the list. 5. Locate and open the flash upgrade file. 9. Choose the MS7580 Genesis from the options list located on the Flash Imager button to expand the supported imager list. 4. Click on the plus sign (+) next to POS Scanners to begin the flash upgrade.... Plug the imager into a serial communication port on the Configure Genesis/7580 Scanner button. 6. Click on the host system. 2. Start the MetroSet2 software. 3. Verify the settings listed in the MS7580: 1. To upgrade the firmware in the Flash Utility ...
...Choose Flash Utility from the list. 5. Locate and open the flash upgrade file. 9. Choose the MS7580 Genesis from the options list located on the Flash Imager button to expand the supported imager list. 4. Click on the plus sign (+) next to POS Scanners to begin the flash upgrade.... Plug the imager into a serial communication port on the Configure Genesis/7580 Scanner button. 6. Click on the host system. 2. Start the MetroSet2 software. 3. Verify the settings listed in the MS7580: 1. To upgrade the firmware in the Flash Utility ...
User Guide
Page 43
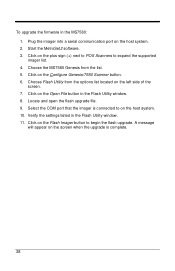
... with an integrated antenna for MS7580-124-EAS kits containing an RS232, MX-5S114-E-3 cable or a USB, MX-5S236-E-3 cable. Figure 26. Antenna Connect 39 Insert the cable's EAS connector into the antenna connector on the imager. The following information is applicable... for Electronic Article Surveillance (EAS) system support. MS7580-124-EAS Model MS7580-124-EAS models are equipped with the manufacturer's EAS system documentation for successful integration of an MS7580-124-EAS Genesis. Integrated RF EAS ...
... with an integrated antenna for MS7580-124-EAS kits containing an RS232, MX-5S114-E-3 cable or a USB, MX-5S236-E-3 cable. Figure 26. Antenna Connect 39 Insert the cable's EAS connector into the antenna connector on the imager. The following information is applicable... for Electronic Article Surveillance (EAS) system support. MS7580-124-EAS Model MS7580-124-EAS models are equipped with the manufacturer's EAS system documentation for successful integration of an MS7580-124-EAS Genesis. Integrated RF EAS ...

User Guide
Page 53
Back/Connector View of the MS7580 RS232 Keyboard Wedge Pin 1 2 3 4 5 6 7 8 9 10 SHELL Function Signal/Power Ground CTS/DTR Input RS232 Receive Input No Connect No Connect RTS Output ... for pass-through functionality. Signals on Pin 6 and 8 are TTL level RS232 output signals. ‡ See page 46 for pinout information specific to the MS7580-124-EAS Genesis model. 49 Imager and Cable Terminations Standard Imager Pinouts‡ Figure 34.
Back/Connector View of the MS7580 RS232 Keyboard Wedge Pin 1 2 3 4 5 6 7 8 9 10 SHELL Function Signal/Power Ground CTS/DTR Input RS232 Receive Input No Connect No Connect RTS Output ... for pass-through functionality. Signals on Pin 6 and 8 are TTL level RS232 output signals. ‡ See page 46 for pinout information specific to the MS7580-124-EAS Genesis model. 49 Imager and Cable Terminations Standard Imager Pinouts‡ Figure 34.