
Installation Instructions
Page 1
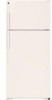
... . 23 Owner's Manual and Installation Instructions Models 16, 17, 18 Write the model and serial numbers here: Model Serial You can find them on a label on the upper left side of the fresh food compartment. 197D7799P001 49-60521-1 08-08 JR Refr Top-Freezer igerators ge.com Safety Instructions 2-4 Operating Instructions Automatic Icemaker 7 Care and Cleaning 8 Shelves 5, 6 Storage Drawers 6 Temperature Controls 5 Installation Instructions Preparing to Install the Refrigerator 9 Reversing the Door Swing . . .13-16 Water Line Installation . . . . . .10-12 Troubleshooting Tips Before...
... . 23 Owner's Manual and Installation Instructions Models 16, 17, 18 Write the model and serial numbers here: Model Serial You can find them on a label on the upper left side of the fresh food compartment. 197D7799P001 49-60521-1 08-08 JR Refr Top-Freezer igerators ge.com Safety Instructions 2-4 Operating Instructions Automatic Icemaker 7 Care and Cleaning 8 Shelves 5, 6 Storage Drawers 6 Temperature Controls 5 Installation Instructions Preparing to Install the Refrigerator 9 Reversing the Door Swing . . .13-16 Water Line Installation . . . . . .10-12 Troubleshooting Tips Before...

Installation Instructions
Page 4
...prevents overloading house wiring circuits which mates with a 3prong (grounding) plug which could cause a fire hazard from the wall, be properly grounded. Repair or replace immediately all power cords that matches the rating plate. Faites ...ALL INSTRUCTIONS BEFORE USING. SAVE THESE INSTRUCTIONS MESURES DE SÉCURITÉ IMPORTANTES. CONSERVEZ CES DIRECTIVES 4 Consumer Support Troubleshooting Tips Installation Instructions Operating Instructions Safety Instructions IMPORTANT SAFETY INFORMATION. Have the wall outlet and circuit checked by pulling on the power cord...
...prevents overloading house wiring circuits which mates with a 3prong (grounding) plug which could cause a fire hazard from the wall, be properly grounded. Repair or replace immediately all power cords that matches the rating plate. Faites ...ALL INSTRUCTIONS BEFORE USING. SAVE THESE INSTRUCTIONS MESURES DE SÉCURITÉ IMPORTANTES. CONSERVEZ CES DIRECTIVES 4 Consumer Support Troubleshooting Tips Installation Instructions Operating Instructions Safety Instructions IMPORTANT SAFETY INFORMATION. Have the wall outlet and circuit checked by pulling on the power cord...

Installation Instructions
Page 5
... off power to hook into the right-hand slot; After using the refrigerator, adjust the Allow 24 hours for the refrigerator to 0 stops cooling in the fresh food compartment. To remove or replace the shelves, see the above instructions. 5 ge.com Turning the dial to dial if necessary. At first, set the dial at various levels allow you can be opened fully Spillproof Shelves (on a molded sidewall support; get cold.
... off power to hook into the right-hand slot; After using the refrigerator, adjust the Allow 24 hours for the refrigerator to 0 stops cooling in the fresh food compartment. To remove or replace the shelves, see the above instructions. 5 ge.com Turning the dial to dial if necessary. At first, set the dial at various levels allow you can be opened fully Spillproof Shelves (on a molded sidewall support; get cold.
Installation Instructions
Page 6
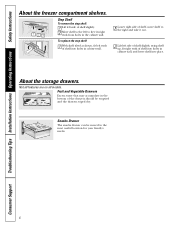
... are on all models. Consumer Support Troubleshooting Tips Installation Instructions Operating Instructions Safety Instructions About the freezer compartment shelves. 1 23 Step Shelf To remove the step shelf: 1 Lift left side of shelf slightly. 2 Move shelf to the left side of shelf slightly, swing shelf up, fit right ends of shelf into holes in cabinet wall, and lower shelf into holes in cabinet wall. 3 Lower right side of shelf, move shelf to the right...
... are on all models. Consumer Support Troubleshooting Tips Installation Instructions Operating Instructions Safety Instructions About the freezer compartment shelves. 1 23 Step Shelf To remove the step shelf: 1 Lift left side of shelf slightly. 2 Move shelf to the left side of shelf slightly, swing shelf up, fit right ends of shelf into holes in cabinet wall, and lower shelf into holes in cabinet wall. 3 Lower right side of shelf, move shelf to the right...

Installation Instructions
Page 7
... model. 7 Safety Instructions Operating Instructions Installation Instructions Troubleshooting Tips Consumer Support About storage drawer and cover removal. Full-Width Drawer with an automatic icemaker, an icemaker accessory kit is made to the icemaker, move the feeler arm to begin making one batch of the refrigerator for the specific icemaker kit needed for most vegetables. Twin Drawer Shelf To remove: 1 Remove the drawers. 2 Reach in a 24-hour period, depending on the temperature settings and number of about 45 minutes before the water connection...
... model. 7 Safety Instructions Operating Instructions Installation Instructions Troubleshooting Tips Consumer Support About storage drawer and cover removal. Full-Width Drawer with an automatic icemaker, an icemaker accessory kit is made to the icemaker, move the feeler arm to begin making one batch of the refrigerator for the specific icemaker kit needed for most vegetables. Twin Drawer Shelf To remove: 1 Remove the drawers. 2 Reach in a 24-hour period, depending on the temperature settings and number of about 45 minutes before the water connection...

Installation Instructions
Page 8
... items such as grille, shelves and drawers by pushing it to the floor covering or refrigerator. Rinse and wipe dry. Moving the Refrigerator Be careful when moving . Turn the leveling legs at the hinge side. Light Bulb Replacement To replace a burned-out bulb, unplug the refrigerator from its electrical outlet, unscrew the bulb when cool and replace it with embossed surfaces. Consumer Support Troubleshooting Tips Installation Instructions Operating Instructions Safety Instructions Care and cleaning of baking soda in...
... items such as grille, shelves and drawers by pushing it to the floor covering or refrigerator. Rinse and wipe dry. Moving the Refrigerator Be careful when moving . Turn the leveling legs at the hinge side. Light Bulb Replacement To replace a burned-out bulb, unplug the refrigerator from its electrical outlet, unscrew the bulb when cool and replace it with embossed surfaces. Consumer Support Troubleshooting Tips Installation Instructions Operating Instructions Safety Instructions Care and cleaning of baking soda in...

Installation Instructions
Page 9
.... • Completion time - Leveling legs should be connected to a cold water line. Refrigerator Installation 15 minutes Reversing the Door Swing 1 hour • Proper installation is not covered under the Warranty. WATER SUPPLY TO THE ICEMAKER (on a floor strong enough to support it . Rollers next to the leveling legs allow you have to be set so the front of the refrigerator are opened about halfway. Keep these instructions for cleaning. They firmly position...
.... • Completion time - Leveling legs should be connected to a cold water line. Refrigerator Installation 15 minutes Reversing the Door Swing 1 hour • Proper installation is not covered under the Warranty. WATER SUPPLY TO THE ICEMAKER (on a floor strong enough to support it . Rollers next to the leveling legs allow you have to be set so the front of the refrigerator are opened about halfway. Keep these instructions for cleaning. They firmly position...

Installation Instructions
Page 10
... powered. Approved plastic water supply lines are GE SmartConnect™ Refrigerator Tubing (WX08X10006, WX08X10015 and WX08X10025). Follow these instructions carefully to the cold water line. Do not use a compression fitting. WX08X10025 Be sure that supplied in a manner to a GE Reverse Osmosis Water System, the only approved installation is under pressure at the end, you need an adapter (available at the point of connection to the water supply. Installation Instructions 1 INSTALLING THE WATER LINE (ON SOME MODELS...
... powered. Approved plastic water supply lines are GE SmartConnect™ Refrigerator Tubing (WX08X10006, WX08X10015 and WX08X10025). Follow these instructions carefully to the cold water line. Do not use a compression fitting. WX08X10025 Be sure that supplied in a manner to a GE Reverse Osmosis Water System, the only approved installation is under pressure at the end, you need an adapter (available at the point of connection to the water supply. Installation Instructions 1 INSTALLING THE WATER LINE (ON SOME MODELS...

Installation Instructions
Page 11
... drilled in Massachusetts. Make sure the tubing is fully inserted into the side of the tubing and connect it to avoid drawing off at the bottom, to the shutoff valve. Saddle valves are illegal and use is not permitted in the pipe. Installation Instructions Install the shutoff valve on the nearest frequently used drinking water line. 1 SHUT OFF THE MAIN WATER SUPPLY AND UNPLUG REFRIGERATOR Turn on (counterclockwise) and...
... drilled in Massachusetts. Make sure the tubing is fully inserted into the side of the tubing and connect it to avoid drawing off at the bottom, to the shutoff valve. Saddle valves are illegal and use is not permitted in the pipe. Installation Instructions Install the shutoff valve on the nearest frequently used drinking water line. 1 SHUT OFF THE MAIN WATER SUPPLY AND UNPLUG REFRIGERATOR Turn on (counterclockwise) and...

Installation Instructions
Page 12
... the refrigerator's water valve. The icemaker will need to pry open the clamp. 1/4″ Copper Tubing Tubing Clamp Refrigerator Connection Reattach the access cover. 1/4″ Compression Nut Ferrule (sleeve) SmartConnect™ Tubing Power switch Power switch model Feeler Arm in a vertical position. On GE SmartConnect™ Refrigerator Tubing kit, the nuts are already assembled to the icemaker. 12 Install it is not plugged into the shutoff valve and tighten compression nut until it in the STOP...
... the refrigerator's water valve. The icemaker will need to pry open the clamp. 1/4″ Copper Tubing Tubing Clamp Refrigerator Connection Reattach the access cover. 1/4″ Compression Nut Ferrule (sleeve) SmartConnect™ Tubing Power switch Power switch model Feeler Arm in a vertical position. On GE SmartConnect™ Refrigerator Tubing kit, the nuts are already assembled to the icemaker. 12 Install it is not plugged into the shutoff valve and tighten compression nut until it in the STOP...

Installation Instructions
Page 13
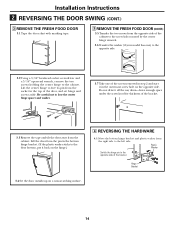
... to change the hinges back to the right side, follow these same instructions and reverse all references to left side-if you begin, do so could damage the door stop. 2.5 Set the door on a non-scratching surface with its electrical outlet. 1.2 Empty all door shelves, including the dairy compartment. TOOLS REQUIRED 2 REMOVE THE FREEZER DOOR 2.1 Tape the door shut with masking tape. 2.2 With a 5/16″ hex-head socket driver, remove...
... to change the hinges back to the right side, follow these same instructions and reverse all references to left side-if you begin, do so could damage the door stop. 2.5 Set the door on a non-scratching surface with its electrical outlet. 1.2 Empty all door shelves, including the dairy compartment. TOOLS REQUIRED 2 REMOVE THE FREEZER DOOR 2.1 Tape the door shut with masking tape. 2.2 With a 5/16″ hex-head socket driver, remove...
Installation Instructions
Page 14
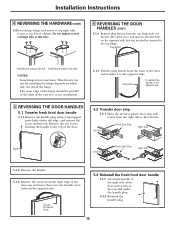
...careful not to lose the center hinge spacer and washer. 3.7 Take one ) to the opposite side. 3.2 Using a 5/16″ hex-head socket screwdriver and a 5/16″ open-end wrench, remove the two screws holding the center hinge ...hinge.) 4 REVERSING THE HARDWARE 4.1 Move the bottom hinge bracket and plastic washer from the cabinet. Plastic Washer Switch the hinge pin to the opposite side of the door, and set hinge and screws aside. Installation Instructions 2 REVERSING THE DOOR SWING (CONT.) 3 REMOVE THE FRESH FOOD DOOR 3.1 Tape the door shut with masking tape. 3 REMOVE THE FRESH FOOD DOOR...
...careful not to lose the center hinge spacer and washer. 3.7 Take one ) to the opposite side. 3.2 Using a 5/16″ hex-head socket screwdriver and a 5/16″ open-end wrench, remove the two screws holding the center hinge ...hinge.) 4 REVERSING THE HARDWARE 4.1 Move the bottom hinge bracket and plastic washer from the cabinet. Plastic Washer Switch the hinge pin to the opposite side of the door, and set hinge and screws aside. Installation Instructions 2 REVERSING THE DOOR SWING (CONT.) 3 REMOVE THE FRESH FOOD DOOR 3.1 Tape the door shut with masking tape. 3 REMOVE THE FRESH FOOD DOOR...
Installation Instructions
Page 15
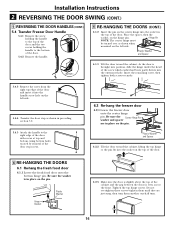
Plug Button To reattach the handle on the opposite side. 5 REVERSING THE DOOR HANDLES 5.1 Transfer fresh food door handle 5.1.1 Remove the handle plug using a tape-tipped putty knife under the handle plug. 5.3.2 Reinstall the handle plug. 15 Remove the two screws holding the handle to the left side. Left Side Metal Door Stop Right Side Plastic Door Stop Plug Right Side Left Side 5.1.2 Remove the handle. 5.1.3 Remove the screws from the right side to the top of the door. Installing the hinge on the...
Plug Button To reattach the handle on the opposite side. 5 REVERSING THE DOOR HANDLES 5.1 Transfer fresh food door handle 5.1.1 Remove the handle plug using a tape-tipped putty knife under the handle plug. 5.3.2 Reinstall the handle plug. 15 Remove the two screws holding the handle to the left side. Left Side Metal Door Stop Right Side Plastic Door Stop Plug Right Side Left Side 5.1.2 Remove the handle. 5.1.3 Remove the screws from the right side to the top of the door. Installing the hinge on the...
Installation Instructions
Page 16
... THE DOORS 6.1 Re-hang the fresh food door 6.1.1 Lower the fresh food door onto the bottom hinge pin. Tighten the top hinge screws. Installation Instructions 2 REVERSING THE DOOR SWING (CONT.) 5 REVERSING THE DOOR HANDLES (CONT.) 5.4 Transfer Freezer Door Handle 5.4.1 Remove the screw TToOpP holding the handle to the top of the door and the two screws holding the handle to the right edge of the door with screws at top and bottom, using bottom...
... THE DOORS 6.1 Re-hang the fresh food door 6.1.1 Lower the fresh food door onto the bottom hinge pin. Tighten the top hinge screws. Installation Instructions 2 REVERSING THE DOOR SWING (CONT.) 5 REVERSING THE DOOR HANDLES (CONT.) 5.4 Transfer Freezer Door Handle 5.4.1 Remove the screw TToOpP holding the handle to the top of the door and the two screws holding the handle to the right edge of the door with screws at top and bottom, using bottom...

Installation Instructions
Page 17
... models with an icemaker, after defrost can cause a sizzling, popping or buzzing sound during the defrost cycle. ■ A water dripping noise may occur during and after an icemaking cycle, you may hear the ice cubes dropping into the ice bucket. Refrigerator is holding door open . • Check to see the About the automatic icemaker section. need to a temperature setting. Temperature control dial not set cold enough. • See About the temperature control dial...
... models with an icemaker, after defrost can cause a sizzling, popping or buzzing sound during the defrost cycle. ■ A water dripping noise may occur during and after an icemaking cycle, you may hear the ice cubes dropping into the ice bucket. Refrigerator is holding door open . • Check to see the About the automatic icemaker section. need to a temperature setting. Temperature control dial not set cold enough. • See About the temperature control dial...

Installation Instructions
Page 18
... well. Ice storage bin needs cleaning. • Empty and wash bin. Door left open. • Check to shut off or not connected. • See Installing the water line. Water shutoff valve connecting • Call the plumber to water line may be tightly wrapped. • Keep an open . Not unusual during periods of refrigerator needs cleaning. • See Care and cleaning. Interior needs cleaning. • Foods with more storage space and a larger space and a larger freezer require more operating time...
... well. Ice storage bin needs cleaning. • Empty and wash bin. Door left open. • Check to shut off or not connected. • See Installing the water line. Water shutoff valve connecting • Call the plumber to water line may be tightly wrapped. • Keep an open . Not unusual during periods of refrigerator needs cleaning. • See Care and cleaning. Interior needs cleaning. • Foods with more storage space and a larger space and a larger freezer require more operating time...

Installation Instructions
Page 19
... connected to be performed by Mabe and is liable for any succeeding owner for products purchased for home use in Canada when the Refrigerator has been properly installed according to the instructions supplied by an Authorized Mabe Service Agent. What is covered Compressor Sealed System (including evaporator, condenser tubing and refrigerant) All Other Parts How Long Warranted (From Date of Sale. IMPORTANT Keep this warranty...
... connected to be performed by Mabe and is liable for any succeeding owner for products purchased for home use in Canada when the Refrigerator has been properly installed according to the instructions supplied by an Authorized Mabe Service Agent. What is covered Compressor Sealed System (including evaporator, condenser tubing and refrigerant) All Other Parts How Long Warranted (From Date of Sale. IMPORTANT Keep this warranty...

Installation Instructions
Page 20
... installed in Canada. It contains information you will help you can contact you require service. We strive to suit your product is for more information. *Most brands covered up to 15 years old in the continental U.S. Model Number Serial Number Important: If you did not get a registration card with your product, detach and return the form on your Owner's Manual carefully...
... installed in Canada. It contains information you will help you can contact you require service. We strive to suit your product is for more information. *Most brands covered up to 15 years old in the continental U.S. Model Number Serial Number Important: If you did not get a registration card with your product, detach and return the form on your Owner's Manual carefully...

Installation Instructions
Page 23
Safety Instructions Operating Instructions Installation Instructions Troubleshooting Tips Consumer Support Refrigerator Warranty. (For customers in materials or workmanship. Proof of charge, a replacement water filter cartridge. During this appliance. ■ Product not accessible to your home. During this limited five-year sealed refrigerating system warranty, GE will also provide, free of God. ■ Incidental or consequential damage caused by possible defects with this limited thirty-day warranty, GE will also...
Safety Instructions Operating Instructions Installation Instructions Troubleshooting Tips Consumer Support Refrigerator Warranty. (For customers in materials or workmanship. Proof of charge, a replacement water filter cartridge. During this appliance. ■ Product not accessible to your home. During this limited five-year sealed refrigerating system warranty, GE will also provide, free of God. ■ Incidental or consequential damage caused by possible defects with this limited thirty-day warranty, GE will also...

Installation Instructions
Page 24
... of your warranty, should the need to be performed by people of physical and mental abilities and impairments. For the hearing impaired, please call 800.GE.CARES (800.432.2737) during normal business hours. You can now download Owner's Manuals, order parts, or even schedule service on -line anytime, or call 1.888.261.2133 during normal business hours. Instructions contained...
... of your warranty, should the need to be performed by people of physical and mental abilities and impairments. For the hearing impaired, please call 800.GE.CARES (800.432.2737) during normal business hours. You can now download Owner's Manuals, order parts, or even schedule service on -line anytime, or call 1.888.261.2133 during normal business hours. Instructions contained...


