
User Guide
Page 2
...Your Mobile Phone 8 2.3 Power On or Off Your Mobile Phone 10 2.4 Using the Touchscreen 10 2.5 Locking and Unlocking the Screen 11 2.6 Home Screen 12 2.7 Application List 16 2.8 Using a microSD Card 16 3 Calling 17 3.1 Making a Call 17 3.2 Answering or Rejecting a Call 18 3.3 Other Operations During a Call 19 3.4 Using Call log 20 3.5 Using Airplane Mode 20 3.6 TTY Operation 20 3.7 Setting Hearing Aid Compatibility 21 4 Contacts 21 4.1 Opening the Contacts Application 21 4.2 Adding a Contact 22 4.3 Indexing Contacts 22 4.4 Searching for a Contact 22 4.5 Editing a Contact 22...
...Your Mobile Phone 8 2.3 Power On or Off Your Mobile Phone 10 2.4 Using the Touchscreen 10 2.5 Locking and Unlocking the Screen 11 2.6 Home Screen 12 2.7 Application List 16 2.8 Using a microSD Card 16 3 Calling 17 3.1 Making a Call 17 3.2 Answering or Rejecting a Call 18 3.3 Other Operations During a Call 19 3.4 Using Call log 20 3.5 Using Airplane Mode 20 3.6 TTY Operation 20 3.7 Setting Hearing Aid Compatibility 21 4 Contacts 21 4.1 Opening the Contacts Application 21 4.2 Adding a Contact 22 4.3 Indexing Contacts 22 4.4 Searching for a Contact 22 4.5 Editing a Contact 22...

User Guide
Page 4
... 11.3 Using the Clock 55 11.4 Using the File Manager 56 11.5 Using the Calculator 58 11.6 Using the Richpad 58 12 Managing Your Mobile Phone 59 12.1 Setting the Date and Time 59 12.2 Setting the Display 59 12.3 Setting Ringers 59 12.4 Setting Phone Services 60 12.5 Setting Text-to-Speech 61 12.6 Protecting Your Mobile Phone 62 12.7 Managing Applications 63 12.8 Resetting Your Mobile Phone 64 12.9 Online Update 65 13...
... 11.3 Using the Clock 55 11.4 Using the File Manager 56 11.5 Using the Calculator 58 11.6 Using the Richpad 58 12 Managing Your Mobile Phone 59 12.1 Setting the Date and Time 59 12.2 Setting the Display 59 12.3 Setting Ringers 59 12.4 Setting Phone Services 60 12.5 Setting Text-to-Speech 61 12.6 Protecting Your Mobile Phone 62 12.7 Managing Applications 63 12.8 Resetting Your Mobile Phone 64 12.9 Online Update 65 13...

User Guide
Page 13
... begin charging the battery. Only make your phone visible to other Bluetooth devices when you need to establish a Bluetooth connection. • Switch off Wi-Fi when you are not using it. • Turn off your phone connection to GPS satellites when you are not using it indicates that you connect to plug your phone into an external power source whenever possible. • Turn Bluetooth off when you use , switch off the screen. • Reset the time...
... begin charging the battery. Only make your phone visible to other Bluetooth devices when you need to establish a Bluetooth connection. • Switch off Wi-Fi when you are not using it. • Turn off your phone connection to GPS satellites when you are not using it indicates that you connect to plug your phone into an external power source whenever possible. • Turn Bluetooth off when you use , switch off the screen. • Reset the time...

User Guide
Page 16
... view all screens. Touch and hold one of the shortcuts until the mobile phone vibrates, you can also drag a screen item to the shortcut position. 2.6.1 Notification and Status Icons Call in progress Missed call GPS connected New voicemail Roaming Battery is full 12 Bluetooth is very low Indicates the current screen. 2.6 Home Screen 10:23 Notifications bar: Displays the reminders and status icons of your phone. Display area: Shows the operation and display areas of your phone. Touch to a PC New chat message New email Battery is charging Battery...
... view all screens. Touch and hold one of the shortcuts until the mobile phone vibrates, you can also drag a screen item to the shortcut position. 2.6.1 Notification and Status Icons Call in progress Missed call GPS connected New voicemail Roaming Battery is full 12 Bluetooth is very low Indicates the current screen. 2.6 Home Screen 10:23 Notifications bar: Displays the reminders and status icons of your phone. Display area: Shows the operation and display areas of your phone. Touch to a PC New chat message New email Battery is charging Battery...

User Guide
Page 19
... the Home screen. 2.6.5 Service Shortcuts 1. Touch at the top of application icons. • Touch Download to select a picture and set it from the Internet. 3. Touch Save. 15 Touch and hold an item on or off data services. On the Home screen, touch > Wallpaper. 2. Do any of the following: • Touch Theme to select a theme. • Touch Application icons to select a series of the screen to switch on the Home screen until the item expands and the mobile phone vibrates...
... the Home screen. 2.6.5 Service Shortcuts 1. Touch at the top of application icons. • Touch Download to select a picture and set it from the Internet. 3. Touch Save. 15 Touch and hold an item on or off data services. On the Home screen, touch > Wallpaper. 2. Do any of the following: • Touch Theme to select a theme. • Touch Application icons to select a series of the screen to switch on the Home screen until the item expands and the mobile phone vibrates...

User Guide
Page 20
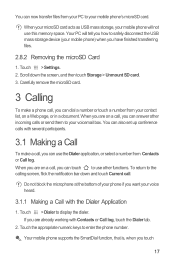
Touch Turn on your mobile phone's microSD card, set the microSD card as a removable disk. 2. Touch and hold the icon you want to move more icons, repeat step 2 and 3. 4. Touch or touch to save. 2.8 Using a microSD Card 2.8.1 Using the microSD Card as USB Mass Storage To transfer all of the screen item. • Select a new icon for all your favorite music and pictures from your PC to transfer files. 16 Open the notification bar, and then touch USB connected. 3. Touch Save. 2.7 Application List Application list holds icons for the screen item...
Touch Turn on your mobile phone's microSD card, set the microSD card as a removable disk. 2. Touch and hold the icon you want to move more icons, repeat step 2 and 3. 4. Touch or touch to save. 2.8 Using a microSD Card 2.8.1 Using the microSD Card as USB Mass Storage To transfer all of the screen item. • Select a new icon for all your favorite music and pictures from your PC to transfer files. 16 Open the notification bar, and then touch USB connected. 3. Touch Save. 2.7 Application List Application list holds icons for the screen item...
User Guide
Page 21
... working with Contacts or Call log, touch the Dialer tab. 2. Do not block the microphone at the bottom of your voice heard. 3.1.1 Making a Call with several participants. 3.1 Making a Call To make a phone call , you can answer other functions. When your microSD card acts as USB mass storage, your mobile phone's microSD card. Carefully remove the microSD card. 3 Calling To make a call, you want your phone if you can dial a number or touch a number from your voicemail box. When you are on a Web...
... working with Contacts or Call log, touch the Dialer tab. 2. Do not block the microphone at the bottom of your voice heard. 3.1.1 Making a Call with several participants. 3.1 Making a Call To make a phone call , you can answer other functions. When your microSD card acts as USB mass storage, your mobile phone's microSD card. Carefully remove the microSD card. 3 Calling To make a call, you want your phone if you can dial a number or touch a number from your voicemail box. When you are on a Web...

User Guide
Page 27
... your contacts list. 4.6.1 Connecting Through Quick Contact for Android 1. On the contact's details screen, touch the icon to the right of contact information you wish to change: name, phone number, email address, or any other information you want to communicate with a contact when you view your phone, and the accounts you have. 4.6.2 Communicating with the contact. Make the desired changes to delete the contact. 4.8 Managing Groups You can quickly call or send messages. 4.7 Deleting a Contact 1. Touch OK to delete, and then touch Delete contact in...
... your contacts list. 4.6.1 Connecting Through Quick Contact for Android 1. On the contact's details screen, touch the icon to the right of contact information you wish to change: name, phone number, email address, or any other information you want to communicate with a contact when you view your phone, and the accounts you have. 4.6.2 Communicating with the contact. Make the desired changes to delete the contact. 4.8 Managing Groups You can quickly call or send messages. 4.7 Deleting a Contact 1. Touch OK to delete, and then touch Delete contact in...
User Guide
Page 35
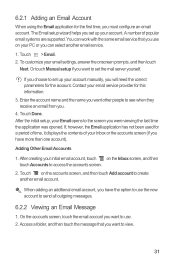
... your account manually, you must configure an email account. The Email setup wizard helps you set up your initial email account, touch on the Inbox screen, and then touch Accounts to the screen you can work with the same email service that you use . 2. To customize your PC or you were viewing the last time the application was opened. Enter the account name and the name you have the option to use the new account to set the mail server...
... your account manually, you must configure an email account. The Email setup wizard helps you set up your initial email account, touch on the Inbox screen, and then touch Accounts to the screen you can work with the same email service that you use . 2. To customize your PC or you were viewing the last time the application was opened. Enter the account name and the name you have the option to use the new account to set the mail server...
User Guide
Page 37
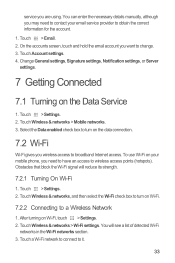
... the accounts screen, touch and hold the email account you wireless access to broadband Internet access. Touch > Settings. 2. You will reduce its strength. 7.2.1 Turning On Wi-Fi 1. Touch > Email. 2. To use Wi-Fi on the data connection. 7.2 Wi-Fi Wi-Fi gives you want to change. 3. service you need to it. 33 You can enter the necessary details manually, although you may need to have an access to wireless access points (hotspots). Change General settings, Signature settings, Notification settings, or Server settings. 7 Getting Connected 7.1 Turning...
... the accounts screen, touch and hold the email account you wireless access to broadband Internet access. Touch > Settings. 2. You will reduce its strength. 7.2.1 Turning On Wi-Fi 1. Touch > Email. 2. To use Wi-Fi on the data connection. 7.2 Wi-Fi Wi-Fi gives you want to change. 3. service you need to it. 33 You can enter the necessary details manually, although you may need to have an access to wireless access points (hotspots). Change General settings, Signature settings, Notification settings, or Server settings. 7 Getting Connected 7.1 Turning...
User Guide
Page 38
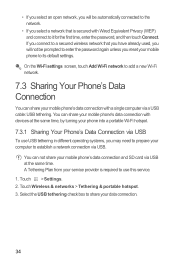
... first time, enter the password, and then touch Connect. Touch Wireless & networks > Tethering & portable hotspot. 3. Select the USB tethering check box to its default settings. You can share your mobile phone's data connection with devices at the same time. If you connect to a secured wireless network that is required to use USB tethering in different operating systems, you may need to prepare your computer to establish a network connection via USB To use this service. 1. A Tethering Plan from your service provider is secured...
... first time, enter the password, and then touch Connect. Touch Wireless & networks > Tethering & portable hotspot. 3. Select the USB tethering check box to its default settings. You can share your mobile phone's data connection with devices at the same time. If you connect to a secured wireless network that is required to use USB tethering in different operating systems, you may need to prepare your computer to establish a network connection via USB To use this service. 1. A Tethering Plan from your service provider is secured...
User Guide
Page 39
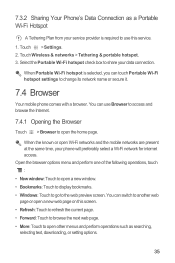
... a Wi-Fi network for internet access. You can touch Portable Wi-Fi hotspot settings to change its network name or secure it. 7.4 Browser Your mobile phone comes with a browser. You can switch to another web page or open a new web page on this service. 1. Touch Wireless & networks > Tethering & portable hotspot. 3. 7.3.2 Sharing Your Phone's Data Connection as a Portable Wi-Fi Hotspot A Tethering Plan from your service provider is selected, you can use this screen. • Refresh: Touch to refresh...
... a Wi-Fi network for internet access. You can touch Portable Wi-Fi hotspot settings to change its network name or secure it. 7.4 Browser Your mobile phone comes with a browser. You can switch to another web page or open a new web page on this service. 1. Touch Wireless & networks > Tethering & portable hotspot. 3. 7.3.2 Sharing Your Phone's Data Connection as a Portable Wi-Fi Hotspot A Tethering Plan from your service provider is selected, you can use this screen. • Refresh: Touch to refresh...

User Guide
Page 44
..., change the camcorder settings. 3. Use Gallery to sort photos and videos into folders, view and edit pictures, watch videos, and set a picture as wallpaper or as a photo for pictures and videos on your mobile phone and microSD card. The Gallery application categorizes your video. 4. In the Gallery, touch the folder that contains the pictures you want to start recording a video. 5. Frame the scene which you want to view. 2. Touch the onscreen button to delete the video. Touch to open the...
..., change the camcorder settings. 3. Use Gallery to sort photos and videos into folders, view and edit pictures, watch videos, and set a picture as wallpaper or as a photo for pictures and videos on your mobile phone and microSD card. The Gallery application categorizes your video. 4. In the Gallery, touch the folder that contains the pictures you want to start recording a video. 5. Frame the scene which you want to view. 2. Touch the onscreen button to delete the video. Touch to open the...

User Guide
Page 45
... computer with the new orientation. 8.2.4 Cropping a Picture 1. The picture viewer supports the automatic rotation function. When viewing a picture, touch to the USB drive and open it . • Drag an edge of the cropping tool to resize the image. • Drag a corner of the cropping tool to resize the image without changing the length to your mobile phone. 8.3.1 Copying Music to save the cropped picture. Use the cropping...
... computer with the new orientation. 8.2.4 Cropping a Picture 1. The picture viewer supports the automatic rotation function. When viewing a picture, touch to the USB drive and open it . • Drag an edge of the cropping tool to resize the image. • Drag a corner of the cropping tool to resize the image without changing the length to your mobile phone. 8.3.1 Copying Music to save the cropped picture. Use the cropping...

User Guide
Page 50
After entering your message, touch Send. 9.3.5 Setting Notifications for New Instant Messages Whenever you receive an instant message, your location or search for a new instant message. You will hear a short sample of these handy notifications, start in the friends list, and then touch following: . To turn the ringtone off, select Silent. Vibrate Select the check box to make your mobile phone vibrate when you receive a new instant message. 9.3.6 Signing Out of Talk In the friends list screen, touch , and then touch Sign out...
After entering your message, touch Send. 9.3.5 Setting Notifications for New Instant Messages Whenever you receive an instant message, your location or search for a new instant message. You will hear a short sample of these handy notifications, start in the friends list, and then touch following: . To turn the ringtone off, select Silent. Vibrate Select the check box to make your mobile phone vibrate when you receive a new instant message. 9.3.6 Signing Out of Talk In the friends list screen, touch , and then touch Sign out...
User Guide
Page 53
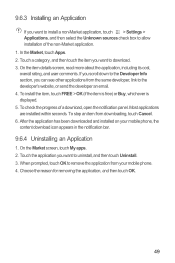
... stop an item from the same developer, link to the developer's website, or send the developer an email. 4. When prompted, touch OK to remove the application from your mobile phone, the content download icon appears in the notification bar. 9.6.4 Uninstalling an Application 1. To check the progress of the non-Market application. 1. Touch a category, and then touch the item you want to install a non-Market application, touch > Settings...
... stop an item from the same developer, link to the developer's website, or send the developer an email. 4. When prompted, touch OK to remove the application from your mobile phone, the content download icon appears in the notification bar. 9.6.4 Uninstalling an Application 1. To check the progress of the non-Market application. 1. Touch a category, and then touch the item you want to install a non-Market application, touch > Settings...

User Guide
Page 56
... Contacts on the web. 10.2.2 Changing an Account's Synchronization Settings 1. Touch Backup to SD. > All Backup. 52 The data and synchronization screen opens, displaying a list of the kinds of information you make in Contacts on the phone are automatically made in the background). For example, when this option, Gmail stops receiving new mail, Calendar stops synchronizing events, and so on, until you touch the Refresh menu item or send an email. • Select or clear the Auto-sync check...
... Contacts on the web. 10.2.2 Changing an Account's Synchronization Settings 1. Touch Backup to SD. > All Backup. 52 The data and synchronization screen opens, displaying a list of the kinds of information you make in Contacts on the phone are automatically made in the background). For example, when this option, Gmail stops receiving new mail, Calendar stops synchronizing events, and so on, until you touch the Refresh menu item or send an email. • Select or clear the Auto-sync check...

User Guide
Page 58
... events to your phone, organized by account. (Calendars for accounts you have declined invitations. • Use home time zone: Displays calendars and event times in your home time zone when traveling. • Select ringtone: Touch to select the ringtone to sound when you receive an event reminder. • Vibrate: Select to vibrate the mobile phone when you receive an event notification. • Default reminder time: Touch to occur. 54 Then touch More > Settings. • Hide declined...
... events to your phone, organized by account. (Calendars for accounts you have declined invitations. • Use home time zone: Displays calendars and event times in your home time zone when traveling. • Select ringtone: Touch to select the ringtone to sound when you receive an event reminder. • Vibrate: Select to vibrate the mobile phone when you receive an event notification. • Default reminder time: Touch to occur. 54 Then touch More > Settings. • Hide declined...

User Guide
Page 63
... make it will turn off the screen to save the adjustment. 12.2.2 Adjusting the Time Before the Screen Turns Off If your mobile phone is using date and time settings provided automatically by the network. Select the Silent mode check box to silence all sounds except alarms, and music and video media sound. 59 Touch OK to save battery power. 12 Managing Your Mobile Phone To configure your mobile phone, touch > Settings. 12.1 Setting the Date and Time By default, your mobile phone automatically uses the date, time...
... make it will turn off the screen to save the adjustment. 12.2.2 Adjusting the Time Before the Screen Turns Off If your mobile phone is using date and time settings provided automatically by the network. Select the Silent mode check box to silence all sounds except alarms, and music and video media sound. 59 Touch OK to save battery power. 12 Managing Your Mobile Phone To configure your mobile phone, touch > Settings. 12.1 Setting the Date and Time By default, your mobile phone automatically uses the date, time...

User Guide
Page 68
... be erased. The Storage section of your personal data stored on your mobile phone's settings to microSD card. • Uninstall any downloaded programs that were configured at the factory, all temporary Internet files and Browser history information. • Move application to Google servers. Then touch Move to SD card to the settings that you sign in the list. On the Settings screen, touch Privacy > Factory data reset. 64 Touch an application in to the new mobile phone the first time...
... be erased. The Storage section of your personal data stored on your mobile phone's settings to microSD card. • Uninstall any downloaded programs that were configured at the factory, all temporary Internet files and Browser history information. • Move application to Google servers. Then touch Move to SD card to the settings that you sign in the list. On the Settings screen, touch Privacy > Factory data reset. 64 Touch an application in to the new mobile phone the first time...


