

User Manual
Page 2
.... patents and other limited viewing uses only unless otherwise authorized by Macrovision Corporation, and is intended for purchasing a HUMAX Digital Satellite Receiver. GB 1 Use of this copyright protection technology must be copied, used or translated in part or whole without HUMAX's prior consent in this user's manual next to safely install, use and maintain the installation. ** Manufactured under license from Dolby Laboratories. ** Dolby and the double-D symbol...
.... patents and other limited viewing uses only unless otherwise authorized by Macrovision Corporation, and is intended for purchasing a HUMAX Digital Satellite Receiver. GB 1 Use of this copyright protection technology must be copied, used or translated in part or whole without HUMAX's prior consent in this user's manual next to safely install, use and maintain the installation. ** Manufactured under license from Dolby Laboratories. ** Dolby and the double-D symbol...
User Manual
Page 4
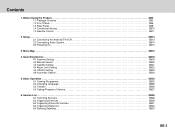
... Operation GB25 5.1 Viewing Programme GB25 5.2 Changing Language GB26 5.3 Teletext GB26 5.4 Setting Property of Service GB27 6. Service List GB28 6.1 Switching Services GB28 6.2 Organising Services GB29 6.3 Organising Favourite Services GB31 6.4 Organising Networks GB32 6.5 Deleting Satellites GB33 GB 3 Searching Service GB18 4.1 Antenna Setting GB18 4.2 Manual Search GB20 4.3 Satellite Setting GB21 4.4 Motor Limit Setting GB22 4.5 USALS Setting GB23 4.6 Automatic Search GB24 5. Contents 1. Setup ...GB13 2.1 Connecting the Antenna/TV/VCR GB13 2.2 Connecting Audio...
... Operation GB25 5.1 Viewing Programme GB25 5.2 Changing Language GB26 5.3 Teletext GB26 5.4 Setting Property of Service GB27 6. Service List GB28 6.1 Switching Services GB28 6.2 Organising Services GB29 6.3 Organising Favourite Services GB31 6.4 Organising Networks GB32 6.5 Deleting Satellites GB33 GB 3 Searching Service GB18 4.1 Antenna Setting GB18 4.2 Manual Search GB20 4.3 Satellite Setting GB21 4.4 Motor Limit Setting GB22 4.5 USALS Setting GB23 4.6 Automatic Search GB24 5. Contents 1. Setup ...GB13 2.1 Connecting the Antenna/TV/VCR GB13 2.2 Connecting Audio...
User Manual
Page 10
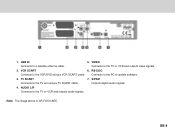
S/PDIF ** Connects to the TV set using a VCR SCART cable. ** Connects to the PC to the VCR/DVD using a TV SCART cable. ** Outputs digital audio signals. ** ** 4. GB 9 RS-232C ** Connects to update software. ** ** 3. TV SCART 7. VIDEO ** Connects to a satellite antenna cable. ** Connects to the TV or VCR and outputs audio signals. ** ** Note: The image above is CR-FOX II/AEE. ** ** 1. LNB IN 5. VCR SCART 6. AUDIO L/R ** Connects to the TV or VCR and outputs video signals. ** ** 2.
S/PDIF ** Connects to the TV set using a VCR SCART cable. ** Connects to the PC to the VCR/DVD using a TV SCART cable. ** Outputs digital audio signals. ** ** 4. GB 9 RS-232C ** Connects to update software. ** ** 3. TV SCART 7. VIDEO ** Connects to a satellite antenna cable. ** Connects to the TV or VCR and outputs audio signals. ** ** Note: The image above is CR-FOX II/AEE. ** ** 1. LNB IN 5. VCR SCART 6. AUDIO L/R ** Connects to the TV or VCR and outputs video signals. ** ** 2.

User Manual
Page 13
... interactive applications. GB 12 FREEZE ** Freezes the TV screen you are watching. SUBTITLE - RECALL ** Returns to 5.4 Setting Property of service on the screen. ZOOM - Please refer to the previous service. ** 11. WIDE ** Sets the display format. ** 13. BLUE ** Enlarges the picture. ** 18. EXIT ** Exits all On-Screen Display (OSD) screens. ** 16. YELLOW ** Displays the subtitle language list. ** 19. CH - / CH + ** Changes the service. ** 10. GUIDE ** Displays the programme guide. ** 15. Also, displays the channel list while watching a programme. 17.
... interactive applications. GB 12 FREEZE ** Freezes the TV screen you are watching. SUBTITLE - RECALL ** Returns to 5.4 Setting Property of service on the screen. ZOOM - Please refer to the previous service. ** 11. WIDE ** Sets the display format. ** 13. BLUE ** Enlarges the picture. ** 18. EXIT ** Exits all On-Screen Display (OSD) screens. ** 16. YELLOW ** Displays the subtitle language list. ** 19. CH - / CH + ** Changes the service. ** 10. GUIDE ** Displays the programme guide. ** 15. Also, displays the channel list while watching a programme. 17.
User Manual
Page 14
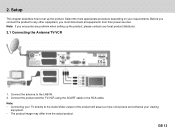
Connect the antenna to any other equipment, you encounter any problem when setting up the product. Setup 2. Setup This chapter describes how to the Audio/Video output of the product will assure a more vivid picture and enhance your viewing enjoyment. • The product image may differ from their power sources. 2. Connect the product and the TV/VCR using the SCART cable or the RCA cable. ** Note: • Connecting your...
Connect the antenna to any other equipment, you encounter any problem when setting up the product. Setup 2. Setup This chapter describes how to the Audio/Video output of the product will assure a more vivid picture and enhance your viewing enjoyment. • The product image may differ from their power sources. 2. Connect the product and the TV/VCR using the SCART cable or the RCA cable. ** Note: • Connecting your...
User Manual
Page 18
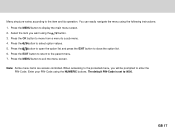
... menu items are access controlled. Press the EXIT button to return to 0000. The default PIN-Code is set to the parent-menu. ** 7. Press the button to close the option list. ** 6. GB 17 Press the button to open the option list and press the EXIT button to select option values. ** 5. Press the MENU button to a sub-menu. ** 4. Press the OK button to move from a menu to display the main menu screen. ** 2. You can easily navigate the menu using the following instructions: ** 1. ** ** Menu structure...
... menu items are access controlled. Press the EXIT button to return to 0000. The default PIN-Code is set to the parent-menu. ** 7. Press the button to close the option list. ** 6. GB 17 Press the button to open the option list and press the EXIT button to select option values. ** 5. Press the MENU button to a sub-menu. ** 4. Press the OK button to move from a menu to display the main menu screen. ** 2. You can easily navigate the menu using the following instructions: ** 1. ** ** Menu structure...
User Manual
Page 19
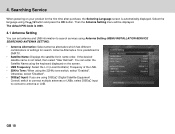
... displayed. Searching Service 4. Searching Service When powering on the screen. • LNB Frequency: Select the L.O (Local Oscillator) Frequency of settings for search. Antenna Alternative 16 is 0000. ** 4.1 Antenna Setting You can enter the Satellite Name using the 22HKz tone switch, select "Enabled". You can set antenna and LNB information to antenna or LNB. 4. The default PIN-Code is predefined for the first time after purchase, the Selecting Language screen is not listed, then select "User Defined". Otherwise, select "Disabled". • DiSEqC Input: If you are using...
... displayed. Searching Service 4. Searching Service When powering on the screen. • LNB Frequency: Select the L.O (Local Oscillator) Frequency of settings for search. Antenna Alternative 16 is 0000. ** 4.1 Antenna Setting You can enter the Satellite Name using the 22HKz tone switch, select "Enabled". You can set antenna and LNB information to antenna or LNB. 4. The default PIN-Code is predefined for the first time after purchase, the Selecting Language screen is not listed, then select "User Defined". Otherwise, select "Disabled". • DiSEqC Input: If you are using...

User Manual
Page 20
... enter the band frequency directly. ** Note: If Single Cable System is enabled, 22KHz, Motorised System and DiSEqC Input is disabled. GB 19 Searching Service • Motorised System: When using more than one receiver at a time and turn off the others while setting. If Single Cable System is disabled, Band Frequency is displayed. Refer to the LNB manual for details.) • Band Frequency:When selecting "User Band 1 to 8" in Single Cable System, the default...
... enter the band frequency directly. ** Note: If Single Cable System is enabled, 22KHz, Motorised System and DiSEqC Input is disabled. GB 19 Searching Service • Motorised System: When using more than one receiver at a time and turn off the others while setting. If Single Cable System is disabled, Band Frequency is displayed. Refer to the LNB manual for details.) • Band Frequency:When selecting "User Band 1 to 8" in Single Cable System, the default...

User Manual
Page 21
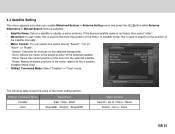
...". Otherwise, select "No". • Advanced: In advanced mode, enter Video Packet ID (PID), Audio PID, and PCR PID. ** After setting the parameters of search, press the OK button to search services for SMATV. • Frequency: Enter transponder frequency. • Polarisation: Select the type of the selected satellite by transponders using the and the RED button. To cancel deleting operation, press the RED button again. After finishing search operation, the result window will appear...
...". Otherwise, select "No". • Advanced: In advanced mode, enter Video Packet ID (PID), Audio PID, and PCR PID. ** After setting the parameters of search, press the OK button to search services for SMATV. • Frequency: Enter transponder frequency. • Polarisation: Select the type of the selected satellite by transponders using the and the RED button. To cancel deleting operation, press the RED button again. After finishing search operation, the result window will appear...
User Manual
Page 22
... in Antenna Setting menu and press the i button while Antenna Alternative in Manual Search menu is selected. ** • Satellite Name: Select a satellite to ", "Store", or "Reset". ** - In installer mode, this is used to fine-tune the position of the satellite manually. • Motor Control: You can select one option among "Search", "Go to identify a motor antenna. Search: Searches for the selected satellite. - If the desired satellite name is not listed, then select "other". • Movement: In user mode...
... in Antenna Setting menu and press the i button while Antenna Alternative in Manual Search menu is selected. ** • Satellite Name: Select a satellite to ", "Store", or "Reset". ** - In installer mode, this is used to fine-tune the position of the satellite manually. • Motor Control: You can select one option among "Search", "Go to identify a motor antenna. Search: Searches for the selected satellite. - If the desired satellite name is not listed, then select "other". • Movement: In user mode...

User Manual
Page 23
The motor starts moving. Movement is used to fine-tune the position of the satellite, select the Satellite Name, set DiSEqC Command Mode to "User", set Motor Control to "Goto", and set to "Enabled", the motor does not move to the desired value. the motor will see a warning message. When Limit setting is set to "Disabled", the setting is set Movement to the position of the dish. To set position...
The motor starts moving. Movement is used to fine-tune the position of the satellite, select the Satellite Name, set DiSEqC Command Mode to "User", set Motor Control to "Goto", and set to "Enabled", the motor does not move to the desired value. the motor will see a warning message. When Limit setting is set to "Disabled", the setting is set Movement to the position of the dish. To set position...

User Manual
Page 26
... Dolby Digital. 5. If the detailed information is braodcast in MENU-INSTALLATION-SYSTEM SETTING-OTHER SETTING-INFO.BOX DISPLAY TIME. ** ** Represents parental level. You can change a service using the V-/V+ or button. ** The Programme Information (i-plate) The i-plate, or the Information Box, is always displayed for a specific period of ages that the programme is targeted at. ** Displayed only when the programme is reserved. ** Displayed only when the channel is a locked channel. ** Displayed only when the channel is a scrambled channel. ** Displayed only when subtitle...
... Dolby Digital. 5. If the detailed information is braodcast in MENU-INSTALLATION-SYSTEM SETTING-OTHER SETTING-INFO.BOX DISPLAY TIME. ** ** Represents parental level. You can change a service using the V-/V+ or button. ** The Programme Information (i-plate) The i-plate, or the Information Box, is always displayed for a specific period of ages that the programme is targeted at. ** Displayed only when the programme is reserved. ** Displayed only when the channel is a locked channel. ** Displayed only when the channel is a scrambled channel. ** Displayed only when subtitle...

User Manual
Page 27
.... You can select a default subtitle language in MENU-INSTALLATION-SYSTEM SETTING-LANGUAGE SETTING-AUDIO LANGUAGE. MIX Adjusts transparency of teletext screen. Cancel Hides the teletext except page number. Reveal Displays the concealed information. You can select a default audio language in MENU-INSTALLATION-SYSTEM SETTING-LANGUAGE SETTING-SUBTITLE LANGUAGE. You can select the language for the subtitle using the SOUNDTRACK button. Basic Operation 5.2 Changing Language If the current programme provides subtitle information, the subtitle icon will appear on...
.... You can select a default subtitle language in MENU-INSTALLATION-SYSTEM SETTING-LANGUAGE SETTING-AUDIO LANGUAGE. MIX Adjusts transparency of teletext screen. Cancel Hides the teletext except page number. Reveal Displays the concealed information. You can select a default audio language in MENU-INSTALLATION-SYSTEM SETTING-LANGUAGE SETTING-SUBTITLE LANGUAGE. You can select the language for the subtitle using the SOUNDTRACK button. Basic Operation 5.2 Changing Language If the current programme provides subtitle information, the subtitle icon will appear on...
User Manual
Page 29
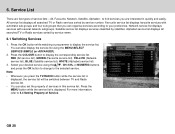
..., the service list will be switched between TV and Radio service list. • You can also display the service list using the , CH-/CH+ or NUMERIC buttons, and press the OK button to change to your desired service using the MENU-SELECT SERVICE-SIMPLE (or ADVANCED). 2. All, Favourite, Network, Satellite, Alphabet - Favourite service list displays favourite services with several network subgroups. Satellite service list displays services classified by service number. Alphabet service list displays all searched TV or Radio services sorted by satellites. For more information...
..., the service list will be switched between TV and Radio service list. • You can also display the service list using the , CH-/CH+ or NUMERIC buttons, and press the OK button to change to your desired service using the MENU-SELECT SERVICE-SIMPLE (or ADVANCED). 2. All, Favourite, Network, Satellite, Alphabet - Favourite service list displays favourite services with several network subgroups. Satellite service list displays services classified by service number. Alphabet service list displays all searched TV or Radio services sorted by satellites. For more information...
User Manual
Page 31
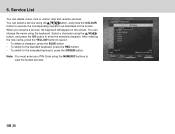
... on the screen. After entering the new name, press the YELLOW button to save it. • To delete a character, press the BLUE button. • To switch to the standard keyboard, press the RED button. • To switch to the extended keyboard, press the GREEN button. ** Note: You must enter your PIN-Code using the button, and press the COLOUR button to view the locked services. You can select a service using the NUMERIC buttons to execute...
... on the screen. After entering the new name, press the YELLOW button to save it. • To delete a character, press the BLUE button. • To switch to the standard keyboard, press the RED button. • To switch to the extended keyboard, press the GREEN button. ** Note: You must enter your PIN-Code using the button, and press the COLOUR button to view the locked services. You can select a service using the NUMERIC buttons to execute...

User Manual
Page 38
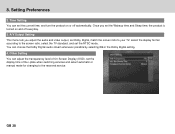
... Setting menu (MENU-INSTALLATION-SYSTEM SETTING) lets you to reserved service options. 1. We recommend you control the access to a new one periodically for menu, audio, and subtitle. Setting Preferences This chapter describes the menu which lets you customise your product according to your perference. ** 8.1 Parental Control The Parental Control menu (MENU-PARENTAL CONTROL) lets you to change the old PIN-Code to programmes by age level. Language Setting You can block all programmes regardless of OSD, i-plate display time and changing to watch...
... Setting menu (MENU-INSTALLATION-SYSTEM SETTING) lets you to reserved service options. 1. We recommend you control the access to a new one periodically for menu, audio, and subtitle. Setting Preferences This chapter describes the menu which lets you customise your product according to your perference. ** 8.1 Parental Control The Parental Control menu (MENU-PARENTAL CONTROL) lets you to change the old PIN-Code to programmes by age level. Language Setting You can block all programmes regardless of OSD, i-plate display time and changing to watch...
User Manual
Page 39
... time and Sleep time, the product is turned on or off everyday. 3. Setting Preferences 2. You can set Dolby Digital, match the screen ratio to your TV, select the display format according to the reserved service. GB 38 A/V Output Setting This menu lets you set the NTSC mode. 8. Time Setting You can choose the Dolby Digital audio stream whenever possible by selecting On in the Dolby Digital setting. 4. Once you adjust the audio and video output, set the current time...
... time and Sleep time, the product is turned on or off everyday. 3. Setting Preferences 2. You can set Dolby Digital, match the screen ratio to your TV, select the display format according to the reserved service. GB 38 A/V Output Setting This menu lets you set the NTSC mode. 8. Time Setting You can choose the Dolby Digital audio stream whenever possible by selecting On in the Dolby Digital setting. 4. Once you adjust the audio and video output, set the current time...

User Manual
Page 41
... the factory settings using the button and press the OK button to the mail box screen. Select a mail using the Default Setting menu (MENU-INSTALLATION-DEFAULT SETTING). Searching Services. You will be displayed directly on the screen while watching a programme. When a new mail arrives, the envelope icon will be deleted automatically when the mail box becomes full. The default PIN-Code is 0000. If you perform Default Setting, all data except the customised PIN-Code will be displayed. For more information, refer to enter your PIN-Code...
... the factory settings using the button and press the OK button to the mail box screen. Select a mail using the Default Setting menu (MENU-INSTALLATION-DEFAULT SETTING). Searching Services. You will be displayed directly on the screen while watching a programme. When a new mail arrives, the envelope icon will be deleted automatically when the mail box becomes full. The default PIN-Code is 0000. If you perform Default Setting, all data except the customised PIN-Code will be displayed. For more information, refer to enter your PIN-Code...
User Manual
Page 44
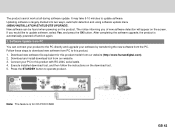
... found when powering on the screen. Press the STANDBY button to download new software from our website. 3. After completing the software upgrade, the product is largely divided into two ways, automatic detection and using software update menu (MENU-INSTALLATION-STATUS-STB UPGRADE). Follow these steps to operate product. ** ** Note: The feature is for this product with RS-232C serial cable. 4. Execute installed download tool, and then follow the instructions on again...
... found when powering on the screen. Press the STANDBY button to download new software from our website. 3. After completing the software upgrade, the product is largely divided into two ways, automatic detection and using software update menu (MENU-INSTALLATION-STATUS-STB UPGRADE). Follow these steps to operate product. ** ** Note: The feature is for this product with RS-232C serial cable. 4. Execute installed download tool, and then follow the instructions on again...
User Manual
Page 48
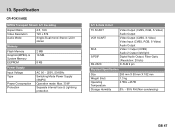
... Memory Flash Memory Graphics(MPEG) & System Memory EEPROM 2 MB 16 MB 8 KB Power Supply Input Voltage Type Power Consumption Protection AC 90 ~ 250V, 50/60Hz Switching Mode Power Supply (SMPS) Operation mode: Max. 30 W Separate internal fuse & Lightning protection A/V & Data In/Out TV SCART VCR SCART RCA S/PDIF RS-232C Video Output (CVBS, RGB, S-Video) Audio Output Video Output (CVBS, S-Video) Video Input (CVBS, RGB, S-Video) Audio Output Video 1 Output (CVBS) Audio 2 Output (left/right) Digital Audio Output, Fiber-Optic (Resolution: 20 bits) D-SUB 9 pin Physical Specification...
... Memory Flash Memory Graphics(MPEG) & System Memory EEPROM 2 MB 16 MB 8 KB Power Supply Input Voltage Type Power Consumption Protection AC 90 ~ 250V, 50/60Hz Switching Mode Power Supply (SMPS) Operation mode: Max. 30 W Separate internal fuse & Lightning protection A/V & Data In/Out TV SCART VCR SCART RCA S/PDIF RS-232C Video Output (CVBS, RGB, S-Video) Audio Output Video Output (CVBS, S-Video) Video Input (CVBS, RGB, S-Video) Audio Output Video 1 Output (CVBS) Audio 2 Output (left/right) Digital Audio Output, Fiber-Optic (Resolution: 20 bits) D-SUB 9 pin Physical Specification...


