
User Manual
Page 1
Digital Set-Top Box DIGI+IV User's Manual The default password is 0000.
Digital Set-Top Box DIGI+IV User's Manual The default password is 0000.
User Manual
Page 2
... to be able to change without HUMAX's prior consent in this user's manual next to help understand, use and maintain the product at maximum performance. Warranty The warranty does not cover parts which could damage the equipment or other apparatus. • Note Indicates additional information to make the user aware of possible problems and information of the information contained in writing except...
... to be able to change without HUMAX's prior consent in this user's manual next to help understand, use and maintain the product at maximum performance. Warranty The warranty does not cover parts which could damage the equipment or other apparatus. • Note Indicates additional information to make the user aware of possible problems and information of the information contained in writing except...
User Manual
Page 4
... satellite dish. VENTILATION • The slots on top of power supplied to your home, consult your local power company. • Disconnect the product from the mains before connecting or disconnecting the cable from the TV. Failure to do so can damage the LNB. 8. CONNECTION TO THE TV • Disconnect the product from the type of power supply indicated on top of any maintenance or installation...
... satellite dish. VENTILATION • The slots on top of power supplied to your home, consult your local power company. • Disconnect the product from the mains before connecting or disconnecting the cable from the TV. Failure to do so can damage the LNB. 8. CONNECTION TO THE TV • Disconnect the product from the type of power supply indicated on top of any maintenance or installation...
User Manual
Page 7
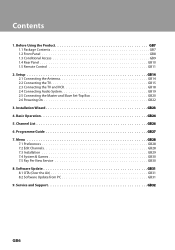
... the Air GB31 8.2 Software Update from PC GB31 9. Menu GB28 7.1 Preferences GB28 7.2 Edit Channels GB28 7.3 Installation GB29 7.4 System & Games GB30 7.5 Pay Per View Service GB30 8. Before Using the Product GB7 1.1 Package Contents GB7 1.2 Front Panel GB8 1.3 Conditional Access GB9 1.4 Rear Panel GB10 1.5 Remote Control GB11 2. Programme Guide GB27 7. Setup GB14 2.1 Connecting the Antenna GB14 2.2 Connecting the TV GB15 2.3 Connecting the TV and VCR GB18 2.4 Connecting Audio System GB19 2.5 Connecting the Master and Slave Set-Top Box GB20 2.6 Powering On...
... the Air GB31 8.2 Software Update from PC GB31 9. Menu GB28 7.1 Preferences GB28 7.2 Edit Channels GB28 7.3 Installation GB29 7.4 System & Games GB30 7.5 Pay Per View Service GB30 8. Before Using the Product GB7 1.1 Package Contents GB7 1.2 Front Panel GB8 1.3 Conditional Access GB9 1.4 Rear Panel GB10 1.5 Remote Control GB11 2. Programme Guide GB27 7. Setup GB14 2.1 Connecting the Antenna GB14 2.2 Connecting the TV GB15 2.3 Connecting the TV and VCR GB18 2.4 Connecting Audio System GB19 2.5 Connecting the Master and Slave Set-Top Box GB20 2.6 Powering On...
User Manual
Page 8
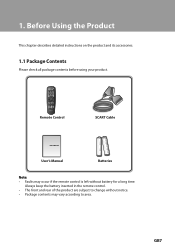
Remote Control SCART Cable User's Manual User's Manual Batteries Note: • Faults may vary according to area. Before Using the Product This chapter describes detailed instructions on the product and its accessories. 1.1 Package Contents Please check all package contents before using your product. 1. GB7 Always keep the battery inserted in the remote control. • The front and rear of the product are subject to change without notice. • Package contents may occur if the remote control is left without battery for a long time.
Remote Control SCART Cable User's Manual User's Manual Batteries Note: • Faults may vary according to area. Before Using the Product This chapter describes detailed instructions on the product and its accessories. 1.1 Package Contents Please check all package contents before using your product. 1. GB7 Always keep the battery inserted in the remote control. • The front and rear of the product are subject to change without notice. • Package contents may occur if the remote control is left without battery for a long time.
User Manual
Page 11
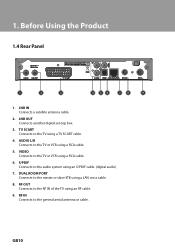
... using a RCA cable. 5. GB10 VIDEO Connects to the TV or VCR using an S/PDIF cable. (digital audio) 7. S/PDIF Connects to the master or slave STB using a TV SCART cable. 4. 1. DUAL ROOM PORT Connects to the audio system using a RCA cable. 6. TV SCART Connects to the TV or VCR using an RF cable. 9. Before Using the Product 1.4 Rear Panel 1 2 3 4 56 78 9 1. AUDIO L/R Connects to the TV using a LAN cross cable. 8. LNB IN Connects a satellite antenna cable. 2. RF OUT Connects to the general aerial antenna or cable. LNB OUT Connects another digital set-top box...
... using a RCA cable. 5. GB10 VIDEO Connects to the TV or VCR using an S/PDIF cable. (digital audio) 7. S/PDIF Connects to the master or slave STB using a TV SCART cable. 4. 1. DUAL ROOM PORT Connects to the audio system using a RCA cable. 6. TV SCART Connects to the TV or VCR using an RF cable. 9. Before Using the Product 1.4 Rear Panel 1 2 3 4 56 78 9 1. AUDIO L/R Connects to the TV using a LAN cross cable. 8. LNB IN Connects a satellite antenna cable. 2. RF OUT Connects to the general aerial antenna or cable. LNB OUT Connects another digital set-top box...
User Manual
Page 12
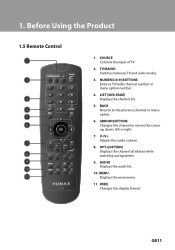
... and radio modes. 3. NUMERIC(0-9) BUTTONS Enters a TV/radio channel number or menu option number. 4. MENU Displays the main menu. 11. Before Using the Product 1.5 Remote Control 1 2 3 4 5 6 7 8 9 10 11 1. BACK Returns to the previous channel or menu option. 6. WIDE Changes the display format. AUDIO Displays the audio list. 10. V-/V+ Adjusts the audio volume. 8. ARROW BUTTONS Changes the channel or moves the cursor up, down, left or right. 7. OPT+(OPTION) Displays the channel attributes while watching a programme. 9. GB11 SOURCE Controls the input of TV. 2. LIST (SUB...
... and radio modes. 3. NUMERIC(0-9) BUTTONS Enters a TV/radio channel number or menu option number. 4. MENU Displays the main menu. 11. Before Using the Product 1.5 Remote Control 1 2 3 4 5 6 7 8 9 10 11 1. BACK Returns to the previous channel or menu option. 6. WIDE Changes the display format. AUDIO Displays the audio list. 10. V-/V+ Adjusts the audio volume. 8. ARROW BUTTONS Changes the channel or moves the cursor up, down, left or right. 7. OPT+(OPTION) Displays the channel attributes while watching a programme. 9. GB11 SOURCE Controls the input of TV. 2. LIST (SUB...
User Manual
Page 15
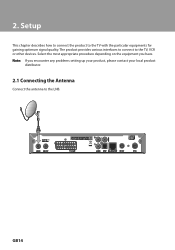
Note: If you have. GB14 The product provides various interfaces to connect to the TV with the particular equipments for gaining optimum signal quality. 2. Select the most appropriate procedure depending on the equipment you encounter any problems setting up your product, please contact your local product distributor. 2.1 Connecting the Antenna Connect the antenna to the LNB. Setup This chapter describes how to connect the product to the TV, VCR or other devices.
Note: If you have. GB14 The product provides various interfaces to connect to the TV with the particular equipments for gaining optimum signal quality. 2. Select the most appropriate procedure depending on the equipment you encounter any problems setting up your product, please contact your local product distributor. 2.1 Connecting the Antenna Connect the antenna to the LNB. Setup This chapter describes how to connect the product to the TV, VCR or other devices.
User Manual
Page 18
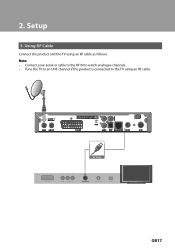
RF Cable TV SCART VIDEO L AUDIO R TV Antenna IN TV Antenna OUT S/PDIF GB17 Setup 3. Using RF Cable Connect the product and the TV using an RF cable. Note: • Connect your aerial or cable to the RF IN to watch analogue channels. • Tune the TV to an UHF channel if the product is connected to the TV using an RF cable as follows. 2.
RF Cable TV SCART VIDEO L AUDIO R TV Antenna IN TV Antenna OUT S/PDIF GB17 Setup 3. Using RF Cable Connect the product and the TV using an RF cable. Note: • Connect your aerial or cable to the RF IN to watch analogue channels. • Tune the TV to an UHF channel if the product is connected to the TV using an RF cable as follows. 2.
User Manual
Page 19
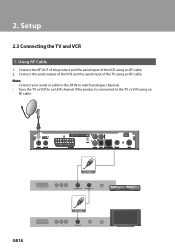
... IN to watch analogue channels. • Tune the TV or VCR to an UHF channel if the product is connected to the TV or VCR using an RF cable. Using RF Cable 1. Setup 2.3 Connecting the TV and VCR 1. Connect the aerial output of the VCR and the aerial input of the VCR using an RF cable. 2. RF Cable VCR SCART VIDEO L AUDIO R VCR Antenna IN VCR Antenna OUT S/PDIF GB18 RF Cable TV SCART VIDEO L AUDIO R TV Antenna IN TV Antenna OUT S/PDIF Connect the...
... IN to watch analogue channels. • Tune the TV or VCR to an UHF channel if the product is connected to the TV or VCR using an RF cable. Using RF Cable 1. Setup 2.3 Connecting the TV and VCR 1. Connect the aerial output of the VCR and the aerial input of the VCR using an RF cable. 2. RF Cable VCR SCART VIDEO L AUDIO R VCR Antenna IN VCR Antenna OUT S/PDIF GB18 RF Cable TV SCART VIDEO L AUDIO R TV Antenna IN TV Antenna OUT S/PDIF Connect the...
User Manual
Page 21
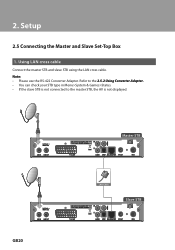
Refer to the 2.5.2 Using Converter Adapter. • You can check your STB type in Menu>System & Games>Status. • If the slave STB is not connected to the master STB, the AV is not displayed. Note: • Please use the RS-422 Converter Adapter. Master STB GB20 LAN Cable Slave STB Setup 2.5 Connecting the Master and Slave Set-Top Box 1. Using LAN cross cable Connect the master STB and slave STB using the LAN cross cable. 2.
Refer to the 2.5.2 Using Converter Adapter. • You can check your STB type in Menu>System & Games>Status. • If the slave STB is not connected to the master STB, the AV is not displayed. Note: • Please use the RS-422 Converter Adapter. Master STB GB20 LAN Cable Slave STB Setup 2.5 Connecting the Master and Slave Set-Top Box 1. Using LAN cross cable Connect the master STB and slave STB using the LAN cross cable. 2.
User Manual
Page 22
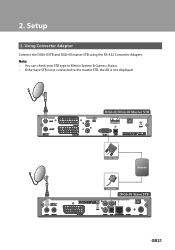
2. Note: • You can check your STB type in Menu>System & Games>Status. • If the slave STB is not connected to the master STB, the AV is not displayed. Setup 2. DIGI+II/DIGI+III Master STB RS-232C Cable Adapter LAN Cable DIGI+IV Slave STB GB21 Using Converter Adapter Connect the DIGI+II STB and DIGI+III master STB using the RS-422 Converter Adapter.
2. Note: • You can check your STB type in Menu>System & Games>Status. • If the slave STB is not connected to the master STB, the AV is not displayed. Setup 2. DIGI+II/DIGI+III Master STB RS-232C Cable Adapter LAN Cable DIGI+IV Slave STB GB21 Using Converter Adapter Connect the DIGI+II STB and DIGI+III master STB using the RS-422 Converter Adapter.
User Manual
Page 24
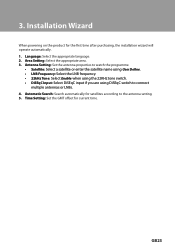
... operate automatically. 1. GB23 Area Setting: Select the appropriate area. 3. Installation Wizard When powering on the product for satellites according to connect multiple antennas or LNBs. 4. Antenna Setting: Set the antenna properties to watch the programme. • Satellite: Select a satellite or enter the satellite name using User Define. • LNB Frequency: Select the LNB frequency. • 22kHz Tone: Select Enable when using the 22KHz tone switch. • DiSEqC Input: Select DiSEqC input if you are using DiSEqC switch to the antenna setting. 5. Time Setting: Set...
... operate automatically. 1. GB23 Area Setting: Select the appropriate area. 3. Installation Wizard When powering on the product for satellites according to connect multiple antennas or LNBs. 4. Antenna Setting: Set the antenna properties to watch the programme. • Satellite: Select a satellite or enter the satellite name using User Define. • LNB Frequency: Select the LNB frequency. • 22kHz Tone: Select Enable when using the 22KHz tone switch. • DiSEqC Input: Select DiSEqC input if you are using DiSEqC switch to the antenna setting. 5. Time Setting: Set...
User Manual
Page 25
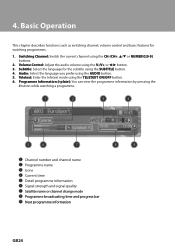
... signal quality Satellite name or channel change mode Programme broadcasting time and progress bar Next programme information GB24 Audio: Select the language you prefer using the CH-/CH+, / or NUMERIC(0-9) buttons. 2. Subtitle: Select the language for watching programmes. 1. 4. Switching Channel: Switch the current channel using the AUDIO button. 5. Volume Control: Adjust the audio volume using the TELETEXT ON/OFF button. 6. Teletext: Enter the teletext mode using the V-/V+ or / button. 3. Basic Operation This chapter describes functions such as switching channel, volume control...
... signal quality Satellite name or channel change mode Programme broadcasting time and progress bar Next programme information GB24 Audio: Select the language you prefer using the CH-/CH+, / or NUMERIC(0-9) buttons. 2. Subtitle: Select the language for watching programmes. 1. 4. Switching Channel: Switch the current channel using the AUDIO button. 5. Volume Control: Adjust the audio volume using the TELETEXT ON/OFF button. 6. Teletext: Enter the teletext mode using the V-/V+ or / button. 3. Basic Operation This chapter describes functions such as switching channel, volume control...
User Manual
Page 26
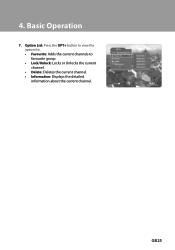
GB25 Option List: Press the OPT+ button to view the option list. • Favourite: Adds the current channels to favourite group. • Lock/Unlock: Locks or Unlocks the current channel. • Delete: Deletes the current channel. • Information: Displays the detailed information about the current channel. Basic Operation 7. 4.
GB25 Option List: Press the OPT+ button to view the option list. • Favourite: Adds the current channels to favourite group. • Lock/Unlock: Locks or Unlocks the current channel. • Delete: Deletes the current channel. • Information: Displays the detailed information about the current channel. Basic Operation 7. 4.
User Manual
Page 27
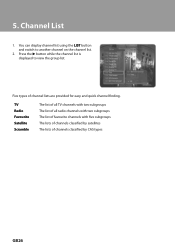
Channel List 1. Press the button while the channel list is displayed to another channel on the channel list. 2. Five types of channels classified by CAS types GB26 5. You can display channel list using the LIST button and switch to view the group list. TV Radio Favourite Satellite Scramble The list of all TV channels with two subgroups The list of all radio channels with two subgroups The list of favourite channels with five subgroups The lists of channels classified by satellites The lists of channel lists are provided for easy and quick channel finding.
Channel List 1. Press the button while the channel list is displayed to another channel on the channel list. 2. Five types of channels classified by CAS types GB26 5. You can display channel list using the LIST button and switch to view the group list. TV Radio Favourite Satellite Scramble The list of all TV channels with two subgroups The list of all radio channels with two subgroups The list of favourite channels with five subgroups The lists of channels classified by satellites The lists of channel lists are provided for easy and quick channel finding.
User Manual
Page 29
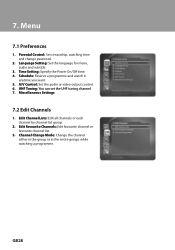
...it anytime you want. 5. UHF Tuning: You can set the UHF tuning channel. 7. A/V Control: Set the audio or video output control. 6. GB28 7. Menu 7.1 Preferences 1. Edit Favourite Channels: Edit favourite channel or favourite channel list. 3. Miscellaneous Settings 7.2 Edit Channels 1. Edit Channel Lists: Edit all channels or each channel by channel list group. 2. Language Setting: Set the language for menu, audio and subtitle. 3. Parental Control: Set censorship, watching time and change password. 2. Channel Change Mode: Change the channel either in the group or in the entire...
...it anytime you want. 5. UHF Tuning: You can set the UHF tuning channel. 7. A/V Control: Set the audio or video output control. 6. GB28 7. Menu 7.1 Preferences 1. Edit Favourite Channels: Edit favourite channel or favourite channel list. 3. Miscellaneous Settings 7.2 Edit Channels 1. Edit Channel Lists: Edit all channels or each channel by channel list group. 2. Language Setting: Set the language for menu, audio and subtitle. 3. Parental Control: Set censorship, watching time and change password. 2. Channel Change Mode: Change the channel either in the group or in the entire...
User Manual
Page 30
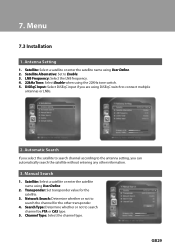
...: Set to search channel by FTA or CAS type. 5. LNB Frequency: Select the LNB frequency. 4. 22kHz Tone: Select Enable when using User Define. 2. Manual Search 1. Search Type: Determine whether or not to Enable. 3. Satellite: Select a satellite or enter the satellite name using the 22KHz tone switch. 5. 7. Automatic Search If you select the satellite to search channel according to the antenna setting, you are using User Define. 2. Transponder: Set transponder value for the other information. 3. Channel Type: Select the channel type. GB29 Antenna Setting 1. DiSEqC Input...
...: Set to search channel by FTA or CAS type. 5. LNB Frequency: Select the LNB frequency. 4. 22kHz Tone: Select Enable when using User Define. 2. Manual Search 1. Search Type: Determine whether or not to Enable. 3. Satellite: Select a satellite or enter the satellite name using the 22KHz tone switch. 5. 7. Automatic Search If you select the satellite to search channel according to the antenna setting, you are using User Define. 2. Transponder: Set transponder value for the other information. 3. Channel Type: Select the channel type. GB29 Antenna Setting 1. DiSEqC Input...

User Manual
Page 31
... to the default settings. 7.4 System & Games 1. Mail Box: You can view system information. Status: You can view and delete the message. 4. Signal Detection: You can update the software. 6. Update You can view the signal strength and signal quality. 3. Purchasing History 3. Menu 4. Other Search You can check your STB type (Master or Slave) in the Status menu. 2. IPPV Smartcard Information 2. PPV Service Description GB30 Note: You can directly enter the packet ID value or search channel using SMATV. 5. 7. Games...
... to the default settings. 7.4 System & Games 1. Mail Box: You can view system information. Status: You can view and delete the message. 4. Signal Detection: You can update the software. 6. Update You can view the signal strength and signal quality. 3. Purchasing History 3. Menu 4. Other Search You can check your STB type (Master or Slave) in the Status menu. 2. IPPV Smartcard Information 2. PPV Service Description GB30 Note: You can directly enter the packet ID value or search channel using SMATV. 5. 7. Games...
User Manual
Page 32
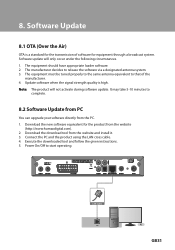
... the product using the LAN cross cable. 4. Software Update 8.1 OTA (Over the Air) OTA is high. The manufacturer decides to start operating. LAN Cable LAN PC GB31 8. Download the download tool from the website (http://www.humaxdigital.com). 2. Execute the downloaded tool and follow the given instructions. 5. Power On/Off to release the software via a designated antenna system. 3. Update software when the signal strength quality is a standard for equipment...
... the product using the LAN cross cable. 4. Software Update 8.1 OTA (Over the Air) OTA is high. The manufacturer decides to start operating. LAN Cable LAN PC GB31 8. Download the download tool from the website (http://www.humaxdigital.com). 2. Execute the downloaded tool and follow the given instructions. 5. Power On/Off to release the software via a designated antenna system. 3. Update software when the signal strength quality is a standard for equipment...


