
User Manual
Page 2
... law. ** Warranty The information in this document is a trademark of Philips Electronics N.V. Notice ** Copyright (Copyright © 2001 HUMAX Corporation) Not to be able to your offer or use and maintain the receiver at maximum performance. Manufactured under license from Dolby Laboratories.... ** Thank you for purchasing a HUMAX digital terrestrial receiver. Irdeto is subject to your receiver for future reference. Keep this user manual next to safely install, use of France Telecom. CryptoWorks (TM) is a trademark of the...
... law. ** Warranty The information in this document is a trademark of Philips Electronics N.V. Notice ** Copyright (Copyright © 2001 HUMAX Corporation) Not to be able to your offer or use and maintain the receiver at maximum performance. Manufactured under license from Dolby Laboratories.... ** Thank you for purchasing a HUMAX digital terrestrial receiver. Irdeto is subject to your receiver for future reference. Keep this user manual next to safely install, use of France Telecom. CryptoWorks (TM) is a trademark of the...
User Manual
Page 3
... and make the user aware of possible problems and information of any importance to help the user to understand, to use and to maintain the installation. ** To reduce the risk of electric shock or personal injury.
... and make the user aware of possible problems and information of any importance to help the user to understand, to use and to maintain the installation. ** To reduce the risk of electric shock or personal injury.

User Manual
Page 4
... before cleaning. CLEANING ** Disconnect the receiver from the aerial. Do not stack electronic equipments on soft furnishings or carpets. If you start any maintenance or installation procedure ** 2. In addition, no solvents) to satisfy international safety standards. CONNECTION TO THE AERIAL ** Disconnect the receiver from the mains before connecting or disconnecting the...
... before cleaning. CLEANING ** Disconnect the receiver from the aerial. Do not stack electronic equipments on soft furnishings or carpets. If you start any maintenance or installation procedure ** 2. In addition, no solvents) to satisfy international safety standards. CONNECTION TO THE AERIAL ** Disconnect the receiver from the mains before connecting or disconnecting the...

User Manual
Page 6
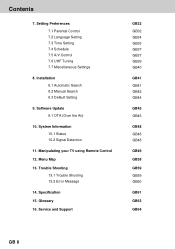
Basic Operation 4.1 Switching Channel 4.2 Volume Control 4.3 Motion Still 4.4 Change the Subtitle Language 4.5 Change a Audio Language 4.6 Programme Information (I- Installation Wizard 4. plate) 4.7 Option List 5. Programme Guide 6.1 Viewing Programme Guide Information 6.2 Finding a Programme 6.3 Viewing Reserved Programme GB7 ** GB7 GB8 GB9 GB10 GB12 ** GB12 GB12 GB13 GB14 ** ...
Basic Operation 4.1 Switching Channel 4.2 Volume Control 4.3 Motion Still 4.4 Change the Subtitle Language 4.5 Change a Audio Language 4.6 Programme Information (I- Installation Wizard 4. plate) 4.7 Option List 5. Programme Guide 6.1 Viewing Programme Guide Information 6.2 Finding a Programme 6.3 Viewing Reserved Programme GB7 ** GB7 GB8 GB9 GB10 GB12 ** GB12 GB12 GB13 GB14 ** ...
User Manual
Page 7
... your TV using Remote Control 12. Glossary 16. System Information 10.1 Status 10.2 Signal Detection 11. Trouble Shooting 13.1 Trouble Shooting 13.2 Error Message 14. Installation 8.1 Automatic Search 8.2 Manual Search 8.3 Default Setting 9. Contents ** 7. Specification 15. Software Update 9.1 OTA (Over the Air) 10. Menu Map 13. Service and Support GB32 ** GB32 GB34...
... your TV using Remote Control 12. Glossary 16. System Information 10.1 Status 10.2 Signal Detection 11. Trouble Shooting 13.1 Trouble Shooting 13.2 Error Message 14. Installation 8.1 Automatic Search 8.2 Manual Search 8.3 Default Setting 9. Contents ** 7. Specification 15. Software Update 9.1 OTA (Over the Air) 10. Menu Map 13. Service and Support GB32 ** GB32 GB34...

User Manual
Page 14
... ** When powering on your receiver as you can enjoy programmes. If you exit the install wizard without fully completing the setting procedures, you want to stop the Channel Search, select the OK button. Warning: Press the EXIT button to ...finished, the result of Channel Search is automatically started. 3. When completing Channel Search, you like. In this case, you can run the Installation Wizard in Default Setting.) Please wait for the first time after purchasing, the Installation Wizard is automatically saved. GB 13 It immediately performs Channel Search.(You can use the...
... ** When powering on your receiver as you can enjoy programmes. If you exit the install wizard without fully completing the setting procedures, you want to stop the Channel Search, select the OK button. Warning: Press the EXIT button to ...finished, the result of Channel Search is automatically started. 3. When completing Channel Search, you like. In this case, you can run the Installation Wizard in Default Setting.) Please wait for the first time after purchasing, the Installation Wizard is automatically saved. GB 13 It immediately performs Channel Search.(You can use the...

User Manual
Page 42
...select Delete and press the OK button. If search operation is located at Stop Therefore, if you can delete unnecessary channels from Installation menu using the OK or button. When completing Channel Search and deleting unnecessary channels, select Save to select all channels, select Select...All to save the changes. button, and press the 3. To delete all channels, select Delete, and press the OK button. 4. GB 41 Installation ** This chapter describes how to search for the channels, this may take a few minutes. 1. You can automatically search channels without entering any ...
...select Delete and press the OK button. If search operation is located at Stop Therefore, if you can delete unnecessary channels from Installation menu using the OK or button. When completing Channel Search and deleting unnecessary channels, select Save to select all channels, select Select...All to save the changes. button, and press the 3. To delete all channels, select Delete, and press the OK button. 4. GB 41 Installation ** This chapter describes how to search for the channels, this may take a few minutes. 1. You can automatically search channels without entering any ...

User Manual
Page 43
... Required for the entered frequency is entered. 1. Select Mode using the OK or button. Select among Auto, 2k and 8k using the OK or button. Installation ** 8.2 Manual Search You can search channels manually by searching parameters, if you don't know the MUX information. 1. 8. Channel Number Enter your desired frequency to search...
... Required for the entered frequency is entered. 1. Select Mode using the OK or button. Select among Auto, 2k and 8k using the OK or button. Installation ** 8.2 Manual Search You can search channels manually by searching parameters, if you don't know the MUX information. 1. 8. Channel Number Enter your desired frequency to search...

User Manual
Page 45
...to restore all data such as Channel List, and User Configured data are deleted. When default setting is completed, Installation Wizard is automatically displayed, which helps Channel Search. button, and press the 3. Select Default Setting using the NUMERICAL (0-9) ...button to 6. For detailed information about Installation Wizard, refer to the previous menu. Installation ** 8.3 Default Setting Default Setting restores the receiver to automatically run the Installation Wizard. button, press the 5. Enter Password using the OK or ...
...to restore all data such as Channel List, and User Configured data are deleted. When default setting is completed, Installation Wizard is automatically displayed, which helps Channel Search. button, and press the 3. Select Default Setting using the NUMERICAL (0-9) ...button to 6. For detailed information about Installation Wizard, refer to the previous menu. Installation ** 8.3 Default Setting Default Setting restores the receiver to automatically run the Installation Wizard. button, press the 5. Enter Password using the OK or ...
User Manual
Page 47
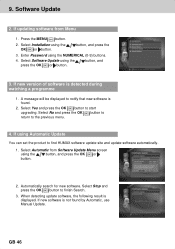
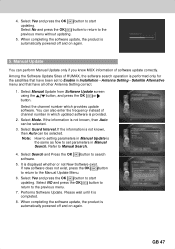
...4. Select Stop and press the OK button to start upgrading. Select Yes and press the OK button to finish Search. 3. Select Installation using Automatic Update You can set the product to the previous menu. ** 4. A message will be displayed to notify that new ...software is detected during watching a programme 1. Select No and press the OK button to return to find HUMAX software update site and update software automatically. 1. Software Update ** ** 2. button, and ** 3. GB 46 button, and press the 3. Automatically ...
...4. Select Stop and press the OK button to start upgrading. Select Yes and press the OK button to finish Search. 3. Select Installation using Automatic Update You can set the product to the previous menu. ** 4. A message will be displayed to notify that new ...software is detected during watching a programme 1. Select No and press the OK button to return to find HUMAX software update site and update software automatically. 1. Software Update ** ** 2. button, and ** 3. GB 46 button, and press the 3. Automatically ...
User Manual
Page 48
... Select Mode. Refer to the previous menu. 7. Select Yes and press the OK button to start updating. Among the Software Update Sites of HUMAX, the software search operation is not known, then Auto can be selected. Satellite Alternative menu and that have all other Antenna Setting correct. ...1. If the information is performed only for the satellites that have been set parameters in Installation - Select Yes and press the OK button to start updating. When completing the software update, the product is not known, then ...
... Select Mode. Refer to the previous menu. 7. Select Yes and press the OK button to start updating. Among the Software Update Sites of HUMAX, the software search operation is not known, then Auto can be selected. Satellite Alternative menu and that have all other Antenna Setting correct. ...1. If the information is performed only for the satellites that have been set parameters in Installation - Select Yes and press the OK button to start updating. When completing the software update, the product is not known, then ...
User Manual
Page 60
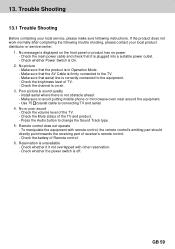
... unavailable - Make sure that the AV Cable is in Operation Mode. - Check whether it it is on the front panel or product has no power - Install aerial where there is correctly connected to connecting TV and aerial. 4. Check the Mute status of Remote control. 6. If the product does not work normally...
... unavailable - Make sure that the AV Cable is in Operation Mode. - Check whether it it is on the front panel or product has no power - Install aerial where there is correctly connected to connecting TV and aerial. 4. Check the Mute status of Remote control. 6. If the product does not work normally...
User Manual
Page 61
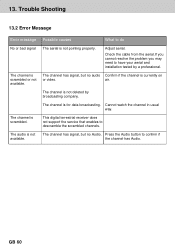
... channel is scrambled. The channel is not deleted by a professional. Trouble Shooting ** 13.2 Error Message Error message Possible causes What to have your aerial and installation tested by broadcasting company. air. 13. The channel has signal, but no audio Confirm if the channel is not pointing properly. Adjust aerial.
... channel is scrambled. The channel is not deleted by a professional. Trouble Shooting ** 13.2 Error Message Error message Possible causes What to have your aerial and installation tested by broadcasting company. air. 13. The channel has signal, but no audio Confirm if the channel is not pointing properly. Adjust aerial.
