
User Manual
Page 7
...Search GB25 4. Record GB44 7.1 Recorded Programme GB44 7.2 Recording Schedule GB47 7.3 HDD Control GB50 7.4 Recording's Start/End Time GB50 GB6 User's Manual Setup GB15 2.1 Connecting the Antenna GB15 2.2 Connecting the TV GB16 2.3 Connecting the TV and VCR GB21 2.4 Connecting the Audio System GB23 2.5 Powering On... GB8 1.1 Package Contents GB8 1.2 Front Panel GB9 1.3 Conditional Access GB10 1.4 Rear Panel GB11 1.5 Remote Control GB12 2. PVR GB34 5.1 Time Shifted Recording (TSR GB34 5.2 Recording GB36 5.3 Programme Playback in -Picture) Screen GB32 4.8 Game GB33 5.
...Search GB25 4. Record GB44 7.1 Recorded Programme GB44 7.2 Recording Schedule GB47 7.3 HDD Control GB50 7.4 Recording's Start/End Time GB50 GB6 User's Manual Setup GB15 2.1 Connecting the Antenna GB15 2.2 Connecting the TV GB16 2.3 Connecting the TV and VCR GB21 2.4 Connecting the Audio System GB23 2.5 Powering On... GB8 1.1 Package Contents GB8 1.2 Front Panel GB9 1.3 Conditional Access GB10 1.4 Rear Panel GB11 1.5 Remote Control GB12 2. PVR GB34 5.1 Time Shifted Recording (TSR GB34 5.2 Recording GB36 5.3 Programme Playback in -Picture) Screen GB32 4.8 Game GB33 5.

User Manual
Page 16
Note: Connect the product and the TV using an RF cable to the TV with the particular equipments for gaining optimum signal quality. 2. Setup This chapter describes how to connect the product to watch analogue channels. Note: If you have. RF Cable TV Antenna IN GB15 User's Manual Select ...
Note: Connect the product and the TV using an RF cable to the TV with the particular equipments for gaining optimum signal quality. 2. Setup This chapter describes how to connect the product to watch analogue channels. Note: If you have. RF Cable TV Antenna IN GB15 User's Manual Select ...
User Manual
Page 17
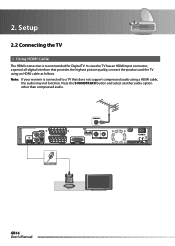
Setup 2.2 Connecting the TV 1. Using HDMI Cable The HDMI connection is connected to a TV that provides the highest picture quality, connect the product and the TV using a HDMI cable, the audio may not function. 2. Note: If your receiver is recommended for Digital TV. HDMI Cable GB16 User's Manual In case the TV has an HDMI input connector, a special all-digital interface that does not support compressed audio using an HDMI cable as follows. Press the SOUNDTRACK button and select another audio option other than compressed audio.
Setup 2.2 Connecting the TV 1. Using HDMI Cable The HDMI connection is connected to a TV that provides the highest picture quality, connect the product and the TV using a HDMI cable, the audio may not function. 2. Note: If your receiver is recommended for Digital TV. HDMI Cable GB16 User's Manual In case the TV has an HDMI input connector, a special all-digital interface that does not support compressed audio using an HDMI cable as follows. Press the SOUNDTRACK button and select another audio option other than compressed audio.
User Manual
Page 18
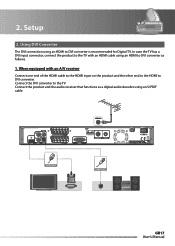
Using DVI Converter The DVI connection using an S/PDIF cable. When equipped with an HDMI cable using an HDMI to DVI converter as a digital audio decoder using an HDMI to DVI converter is recommended for Digital TV. Setup 2. In case the TV has a DVI input connector, connect the product to the TV with an A/V receiver Connect one end of the HDMI cable to the HDMI input on the product and the other end to the HDMI to the TV. Connect the product and the audio receiver that functions as follows. 1. HDMI Cable GB17 User's Manual 2. Connect the DVI converter to DVI converter.
Using DVI Converter The DVI connection using an S/PDIF cable. When equipped with an HDMI cable using an HDMI to DVI converter as a digital audio decoder using an HDMI to DVI converter is recommended for Digital TV. Setup 2. In case the TV has a DVI input connector, connect the product to the TV with an A/V receiver Connect one end of the HDMI cable to the HDMI input on the product and the other end to the HDMI to the TV. Connect the product and the audio receiver that functions as follows. 1. HDMI Cable GB17 User's Manual 2. Connect the DVI converter to DVI converter.
User Manual
Page 19
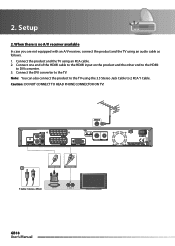
HDMI Cable GB18 User's Manual Connect one end of the HDMI cable to the HDMI input on the product and the other end to the HDMI to the TV. Setup 2. Note: You can also connect the product to 2 RCA Y Cable. Connect the DVI converter to DVI converter. 3. Caution: DO NOT CONNECT TO HEAD PHONE CONNECTOR ON TV! When there is no A/V receiver available In case you are not equipped with an A/V receiver, connect the product and the TV using the 3.5 Stereo Jack Cable to the TV using an audio cable as follows. 1. Connect the product and the TV using an RCA cable. 2. 2.
HDMI Cable GB18 User's Manual Connect one end of the HDMI cable to the HDMI input on the product and the other end to the HDMI to the TV. Setup 2. Note: You can also connect the product to 2 RCA Y Cable. Connect the DVI converter to DVI converter. 3. Caution: DO NOT CONNECT TO HEAD PHONE CONNECTOR ON TV! When there is no A/V receiver available In case you are not equipped with an A/V receiver, connect the product and the TV using the 3.5 Stereo Jack Cable to the TV using an audio cable as follows. 1. Connect the product and the TV using an RCA cable. 2. 2.

User Manual
Page 20
SCART Cable TV SCART GB19 User's Manual 2. Using SCART Cable Connect the product and the TV using a SCART cable. Setup 3.
SCART Cable TV SCART GB19 User's Manual 2. Using SCART Cable Connect the product and the TV using a SCART cable. Setup 3.

User Manual
Page 21
2. RCA Cable VIDEO L AUDIO R GB20 User's Manual Using RCA Cable Connect the product and the TV using an RCA cable. Setup 4.
2. RCA Cable VIDEO L AUDIO R GB20 User's Manual Using RCA Cable Connect the product and the TV using an RCA cable. Setup 4.

User Manual
Page 22
SCART Cable SCART Cable TV SCART VCR SCART GB21 User's Manual Setup 2.3 Connecting the TV and VCR 1. 2. Using SCART Cable Connect the product and the TV/VCR using a SCART cable.
SCART Cable SCART Cable TV SCART VCR SCART GB21 User's Manual Setup 2.3 Connecting the TV and VCR 1. 2. Using SCART Cable Connect the product and the TV/VCR using a SCART cable.

User Manual
Page 23
Connect the aerial output of the VCR and the aerial input of the VCR using an RF cable. Using RF Cable 1. Connect the TV/VCR (LOOP OUT) of the product and the aerial input of the TV using an RF cable. 2. Setup 2. TV Antenna IN TV Antenna OUT RF Cable VCR Antenna IN VCR Antenna OUT RF Cable GB22 User's Manual 2.
Connect the aerial output of the VCR and the aerial input of the VCR using an RF cable. Using RF Cable 1. Connect the TV/VCR (LOOP OUT) of the product and the aerial input of the TV using an RF cable. 2. Setup 2. TV Antenna IN TV Antenna OUT RF Cable VCR Antenna IN VCR Antenna OUT RF Cable GB22 User's Manual 2.

User Manual
Page 24
RCA Cable L AUDIO R S/PDIF Cable S/PDIF GB23 User's Manual 2. Setup 2.4 Connecting the Audio System Select the most appropriate procedure for your convenience. • Connect the product and the audio system using an RCA cable. • Connect the product and the audio receiver that functions as a digital audio decoder using an S/PDIF cable.
RCA Cable L AUDIO R S/PDIF Cable S/PDIF GB23 User's Manual 2. Setup 2.4 Connecting the Audio System Select the most appropriate procedure for your convenience. • Connect the product and the audio system using an RCA cable. • Connect the product and the audio receiver that functions as a digital audio decoder using an S/PDIF cable.

User Manual
Page 25
Power on the power switch located at the front of the product. Connect the power cord of the product. 3. Setup 2.5 Powering On 1. Zoom in 1 4 7 MENU STANDBY 2 3 5 6 8 9 0 TEXT GB24 User's Manual Turn on by pressing the STANDBY button of the remote control or the STANDBY button at the back left of the product to a wall outlet. 2. 2.
Power on the power switch located at the front of the product. Connect the power cord of the product. 3. Setup 2.5 Powering On 1. Zoom in 1 4 7 MENU STANDBY 2 3 5 6 8 9 0 TEXT GB24 User's Manual Turn on by pressing the STANDBY button of the remote control or the STANDBY button at the back left of the product to a wall outlet. 2. 2.

User Manual
Page 71
... a valid and working subscription to restriction of the functions that the Scart cable to the TV set to view. • Ensure that the PVR and the TV are available. How can I receive new channels? If channels change channel while recording. • Certain channels may not work.... and working subscription to the channels you wish to view. • Contact your password (Default = 0000) Note: The receiver will need to setup any schedules and any Favourites list you will then restart and search for new recording. • Check if recording is finished. 13. Select Installation...
... a valid and working subscription to restriction of the functions that the Scart cable to the TV set to view. • Ensure that the PVR and the TV are available. How can I receive new channels? If channels change channel while recording. • Certain channels may not work.... and working subscription to the channels you wish to view. • Contact your password (Default = 0000) Note: The receiver will need to setup any schedules and any Favourites list you will then restart and search for new recording. • Check if recording is finished. 13. Select Installation...