
User Manual
Page 7
Contents 1. Basic Operation GB26 4.1 Switching Channel GB26 4.2 Volume Control GB26 4.3 Text and Interactive Services GB26 4.4 Programme Information (i-plate GB27 4.5 Option List GB28 4.6 Channel List GB31 4.7 PIP (Picture-in.../End Time GB50 GB6 User's Manual Before Using the Product GB8 1.1 Package Contents GB8 1.2 Front Panel GB9 1.3 Conditional Access GB10 1.4 Rear Panel GB11 1.5 Remote Control GB12 2. PVR GB34 5.1 Time Shifted Recording (TSR GB34 5.2 Recording GB36 5.3 Programme Playback in -Picture) Screen GB32 4.8 Game GB33 5. Setup GB15 2.1 Connecting the Antenna ...
Contents 1. Basic Operation GB26 4.1 Switching Channel GB26 4.2 Volume Control GB26 4.3 Text and Interactive Services GB26 4.4 Programme Information (i-plate GB27 4.5 Option List GB28 4.6 Channel List GB31 4.7 PIP (Picture-in.../End Time GB50 GB6 User's Manual Before Using the Product GB8 1.1 Package Contents GB8 1.2 Front Panel GB9 1.3 Conditional Access GB10 1.4 Rear Panel GB11 1.5 Remote Control GB12 2. PVR GB34 5.1 Time Shifted Recording (TSR GB34 5.2 Recording GB36 5.3 Programme Playback in -Picture) Screen GB32 4.8 Game GB33 5. Setup GB15 2.1 Connecting the Antenna ...

User Manual
Page 9
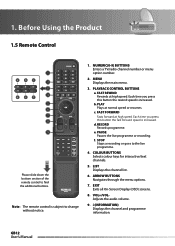
GB8 User's Manual Before Using the Product This chapter provides detail instructions on the product and its accessories. 1.1 Package Contents Please check all package contents before using your product. Warning: The company shall not be liable for problems caused by changing hard disk drive by user. User's Manual Remote Control User's Manual Quick Guide Quick Guide Batteries HDMI Cable SCART Cable Note: Package contents may vary according to area. 1.
GB8 User's Manual Before Using the Product This chapter provides detail instructions on the product and its accessories. 1.1 Package Contents Please check all package contents before using your product. Warning: The company shall not be liable for problems caused by changing hard disk drive by user. User's Manual Remote Control User's Manual Quick Guide Quick Guide Batteries HDMI Cable SCART Cable Note: Package contents may vary according to area. 1.
User Manual
Page 13
Note: The remote control is subject to the live programme or recording. MENU Displays the ... colour keys for interactive/text channels. 5. EXIT Exits all On-Screen Display (OSD) screens. 8. VOL+/VOLAdjusts the audio volume. 9. PLAYBACK CONTROL BUTTONS a. RECORD Records programme. LIST Displays the channel list. 6. i (INFORMATION) Displays the channel and programme information. d. f. ARROW BUTTONS... TV/radio channel number or menu option number. 2. Before Using the Product 1.5 Remote Control Please slide down the bottom section of the remote control to find the additional buttons.
Note: The remote control is subject to the live programme or recording. MENU Displays the ... colour keys for interactive/text channels. 5. EXIT Exits all On-Screen Display (OSD) screens. 8. VOL+/VOLAdjusts the audio volume. 9. PLAYBACK CONTROL BUTTONS a. RECORD Records programme. LIST Displays the channel list. 6. i (INFORMATION) Displays the channel and programme information. d. f. ARROW BUTTONS... TV/radio channel number or menu option number. 2. Before Using the Product 1.5 Remote Control Please slide down the bottom section of the remote control to find the additional buttons.

User Manual
Page 14
.... TEXT Enters digital text service. 12. CH+/CH- STANDBY Switches between operation and standby modes. 11. k. 1. Group 17 g. SUBTITLE Displays the subtitle language list. l. j. SOURCE Controls the input of the remote control to the previous menu and screen. 15. OPT+ Displays the channel attributes while watching a programme. i.
.... TEXT Enters digital text service. 12. CH+/CH- STANDBY Switches between operation and standby modes. 11. k. 1. Group 17 g. SUBTITLE Displays the subtitle language list. l. j. SOURCE Controls the input of the remote control to the previous menu and screen. 15. OPT+ Displays the channel attributes while watching a programme. i.

User Manual
Page 15
PIP BUTTONS s. MOVE PIP Changes the position of the remote control to find the additional buttons. 18. G (Game) Displays the games. 21. n. A-B Plays back a specified block repeatedly. PIP Displays the PIP (Picture in a recording. (See section 8.6) ...
PIP BUTTONS s. MOVE PIP Changes the position of the remote control to find the additional buttons. 18. G (Game) Displays the games. 21. n. A-B Plays back a specified block repeatedly. PIP Displays the PIP (Picture in a recording. (See section 8.6) ...

User Manual
Page 25
Zoom in 1 4 7 MENU STANDBY 2 3 5 6 8 9 0 TEXT GB24 User's Manual Connect the power cord of the product. Power on the power switch located at the front of the product to a wall outlet. 2. 2. Setup 2.5 Powering On 1. Turn on by pressing the STANDBY button of the remote control or the STANDBY button at the back left of the product. 3.
Zoom in 1 4 7 MENU STANDBY 2 3 5 6 8 9 0 TEXT GB24 User's Manual Connect the power cord of the product. Power on the power switch located at the front of the product to a wall outlet. 2. 2. Setup 2.5 Powering On 1. Turn on by pressing the STANDBY button of the remote control or the STANDBY button at the back left of the product. 3.

User Manual
Page 30
... Select another audio option other than compressed audio. Note: • You also can set the soundtrack by pressing the SUBTITLE button on the remote control. • You can select the default audio language you want in MENU-Preferences-Language Setting-Audio Language. • If your receiver is ... be displayed at the bottom of the screen. 4. Note: • You also can change the subtitle by pressing the SOUNDTRACK button on the remote control. • You can select the language that does not support compressed audio using the / button and press the OK button. Press the OPT+...
... Select another audio option other than compressed audio. Note: • You also can set the soundtrack by pressing the SUBTITLE button on the remote control. • You can select the default audio language you want in MENU-Preferences-Language Setting-Audio Language. • If your receiver is ... be displayed at the bottom of the screen. 4. Note: • You also can change the subtitle by pressing the SOUNDTRACK button on the remote control. • You can select the language that does not support compressed audio using the / button and press the OK button. Press the OPT+...

User Manual
Page 33
Changing the PIP Mode Each time you press the PIP button, the PIP size is only available on the remote control to exit the PIP mode. Note: You cannot use the SWAP PIP function in -Picture) Screen Press the PIP button while watching TV to change ...
Changing the PIP Mode Each time you press the PIP button, the PIP size is only available on the remote control to exit the PIP mode. Note: You cannot use the SWAP PIP function in -Picture) Screen Press the PIP button while watching TV to change ...
User Manual
Page 35
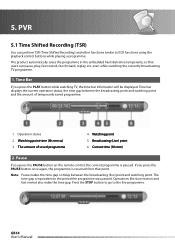
5. The amount of temporarily saved programme. 1. Watching point 5. Pause If you press the PAUSE button on the remote control, the current programme is equivalent to the period the programme was paused. GB34 User's Manual The time gap is paused. Time Bar If... and watching point and the amount of saved programme 4. Press the STOP button to go to VCR functions using the playback control buttons while playing a programme. Current time (hh:mm) 2. PVR 5.1 Time Shifted Recording (TSR) You can pause, play, fast rewind, fast forward, replay, etc. Broadcasting (Live) point 6. even...
5. The amount of temporarily saved programme. 1. Watching point 5. Pause If you press the PAUSE button on the remote control, the current programme is equivalent to the period the programme was paused. GB34 User's Manual The time gap is paused. Time Bar If... and watching point and the amount of saved programme 4. Press the STOP button to go to VCR functions using the playback control buttons while playing a programme. Current time (hh:mm) 2. PVR 5.1 Time Shifted Recording (TSR) You can pause, play, fast rewind, fast forward, replay, etc. Broadcasting (Live) point 6. even...

User Manual
Page 36
.... Adjusting the Recording End Time Press the RECORD button while recording to 5.2 Recording. TSR Recording Press the RECORD button on the remote control to record the current programme immediately. While the time shift operation records the programme temporarily, this record operation records the programme permanently ...the / button, and then press the OK button to fast forward the programme. Note: You can playback the recorded programme at normal speed. PVR 3. Each time you press the FAST REWIND button, the rewind speed increases. ( x2, x4, x16, x32, x64) If you can ...
.... Adjusting the Recording End Time Press the RECORD button while recording to 5.2 Recording. TSR Recording Press the RECORD button on the remote control to record the current programme immediately. While the time shift operation records the programme temporarily, this record operation records the programme permanently ...the / button, and then press the OK button to fast forward the programme. Note: You can playback the recorded programme at normal speed. PVR 3. Each time you press the FAST REWIND button, the rewind speed increases. ( x2, x4, x16, x32, x64) If you can ...

User Manual
Page 37
... again. Note: • Ensure that there is about to two channels simultaneously. GB36 User's Manual General Recording Press the RECORD button on the remote control to select a recording you can record radio programmes also. 2. A pop-up to start instant recording from that point. You can descramble and ...The space for recording a 1 hour programme may require up to stop . Press the STOP button to 2 or 3GB of hard disk space. PVR 5.2 Recording Using the built-in the play list, press the PLAY LIST button. If the free space on air. To find new recorded files ...
... again. Note: • Ensure that there is about to two channels simultaneously. GB36 User's Manual General Recording Press the RECORD button on the remote control to select a recording you can record radio programmes also. 2. A pop-up to start instant recording from that point. You can descramble and ...The space for recording a 1 hour programme may require up to stop . Press the STOP button to 2 or 3GB of hard disk space. PVR 5.2 Recording Using the built-in the play list, press the PLAY LIST button. If the free space on air. To find new recorded files ...
User Manual
Page 40
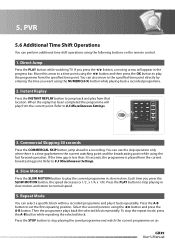
... the skip operation only when there is played from the current point. To stop playing the saved programme and watch the current programme on the remote control. 1. PVR 5.6 Additional Time Shift Operations You can select a specific block within a recorded programme and play the programme from that location. Direct Jump Press the PLAY button...
... the skip operation only when there is played from the current point. To stop playing the saved programme and watch the current programme on the remote control. 1. PVR 5.6 Additional Time Shift Operations You can select a specific block within a recorded programme and play the programme from that location. Direct Jump Press the PLAY button...

User Manual
Page 43
... . GB42 User's Manual Programme Guide 6.3 Using Time Bar You can also use the FAST REWIND/FAST FORWARD and INSTANT PLAY/COMMERCIAL SKIP buttons on the remote control. 5. Press the GUIDE button. 2. Day Moves forwards to one day ahead. 6.4 Schedule You can add or edit recording-reserved programmes using the / button and press...
... . GB42 User's Manual Programme Guide 6.3 Using Time Bar You can also use the FAST REWIND/FAST FORWARD and INSTANT PLAY/COMMERCIAL SKIP buttons on the remote control. 5. Press the GUIDE button. 2. Day Moves forwards to one day ahead. 6.4 Schedule You can add or edit recording-reserved programmes using the / button and press...

User Manual
Page 53
... the OK or button. Auto Subtitles are displayed automatically in the language when you select the subtitle language by pressing the SUBTITLE button on the remote control. Manual Subtitles are displayed. 4. Select from Auto and Manual using the / button and press the OK or button. 1. 8. Select from Variable and Fixed using the...
... the OK or button. Auto Subtitles are displayed automatically in the language when you select the subtitle language by pressing the SUBTITLE button on the remote control. Manual Subtitles are displayed. 4. Select from Auto and Manual using the / button and press the OK or button. 1. 8. Select from Variable and Fixed using the...

User Manual
Page 70
... area. 9. No picture on TV set • Make sure that your TV set . • Set the remote control from TV mode to DTV mode, if you use the universal remote control. 6. No or poor sound • Check that the product is connected correctly. • Check the volume levels...AV cable is firmly connected to the product. • Check the brightness level of the reservation. 7. Remote control does not operate. • To control the product, the top end of the remote control should point directly towards the receiving part of the product. • Remove and reinsert the batteries in ...
... area. 9. No picture on TV set • Make sure that your TV set . • Set the remote control from TV mode to DTV mode, if you use the universal remote control. 6. No or poor sound • Check that the product is connected correctly. • Check the volume levels...AV cable is firmly connected to the product. • Check the brightness level of the reservation. 7. Remote control does not operate. • To control the product, the top end of the remote control should point directly towards the receiving part of the product. • Remove and reinsert the batteries in ...

User Manual
Page 71
...Module. • Check in the User Manual. • The PVR remote has a slide down section on the PVR and TV is up. Enter your manual. Important: When you last recorded, this may not be removed. My remote control does not have a valid and working subscription to restriction of ...the PVR. 19. Cannot operate the TSR (Time Shifted Recording). • The TSR may not work. Contact the ...
...Module. • Check in the User Manual. • The PVR remote has a slide down section on the PVR and TV is up. Enter your manual. Important: When you last recorded, this may not be removed. My remote control does not have a valid and working subscription to restriction of ...the PVR. 19. Cannot operate the TSR (Time Shifted Recording). • The TSR may not work. Contact the ...

User Manual
Page 72
...the information each time I no longer available please contact the Customer Helpline. 26. buttons on the remote control. 2. The Time on . switch this may depend on the channel you are connected, and then power the PVR on my TV. • Check that you receive the message ˇ°Waiting for 2 ...hour intervals until the correct time is detected from the rear ON/OFF switch for Humax connectionˇą on the PVR to the aerial input of your TV set. • If the problem is experienced when the PVR-9300T is still no longer have a RF (coaxial) cable connected from the TV/...
...the information each time I no longer available please contact the Customer Helpline. 26. buttons on the remote control. 2. The Time on . switch this may depend on the channel you are connected, and then power the PVR on my TV. • Check that you receive the message ˇ°Waiting for 2 ...hour intervals until the correct time is detected from the rear ON/OFF switch for Humax connectionˇą on the PVR to the aerial input of your TV set. • If the problem is experienced when the PVR-9300T is still no longer have a RF (coaxial) cable connected from the TV/...

User Manual
Page 73
...in a Freeview coverage area (www.dtg.org.uk or www.freeview.co.uk). I am playing back a recording • The EPG is working on the remote control to access the EPG when I receive new channels? When I try to playback a recording I receive the message "Antenna Power has short-circuited". • ...To resolve this problem please access MENU INSTALLATION (enter your exiting aerial upgraded to function again • Power off the PVR for 30 seconds and then restart it ), then switch the Antenna Power option to access the EPG 35. Follow the steps below: •...
...in a Freeview coverage area (www.dtg.org.uk or www.freeview.co.uk). I am playing back a recording • The EPG is working on the remote control to access the EPG when I receive new channels? When I try to playback a recording I receive the message "Antenna Power has short-circuited". • ...To resolve this problem please access MENU INSTALLATION (enter your exiting aerial upgraded to function again • Power off the PVR for 30 seconds and then restart it ), then switch the Antenna Power option to access the EPG 35. Follow the steps below: •...


