

User Manual
Page 1
Please read this manual carefully before setting up your Personal Video Recorder PVR-9300T. Digital Personal Video Recorder User's Manual PVR-9300T The default password is 0000.
Please read this manual carefully before setting up your Personal Video Recorder PVR-9300T. Digital Personal Video Recorder User's Manual PVR-9300T The default password is 0000.

User Manual
Page 2
.... Notice Thank you can now record the whole series. If the programme changes to a different day or time the PVR-9300T will track these changes and still record the programme. (page GB40, GB41, GB44) • Alternate Instances If a...or a different channel. • Split Recordings If a programme has two parts split by the broadcasters. GB1 User's Manual Some channels may not support all services. Freeview Playback explained: • Accurate recording The start and end times of the... at the times sent by another entry in a series, you for purchasing a Humax PVR-9300T product.
.... Notice Thank you can now record the whole series. If the programme changes to a different day or time the PVR-9300T will track these changes and still record the programme. (page GB40, GB41, GB44) • Alternate Instances If a...or a different channel. • Split Recordings If a programme has two parts split by the broadcasters. GB1 User's Manual Some channels may not support all services. Freeview Playback explained: • Accurate recording The start and end times of the... at the times sent by another entry in a series, you for purchasing a Humax PVR-9300T product.

User Manual
Page 3
... Indicates a situation which may become defective due to misuse of any importance to change without HUMAX's prior consent in this manual. Warnings, Cautions and Notes Throughout the whole manual, pay special attention to the following marks that presents a risk of copyright and copyright law...and maintain the product at maximum performance. Please read this user's manual next to qualified service personnel. This symbol indicates dangerous voltage inside . Refer servicing to your product for purchasing a HUMAX product. Meaning of Symbols To reduce the risk of Telenor Conax ...
... Indicates a situation which may become defective due to misuse of any importance to change without HUMAX's prior consent in this manual. Warnings, Cautions and Notes Throughout the whole manual, pay special attention to the following marks that presents a risk of copyright and copyright law...and maintain the product at maximum performance. Please read this user's manual next to qualified service personnel. This symbol indicates dangerous voltage inside . Refer servicing to your product for purchasing a HUMAX product. Meaning of Symbols To reduce the risk of Telenor Conax ...

User Manual
Page 4
...your aerial may need to be realigned. (Alternatively, you are in a Freeview Coverage area in one of the follow ways: • Contact the Humax Customer Helpline on 0844 669 8800 for information on Freeview coverage in your area. • Text your area. • Telephone the shop where you... may need to reposition or upgrade your location the digital channels may not be able to 5:30pm (Excludes Bank Holidays) GB3 User's Manual They will reply with advice on whether you can take this item for environmentally safe recycling. • Business users: Contact your existing analogue ...
...your aerial may need to be realigned. (Alternatively, you are in a Freeview Coverage area in one of the follow ways: • Contact the Humax Customer Helpline on 0844 669 8800 for information on Freeview coverage in your area. • Text your area. • Telephone the shop where you... may need to reposition or upgrade your location the digital channels may not be able to 5:30pm (Excludes Bank Holidays) GB3 User's Manual They will reply with advice on whether you can take this item for environmentally safe recycling. • Business users: Contact your existing analogue ...

User Manual
Page 5
... top of any object, and do not place the product on a bed, sofa, rug, or other appliances susceptible to do so can fall. GB4 User's Manual Please read the following safety precautions carefully. Failure to electromagnetic influences, such as a TV or a VCR. • Do not block the openings with liquid should...
... top of any object, and do not place the product on a bed, sofa, rug, or other appliances susceptible to do so can fall. GB4 User's Manual Please read the following safety precautions carefully. Failure to electromagnetic influences, such as a TV or a VCR. • Do not block the openings with liquid should...

User Manual
Page 6
... holding the plug. • Keep heating appliances as far as the original part. Make sure to the product and reduce its life span. 4. GB5 User's Manual To avoid electrical shock; • Do not open the main body. • Do not insert metal or inflammable objects inside the product. • Do not...
... holding the plug. • Keep heating appliances as far as the original part. Make sure to the product and reduce its life span. 4. GB5 User's Manual To avoid electrical shock; • Do not open the main body. • Do not insert metal or inflammable objects inside the product. • Do not...
User Manual
Page 7
... Record GB44 7.1 Recorded Programme GB44 7.2 Recording Schedule GB47 7.3 HDD Control GB50 7.4 Recording's Start/End Time GB50 GB6 User's Manual Programme Guide GB40 6.1 Viewing Programme Guide Information GB40 6.2 Selecting Channel Group GB41 6.3 Using Time Bar GB42 6.4 Schedule GB42 6.5 ...Channel List GB31 4.7 PIP (Picture-in the Play List GB37 5.4 Chase Play GB38 5.5 Bookmark GB38 5.6 Additional Time Shift Operations GB39 6. PVR GB34 5.1 Time Shifted Recording (TSR GB34 5.2 Recording GB36 5.3 Programme Playback in -Picture) Screen GB32 4.8 Game GB33 5. Setup GB15 ...
... Record GB44 7.1 Recorded Programme GB44 7.2 Recording Schedule GB47 7.3 HDD Control GB50 7.4 Recording's Start/End Time GB50 GB6 User's Manual Programme Guide GB40 6.1 Viewing Programme Guide Information GB40 6.2 Selecting Channel Group GB41 6.3 Using Time Bar GB42 6.4 Schedule GB42 6.5 ...Channel List GB31 4.7 PIP (Picture-in the Play List GB37 5.4 Chase Play GB38 5.5 Bookmark GB38 5.6 Additional Time Shift Operations GB39 6. PVR GB34 5.1 Time Shifted Recording (TSR GB34 5.2 Recording GB36 5.3 Programme Playback in -Picture) Screen GB32 4.8 Game GB33 5. Setup GB15 ...

User Manual
Page 8
... 13.2 Trouble Shooting GB69 13.3 Error Message GB73 13.4. Specification GB74 13.5 Glossary GB76 13.6 Service and Support GB77 GB7 User's Manual Contents 8. Installation GB60 10.1 Automatic Search GB60 10.2 Manual Search GB61 10.3 Default Setting GB62 10.4 Antenna Power GB62 11. Preferences GB51 8.1 Parental Control GB51 8.2 Language Setting GB52 8.3 Time Setting...
... 13.2 Trouble Shooting GB69 13.3 Error Message GB73 13.4. Specification GB74 13.5 Glossary GB76 13.6 Service and Support GB77 GB7 User's Manual Contents 8. Installation GB60 10.1 Automatic Search GB60 10.2 Manual Search GB61 10.3 Default Setting GB62 10.4 Antenna Power GB62 11. Preferences GB51 8.1 Parental Control GB51 8.2 Language Setting GB52 8.3 Time Setting...

User Manual
Page 9
GB8 User's Manual Warning: The company shall not be liable for problems caused by changing hard disk drive by user. 1. User's Manual Remote Control User's Manual Quick Guide Quick Guide Batteries HDMI Cable SCART Cable Note: Package contents may vary according to area. Before Using the Product This chapter provides detail instructions on the product and its accessories. 1.1 Package Contents Please check all package contents before using your product.
GB8 User's Manual Warning: The company shall not be liable for problems caused by changing hard disk drive by user. 1. User's Manual Remote Control User's Manual Quick Guide Quick Guide Batteries HDMI Cable SCART Cable Note: Package contents may vary according to area. Before Using the Product This chapter provides detail instructions on the product and its accessories. 1.1 Package Contents Please check all package contents before using your product.
User Manual
Page 10
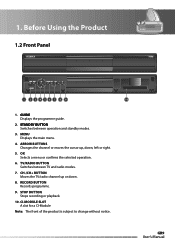
...+ BUTTON Moves the TV/radio channel up , down . 8. 1. ARROW BUTTONS Changes the channel or moves the cursor up or down , left or right. 5. GB9 User's Manual STANDBY BUTTON Switches between TV and radio modes. 7.
...+ BUTTON Moves the TV/radio channel up , down . 8. 1. ARROW BUTTONS Changes the channel or moves the cursor up or down , left or right. 5. GB9 User's Manual STANDBY BUTTON Switches between TV and radio modes. 7.

User Manual
Page 11
... CI-Module into the CI-Module. 3. Open the right-hand flap on a subscription basis and can only be enjoyed via a Conditional Access component. GB10 User's Manual CI-Module Smartcard The Conditional Access component is needed to air, however some TV and radio/music channels are different kinds of CI-Modules, suitable...
... CI-Module into the CI-Module. 3. Open the right-hand flap on a subscription basis and can only be enjoyed via a Conditional Access component. GB10 User's Manual CI-Module Smartcard The Conditional Access component is needed to air, however some TV and radio/music channels are different kinds of CI-Modules, suitable...

User Manual
Page 12
... Connects to the PC to the audio system using an S/PDIF cable. (digital audio) 5. Before Using the Product 1.4 Rear Panel 12 34 5 6 7 8 9 10 1. GB11 User's Manual S/PDIF Connects to update software. 8.
... Connects to the PC to the audio system using an S/PDIF cable. (digital audio) 5. Before Using the Product 1.4 Rear Panel 12 34 5 6 7 8 9 10 1. GB11 User's Manual S/PDIF Connects to update software. 8.

User Manual
Page 13
... at high speed. COLOUR BUTTONS Selects colour keys for interactive/text channels. 5. EXIT Exits all On-Screen Display (OSD) screens. 8. RECORD Records programme. GB12 User's Manual i (INFORMATION) Displays the channel and programme information. c. PAUSE Pauses the live programme. 4. FAST REWIND Rewinds at high speed. Each time you press this button the...
... at high speed. COLOUR BUTTONS Selects colour keys for interactive/text channels. 5. EXIT Exits all On-Screen Display (OSD) screens. 8. RECORD Records programme. GB12 User's Manual i (INFORMATION) Displays the channel and programme information. c. PAUSE Pauses the live programme. 4. FAST REWIND Rewinds at high speed. Each time you press this button the...

User Manual
Page 14
... the input of the remote control to the previous menu and screen. 15. BACK Closes and returns to find the additional buttons. 10. GB13 User's Manual Before Using the Product Please slide down the bottom section of TV. STANDBY Switches between operation and standby modes. 11. TEXT Enters digital text service...
... the input of the remote control to the previous menu and screen. 15. BACK Closes and returns to find the additional buttons. 10. GB13 User's Manual Before Using the Product Please slide down the bottom section of TV. STANDBY Switches between operation and standby modes. 11. TEXT Enters digital text service...

User Manual
Page 15
... from that location. (See section 8.6) q. COMMERCIAL SKIP Jumps ahead in slow motion. t. u. 1. A-B Plays back a specified block repeatedly. PIP CH+/CHChanges the PIP channel. GB14 User's Manual p. Each time you press this button, speed is slowed progressively more. PIP BUTTONS s. G (Game) Displays the games. 21. n. BOOKMARK LIST Displays the list of the...
... from that location. (See section 8.6) q. COMMERCIAL SKIP Jumps ahead in slow motion. t. u. 1. A-B Plays back a specified block repeatedly. PIP CH+/CHChanges the PIP channel. GB14 User's Manual p. Each time you press this button, speed is slowed progressively more. PIP BUTTONS s. G (Game) Displays the games. 21. n. BOOKMARK LIST Displays the list of the...

User Manual
Page 16
The product provides various interfaces to connect to watch analogue channels. RF Cable TV Antenna IN GB15 User's Manual Select the most appropriate procedure depending on the equipment you encounter any problems setting up your product, please contact your local product distributor. 2.1 Connecting the ...
The product provides various interfaces to connect to watch analogue channels. RF Cable TV Antenna IN GB15 User's Manual Select the most appropriate procedure depending on the equipment you encounter any problems setting up your product, please contact your local product distributor. 2.1 Connecting the ...
User Manual
Page 17
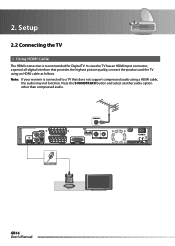
2. HDMI Cable GB16 User's Manual Setup 2.2 Connecting the TV 1. Using HDMI Cable The HDMI connection is connected to a TV that provides the highest picture quality, connect the product and the TV using a HDMI cable, the audio may not function. Note: If your receiver is recommended for Digital TV. Press the SOUNDTRACK button and select another audio option other than compressed audio. In case the TV has an HDMI input connector, a special all-digital interface that does not support compressed audio using an HDMI cable as follows.
2. HDMI Cable GB16 User's Manual Setup 2.2 Connecting the TV 1. Using HDMI Cable The HDMI connection is connected to a TV that provides the highest picture quality, connect the product and the TV using a HDMI cable, the audio may not function. Note: If your receiver is recommended for Digital TV. Press the SOUNDTRACK button and select another audio option other than compressed audio. In case the TV has an HDMI input connector, a special all-digital interface that does not support compressed audio using an HDMI cable as follows.
User Manual
Page 18
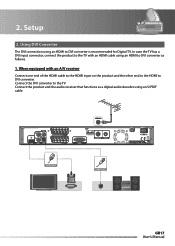
... on the product and the other end to the HDMI to DVI converter as a digital audio decoder using an S/PDIF cable. HDMI Cable GB17 User's Manual Connect the DVI converter to DVI converter is recommended for Digital TV. When equipped with an HDMI cable using an HDMI to the TV. Connect...
... on the product and the other end to the HDMI to DVI converter as a digital audio decoder using an S/PDIF cable. HDMI Cable GB17 User's Manual Connect the DVI converter to DVI converter is recommended for Digital TV. When equipped with an HDMI cable using an HDMI to the TV. Connect...
User Manual
Page 19
Connect the product and the TV using an audio cable as follows. 1. Caution: DO NOT CONNECT TO HEAD PHONE CONNECTOR ON TV! Note: You can also connect the product to the TV using the 3.5 Stereo Jack Cable to DVI converter. 3. 2. Connect one end of the HDMI cable to the HDMI input on the product and the other end to the HDMI to 2 RCA Y Cable. Connect the DVI converter to the TV. When there is no A/V receiver available In case you are not equipped with an A/V receiver, connect the product and the TV using an RCA cable. 2. Setup 2. HDMI Cable GB18 User's Manual
Connect the product and the TV using an audio cable as follows. 1. Caution: DO NOT CONNECT TO HEAD PHONE CONNECTOR ON TV! Note: You can also connect the product to the TV using the 3.5 Stereo Jack Cable to DVI converter. 3. 2. Connect one end of the HDMI cable to the HDMI input on the product and the other end to the HDMI to 2 RCA Y Cable. Connect the DVI converter to the TV. When there is no A/V receiver available In case you are not equipped with an A/V receiver, connect the product and the TV using an RCA cable. 2. Setup 2. HDMI Cable GB18 User's Manual

User Manual
Page 20
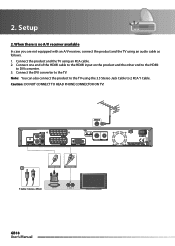
Using SCART Cable Connect the product and the TV using a SCART cable. Setup 3. SCART Cable TV SCART GB19 User's Manual 2.
Using SCART Cable Connect the product and the TV using a SCART cable. Setup 3. SCART Cable TV SCART GB19 User's Manual 2.


