
Installation Guide
Page 1
...both the inner and outer holes in contact with the rotating fan blades during normal operation. • e fan blades are at least 8 feet high. • e fan blades have now successfully prepared your new Hunter fan. Attach the outlet box directly to the support brace or ...and washers. e bottom of the outlet box must be recessed a minimum of 1/16" into ceiling. Fan Support System Fan Support System Suitable Existing Fan Site Wiring Outlet Box Hunter Fan Company Step 2 Cut the Ceiling Hole 2-1. Locate the site for the ceiling hole directly below the joist or...
...both the inner and outer holes in contact with the rotating fan blades during normal operation. • e fan blades are at least 8 feet high. • e fan blades have now successfully prepared your new Hunter fan. Attach the outlet box directly to the support brace or ...and washers. e bottom of the outlet box must be recessed a minimum of 1/16" into ceiling. Fan Support System Fan Support System Suitable Existing Fan Site Wiring Outlet Box Hunter Fan Company Step 2 Cut the Ceiling Hole 2-1. Locate the site for the ceiling hole directly below the joist or...
Owner's Manual
Page 2
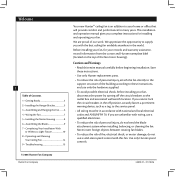
...the circuit breakers in the off the circuit breakers to the outlet box and associated wall switch location. Use only Hunter speed controls. © 2006 Hunter Fan Company Hunter Fan Company 42800-01 • 01/18/06 We are unfamiliar with wiring, use a solid-state speed control ... 7 • Completing Your Installation With or Without a Light Fixture 10 8 • Operating and Cleaning Your Ceiling Fan 14 9 • Troubleshooting 15 Your new Hunter® ceiling fan is an addition to your home or office that will provide comfort and performance for many years. is installation ...
...the circuit breakers in the off the circuit breakers to the outlet box and associated wall switch location. Use only Hunter speed controls. © 2006 Hunter Fan Company Hunter Fan Company 42800-01 • 01/18/06 We are unfamiliar with wiring, use a solid-state speed control ... 7 • Completing Your Installation With or Without a Light Fixture 10 8 • Operating and Cleaning Your Ceiling Fan 14 9 • Troubleshooting 15 Your new Hunter® ceiling fan is an addition to your home or office that will provide comfort and performance for many years. is installation ...

Owner's Manual
Page 3
... LoLwoPwroPfriolefilMe oMuonutinntginfgitsfictslocsleosteottohethe ceiclienilgin. Considering Optional Accessories Consider using Hunter's optional accessories, including a wall-mounted or remote speed control. For quiet and optimum performance of your fan. is fan was designed to be mounted only on flat ceilings ... feet high 3 42800-01 • 01/18/06 Hunter Fan Company Mounting and Optional Accessories Understanding Mounting Hunter's patented mounting system provides you maximum ease in installing your Hunter fan, use the accessories, follow the instructions included with each...
... LoLwoPwroPfriolefilMe oMuonutinntginfgitsfictslocsleosteottohethe ceiclienilgin. Considering Optional Accessories Consider using Hunter's optional accessories, including a wall-mounted or remote speed control. For quiet and optimum performance of your fan. is fan was designed to be mounted only on flat ceilings ... feet high 3 42800-01 • 01/18/06 Hunter Fan Company Mounting and Optional Accessories Understanding Mounting Hunter's patented mounting system provides you maximum ease in installing your Hunter fan, use the accessories, follow the instructions included with each...

Owner's Manual
Page 4
... Parts Guide. Refer to the building structure are missing or damaged, contact your Hunter dealer or call Hunter Technical Support Department at 888-830-1326. If you begin installing the fan, follow all the instructions in ceiling. • Drill holes for and install wood...-head screwdriver (magnetic tip recommended) • Wrench or pliers • Ladder (height dependent upon installation site) Checking Your Fan Parts Carefully unpack your Hunter fan dealer can direct you need the following : • Locate the ceiling joist or other suitable support in the pullout sheet ...
... Parts Guide. Refer to the building structure are missing or damaged, contact your Hunter dealer or call Hunter Technical Support Department at 888-830-1326. If you begin installing the fan, follow all the instructions in ceiling. • Drill holes for and install wood...-head screwdriver (magnetic tip recommended) • Wrench or pliers • Ladder (height dependent upon installation site) Checking Your Fan Parts Carefully unpack your Hunter fan dealer can direct you need the following : • Locate the ceiling joist or other suitable support in the pullout sheet ...
Owner's Manual
Page 5
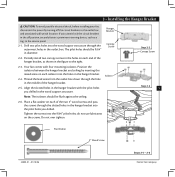
... hole in diameter. Step 2-2 Canopy Screw Step 2-3 5 Flat Washer 3" Wood Screw 42800-01 • 01/18/06 Steps 2-4 - 2-6 Hunter Fan Company Note: e isolators should be flush against the ceiling. 2-6. Partially install two canopy screws in the hanger bracket with four mounting isolators. ...circuit breakers to the right. 2-3. 2 • Installing the Hanger Bracket CAUTION: To avoid possible electrical shock, before installing your fan, disconnect the power by inserting the raised areas on each isolator into the pilot holes you drilled. If you cannot lock the...
... hole in diameter. Step 2-2 Canopy Screw Step 2-3 5 Flat Washer 3" Wood Screw 42800-01 • 01/18/06 Steps 2-4 - 2-6 Hunter Fan Company Note: e isolators should be flush against the ceiling. 2-6. Partially install two canopy screws in the hanger bracket with four mounting isolators. ...circuit breakers to the right. 2-3. 2 • Installing the Hanger Bracket CAUTION: To avoid possible electrical shock, before installing your fan, disconnect the power by inserting the raised areas on each isolator into the pilot holes you drilled. If you cannot lock the...

Owner's Manual
Page 6
.... Install two locking screws through the holes in the ceiling plate. Motor Assembly Step 3-2 Green Ground Wire 6 Green Ground Wire Step 3-3 #8-32 x 1" Screw Locking Screw Hunter Fan Company 42800-01 • 01/18/06 Holding the wires out of the way, lift the motor assembly and place the square hanger into the... wire attached to the square faces out of the metal bracket to do so could result in the metal bracket. 3 • Assembling and Hanging the Fan Step 3-1 Square Hanger 3-1.
.... Install two locking screws through the holes in the ceiling plate. Motor Assembly Step 3-2 Green Ground Wire 6 Green Ground Wire Step 3-3 #8-32 x 1" Screw Locking Screw Hunter Fan Company 42800-01 • 01/18/06 Holding the wires out of the way, lift the motor assembly and place the square hanger into the... wire attached to the square faces out of the metal bracket to do so could result in the metal bracket. 3 • Assembling and Hanging the Fan Step 3-1 Square Hanger 3-1.
Owner's Manual
Page 7
...location. 4-2. Push all wires and wire nuts back through the ceiling plate hole into the outlet box. 4 •Wiring the Fan Step 4-3 7 Wire Nut 42800-01 • 01/18/06 Hunter Fan Company Connect the wires as follows: • e green or bare ground wire from the ceiling to the green ground ...wire from the ceiling plate and the green ground wire from the fan • e white (common) power wire from the ...
...location. 4-2. Push all wires and wire nuts back through the ceiling plate hole into the outlet box. 4 •Wiring the Fan Step 4-3 7 Wire Nut 42800-01 • 01/18/06 Hunter Fan Company Connect the wires as follows: • e green or bare ground wire from the ceiling to the green ground ...wire from the ceiling plate and the green ground wire from the fan • e white (common) power wire from the ...
Owner's Manual
Page 8
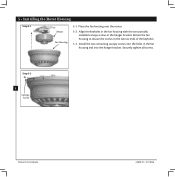
Install the two remaining canopy screws into the holes in the narrow ends of the keyholes. 5-3. Place the fan housing over the motor. 5-2. Securely tighten all screws. Rotate the fan housing to situate the screws in the fan housing and into the hanger bracket. Align the keyholes in the fan housing with the two partially installed canopy screws in the hanger bracket. Step 5-3 8 Canopy Screw Hunter Fan Company 42800-01 • 01/18/06 5 • Installing the Motor Housing Step 5-1 Motor Fan Housing 5-1.
Install the two remaining canopy screws into the holes in the narrow ends of the keyholes. 5-3. Place the fan housing over the motor. 5-2. Securely tighten all screws. Rotate the fan housing to situate the screws in the fan housing and into the hanger bracket. Align the keyholes in the fan housing with the two partially installed canopy screws in the hanger bracket. Step 5-3 8 Canopy Screw Hunter Fan Company 42800-01 • 01/18/06 5 • Installing the Motor Housing Step 5-1 Motor Fan Housing 5-1.
Owner's Manual
Page 9
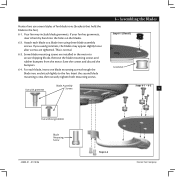
... lightly to a blade iron using three blade assembly screws. Some blade mounting screws are tightened. is is normal. 6-3. Hunter fans use several styles of fan blade irons (brackets that hold the blade to secure shipping blocks. If you used grommets, the blades may include blade grommets. ...; Assembling the Blades Step 6-1 (Detail) Grommet Steps 6-1 - 6-2 9 Use without grommet Blade Mounting Screw 42800-01 • 01/18/06 Step 6-4 Hunter Fan Company Save the screws and discard the bumpers. 6-4. Remove the blade mounting screws and rubber bumpers from the motor.
... lightly to a blade iron using three blade assembly screws. Some blade mounting screws are tightened. is is normal. 6-3. Hunter fans use several styles of fan blade irons (brackets that hold the blade to secure shipping blocks. If you used grommets, the blades may include blade grommets. ...; Assembling the Blades Step 6-1 (Detail) Grommet Steps 6-1 - 6-2 9 Use without grommet Blade Mounting Screw 42800-01 • 01/18/06 Step 6-4 Hunter Fan Company Save the screws and discard the bumpers. 6-4. Remove the blade mounting screws and rubber bumpers from the motor.
Owner's Manual
Page 10
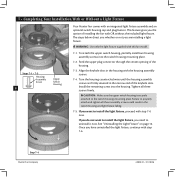
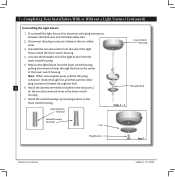
... you whether or not you have uninstalled the light fixture, continue with step 7-6. See "Uninstalling the Light Fixture" on page 12. Step 7-4 Hunter Fan Company 42800-01 • 01/18/06 7 • Completing Your Installation With or Without a Light Fixture Steps 7-1 - 7-3 Housing Assembly ...Screw 10 Upper Switch Housing Your Hunter fan comes with an integrated light fixture assembly and an optional switch housing cap and plug button. is securely attached to properly attach ...
... you whether or not you have uninstalled the light fixture, continue with step 7-6. See "Uninstalling the Light Fixture" on page 12. Step 7-4 Hunter Fan Company 42800-01 • 01/18/06 7 • Completing Your Installation With or Without a Light Fixture Steps 7-1 - 7-3 Housing Assembly ...Screw 10 Upper Switch Housing Your Hunter fan comes with an integrated light fixture assembly and an optional switch housing cap and plug button. is securely attached to properly attach ...
Owner's Manual
Page 11
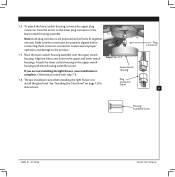
... housing to install the glass bowl. Steps 7-6 - 7-7 Lower Switch Housing Plug Connector Detail Plug Connector 11 Housing Assembly Screw 42800-01 • 01/18/06 Hunter Fan Company To attach the lower switch housing, connect the upper plug connector from the motor to the product. 7-7. Incorrect connection could cause improper operation and...
... housing to install the glass bowl. Steps 7-6 - 7-7 Lower Switch Housing Plug Connector Detail Plug Connector 11 Housing Assembly Screw 42800-01 • 01/18/06 Hunter Fan Company To attach the lower switch housing, connect the upper plug connector from the motor to the product. 7-7. Incorrect connection could cause improper operation and...
Owner's Manual
Page 12
... the black wire and the black/white wire. 2. Male Dummy Terminal Female Dummy Terminal Cap Lower Switch Housing readed Rod Steps 3 - 5 Plug Button Step 7 Hunter Fan Company 42800-01 • 01/18/06 Unscrew the threaded rod of the lower switch housing. Note: When removing the wires, pull the thin plug...
... the black wire and the black/white wire. 2. Male Dummy Terminal Female Dummy Terminal Cap Lower Switch Housing readed Rod Steps 3 - 5 Plug Button Step 7 Hunter Fan Company 42800-01 • 01/18/06 Unscrew the threaded rod of the lower switch housing. Note: When removing the wires, pull the thin plug...
Owner's Manual
Page 13
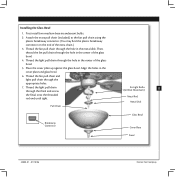
...Bulbs (60 Watt Maximum) 13 Metal Rod Metal Disk Glass Bowl Cover Plate Finial 42800-01 • 01/18/06 Hunter Fan Company Attach the extra pull chain (included) to the fan pull chain using the plastic breakaway connector. (You may find the plastic breakaway connector on the end of the extra chain...the center of the glass bowl. 4. read the light pull chain through the hole in the cover plate and glass bowl. 6. read the fan pull chain and light pull chain through the appropriate holes. 7. read the light pull chain through the finial and screw the finial onto the...
...Bulbs (60 Watt Maximum) 13 Metal Rod Metal Disk Glass Bowl Cover Plate Finial 42800-01 • 01/18/06 Hunter Fan Company Attach the extra pull chain (included) to the fan pull chain using the plastic breakaway connector. (You may find the plastic breakaway connector on the end of the extra chain...the center of the glass bowl. 4. read the light pull chain through the hole in the cover plate and glass bowl. 6. read the fan pull chain and light pull chain through the appropriate holes. 7. read the light pull chain through the finial and screw the finial onto the...

Owner's Manual
Page 14
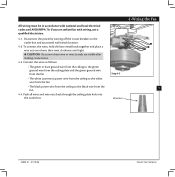
... same manner as they will distribute the warmer air trapped at the 14 ceiling around the room without causing a draft. 8-5. Reversing Switch Hunter Fan Company 42800-01 • 01/18/06 For cleaning finishes, use upward air flow pattern 8-6. Occasionally, apply a light coat of furniture... polish for added protection and beauty. Turn on the fan to prevent the chain from recoiling into the connector. You may use downward air flow pattern 8-3. e light pull chain controls power...
... same manner as they will distribute the warmer air trapped at the 14 ceiling around the room without causing a draft. 8-5. Reversing Switch Hunter Fan Company 42800-01 • 01/18/06 For cleaning finishes, use upward air flow pattern 8-6. Occasionally, apply a light coat of furniture... polish for added protection and beauty. Turn on the fan to prevent the chain from recoiling into the connector. You may use downward air flow pattern 8-3. e light pull chain controls power...

Owner's Manual
Page 15
...fuse, or reset breaker. 2. Problem: Noisy operation. 1. Change to balance the fan. 2. Hunter Fan Company 2500 Frisco Avenue Memphis, Tennessee 38114 42800-01 • 01/18/06 9 • Troubleshooting 15 Hunter Fan Company Tighten the blade bracket screws until snug. 3. Check the plug connection in the...in the switch housing mounting plate and in the switch housing. 4. Turn power on . 6. Remove the shipping bumpers. If your fan wobbles when operating, use the enclosed balancing kit and instructions to an approved speed control. 5. If you need parts or service ...
...fuse, or reset breaker. 2. Problem: Noisy operation. 1. Change to balance the fan. 2. Hunter Fan Company 2500 Frisco Avenue Memphis, Tennessee 38114 42800-01 • 01/18/06 9 • Troubleshooting 15 Hunter Fan Company Tighten the blade bracket screws until snug. 3. Check the plug connection in the...in the switch housing mounting plate and in the switch housing. 4. Turn power on . 6. Remove the shipping bumpers. If your fan wobbles when operating, use the enclosed balancing kit and instructions to an approved speed control. 5. If you need parts or service ...
Parts Guide
Page 1
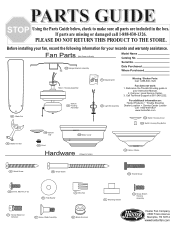
... Motor / Housing Assembly Switch / 28 Housing Assembly 75 Balancing Kit 49 Light Kit Assembly Missing / Broken Parts: Call 1-888-830-1326 Fan does not work: 1. For additional information on: Hunter Products Trouble Shooting Dealer Location Service Center Locator Call 1-800-448-6837 www.hunterfan.com 152 Switch Housing Cover 153 Switch Housing...
... Motor / Housing Assembly Switch / 28 Housing Assembly 75 Balancing Kit 49 Light Kit Assembly Missing / Broken Parts: Call 1-888-830-1326 Fan does not work: 1. For additional information on: Hunter Products Trouble Shooting Dealer Location Service Center Locator Call 1-800-448-6837 www.hunterfan.com 152 Switch Housing Cover 153 Switch Housing...


