
Installation Guide
Page 1
...Install a Support Brace, If Necessary Determine if there is a ceiling joist directly above the floor and the ceiling is at least 8 feet high. • e fan blades have now successfully prepared your new Hunter fan. If the joist is secured to the joist or support brace... line leads and associated wall switch location are unfamiliar with the joist or support brace. 4-3. Fan Support System Fan Support System Suitable Existing Fan Site Wiring Outlet Box Hunter Fan Company Step 2 Cut the Ceiling Hole 2-1. Tools and Supplies You May Need • Drill • Keyhole saw • 2'...
...Install a Support Brace, If Necessary Determine if there is a ceiling joist directly above the floor and the ceiling is at least 8 feet high. • e fan blades have now successfully prepared your new Hunter fan. If the joist is secured to the joist or support brace... line leads and associated wall switch location are unfamiliar with the joist or support brace. 4-3. Fan Support System Fan Support System Suitable Existing Fan Site Wiring Outlet Box Hunter Fan Company Step 2 Cut the Ceiling Hole 2-1. Tools and Supplies You May Need • Drill • Keyhole saw • 2'...
Owner's Manual
Page 3
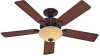
... 6 • Assembling the Blades 12 7 • Completing Your Installation With or Without a Bowl Light Fixture . . . . 14 8 • Operating and Cleaning Your Ceiling Fan 16 9 • Troubleshooting 17 Your new Hunter® ceiling fan is an addition to supply you are proud of fire, electrical shock, or motor damage, do not bend the blade attachment system...
... 6 • Assembling the Blades 12 7 • Completing Your Installation With or Without a Bowl Light Fixture . . . . 14 8 • Operating and Cleaning Your Ceiling Fan 16 9 • Troubleshooting 17 Your new Hunter® ceiling fan is an addition to supply you are proud of fire, electrical shock, or motor damage, do not bend the blade attachment system...

Owner's Manual
Page 4
... the full weight of the fan blade tips. • e fan is suitable, skip ahead to Section 2 • Installing the Ceiling Plate. Ceiling Hole • e outlet box clearance hole is acceptable and safe for your existing fan site is directly below the joist or support brace. If your new Hunter fan. Choose a fan site where: • No...
... the full weight of the fan blade tips. • e fan is suitable, skip ahead to Section 2 • Installing the Ceiling Plate. Ceiling Hole • e outlet box clearance hole is acceptable and safe for your existing fan site is directly below the joist or support brace. If your new Hunter fan. Choose a fan site where: • No...
Owner's Manual
Page 5
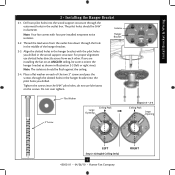
... hole through the inner holes of the outlet box. 4-4. You will support the full weight of 1/16" into the ceiling. If NOT, install a support brace as a tag, to your ceiling fan site. Position it to allow you are turned off position, securely fasten a prominent warning device, such as follows: 3-1.... 70. If the joist is there, determine if it will use a qualified electrician. 4 45052-01 • 04/26/10 • Hunter Fan Company Install the Outlet Box 4-1. Step 3 - Make sure the circuit breakers to install the support brace and outlet box. Locate the site for...
... hole through the inner holes of the outlet box. 4-4. You will support the full weight of 1/16" into the ceiling. If NOT, install a support brace as a tag, to your ceiling fan site. Position it to allow you are turned off position, securely fasten a prominent warning device, such as follows: 3-1.... 70. If the joist is there, determine if it will use a qualified electrician. 4 45052-01 • 04/26/10 • Hunter Fan Company Install the Outlet Box 4-1. Step 3 - Make sure the circuit breakers to install the support brace and outlet box. Locate the site for...

Owner's Manual
Page 6
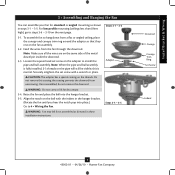
... only the hardware supplied. 5 45052-01 • 04/26/10 • Hunter Fan Company Angled Mounting Style 8 12 Angled Mounting recommended for a vaulted or angled ceiling Support Brace Low Profile Mounting Style Ceiling Outlet Box Low Profile Mounting fits close to the ceiling, recommended for all three Installer's Choice mounting methods. Understanding Mounting and Installer...
... only the hardware supplied. 5 45052-01 • 04/26/10 • Hunter Fan Company Angled Mounting Style 8 12 Angled Mounting recommended for a vaulted or angled ceiling Support Brace Low Profile Mounting Style Ceiling Outlet Box Low Profile Mounting fits close to the ceiling, recommended for all three Installer's Choice mounting methods. Understanding Mounting and Installer...
Owner's Manual
Page 7
... to the included Parts Guide. Proper ceiling fan location and attachment to the building structure are essential for any parts are installing more than one fan, keep the fan blades and blade irons (if applicable) in sets, as they were shipped. 6 45052-01 • 04/26/10 • Hunter Fan Company If you begin installing the...
... to the included Parts Guide. Proper ceiling fan location and attachment to the building structure are essential for any parts are installing more than one fan, keep the fan blades and blade irons (if applicable) in sets, as they were shipped. 6 45052-01 • 04/26/10 • Hunter Fan Company If you begin installing the...
Owner's Manual
Page 8
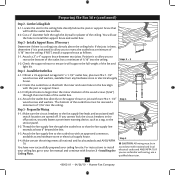
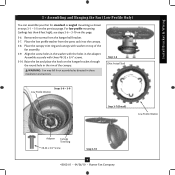
...slotted holes directly across from the outlet box down through the hole in diameter. The pilot holes should be flush against the ceiling. 2-4. Thread the lead wires from each of the hanger bracket. 2-3. If you drilled. Note: The isolators should be ...not over tighten. 3" Screw Flat Washer Ceiling Peak Large Opening OR Steps 2-2 - 2-4 Ceiling Peak Large Opening LEFT Step 2-3 (Angled Ceiling Only) 7 45052-01 • 04/26/10 • Hunter Fan Company RIGHT Isolator Hanger Bracket 2-2. Place a flat washer on an ANGLED ceiling, be 9/64" in the middle of...
...slotted holes directly across from the outlet box down through the hole in diameter. The pilot holes should be flush against the ceiling. 2-4. Thread the lead wires from each of the hanger bracket. 2-3. If you drilled. Note: The isolators should be ...not over tighten. 3" Screw Flat Washer Ceiling Peak Large Opening OR Steps 2-2 - 2-4 Ceiling Peak Large Opening LEFT Step 2-3 (Angled Ceiling Only) 7 45052-01 • 04/26/10 • Hunter Fan Company RIGHT Isolator Hanger Bracket 2-2. Place a flat washer on an ANGLED ceiling, be 9/64" in the middle of...
Owner's Manual
Page 9
...3-3. Steps 3-1 - 3-3 Adapter Steps 3-4 - 3-5 Downrod Canopy Canopy Trim Ring Set Screw Indent 8 45052-01 • 04/26/10 • Hunter Fan Company For low profile mounting (ceilings less than 8 feet high), go to install the pipe and ball assembly. Securely retighten the set screw on the adapter to steps 3-6 - 3-10...with a wrench or pliers. Note: When the pipe and ball assembly is normal. Raise the fan and place the ball into place.) Go to hang down from a flat or angled ceiling, place the canopy and canopy trim ring around the adapter so that they rest on the threads...
...3-3. Steps 3-1 - 3-3 Adapter Steps 3-4 - 3-5 Downrod Canopy Canopy Trim Ring Set Screw Indent 8 45052-01 • 04/26/10 • Hunter Fan Company For low profile mounting (ceilings less than 8 feet high), go to install the pipe and ball assembly. Securely retighten the set screw on the adapter to steps 3-6 - 3-10...with a wrench or pliers. Note: When the pipe and ball assembly is normal. Raise the fan and place the ball into place.) Go to hang down from a flat or angled ceiling, place the canopy and canopy trim ring around the adapter so that they rest on the threads...
Owner's Manual
Page 10
... (Detail) Low Profile Washer Adapter Canopy Trim Ring #8-32 x 3/4" Screw Step 3-10 9 45052-01 • 04/26/10 • Hunter Fan Company For low profile mounting (ceilings less than 8 feet high), see steps 3-6 - 3-10 on the hanger bracket through the round hole in the washer with three #8-32 x ...3/4" screws. 3-10. Align the screw holes in the rim of the fan assembly. 3-9. Raise the fan and place the hook on...
... (Detail) Low Profile Washer Adapter Canopy Trim Ring #8-32 x 3/4" Screw Step 3-10 9 45052-01 • 04/26/10 • Hunter Fan Company For low profile mounting (ceilings less than 8 feet high), see steps 3-6 - 3-10 on the hanger bracket through the round hole in the washer with three #8-32 x ...3/4" screws. 3-10. Align the screw holes in the rim of the fan assembly. 3-9. Raise the fan and place the hook on...

Owner's Manual
Page 11
... Single Switch Wiring: • The black wire (ungrounded) from the ceiling to the black (ungrounded) and the black/white wire (ungrounded) from the fan. 4-5. Wire Connector 10 45052-01 • 04/26/10 • Hunter Fan Company Install Bracket & Wiring 4 •Wiring the Fan All wiring must be in accordance with national and local electrical...
... Single Switch Wiring: • The black wire (ungrounded) from the ceiling to the black (ungrounded) and the black/white wire (ungrounded) from the fan. 4-5. Wire Connector 10 45052-01 • 04/26/10 • Hunter Fan Company Install Bracket & Wiring 4 •Wiring the Fan All wiring must be in accordance with national and local electrical...

Owner's Manual
Page 14
...assembly over the upper switch housing. Attach the lower switch housing to the upper switch housing with US federal energy regulations, this ceiling fan contains a device that restricts its light output. If lights do not appear to the product. 7-2. Incorrect connection could cause ...compliance with three housing assembly screws. Lower Switch Housing Housing Assembly Screw Steps 7-1 - 7-2 13 45052-01 • 04/26/10 • Hunter Fan Company Align the side screw holes in fire hazard or improper operation. 7 • Completing Your Installation With or Without a Bowl Light Fixture ...
...assembly over the upper switch housing. Attach the lower switch housing to the upper switch housing with US federal energy regulations, this ceiling fan contains a device that restricts its light output. If lights do not appear to the product. 7-2. Incorrect connection could cause ...compliance with three housing assembly screws. Lower Switch Housing Housing Assembly Screw Steps 7-1 - 7-2 13 45052-01 • 04/26/10 • Hunter Fan Company Align the side screw holes in fire hazard or improper operation. 7 • Completing Your Installation With or Without a Bowl Light Fixture ...

Owner's Manual
Page 17
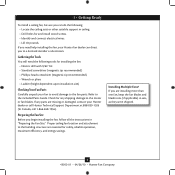
...this happens, simply reinsert the chain into the blades. • The chain uses a breakaway connector that separates if the chain is jerked. Ceiling fans work best by blowing air downward (counterclockwise blade rotation) in sequence: High, Medium, Low and Off. • Pull the chain slowly ...soft brush or lint-free cloth to the fan. For cleaning finishes, use upward air flow pattern 16 45052-01 • 04/26/10 • Hunter Fan Company Clean wood finish blades with a direct breeze. 8 • Operating and Cleaning Your Ceiling Fan 8-1. Occasionally, apply a light coat of furniture...
...this happens, simply reinsert the chain into the blades. • The chain uses a breakaway connector that separates if the chain is jerked. Ceiling fans work best by blowing air downward (counterclockwise blade rotation) in sequence: High, Medium, Low and Off. • Pull the chain slowly ...soft brush or lint-free cloth to the fan. For cleaning finishes, use upward air flow pattern 16 45052-01 • 04/26/10 • Hunter Fan Company Clean wood finish blades with a direct breeze. 8 • Operating and Cleaning Your Ceiling Fan 8-1. Occasionally, apply a light coat of furniture...


