

Parts Manual
Page 5
...530 01 63-49 SCREW 120 MARK II, 967861934, 967861936, 2019-04 Remark QTY KIT CARBURETOR WITH PURGE BULB 1 THROTTLE WIRE 1 HOUSING 1 AIR FILTER 1 FILTER PLATE 1 NUT 2 ISOLATOR FILTER HOUSING 1 SWITCH SPRING 1 SWITCH LEVER 1 CHOKE KNOB 1 CARB ADAPTOR SEAL 1 ADAPTOR CARBURETOR 1 STUD-CARBURETOR 2 CARB ADAPTOR SCREW 4 SCREW 1 TOP STUDCARBURETOR 1 GASKET KIT 1 SCREW 1 CARBURETOR & AIR FILTER Ref Part No Description 1 586 93 62-02 CARBURETTOR 2 577 81 52-01 THROTTLE 3 575 49 34-01 AIR FILTER 4 545 06 18-01 AIR FILTER 5 545 15 18-01 FILTER 6 530 01 61...
...530 01 63-49 SCREW 120 MARK II, 967861934, 967861936, 2019-04 Remark QTY KIT CARBURETOR WITH PURGE BULB 1 THROTTLE WIRE 1 HOUSING 1 AIR FILTER 1 FILTER PLATE 1 NUT 2 ISOLATOR FILTER HOUSING 1 SWITCH SPRING 1 SWITCH LEVER 1 CHOKE KNOB 1 CARB ADAPTOR SEAL 1 ADAPTOR CARBURETOR 1 STUD-CARBURETOR 2 CARB ADAPTOR SCREW 4 SCREW 1 TOP STUDCARBURETOR 1 GASKET KIT 1 SCREW 1 CARBURETOR & AIR FILTER Ref Part No Description 1 586 93 62-02 CARBURETTOR 2 577 81 52-01 THROTTLE 3 575 49 34-01 AIR FILTER 4 545 06 18-01 AIR FILTER 5 545 15 18-01 FILTER 6 530 01 61...

Parts Manual
Page 7
CARBURETOR DETAILS 120 MARK II, 967861934, 967861936, 2019-04 Ref Part No Description 1 586 93 62-02 CARBURETTOR 2 545 00 80-30 PURGE AND LINE ASSEMBLY 3 545 00 80-32 KIT Remark CARBURETOR WITH PURGE BULB PURGE AND LINE ASSEMBLY KIT CARB REPAIR QTY KIT 1 1 1
CARBURETOR DETAILS 120 MARK II, 967861934, 967861936, 2019-04 Ref Part No Description 1 586 93 62-02 CARBURETTOR 2 545 00 80-30 PURGE AND LINE ASSEMBLY 3 545 00 80-32 KIT Remark CARBURETOR WITH PURGE BULB PURGE AND LINE ASSEMBLY KIT CARB REPAIR QTY KIT 1 1 1

Parts Manual
Page 9
... 12 525 74 30-01 COVER 13 545 22 71-01 SCREW 14 530 01 59-17 NUT 15 545 11 87-01 DECAL 16 525 62 89-01 CHAIN BRAKE ASSY 120 MARK II, 967861934, 967861936, 2019-04 Remark QTY KIT PIN. DOWEL 1 LINK FRONT 1 SCREW M3.63-1.34 X 8MM TORX 1 SPRING COMPRESSION 1 SCREW BAR ADJUSTMENT 1 RETAINER BAR ADJUSTMENT 1 PIN BAR ADJUSTING 1 PIN BRAKE BAND 1 BRAKE BAND 1 COVER CHAIN BRAKE 1 SCREW 3 NUT 2 DECAL 1 CHAIN BRAKE ASSY 2,3,4,5,6 1 ,7,8,10,1 1,12,13...
... 12 525 74 30-01 COVER 13 545 22 71-01 SCREW 14 530 01 59-17 NUT 15 545 11 87-01 DECAL 16 525 62 89-01 CHAIN BRAKE ASSY 120 MARK II, 967861934, 967861936, 2019-04 Remark QTY KIT PIN. DOWEL 1 LINK FRONT 1 SCREW M3.63-1.34 X 8MM TORX 1 SPRING COMPRESSION 1 SCREW BAR ADJUSTMENT 1 RETAINER BAR ADJUSTMENT 1 PIN BAR ADJUSTING 1 PIN BRAKE BAND 1 BRAKE BAND 1 COVER CHAIN BRAKE 1 SCREW 3 NUT 2 DECAL 1 CHAIN BRAKE ASSY 2,3,4,5,6 1 ,7,8,10,1 1,12,13...

Parts Manual
Page 11
CLUTCH & OIL PUMP Ref Part No Description 1 530 01 49-49 CLUTCH 2 530 01 56-11 WASHER 3 530 04 70-61 CLUTCH DRUM ASSY 4 579 62 15-01 WASHER 5 525 31 84-01 DUST SEAL 6 530 03 78-20 WORM GEAR 7 581 06 39-01 OIL PUMP ASSY 9 545 22 75-01 BLOCK 10 530 04 94-77 ELBOW 11 545 06 94-01 SEAL 12 530 05 65-33 SCREEN 120 MARK II, 967861934, 967861936, 2019-04 Remark CLUTCH WASHER CLUTCH DRUM ASSY SPUR 3/8" 6T WASHER THRUST DUST SEAL OIL PUMP PISTON OIL PUMP ASSY COMPLETE BLOCK OIL ELBOW SEAL SCREEN QTY KIT 1 1 1 1 1 1 1 1 1 1 1
CLUTCH & OIL PUMP Ref Part No Description 1 530 01 49-49 CLUTCH 2 530 01 56-11 WASHER 3 530 04 70-61 CLUTCH DRUM ASSY 4 579 62 15-01 WASHER 5 525 31 84-01 DUST SEAL 6 530 03 78-20 WORM GEAR 7 581 06 39-01 OIL PUMP ASSY 9 545 22 75-01 BLOCK 10 530 04 94-77 ELBOW 11 545 06 94-01 SEAL 12 530 05 65-33 SCREEN 120 MARK II, 967861934, 967861936, 2019-04 Remark CLUTCH WASHER CLUTCH DRUM ASSY SPUR 3/8" 6T WASHER THRUST DUST SEAL OIL PUMP PISTON OIL PUMP ASSY COMPLETE BLOCK OIL ELBOW SEAL SCREEN QTY KIT 1 1 1 1 1 1 1 1 1 1 1

Parts Manual
Page 19
...-01 BUSHING Remark QTY KIT 1 1 1 1 1 1 1 1 1 13-27 2 1 1 1 1 1 1 2 2 1 1 1 1 1 2 1 2 1 30,31 1 FUEL TANK & HANDLE 120 MARK II, 967861934, 967861936, 2019-04 Ref Part No Description 1 577 61 19-01 HAND GUARD 2 545 12 73-01 BOSS 3 545 06 12-01 REAR WHEEL 4 545 22 71-01 SCREW 5 545 07 54-01 GROMMET 6 545 07 14-01 BAR 7 545 07 13-01 CAP. SPRING HANDGUARD 8 545 07...
...-01 BUSHING Remark QTY KIT 1 1 1 1 1 1 1 1 1 13-27 2 1 1 1 1 1 1 2 2 1 1 1 1 1 2 1 2 1 30,31 1 FUEL TANK & HANDLE 120 MARK II, 967861934, 967861936, 2019-04 Ref Part No Description 1 577 61 19-01 HAND GUARD 2 545 12 73-01 BOSS 3 545 06 12-01 REAR WHEEL 4 545 22 71-01 SCREW 5 545 07 54-01 GROMMET 6 545 07 14-01 BAR 7 545 07 13-01 CAP. SPRING HANDGUARD 8 545 07...

Parts Manual
Page 25
MUFFLER Ref Part No Description 1 574 26 64-01 NUT 2 545 07 69-01 EXHAUST PLATE 3 545 16 74-01 SCREEN 4 530 01 63-38 BOLT 5 586 09 43-01 MUFFLER 6 530 05 48-84 MUFFLER GASKET 7 545 06 69-01 MUFFLER BACK PLATE 8 545 00 80-27 KIT 9 545 18 08-43 MUFFLER 120 MARK II, 967861934, 967861936, 2019-04 Remark NUT 10MM BRASS EXHAUST PLATE SCREEN ARRESTOR GASKET BOLT MUFFLER ASSY MUFFLER GASKET MUFFLER BACK PLATE KIT SPARK ARRESTOR MUFFLER KIT COMPLETE QTY KIT 1 1 1 2 1 1 1 1 1,2,3 1 1,2,3,4,5 ,6,7,8
MUFFLER Ref Part No Description 1 574 26 64-01 NUT 2 545 07 69-01 EXHAUST PLATE 3 545 16 74-01 SCREEN 4 530 01 63-38 BOLT 5 586 09 43-01 MUFFLER 6 530 05 48-84 MUFFLER GASKET 7 545 06 69-01 MUFFLER BACK PLATE 8 545 00 80-27 KIT 9 545 18 08-43 MUFFLER 120 MARK II, 967861934, 967861936, 2019-04 Remark NUT 10MM BRASS EXHAUST PLATE SCREEN ARRESTOR GASKET BOLT MUFFLER ASSY MUFFLER GASKET MUFFLER BACK PLATE KIT SPARK ARRESTOR MUFFLER KIT COMPLETE QTY KIT 1 1 1 2 1 1 1 1 1,2,3 1 1,2,3,4,5 ,6,7,8

Parts Manual
Page 27
STARTER Ref Part No Description 1 545 00 80-28 KIT 2 530 01 59-20 SCREW 3 530 01 60-80 SCREW 4 530 05 78-90 STARTER PULLEY 5 545 01 00-10 HANDLE 6 530 04 20-95 SPRING 7 545 06 38-01 BAFFLE 8 545 06 37-01 FAN HOUSING 9 530 01 64-32 SCREW 10 545 00 80-25 KIT 11 594 91 41-01 DECAL 120 MARK II, 967861934, 967861936, 2019-04 Remark KIT STD STARTER SCREW SCREW STARTER PULLEY HANDLE ROPE ASSY SPRING BAFFLE FAN HOUSING SCREW SCREW M5.3814X22.225MM KIT COMPLETE DECAL FAN HOUSING 120 MARK II QTY KIT 1 2,3,4 1 1 1 1 1 1 1 4 1 1,2,3,4,5 ,6,8,9 1
STARTER Ref Part No Description 1 545 00 80-28 KIT 2 530 01 59-20 SCREW 3 530 01 60-80 SCREW 4 530 05 78-90 STARTER PULLEY 5 545 01 00-10 HANDLE 6 530 04 20-95 SPRING 7 545 06 38-01 BAFFLE 8 545 06 37-01 FAN HOUSING 9 530 01 64-32 SCREW 10 545 00 80-25 KIT 11 594 91 41-01 DECAL 120 MARK II, 967861934, 967861936, 2019-04 Remark KIT STD STARTER SCREW SCREW STARTER PULLEY HANDLE ROPE ASSY SPRING BAFFLE FAN HOUSING SCREW SCREW M5.3814X22.225MM KIT COMPLETE DECAL FAN HOUSING 120 MARK II QTY KIT 1 2,3,4 1 1 1 1 1 1 1 4 1 1,2,3,4,5 ,6,8,9 1

Owner Manual
Page 11
... product agrees with the applicable EC Directives (Fig. 7) Sound power level (Fig. 8) Chain brake, not engaged (left). Chain brake and front hand guard 6. Trigger 10. Primer bulb 23. Combination tool 27. Product overview (Fig. 1) 1. Trigger lockout 3. Chain catcher 12. Guide-bar cover 26. Wash hands after handling Symbols on the product (Fig. 2) Warning (Fig. 3) Read this operator's manual is English. Muffler 7. Sprocket cover 11. Chain tensioning screw 25. Cylinder cover 5. Chain oil tank 16. Starter handle 15. Stop switch 21. Guide bar 13.
... product agrees with the applicable EC Directives (Fig. 7) Sound power level (Fig. 8) Chain brake, not engaged (left). Chain brake and front hand guard 6. Trigger 10. Primer bulb 23. Combination tool 27. Product overview (Fig. 1) 1. Trigger lockout 3. Chain catcher 12. Guide-bar cover 26. Wash hands after handling Symbols on the product (Fig. 2) Warning (Fig. 3) Read this operator's manual is English. Muffler 7. Sprocket cover 11. Chain tensioning screw 25. Cylinder cover 5. Chain oil tank 16. Starter handle 15. Stop switch 21. Guide bar 13.

Owner Manual
Page 12
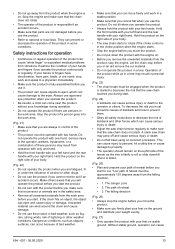
... the spark plug cable before you find an instruction about the situation. Speak to decrease the risk of attachments and accessories. Injury or death is changed from the manufacturer. CAUTION: Damage to keep your dealer, service agent or approved service center for correct installation of injury or death. 12 654 - 007 - 05.05.2020 Use the instructions to assemble, to operate and to...
... the spark plug cable before you find an instruction about the situation. Speak to decrease the risk of attachments and accessories. Injury or death is changed from the manufacturer. CAUTION: Damage to keep your dealer, service agent or approved service center for correct installation of injury or death. 12 654 - 007 - 05.05.2020 Use the instructions to assemble, to operate and to...
Owner Manual
Page 13
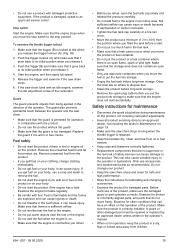
...handle with only one hand. A slack saw chain touches you during operation. • Do not operate the product if there are not damaged before you make sure that you are in control of these persons may result from operation with your right hand. The danger zone • 2. Always use... a utility line or cause damage to cut material. • Do not operate this product in the choke position when the engine starts. • Stop the engine before you start the product. • Do not turn with your knowledge during start to property. • The operator should remain on...
...handle with only one hand. A slack saw chain touches you during operation. • Do not operate the product if there are not damaged before you make sure that you are in control of these persons may result from operation with your right hand. The danger zone • 2. Always use... a utility line or cause damage to cut material. • Do not operate this product in the choke position when the engine starts. • Stop the engine before you start the product. • Do not turn with your knowledge during start to property. • The operator should remain on...

Owner Manual
Page 14
... operate the product. • Cut at high engine speeds. • Do not overreach or cut and after the wood falls to the operator or others. Do not let the weight of the product drop down after the cut is free from the muffler, the guide bar and saw chain suddenly stops during the cut above shoulder height. (Fig. 35) • Obey the manufacturer's sharpening and maintenance instructions...
... operate the product. • Cut at high engine speeds. • Do not overreach or cut and after the wood falls to the operator or others. Do not let the weight of the product drop down after the cut is free from the muffler, the guide bar and saw chain suddenly stops during the cut above shoulder height. (Fig. 35) • Obey the manufacturer's sharpening and maintenance instructions...
Owner Manual
Page 15
... equipment. Only use accessories and replacement parts as recommended. If the saw chain stops moving when the throttle trigger is released. • Keep the handles dry, clean, and free from the position where you filled the tank before a start the product if the engine has a leak. Fuel safety • Do not start the engine if you spill fuel on page 19. • Make sure the saw chain turns with fuel. Fuel is flammable...
... equipment. Only use accessories and replacement parts as recommended. If the saw chain stops moving when the throttle trigger is released. • Keep the handles dry, clean, and free from the position where you filled the tank before a start the product if the engine has a leak. Fuel safety • Do not start the engine if you spill fuel on page 19. • Make sure the saw chain turns with fuel. Fuel is flammable...
Owner Manual
Page 16
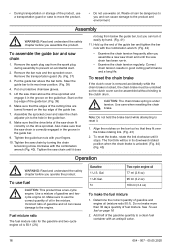
... chain brake. Align the notches on the bar tool so that the edges of the cutting links are turned forward on the drive sprocket. Determine the correct quantity of the gasoline quantity to a clean fuel container with the combination wrench (Fig. 40). Add half of gasoline and engine oil (mixture ratio 50:1). Remove the spark plug cap from below the guide bar, but you assemble a new saw chain and until the saw chain has been run...
... chain brake. Align the notches on the bar tool so that the edges of the cutting links are turned forward on the drive sprocket. Determine the correct quantity of the gasoline quantity to a clean fuel container with the combination wrench (Fig. 40). Add half of gasoline and engine oil (mixture ratio 50:1). Remove the spark plug cap from below the guide bar, but you assemble a new saw chain and until the saw chain has been run...
Owner Manual
Page 17
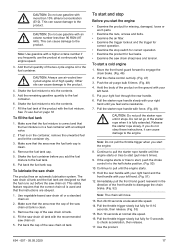
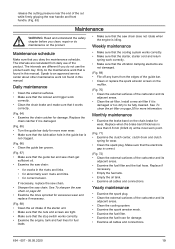
... parts. • Examine the nuts, screws and bolts. • Examine the air filter. • Examine the trigger lockout and the trigger for correct operation. • Examine the stop switch for correct operation. • Examine the product for 5 seconds to pull until it stops. Continue to the half choke position. (Fig. 50) 10. Immediately pull the front hand guard rearward in to pull the starter rope handle until you start , push the choke control...
... parts. • Examine the nuts, screws and bolts. • Examine the air filter. • Examine the trigger lockout and the trigger for correct operation. • Examine the stop switch for correct operation. • Examine the product for 5 seconds to pull until it stops. Continue to the half choke position. (Fig. 50) 10. Immediately pull the front hand guard rearward in to pull the starter rope handle until you start , push the choke control...

Owner Manual
Page 18
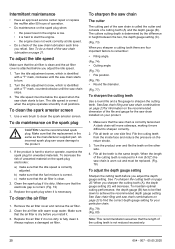
...) • If the log is fully extended. Use larger limbs to engage the chain brake. 2. To start the engine. 9. Pull the choke control out fully. 3. Push the air purge bulb 6 times. 4. Put your footing. (Fig. 58) To limb a tree 1. Pull the starter rope handle slowly with your right hand until the engine starts. 10. Release the starter rope slowly. Note: Do not pull the throttle trigger when you buck a log on a slope...
...) • If the log is fully extended. Use larger limbs to engage the chain brake. 2. To start the engine. 9. Pull the choke control out fully. 3. Push the air purge bulb 6 times. 4. Put your footing. (Fig. 58) To limb a tree 1. Pull the starter rope handle slowly with your right hand until the engine starts. 10. Release the starter rope slowly. Note: Do not pull the throttle trigger when you buck a log on a slope...
Owner Manual
Page 19
... that the saw chain. Yearly maintenance • Examine the spark plug. • Clean the external surfaces of the carburetor and its adjacent areas. • Clean the air filter. The intervals are not damaged. (Fig. 69) • File off any burrs from daily use the product each day. See To clean the air filter on the product. Install a new air filter if it is damaged. (Fig. 65) • Turn the guide bar daily...
... that the saw chain. Yearly maintenance • Examine the spark plug. • Clean the external surfaces of the carburetor and its adjacent areas. • Clean the air filter. The intervals are not damaged. (Fig. 69) • File off any burrs from daily use the product each day. See To clean the air filter on the product. Install a new air filter if it is damaged. (Fig. 65) • Turn the guide bar daily...
Owner Manual
Page 20
... . Use a wire brush to the product. 1. To sharpen the saw chain The cutter The cutting part of the saw chain is correctly tensioned. SeeSaw chain filing and saw chain starts to turn . 2. File all teeth on the spark plug electrodes: a) make sure that the air filter is clean. 2. See To sharpen the cutting teeth on the other side. 4. When you adjust the depth gauge setting. Make sure that the electrode gap is correct. (Fig. 72) 3. Remove the air filter cover...
... . Use a wire brush to the product. 1. To sharpen the saw chain The cutter The cutting part of the saw chain is correctly tensioned. SeeSaw chain filing and saw chain starts to turn . 2. File all teeth on the spark plug electrodes: a) make sure that the air filter is clean. 2. See To sharpen the cutting teeth on the other side. 4. When you adjust the depth gauge setting. Make sure that the electrode gap is correct. (Fig. 72) 3. Remove the air filter cover...
Owner Manual
Page 21
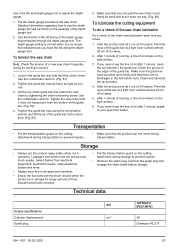
... to adjust the depth gauge. 1. Tighten the saw chain until it does not sag. (Fig. 84) To lubricate the cutting equipment To do a check of the saw chain lubrication Do a check of oil shows on the light surface. 6. Technical data Engine specifications Cylinder displacement Spark plug unit 120 Mark II (P02138HV) cm3 38 Champion RCJ7Y 654 - 007 - 05.05.2020 21 Clean and lubricate the tip sprocket. 4. Use the flat file...
... to adjust the depth gauge. 1. Tighten the saw chain until it does not sag. (Fig. 84) To lubricate the cutting equipment To do a check of the saw chain lubrication Do a check of oil shows on the light surface. 6. Technical data Engine specifications Cylinder displacement Spark plug unit 120 Mark II (P02138HV) cm3 38 Champion RCJ7Y 654 - 007 - 05.05.2020 21 Clean and lubricate the tip sprocket. 4. Use the flat file...

Owner Manual
Page 22
... vibration data Equivalent vibration levels, a hveq front handle1 Equivalent vibration levels, a hveq rear handle2 Sound power level, guaranteed (LWA) 3 Sound power level, measured4 Sound pressure level at operator's ear 5 Product dimensions Weight (excluding cutting equipment) Oil tank volume Fuel and lubrication system Oil pump capacity at 9000 min-1 Oil tank volume Type of oil pump Saw chain and guide bar Standard guide bar length Recommended bar lengths Usable cutting length Maximum saw chain speed Saw chain pitch Thickness of drive links (gauge) Type of drive sprocket unit mm...
... vibration data Equivalent vibration levels, a hveq front handle1 Equivalent vibration levels, a hveq rear handle2 Sound power level, guaranteed (LWA) 3 Sound power level, measured4 Sound pressure level at operator's ear 5 Product dimensions Weight (excluding cutting equipment) Oil tank volume Fuel and lubrication system Oil pump capacity at 9000 min-1 Oil tank volume Type of oil pump Saw chain and guide bar Standard guide bar length Recommended bar lengths Usable cutting length Maximum saw chain speed Saw chain pitch Thickness of drive links (gauge) Type of drive sprocket unit mm...

Owner Manual
Page 23
... Husqvarna S93G 52 56 62 Saw chain filing and saw chain combinations The cutting attachments below are approved for the product. Guide bar Length, cm (in) 33 (13) 38 (15) 35 (14) 40 (16) 45 (18) Pitch, mm (in) 8,25 (0,325) 8,25 (0,325) 9,52 (3/8) 9,52 (3/8) 9,52 (3/8) Gauge, mm (in . / 0,65 mm 654 - 007 - 05.05.2020 23 Number of drive sprocket teeth unit 120 Mark II...
... Husqvarna S93G 52 56 62 Saw chain filing and saw chain combinations The cutting attachments below are approved for the product. Guide bar Length, cm (in) 33 (13) 38 (15) 35 (14) 40 (16) 45 (18) Pitch, mm (in) 8,25 (0,325) 8,25 (0,325) 9,52 (3/8) 9,52 (3/8) 9,52 (3/8) Gauge, mm (in . / 0,65 mm 654 - 007 - 05.05.2020 23 Number of drive sprocket teeth unit 120 Mark II...


