

Parts Manual
Page 9
... 71-01 SCREW 14 530 01 59-17 NUT 15 545 11 87-01 DECAL 16 525 62 89-01 CHAIN BRAKE ASSY 120 MARK II, 967861934, 967861936, 2019-04 Remark QTY KIT PIN. CHAIN BRAKE Ref Part No Description 2 530 05 79-50 PIN. DOWEL 1 LINK FRONT 1 SCREW M3.63-1.34 X 8MM TORX 1 SPRING...
... 71-01 SCREW 14 530 01 59-17 NUT 15 545 11 87-01 DECAL 16 525 62 89-01 CHAIN BRAKE ASSY 120 MARK II, 967861934, 967861936, 2019-04 Remark QTY KIT PIN. CHAIN BRAKE Ref Part No Description 2 530 05 79-50 PIN. DOWEL 1 LINK FRONT 1 SCREW M3.63-1.34 X 8MM TORX 1 SPRING...

Parts Manual
Page 19
...-14 SCREW 29 530 02 98-50 CHAIN CATCHER 30 530 03 89-90 FELLING DOG 31 530 01 64-39 SCREW 32 530 01 43-81 FELLING DOG 33 503 73 58-01 BUSHING Remark QTY KIT 1 1 1 1 1 1 1 1 1 13-27 2 1 1 1 1 1 1 2 2 1 1 1 1 1 2 1 2 1 30,31 1 FUEL TANK & HANDLE 120 MARK II, 967861934, 967861936, 2019-04 Ref Part...
...-14 SCREW 29 530 02 98-50 CHAIN CATCHER 30 530 03 89-90 FELLING DOG 31 530 01 64-39 SCREW 32 530 01 43-81 FELLING DOG 33 503 73 58-01 BUSHING Remark QTY KIT 1 1 1 1 1 1 1 1 1 13-27 2 1 1 1 1 1 1 2 2 1 1 1 1 1 2 1 2 1 30,31 1 FUEL TANK & HANDLE 120 MARK II, 967861934, 967861936, 2019-04 Ref Part...

Owner Manual
Page 11
...harm. Trigger lockout 3. Sprocket cover 11. Starter handle 15. Guide-bar cover 26. Bar nose sprocket 8. Rear handle 20. Chain brake and front hand guard 6. Contents Introduction 11 Safety 12 Assembly 16 Transportation 21 Storage 21 Technical data 21 Operation 16 Accessories... The product agrees with the applicable EAC directives 654 - 007 - 05.05.2020 11 Front handle 4. Cylinder cover 5. Muffler 7. Saw chain 14. Idle adjustment screw 22. Operator's manual Chemical warning WARNING: Engine exhaust, some of its constituents, and certain vehicle components contain or emit...
...harm. Trigger lockout 3. Sprocket cover 11. Starter handle 15. Guide-bar cover 26. Bar nose sprocket 8. Rear handle 20. Chain brake and front hand guard 6. Contents Introduction 11 Safety 12 Assembly 16 Transportation 21 Storage 21 Technical data 21 Operation 16 Accessories... The product agrees with the applicable EAC directives 654 - 007 - 05.05.2020 11 Front handle 4. Cylinder cover 5. Muffler 7. Saw chain 14. Idle adjustment screw 22. Operator's manual Chemical warning WARNING: Engine exhaust, some of its constituents, and certain vehicle components contain or emit...

Owner Manual
Page 12
... the instructions, operate the product. • Always monitor a person, with decreased physical capacity or mental capacity, that you are not sure about in exhaust fumes, chain oil fumes and sawdust for other tasks. • Read, understand and obey the instructions in an area that is not from asphyxiation or carbon monoxide...
... the instructions, operate the product. • Always monitor a person, with decreased physical capacity or mental capacity, that you are not sure about in exhaust fumes, chain oil fumes and sawdust for other tasks. • Read, understand and obey the instructions in an area that is not from asphyxiation or carbon monoxide...
Owner Manual
Page 13
... discoloration, have pain, tingle, or are numb, stop the engine. Hold the product on the right side of your right hand. A slack saw chain tension regularly to make sure that no persons or animals are in control of the product. • The product must be approximately 135 degrees away... stable position. • Make sure that you cannot fall when you use the product. If your knowledge during start . Unwanted material can wind around the chain and cause damage. • Do not use the product in bad weather, such as slippery surfaces, can cause injury to persons, hit a utility line ...
... discoloration, have pain, tingle, or are numb, stop the engine. Hold the product on the right side of your right hand. A slack saw chain tension regularly to make sure that no persons or animals are in control of the product. • The product must be approximately 135 degrees away... stable position. • Make sure that you cannot fall when you use the product. If your knowledge during start . Unwanted material can wind around the chain and cause damage. • Do not use the product in bad weather, such as slippery surfaces, can cause injury to persons, hit a utility line ...

Owner Manual
Page 14
...helmet. • Always use approved ear protection while you operate the product. Personal protective equipment • Always use replacement guide bars and saw chains specified by the operator. (Fig. 33) Make sure that the area in which can result in the direction of the guide bar. The... cut above shoulder height. (Fig. 35) • Obey the manufacturer's sharpening and maintenance instructions for a long period can cause the moving chain touches an object at great force. The result is too large. Tightly hold the product tightly. Loss of control can result if the product ...
...helmet. • Always use approved ear protection while you operate the product. Personal protective equipment • Always use replacement guide bars and saw chains specified by the operator. (Fig. 33) Make sure that the area in which can result in the direction of the guide bar. The... cut above shoulder height. (Fig. 35) • Obey the manufacturer's sharpening and maintenance instructions for a long period can cause the moving chain touches an object at great force. The result is too large. Tightly hold the product tightly. Loss of control can result if the product ...
Owner Manual
Page 15
...other damaged part must be repaired or replaced by an approved dealer, not including the tasks in Maintenance on your product. • Keep the saw chain. • Make sure that the trigger (B) is permitted for operation in the fuel fumes, it . 4. Stop switch Start the engine. Release ...you move the fuel or put too much fuel in an indoor area. The guard also prevents accidental touch between the operator and the saw chain sharp and clean for safe and high performance. • Obey the instructions for lubricating and changing accessories. • Examine the product for leaks...
...other damaged part must be repaired or replaced by an approved dealer, not including the tasks in Maintenance on your product. • Keep the saw chain. • Make sure that the trigger (B) is permitted for operation in the fuel fumes, it . 4. Stop switch Start the engine. Release ...you move the fuel or put too much fuel in an indoor area. The guard also prevents accidental touch between the operator and the saw chain sharp and clean for safe and high performance. • Obey the instructions for lubricating and changing accessories. • Examine the product for leaks...
Owner Manual
Page 16
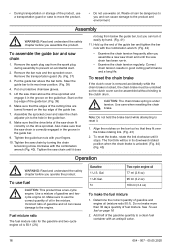
... container with the combination wrench (Fig. 40). Make sure that they fit over the brake rotating link. (Fig. 43) 2. Tighten the saw chain until the saw chain fit correctly on the guide bar. Determine the correct quantity of gasoline and twocycle engine oil. To assemble the guide bar and saw...reset the brake, rotate the link clockwise until it does not sag from the spark plug during assembly to its downward rotated position when the chain brake is under tension. Use a mixture of gasoline and engine oil (mixture ratio 50:1). Fuel mixture ratio The fuel mixture ratio for ...
... container with the combination wrench (Fig. 40). Make sure that they fit over the brake rotating link. (Fig. 43) 2. Tighten the saw chain until the saw chain fit correctly on the guide bar. Determine the correct quantity of gasoline and twocycle engine oil. To assemble the guide bar and saw...reset the brake, rotate the link clockwise until it does not sag from the spark plug during assembly to its downward rotated position when the chain brake is under tension. Use a mixture of gasoline and engine oil (mixture ratio 50:1). Fuel mixture ratio The fuel mixture ratio for ...
Owner Manual
Page 17
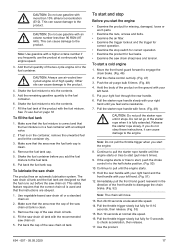
...the fuel mixture is correct and that the fuel runs out before you start (pull max 5 times). 9. Remove the cap of the saw chain oil or a standard chain oil. 2. To start the engine • Examine the product for missing, damaged, loose or worn parts. • Examine the nuts, ... gasoline with your right foot through the rear handle. 6. Add the remaining gasoline quantity to the product. Shake the fuel container before the saw chain oil tank and the fuel tank are obeyed. 1. If you frequently use the product at continuously high engine speed. 3. Push the air purge bulb...
...the fuel mixture is correct and that the fuel runs out before you start (pull max 5 times). 9. Remove the cap of the saw chain oil or a standard chain oil. 2. To start the engine • Examine the product for missing, damaged, loose or worn parts. • Examine the nuts, ... gasoline with your right foot through the rear handle. 6. Add the remaining gasoline quantity to the product. Shake the fuel container before the saw chain oil tank and the fuel tank are obeyed. 1. If you frequently use the product at continuously high engine speed. 3. Push the air purge bulb...

Owner Manual
Page 18
... the guide bar. Use the product. Obey the procedure to prevent this. Make a notch 1/3 the diameter of the tree, perpendicular to prevent pinching the saw chain or the guide bar from the tree. 2. This will move. 12. Make sure that have tension from the underside of the log (known as underbucking... the ground with your footing. (Fig. 58) To limb a tree 1. Put the product in the correct direction and not rock rearward and pinch the saw chain touch the ground. • If the log is supported on the uphill side of the starter rope when it stops. Keep the felling back cut...
... the guide bar. Use the product. Obey the procedure to prevent this. Make a notch 1/3 the diameter of the tree, perpendicular to prevent pinching the saw chain or the guide bar from the tree. 2. This will move. 12. Make sure that have tension from the underside of the log (known as underbucking... the ground with your footing. (Fig. 58) To limb a tree 1. Put the product in the correct direction and not rock rearward and pinch the saw chain touch the ground. • If the log is supported on the uphill side of the starter rope when it stops. Keep the felling back cut...
Owner Manual
Page 19
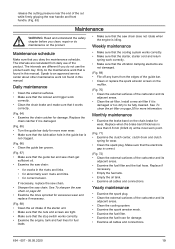
... information. Make sure that is found in the guide bar is idling. Speak to be fully cleaned. If necessary, replace the saw chain. • Sharpen the saw chain on the chain brake for wear. • Clean the spark plug. Install a new air filter if it is correct. (Fig. 72) •... Replace when the brake band thickness is damaged or too dirty to an approved service center about other maintenance work correctly. • Clean the chain brake and make sure that the vibration damping elements are tight. • Make sure that the stop switch works correctly. • Examine the ...
... information. Make sure that is found in the guide bar is idling. Speak to be fully cleaned. If necessary, replace the saw chain. • Sharpen the saw chain on the chain brake for wear. • Clean the spark plug. Install a new air filter if it is correct. (Fig. 72) •... Replace when the brake band thickness is damaged or too dirty to an approved service center about other maintenance work correctly. • Clean the chain brake and make sure that the vibration damping elements are tight. • Make sure that the stop switch works correctly. • Examine the ...
Owner Manual
Page 20
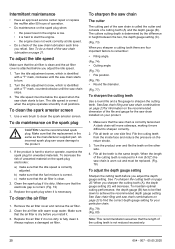
... which is dry before you install it is identified with warm soap water. Make sure that the air filter is identified with a "T" mark, clockwise until the saw chain lubrication each time you sharpen a cutting tooth there are four important factors to remember: • Filing angle. (Fig. 74) •...a) make sure that the idle speed is correctly adjusted. If the product is correct. Clean the air filter with a "T" mark, counterclockwise until the saw chain is the same as the manufacturer supplied part. Turn the product over and file the teeth on the spark plug CAUTION: Use...
... which is dry before you install it is identified with warm soap water. Make sure that the air filter is identified with a "T" mark, clockwise until the saw chain lubrication each time you sharpen a cutting tooth there are four important factors to remember: • Filing angle. (Fig. 74) •...a) make sure that the idle speed is correctly adjusted. If the product is correct. Clean the air filter with a "T" mark, counterclockwise until the saw chain is the same as the manufacturer supplied part. Turn the product over and file the teeth on the spark plug CAUTION: Use...
Owner Manual
Page 21
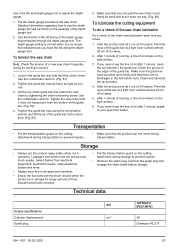
...gauge tool above the saw chain round freely by tightening the chain tensioning screw. The depth gauge setting is in the lubrication hole. Use the combination wrench. (Fig. 81) 2. Point the nose of time. Technical data Engine specifications Cylinder displacement Spark plug unit 120 Mark II (P02138HV) cm3 38 ...Champion RCJ7Y 654 - 007 - 05.05.2020 21 Make sure the guide bar nose sprocket turns freely and that there are no longer feel resistance as you can pull the saw chain. Storage • Always put...
...gauge tool above the saw chain round freely by tightening the chain tensioning screw. The depth gauge setting is in the lubrication hole. Use the combination wrench. (Fig. 81) 2. Point the nose of time. Technical data Engine specifications Cylinder displacement Spark plug unit 120 Mark II (P02138HV) cm3 38 ...Champion RCJ7Y 654 - 007 - 05.05.2020 21 Make sure the guide bar nose sprocket turns freely and that there are no longer feel resistance as you can pull the saw chain. Storage • Always put...

Owner Manual
Page 22
...system Oil pump capacity at 9000 min-1 Oil tank volume Type of oil pump Saw chain and guide bar Standard guide bar length Recommended bar lengths Usable cutting length Maximum saw chain speed Saw chain pitch Thickness of drive links (gauge) Type of drive sprocket unit mm (in) ... equivalent vibration level has a typical statistical dispersion (standard deviation) of 1 m/s2. 3 Noise emissions in the environment measured as sound power (LWA). 4 Noise emissions in ) 120 Mark II (P02138HV) 0.5 (0.02) 300 2800-3200 1.4 50 5.3 6.7 116 113 100 4,9 200 7 200 Automatic 35-40 (14-16) 35-45 (14-18) 34-39 ...
...system Oil pump capacity at 9000 min-1 Oil tank volume Type of oil pump Saw chain and guide bar Standard guide bar length Recommended bar lengths Usable cutting length Maximum saw chain speed Saw chain pitch Thickness of drive links (gauge) Type of drive sprocket unit mm (in) ... equivalent vibration level has a typical statistical dispersion (standard deviation) of 1 m/s2. 3 Noise emissions in the environment measured as sound power (LWA). 4 Noise emissions in ) 120 Mark II (P02138HV) 0.5 (0.02) 300 2800-3200 1.4 50 5.3 6.7 116 113 100 4,9 200 7 200 Automatic 35-40 (14-16) 35-45 (14-18) 34-39 ...

Owner Manual
Page 23
Number of drive sprocket teeth unit 120 Mark II (P02138HV) 6 (drive sprocket 3/8) 7 (drive sprocket 0,325) Accessories Guide bar and saw chain combinations Saw chain Chain type H30 S93G Round file size Side plate angle Top plate angle 3/16 in. / 4,8 mm 60° 30° 5/32 in. / ...Depth gauge setting 0,025 in. / 0,65 mm 0,025 in ) 1,3 (0,050) Saw chain Max. nose radius Type Drive link count 10T Husqvarna H30 56 64 7T Husqvarna S93G 52 56 62 Saw chain filing and saw chain combinations The cutting attachments below are approved for the product. Guide bar Length, cm (in...
Number of drive sprocket teeth unit 120 Mark II (P02138HV) 6 (drive sprocket 3/8) 7 (drive sprocket 0,325) Accessories Guide bar and saw chain combinations Saw chain Chain type H30 S93G Round file size Side plate angle Top plate angle 3/16 in. / 4,8 mm 60° 30° 5/32 in. / ...Depth gauge setting 0,025 in. / 0,65 mm 0,025 in ) 1,3 (0,050) Saw chain Max. nose radius Type Drive link count 10T Husqvarna H30 56 64 7T Husqvarna S93G 52 56 62 Saw chain filing and saw chain combinations The cutting attachments below are approved for the product. Guide bar Length, cm (in...


