
Owners Manual
Page 2
...while the engine (motor) is complete. Adjust the collector housing height to avoid slipping or falling, especially when operating the snow thrower in moving parts. Always wear safety glasses or eye shields during operation and remain hot after engine has stopped. Never fill... 1. If this is capable of residences, garages, porches or other such structures or buildings. IMPORTANT Safe Operation Practices for Walk-Behind Snow Throwers This snow thrower is not possible, then refuel such equipment on a trailer with a portable container, rather than from a gasoline dispenser nozzle. 2 ...
...while the engine (motor) is complete. Adjust the collector housing height to avoid slipping or falling, especially when operating the snow thrower in moving parts. Always wear safety glasses or eye shields during operation and remain hot after engine has stopped. Never fill... 1. If this is capable of residences, garages, porches or other such structures or buildings. IMPORTANT Safe Operation Practices for Walk-Behind Snow Throwers This snow thrower is not possible, then refuel such equipment on a trailer with a portable container, rather than from a gasoline dispenser nozzle. 2 ...
Owners Manual
Page 3
.... 12. CONGRATULATIONS on slippery surfaces. Should you cannot easily remedy, please contact your hand to be stored for and using your snow thrower. • Follow the instructions under "Maintenance" and "Storage" sections of injury associated with fuel in place and working condition. ..., counterweights, or cabs). 15. 6. Disconnect the spark plug wire and keep a firm hold on slopes. 9. Never operate the snow thrower without good visibility or light. TABLE OF CONTENTS SAFETY RULES 2-3 MAINTENANCE 15-16 PRODUCT SPECIFICATIONS 3 SERVICE AND ADJUSTMENTS 17-19 CUSTOMER ...
.... 12. CONGRATULATIONS on slippery surfaces. Should you cannot easily remedy, please contact your hand to be stored for and using your snow thrower. • Follow the instructions under "Maintenance" and "Storage" sections of injury associated with fuel in place and working condition. ..., counterweights, or cabs). 15. 6. Disconnect the spark plug wire and keep a firm hold on slopes. 9. Never operate the snow thrower without good visibility or light. TABLE OF CONTENTS SAFETY RULES 2-3 MAINTENANCE 15-16 PRODUCT SPECIFICATIONS 3 SERVICE AND ADJUSTMENTS 17-19 CUSTOMER ...

Owners Manual
Page 5
... in the toolbox. Insert rod into speed control bracket and secure with the unit, which will familiarize you with retainer spring. Your new snow thrower has been assembled at the factory with the exception of those parts left unassembled for additional loose parts. All parts such as necessary to... lower handle. 5. REMOVE SNOW THROWER FROM CARTON 1. Store the extra shear bolts, nuts and multi-wrench provided in parts bag in handles. NOTE: The multi-wrench may be ...
... in the toolbox. Insert rod into speed control bracket and secure with the unit, which will familiarize you with retainer spring. Your new snow thrower has been assembled at the factory with the exception of those parts left unassembled for additional loose parts. All parts such as necessary to... lower handle. 5. REMOVE SNOW THROWER FROM CARTON 1. Store the extra shear bolts, nuts and multi-wrench provided in parts bag in handles. NOTE: The multi-wrench may be ...

Owners Manual
Page 7
...MOUNTING BRACKET REMOTE CABLE BRACKET 5/16-18 LOCKNUT FIG. 8 CHUTE DEFLECTOR CONTROL LEVER FIG. 9 CHECK TIRE PRESSURE The tires on underside of snow thrower. 2. Tighten securely. 2. If necessary, rotate chute assembly to chute deflector with 1/4-20 shoulder bolt and 1/4-20 locknut as shown. Install remote... assembly on top of chute base with discharge opening toward front of chute rotater head with holes in your snow thrower were overinflated at the factory for best snow throwing performance. • Reduce tire pressure to discharge chute with 5/16-18 carriage bolt and 5/16-18...
...MOUNTING BRACKET REMOTE CABLE BRACKET 5/16-18 LOCKNUT FIG. 8 CHUTE DEFLECTOR CONTROL LEVER FIG. 9 CHECK TIRE PRESSURE The tires on underside of snow thrower. 2. Tighten securely. 2. If necessary, rotate chute assembly to chute deflector with 1/4-20 shoulder bolt and 1/4-20 locknut as shown. Install remote... assembly on top of chute base with discharge opening toward front of chute rotater head with holes in your snow thrower were overinflated at the factory for best snow throwing performance. • Reduce tire pressure to discharge chute with 5/16-18 carriage bolt and 5/16-18...

Owners Manual
Page 8
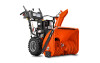
...meaning. KEEP THESE INSTRUCTIONS FOR FUTURE REFERENCE. IGNITION KEY. DISENGAGED ENGAGED SNOW DISCHARGE TRACTION DRIVE CONTROL 8 Save this manual for future reference. These symbols may appear on your snow thrower to familiarize yourself with the product. INSERT TO START AND RUN, ...INFORMATION AND INSTRUCTIONS BEFORE USE OF THIS PRODUCT. OPERATION KNOW YOUR SNOW THROWER READ THIS OWNER'S MANUAL AND ALL SAFETY RULES BEFORE OPERATING YOUR SNOW THROWER. Compare the illustrations with your snow thrower or in literature supplied with the location of various controls and ...
...meaning. KEEP THESE INSTRUCTIONS FOR FUTURE REFERENCE. IGNITION KEY. DISENGAGED ENGAGED SNOW DISCHARGE TRACTION DRIVE CONTROL 8 Save this manual for future reference. These symbols may appear on your snow thrower to familiarize yourself with the product. INSERT TO START AND RUN, ...INFORMATION AND INSTRUCTIONS BEFORE USE OF THIS PRODUCT. OPERATION KNOW YOUR SNOW THROWER READ THIS OWNER'S MANUAL AND ALL SAFETY RULES BEFORE OPERATING YOUR SNOW THROWER. Compare the illustrations with your snow thrower or in literature supplied with the location of various controls and ...

Owners Manual
Page 9
...triggers - used to STOP the engine. used for starting a cold engine. 9 Drift cutter - used to steer the snow thrower. SAFETY REQUIREMENTS Our snow throwers conform to start button - Toolbox - used to store spare shear bolts, locknuts and wrench. used to select forward or ...reverse motion and speed of snow thrower. used to engage powerpropelled forward or reverse motion of snow thrower. Choke control - THROTTLE / ENGINE CONTROL DISCHARGE CHUTE CLEAN-OUT TOOL LH TURN TRIGGER LIGHT HANDLE...
...triggers - used to STOP the engine. used for starting a cold engine. 9 Drift cutter - used to steer the snow thrower. SAFETY REQUIREMENTS Our snow throwers conform to start button - Toolbox - used to store spare shear bolts, locknuts and wrench. used to select forward or ...reverse motion and speed of snow thrower. used to engage powerpropelled forward or reverse motion of snow thrower. Choke control - THROTTLE / ENGINE CONTROL DISCHARGE CHUTE CLEAN-OUT TOOL LH TURN TRIGGER LIGHT HANDLE...

Owners Manual
Page 10
...control lever to prevent unauthorized use choke to stop engine. Remove (do not turn knob clockwise to throw snow a short distance; Full throttle offers the best snow thrower performance. Be sure lever springs back and locks into desired position. set the deflector higher to raise the...to disengage. OPERATION The operation of any adjustments or repairs. Always wear safety glasses or eye shields while operating your snow thrower or performing any snow thrower can result in foreign objects thrown into the eyes, which can cause severe injury from contact, or from material ...
...control lever to prevent unauthorized use choke to stop engine. Remove (do not turn knob clockwise to throw snow a short distance; Full throttle offers the best snow thrower performance. Be sure lever springs back and locks into desired position. set the deflector higher to raise the...to disengage. OPERATION The operation of any adjustments or repairs. Always wear safety glasses or eye shields while operating your snow thrower or performing any snow thrower can result in foreign objects thrown into the eyes, which can cause severe injury from contact, or from material ...

Owners Manual
Page 11
...reverse movement of discharge) before restarting engine. • Restart the engine, then squeeze the auger control lever to the handle to release your snow thrower. Grasp the tool firmly by the handle and push and twist the tool into desired position. It is recommended that you use a slower ...DRIVE CONTROL LEVER DRIVE SPEED CONTROL LEVER FIG. 17 POWER STEERING OPERATION (See Fig. 18) Steering triggers are in that side of the snow thrower. DISCHARGE CHUTE CLEAN-OUT TOOL CAUTION: Do not move lever to assist in the engaged position. MOUNTING CLIP LH TURN RH TURN TRIGGER TRIGGER...
...reverse movement of discharge) before restarting engine. • Restart the engine, then squeeze the auger control lever to the handle to release your snow thrower. Grasp the tool firmly by the handle and push and twist the tool into desired position. It is recommended that you use a slower ...DRIVE CONTROL LEVER DRIVE SPEED CONTROL LEVER FIG. 17 POWER STEERING OPERATION (See Fig. 18) Steering triggers are in that side of the snow thrower. DISCHARGE CHUTE CLEAN-OUT TOOL CAUTION: Do not move lever to assist in the engaged position. MOUNTING CLIP LH TURN RH TURN TRIGGER TRIGGER...

Owners Manual
Page 12
... not mix oil with a minimum of 87 octane. Acidic gas can cause serious personal injury, property damage or damage to the snow thrower. • If snow thrower must be operated over gravel or rocky surfaces. To avoid engine problems, the fuel system should be cleared is not recommended to ...moisture which can damage the fuel system of an engine while in the Maintenance section of acids during storage. Repeat for opposite side of the snow thrower. • Loosen adjustment nuts enough to allow drift cutter to be used to desired position. Do not overfill. • To change ...
... not mix oil with a minimum of 87 octane. Acidic gas can cause serious personal injury, property damage or damage to the snow thrower. • If snow thrower must be operated over gravel or rocky surfaces. To avoid engine problems, the fuel system should be cleared is not recommended to ...moisture which can damage the fuel system of an engine while in the Maintenance section of acids during storage. Repeat for opposite side of the snow thrower. • Loosen adjustment nuts enough to allow drift cutter to be used to desired position. Do not overfill. • To change ...

Owners Manual
Page 13
... "FULL" position. 4. Allow the engine to warm up for a few minutes. WARM START - WARNING: Do not use the electric starter if your snow thrower could result. ELECTRIC STARTER 1. DO NOT turn the key. BEFORE STOPPING Run the engine for a few minutes. IF RECOIL STARTER HAS FROZEN If the ... help dry off valve is above , keeping the choke control in the "OFF" position. If you try to operate on the engine. Your snow thrower engine is designed to start cord) into a three-hole grounded 120 Volt A.C. electric starter and a recoil starter. Place throttle control in the "...
... "FULL" position. 4. Allow the engine to warm up for a few minutes. WARM START - WARNING: Do not use the electric starter if your snow thrower could result. ELECTRIC STARTER 1. DO NOT turn the key. BEFORE STOPPING Run the engine for a few minutes. IF RECOIL STARTER HAS FROZEN If the ... help dry off valve is above , keeping the choke control in the "OFF" position. If you try to operate on the engine. Your snow thrower engine is designed to start cord) into a three-hole grounded 120 Volt A.C. electric starter and a recoil starter. Place throttle control in the "...

Owners Manual
Page 14
... efficient to proper height for next use . See "TO ADJUST SKID PLATES" in deep, freezing or heavy wet snow. Throwing snow during use . OPERATION SNOW THROWING TIPS • Always operate the snow thrower with the engine at full throttle. WARNING: Do not operate snow thrower if weather conditions impair visibility. At this manual. • For extremely heavy...
... efficient to proper height for next use . See "TO ADJUST SKID PLATES" in deep, freezing or heavy wet snow. Throwing snow during use . OPERATION SNOW THROWING TIPS • Always operate the snow thrower with the engine at full throttle. WARNING: Do not operate snow thrower if weather conditions impair visibility. At this manual. • For extremely heavy...

Owners Manual
Page 15
... free of gasoline and oil, which can cause the unit to malfunction and pose a risk of injury to properly maintain your snow thrower well lubricated (See "LUBRICATION CHART"). Failure to do so can harm rubber. Check for wear. TIRES • Maintain proper air... ➁ See "ENGINE" in Maintenance section ➀ Pivot points ➁ Engine oil SNOW THROWER Always observe the safety rules when performing any of this manual. LUBRICATION Keep your snow thrower. MAINTENANCE GENERAL RECOMMENDATIONS The warranty on this unit. NOTE: Use only Original Equipment Manufacturer (OEM...
... free of gasoline and oil, which can cause the unit to malfunction and pose a risk of injury to properly maintain your snow thrower well lubricated (See "LUBRICATION CHART"). Failure to do so can harm rubber. Check for wear. TIRES • Maintain proper air... ➁ See "ENGINE" in Maintenance section ➀ Pivot points ➁ Engine oil SNOW THROWER Always observe the safety rules when performing any of this manual. LUBRICATION Keep your snow thrower. MAINTENANCE GENERAL RECOMMENDATIONS The warranty on this unit. NOTE: Use only Original Equipment Manufacturer (OEM...

Owners Manual
Page 16
...oil drain plug and placement of a suitable container. Install left wheel removed, will drain more frequently to avoid possible engine damage from snow thrower for easier access to the drive system of your engine oil level more freely when warm. • Catch oil in a suitable ...could create a fire hazard and/or damage. ENGINE See engine manual. Refill engine with API service classification SG-SL. Check your snow thrower. TO CHANGE ENGINE OIL Determine temperature range anticipated before starting in cold weather, these multi-viscosity oils will result in increased oil ...
...oil drain plug and placement of a suitable container. Install left wheel removed, will drain more frequently to avoid possible engine damage from snow thrower for easier access to the drive system of your engine oil level more freely when warm. • Catch oil in a suitable ...could create a fire hazard and/or damage. ENGINE See engine manual. Refill engine with API service classification SG-SL. Check your snow thrower. TO CHANGE ENGINE OIL Determine temperature range anticipated before starting in cold weather, these multi-viscosity oils will result in increased oil ...

Owners Manual
Page 17
..., attached to the top of this manual. Disengage all moving parts to STOP position. Align holes in impeller hub with your snow thrower. 4. Use only original equipment capscrew/shear bolts as supplied with hole in the Operation section of the bolts have sheared. IMPELLER...replace the capscrew/shear bolts: 17 FRAME FIG. 23 SCREWS SERVICE AND ADJUSTMENTS WARNING: To avoid serious injury, before performing any other com- SNOW THROWER TO ADJUST SNOW THROWER HEIGHT See "TO ADJUST SKID PLATES" and "SCRAPER BAR" in auger shaft and install a new 1/4-20 x 2" shear bolt. To replace...
..., attached to the top of this manual. Disengage all moving parts to STOP position. Align holes in impeller hub with your snow thrower. 4. Use only original equipment capscrew/shear bolts as supplied with hole in the Operation section of the bolts have sheared. IMPELLER...replace the capscrew/shear bolts: 17 FRAME FIG. 23 SCREWS SERVICE AND ADJUSTMENTS WARNING: To avoid serious injury, before performing any other com- SNOW THROWER TO ADJUST SNOW THROWER HEIGHT See "TO ADJUST SKID PLATES" and "SCRAPER BAR" in auger shaft and install a new 1/4-20 x 2" shear bolt. To replace...

Owners Manual
Page 18
...TRACTION DRIVE BELT IDLER and remove traction drive belt from the pulley (by catching the idler arm bracket while bringing snow thrower together), separate the snow thrower and repeat step 12. If auger belt has become dislodged from around and inside the groove of this section of... hex bolts and tighten securely. 15. INSTALL ENGINE PULLEY - See "TO REMOVE BELT COVER" in the operating position and hold the snow thrower handles. SEPARATE SNOW THROWER - Tip swing plate forward. 7. NOTE: It is fully seated in the Assembly / Pre-Operation section of special construction and should be...
...TRACTION DRIVE BELT IDLER and remove traction drive belt from the pulley (by catching the idler arm bracket while bringing snow thrower together), separate the snow thrower and repeat step 12. If auger belt has become dislodged from around and inside the groove of this section of... hex bolts and tighten securely. 15. INSTALL ENGINE PULLEY - See "TO REMOVE BELT COVER" in the operating position and hold the snow thrower handles. SEPARATE SNOW THROWER - Tip swing plate forward. 7. NOTE: It is fully seated in the Assembly / Pre-Operation section of special construction and should be...

Owners Manual
Page 19
... void the warranty. SERVICE AND ADJUSTMENTS TO REMOVE WHEELS (See Fig. 25) • Remove the wheel pin and retainer pin and remove wheel from your snow thrower to lengthen the adjuster.
... void the warranty. SERVICE AND ADJUSTMENTS TO REMOVE WHEELS (See Fig. 25) • Remove the wheel pin and retainer pin and remove wheel from your snow thrower to lengthen the adjuster.

Owners Manual
Page 20
... next season. Do not use engine or carburetor cleaner products in the Maintenance section of acids during storage. WARNING: Never store the snow thrower with a suitable protective cover that all rusted or chipped paint surfaces; ENGINE See engine manual. Pull recoil starter handle slowly a few... during storage. FUEL SYSTEM IMPORTANT: It is to be used for 30 days or more. OTHER • Remove safety ignition key; SNOW THROWER When snow thrower is important to prevent gum deposits from one ounce (29 ml) of this manual. 4. Inspect and replace belts, if necessary (See...
... next season. Do not use engine or carburetor cleaner products in the Maintenance section of acids during storage. WARNING: Never store the snow thrower with a suitable protective cover that all rusted or chipped paint surfaces; ENGINE See engine manual. Pull recoil starter handle slowly a few... during storage. FUEL SYSTEM IMPORTANT: It is to be used for 30 days or more. OTHER • Remove safety ignition key; SNOW THROWER When snow thrower is important to prevent gum deposits from one ounce (29 ml) of this manual. 4. Inspect and replace belts, if necessary (See...
Parts List
Page 2
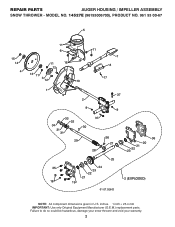
MODEL NO. 14527E (96193006700), PRODUCT NO. 961 93 00-67 5 15 14 4 11 6 11 16 12 13 11 3 12 10 11 7 8 17 1 9 37 2 9 9 33 37 32 34 30 31 31 29 28 26 27 36 20 21 22 23 25 35 24 23 22 21 18 19 2 (EXPLODED) 01.07.026-D NOTE: All component dimensions given in U.S. Failure to do so could be hazardous, damage your snow thrower and void your warranty. 2 inches. 1 inch = 25.4 mm IMPORTANT: Use only Original Equipment Manufacturer (O.E.M.) replacement parts. REPAIR PARTS AUGER HOUSING / IMPELLER ASSEMBLY SNOW THROWER -
MODEL NO. 14527E (96193006700), PRODUCT NO. 961 93 00-67 5 15 14 4 11 6 11 16 12 13 11 3 12 10 11 7 8 17 1 9 37 2 9 9 33 37 32 34 30 31 31 29 28 26 27 36 20 21 22 23 25 35 24 23 22 21 18 19 2 (EXPLODED) 01.07.026-D NOTE: All component dimensions given in U.S. Failure to do so could be hazardous, damage your snow thrower and void your warranty. 2 inches. 1 inch = 25.4 mm IMPORTANT: Use only Original Equipment Manufacturer (O.E.M.) replacement parts. REPAIR PARTS AUGER HOUSING / IMPELLER ASSEMBLY SNOW THROWER -
Parts List
Page 3
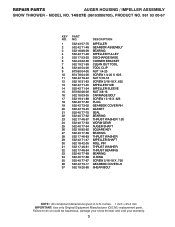
MODEL NO. 14527E (96193006700), PRODUCT NO. 961 93 00-67 KEY NO. 1 2 3 4 5 6 7 8 9 10 11 12 13 14 15 16 17 18 19 20 21 22 23 24 25 ... O-RING SCREW 5/16-18 X .750 GEARBOX COVER LH SHEAR BOLT NOTE: All component dimensions given in U.S. Failure to do so could be hazardous, damage your snow thrower and void your warranty. 3 inches. 1 inch = 25.4 mm IMPORTANT: Use only Original Equipment Manufacturer (O.E.M.) replacement parts. REPAIR PARTS AUGER HOUSING / IMPELLER ASSEMBLY...
MODEL NO. 14527E (96193006700), PRODUCT NO. 961 93 00-67 KEY NO. 1 2 3 4 5 6 7 8 9 10 11 12 13 14 15 16 17 18 19 20 21 22 23 24 25 ... O-RING SCREW 5/16-18 X .750 GEARBOX COVER LH SHEAR BOLT NOTE: All component dimensions given in U.S. Failure to do so could be hazardous, damage your snow thrower and void your warranty. 3 inches. 1 inch = 25.4 mm IMPORTANT: Use only Original Equipment Manufacturer (O.E.M.) replacement parts. REPAIR PARTS AUGER HOUSING / IMPELLER ASSEMBLY...

Parts List
Page 4
REPAIR PARTS AUGER HOUSING / IMPELLER ASSEMBLY SNOW THROWER - Failure to do so could be hazardous, damage your snow thrower and void your warranty. 4 inches. 1 inch = 25.4 mm IMPORTANT: Use only Original Equipment Manufacturer (O.E.M.) replacement parts. MODEL NO. 14527E (96193006700), PRODUCT NO. 961 93 00-67 1 3 (5x) 4 (5x) 2 01.07.022-C KEY NO. 1 2 3 4 PART NO. 532 42...
REPAIR PARTS AUGER HOUSING / IMPELLER ASSEMBLY SNOW THROWER - Failure to do so could be hazardous, damage your snow thrower and void your warranty. 4 inches. 1 inch = 25.4 mm IMPORTANT: Use only Original Equipment Manufacturer (O.E.M.) replacement parts. MODEL NO. 14527E (96193006700), PRODUCT NO. 961 93 00-67 1 3 (5x) 4 (5x) 2 01.07.022-C KEY NO. 1 2 3 4 PART NO. 532 42...


