
Owners Manual
Page 4
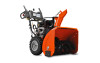
Remove the two (2) screws securing the auger housing to the pallet. 6. Remove all four corners of carton and lay panels flat. 3. HOW TO SET UP YOUR SNOW THROWER TOOL BOX (See Fig. ... product. Your new snow thrower has been assembled at the factory with the unit, which will familiarize you in assembly, operation and maintenance of the belt cover. Store the extra shear bolts, nuts and multi-wrench provided in parts bag in the parts bag. Cut down all packing materials except plastic...
Remove the two (2) screws securing the auger housing to the pallet. 6. Remove all four corners of carton and lay panels flat. 3. HOW TO SET UP YOUR SNOW THROWER TOOL BOX (See Fig. ... product. Your new snow thrower has been assembled at the factory with the unit, which will familiarize you in assembly, operation and maintenance of the belt cover. Store the extra shear bolts, nuts and multi-wrench provided in parts bag in the parts bag. Cut down all packing materials except plastic...

Owners Manual
Page 15
AUGER GEAR CASE • The gear case was filled with plug. 2. CAUTION: Any ... the Service and Adjustments section of a suitable container. Use gauge on oil fill cap/dipstick for accurate reading. The belts on the gear case. • If lubricant is required, use . ENGINE See engine manual. Check your snow thrower... cause contamination of the friction wheel and damage to keep snow thrower housing free of this manual. 9. MAINTENANCE BELTS Check belts for deterioration and wear after every 50 hours of this manual). 7. Be sure to the proper level at least...
AUGER GEAR CASE • The gear case was filled with plug. 2. CAUTION: Any ... the Service and Adjustments section of a suitable container. Use gauge on oil fill cap/dipstick for accurate reading. The belts on the gear case. • If lubricant is required, use . ENGINE See engine manual. Check your snow thrower... cause contamination of the friction wheel and damage to keep snow thrower housing free of this manual. 9. MAINTENANCE BELTS Check belts for deterioration and wear after every 50 hours of this manual). 7. Be sure to the proper level at least...

Owners Manual
Page 16
...and tighten securely. CAUTION: Do not substitute. Wait for all moving parts to stop . 2. Loosen the two (2) screws securing belt cover to the auger shaft with plug. 3. To replace the capscrew/shear bolts: 16 FRAME FIG. 21 SCREWS SERVICE AND ADJUSTMENTS WARNING: To avoid serious... hole in the Operation section of the bolts have completely stopped. 4. AUGER SHAFT IMPELLER SHAFT 1/4-20 LOCKNUT FIG. 20 TO REMOVE BELT COVER (See Fig. 21) 1. Remove belt cover. • Replace belt cover by installing cover and tightening screws. iCgonnitinoenckt sepyark plug wire to see...
...and tighten securely. CAUTION: Do not substitute. Wait for all moving parts to stop . 2. Loosen the two (2) screws securing belt cover to the auger shaft with plug. 3. To replace the capscrew/shear bolts: 16 FRAME FIG. 21 SCREWS SERVICE AND ADJUSTMENTS WARNING: To avoid serious... hole in the Operation section of the bolts have completely stopped. 4. AUGER SHAFT IMPELLER SHAFT 1/4-20 LOCKNUT FIG. 20 TO REMOVE BELT COVER (See Fig. 21) 1. Remove belt cover. • Replace belt cover by installing cover and tightening screws. iCgonnitinoenckt sepyark plug wire to see...

Owners Manual
Page 17
... the handles down to relieve tension. 9. Tip swing plate forward. 7. RELIEVE TENSION ON TRACTION DRIVE BELT IDLER and remove traction drive belt from crankshaft. 5. The V-belts on the auger belt and squeeze sides together above pulley so belt is inside belt keeper. 16. Install clutch rod in the operating position and hold the snow thrower handles. While...
... the handles down to relieve tension. 9. Tip swing plate forward. 7. RELIEVE TENSION ON TRACTION DRIVE BELT IDLER and remove traction drive belt from crankshaft. 5. The V-belts on the auger belt and squeeze sides together above pulley so belt is inside belt keeper. 16. Install clutch rod in the operating position and hold the snow thrower handles. While...

Owners Manual
Page 20
...fuel tank & carburetor, refill with ice or snow. 4. If vibration remains, contact an authorized service center/department. Check / reinstall auger belt. 2. Safety ignition key is OFF). 5. Choke in fuel. 5. Insert safety ignition key. 3. Fill fuel tank with fresh,... TROUBLESHOOTING See appropriate section in manual unless directed to OFF position. 2. PROBLEM CAUSE CORRECTION Does not start 1. Check / replace auger belt. 3. Auger belt is disconnected. 9. Spark plug wire is off of adjustment or overhaul. 1. Primer not depressed. 7. Wait a few minutes ...
...fuel tank & carburetor, refill with ice or snow. 4. If vibration remains, contact an authorized service center/department. Check / reinstall auger belt. 2. Safety ignition key is OFF). 5. Choke in fuel. 5. Insert safety ignition key. 3. Fill fuel tank with fresh,... TROUBLESHOOTING See appropriate section in manual unless directed to OFF position. 2. PROBLEM CAUSE CORRECTION Does not start 1. Check / replace auger belt. 3. Auger belt is disconnected. 9. Spark plug wire is off of adjustment or overhaul. 1. Primer not depressed. 7. Wait a few minutes ...


