

Operation Manual
Page 1
Operator´s manual AR19 AR25 Please read these instructions carefully and make sure you understand them before using the machine. English
Operator´s manual AR19 AR25 Please read these instructions carefully and make sure you understand them before using the machine. English

Operation Manual
Page 2
To implement improvements, specifications and designs can be returned to the reseller or other parts voids the warranty. The use of other party for repairs. Beatrice, NE. All Rights Reserved. When this product is worn out and no legal demands can be altered without...Do not modify or install non-standard equipment to the unit may cause unsafe operations or damage the unit. Use only original parts for recycling. ©2010 HTC. Note that no longer used, it should be placed based on the information contained in these instructions. Modifications to the unit ...
To implement improvements, specifications and designs can be returned to the reseller or other parts voids the warranty. The use of other party for repairs. Beatrice, NE. All Rights Reserved. When this product is worn out and no legal demands can be altered without...Do not modify or install non-standard equipment to the unit may cause unsafe operations or damage the unit. Use only original parts for recycling. ©2010 HTC. Note that no longer used, it should be placed based on the information contained in these instructions. Modifications to the unit ...

Operation Manual
Page 4
... state the type designation and serial number when ordering spare parts. Good Service Husqvarna's products are sold all -inclusive insurance for purchasing a Husqvarna lawn care product. If you sell your insurance company to use , service, maintenance, etc.) can be found on the printed plate attached ...serial number is a valuable document. Read the manual carefully before attempting to check on the starter. Insure your machine Contact your Husqvarna machine, make sure to give the operator's manual to the rear side panel of your dealer. Please state engine serial number and...
... state the type designation and serial number when ordering spare parts. Good Service Husqvarna's products are sold all -inclusive insurance for purchasing a Husqvarna lawn care product. If you sell your insurance company to use , service, maintenance, etc.) can be found on the printed plate attached ...serial number is a valuable document. Read the manual carefully before attempting to check on the starter. Insure your machine Contact your Husqvarna machine, make sure to give the operator's manual to the rear side panel of your dealer. Please state engine serial number and...

Operation Manual
Page 5
...or rotating parts. • Do not lift alone. • Do not run engine while servicing. Call your Husqvarna equipment. DO NOT: • Do not run engine while servicing. • Do not use on any surface other than grass. • Do not operate on slopes exceeding 35% grade. • ...8226; Do not run engine in place. Warranty will assist you in the safe operation and proper maintenance of your dealer or Husqvarna if additional information is required. SAFETY General Information This manual will be modified without the manufacturer's prior written authorization.
...or rotating parts. • Do not lift alone. • Do not run engine while servicing. Call your Husqvarna equipment. DO NOT: • Do not run engine while servicing. • Do not use on any surface other than grass. • Do not operate on slopes exceeding 35% grade. • ...8226; Do not run engine in place. Warranty will assist you in the safe operation and proper maintenance of your dealer or Husqvarna if additional information is required. SAFETY General Information This manual will be modified without the manufacturer's prior written authorization.

Operation Manual
Page 8
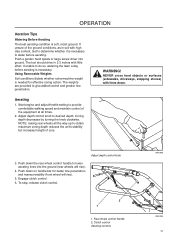
... cam lock lever or link lock (dependent on the rear wheel control handle, using the front holes. (See illustration) 2 1 1. Cam Lock - Model AR19 Handle 1. Rotate handle into upright position and lock, using the back holes. (See illustration) Link Lock - Connect the top of control rod to rear wheel control handle with the fasteners...
... cam lock lever or link lock (dependent on the rear wheel control handle, using the front holes. (See illustration) 2 1 1. Cam Lock - Model AR19 Handle 1. Rotate handle into upright position and lock, using the back holes. (See illustration) Link Lock - Connect the top of control rod to rear wheel control handle with the fasteners...

Operation Manual
Page 9
...on the control rod. 8060-034 Connect upper control rod 5. Connect top of lever on the torque arm through the lower hole, using the fastener assembly. CAUTION! Connect lower control rod 8060-035 8060-036 9 Slide handle onto handle mounting brackets. Connect bottom of ...with the handle detached. Be certain that the clutch cable is shipped with fasteners located on rear wheel control handle using two ½" wrenches. Mount the handle using the upper hole on handle mounting brackets. Attaching non-folding handle 4. The aerator is properly routed. ASSEMBLY Model ...
...on the control rod. 8060-034 Connect upper control rod 5. Connect top of lever on the torque arm through the lower hole, using the fastener assembly. CAUTION! Connect lower control rod 8060-035 8060-036 9 Slide handle onto handle mounting brackets. Connect bottom of ...with the handle detached. Be certain that the clutch cable is shipped with fasteners located on rear wheel control handle using two ½" wrenches. Mount the handle using the upper hole on handle mounting brackets. Attaching non-folding handle 4. The aerator is properly routed. ASSEMBLY Model ...
Operation Manual
Page 11
... maneuverability (front wheel will rise). 4. Adjust depth control knob 3. The tool should drive in soil with tines down on handle bar for effective coring action. Using Removable Weights Soil conditions dictate whether extra machine weight is soft, moist ground.
... maneuverability (front wheel will rise). 4. Adjust depth control knob 3. The tool should drive in soil with tines down on handle bar for effective coring action. Using Removable Weights Soil conditions dictate whether extra machine weight is soft, moist ground.
Operation Manual
Page 13
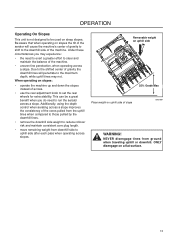
Under these circumstances you do need to exert a greater effort to steer and maintain the balance of across. • use the rear adjustment knob to set the rear wheels for extra stability. Additionally, using the depth control when aerating across a slope. Due to the shifted center of gravity the downhill tines will cause... slopes: • operate the machine up and down the slopes instead of the machine. • uneven tine penetration, when operating across slopes. This can be used on a flat surface. 13
Under these circumstances you do need to exert a greater effort to steer and maintain the balance of across. • use the rear adjustment knob to set the rear wheels for extra stability. Additionally, using the depth control when aerating across a slope. Due to the shifted center of gravity the downhill tines will cause... slopes: • operate the machine up and down the slopes instead of the machine. • uneven tine penetration, when operating across slopes. This can be used on a flat surface. 13
Operation Manual
Page 14
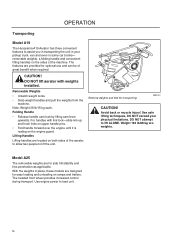
...the aerator, to allow two people to assist you in transporting the unit in your physical limitations. OPERATION Transporting Model A19 The Husqvarna A19 Aerator has three convenient features to lift the unit. Model A25 The removable weights are provided for side hill stability and ...tine penetration as applicable. Removable Weights • Unlatch weight locks. • Grab weight handles and pull the weights from the machine. Use safe lifting techniques, DO NOT exceed your pickup truck, van and even in place, these models are designed for transporting 8060-037 CAUTION!...
...the aerator, to allow two people to assist you in transporting the unit in your physical limitations. OPERATION Transporting Model A19 The Husqvarna A19 Aerator has three convenient features to lift the unit. Model A25 The removable weights are provided for side hill stability and ...tine penetration as applicable. Removable Weights • Unlatch weight locks. • Grab weight handles and pull the weights from the machine. Use safe lifting techniques, DO NOT exceed your pickup truck, van and even in place, these models are designed for transporting 8060-037 CAUTION!...

Operation Manual
Page 15
... Minute Rule Aerators may result from gasoline draining into the crankcase if prolonged. Maintenance Schedule Inspection Schedule Item Out of the machine. NOTE: Use care with power washers to avoid damage to warning decals, operator instruction labels, bearings, chains and engine. MAINTENANCE AND SERVICE Cleaning Regular cleaning... lubricant (aerosol) Tines Light machine oil Linkage 30W oil (*) (*) after each pressure wash or steam cleaning Every 10 hrs Each Use Every 60 hrs As Required Storage 15 Limit direct spray on the engine guard for cleaning and access for cleaning.
... Minute Rule Aerators may result from gasoline draining into the crankcase if prolonged. Maintenance Schedule Inspection Schedule Item Out of the machine. NOTE: Use care with power washers to avoid damage to warning decals, operator instruction labels, bearings, chains and engine. MAINTENANCE AND SERVICE Cleaning Regular cleaning... lubricant (aerosol) Tines Light machine oil Linkage 30W oil (*) (*) after each pressure wash or steam cleaning Every 10 hrs Each Use Every 60 hrs As Required Storage 15 Limit direct spray on the engine guard for cleaning and access for cleaning.

Operation Manual
Page 16
... 2. Large pulley Replace belt on small pulley first 8060-010 IMPORTANT INFORMATION Many parts, including the drive belt on Model AR19), with genuine Husqvarna parts to an Authorized Service Dealer. Remove drive guard. 3. Inspect condition of removal. 8. removal and replacement 1. Check V-pulley ... the large V-pulley. 6. Replace drive guard. DO NOT tear down the belt with optional Honda engines have two (2) pairs of use. Belt keeper 3. Check that the aerator rolls freely (with handle folded on your aerator, are directly in line with the engine ...
... 2. Large pulley Replace belt on small pulley first 8060-010 IMPORTANT INFORMATION Many parts, including the drive belt on Model AR19), with genuine Husqvarna parts to an Authorized Service Dealer. Remove drive guard. 3. Inspect condition of removal. 8. removal and replacement 1. Check V-pulley ... the large V-pulley. 6. Replace drive guard. DO NOT tear down the belt with optional Honda engines have two (2) pairs of use. Belt keeper 3. Check that the aerator rolls freely (with handle folded on your aerator, are directly in line with the engine ...

Operation Manual
Page 20
... reinstall. 13. Remove the tine rotor shaft bearing bolts (4). 9. Remove the rotor shaft assembly. 10. Fold handle on the AR19 Model. 3. Fold handle. 4. Inspect tines using a hammer and pin punch). Reverse steps to loosen the chain. 7. Remove retaining bolt and old tine, insert new tine and...to the set screw in the opposite direction the rotor would normally turn. 12. MAINTENANCE AND SERVICE Tines Tine Wear After the Husqvarna Aerator has been used for access to master link. 6. When this happens aerating performance diminishes. Turn off engine and remove weights. 2. Remove and ...
... reinstall. 13. Remove the tine rotor shaft bearing bolts (4). 9. Remove the rotor shaft assembly. 10. Fold handle on the AR19 Model. 3. Fold handle. 4. Inspect tines using a hammer and pin punch). Reverse steps to loosen the chain. 7. Remove retaining bolt and old tine, insert new tine and...to the set screw in the opposite direction the rotor would normally turn. 12. MAINTENANCE AND SERVICE Tines Tine Wear After the Husqvarna Aerator has been used for access to master link. 6. When this happens aerating performance diminishes. Turn off engine and remove weights. 2. Remove and ...

Operation Manual
Page 22
... amount of the handle. Drive Wheel Shaft Removal and Replacement 7. Pull sprocket and bearing from wheels. NOTE: Sprocket is double set screw and, using a hammer, with the wheel and shaft. 8. Center the wheels between the wheel opening and the housing. Adjust chain per section "Adjusting Chain ...Tension" and replace drive guard. Collar punch pin hole 8060-012 22 Remove master link and chain. 4. Model AR19: hub side away from shaft. Wheel shaft bearing should have hub facing away from wheel. If bearings are double set screws. 11....
... amount of the handle. Drive Wheel Shaft Removal and Replacement 7. Pull sprocket and bearing from wheels. NOTE: Sprocket is double set screw and, using a hammer, with the wheel and shaft. 8. Center the wheels between the wheel opening and the housing. Adjust chain per section "Adjusting Chain ...Tension" and replace drive guard. Collar punch pin hole 8060-012 22 Remove master link and chain. 4. Model AR19: hub side away from shaft. Wheel shaft bearing should have hub facing away from wheel. If bearings are double set screws. 11....

Operation Manual
Page 23
.... 3. AR25 only 2 8058-025 23 Turn the rear wheel depth/stability control knob clockwise to adjust the rear wheels for minimum depth clockwise (more stability). 4. Use washer and lock nut, tighten firmly. 6. Pull the axle bolt, then the wheel from the wheel carriage. 5. Remove the hairpin cotter pin. 5. MAINTENANCE AND...
.... 3. AR25 only 2 8058-025 23 Turn the rear wheel depth/stability control knob clockwise to adjust the rear wheels for minimum depth clockwise (more stability). 4. Use washer and lock nut, tighten firmly. 6. Pull the axle bolt, then the wheel from the wheel carriage. 5. Remove the hairpin cotter pin. 5. MAINTENANCE AND...

Operation Manual
Page 26
U.S. TECHNICAL DATA Torque Specifications Hex Head Cap Screws The torque values shown should be used as a general guideline when specific torque values are not given. Standard Hardware Grade SAE Grade 5 SAE Grade 8 Flangelock Screw w/Flangelock Nut Shank Size (Diameter ...
U.S. TECHNICAL DATA Torque Specifications Hex Head Cap Screws The torque values shown should be used as a general guideline when specific torque values are not given. Standard Hardware Grade SAE Grade 5 SAE Grade 8 Flangelock Screw w/Flangelock Nut Shank Size (Diameter ...
