
Parts List
Page 3
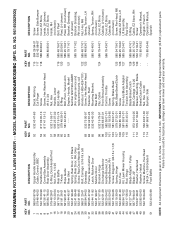
... Nut, Hex Handle, Lower Bolt, Handle E-Ring Bolt, Pivot, Tension Arm Engine, Honda, Model Number GSV190-LAGBH (For engine service and replacement parts, call Honda at 1-800-426-7701) Screw, Hex Washer Head Fastener, Push Mounting Bracket, Rear Skirt Clip, Cable Front Shroud Assembly Control, Throttle Screw Spring, Brake Reset Belt, Blade Brake/Clutch Screw Free Hub/Blade Adapter Tension Arm Assembly, Blade Brake/Clutch Bolt, Carriage 1/4-20 Bracket, Mounting, Blade Brake/Clutch Cable Nut, Hex 1/4-20 Bumper, Side KEY PART NO. HUSQVARNA ROTARY LAWN MOWER - - NO. 96145002900) 3 KEY PART NO...
... Nut, Hex Handle, Lower Bolt, Handle E-Ring Bolt, Pivot, Tension Arm Engine, Honda, Model Number GSV190-LAGBH (For engine service and replacement parts, call Honda at 1-800-426-7701) Screw, Hex Washer Head Fastener, Push Mounting Bracket, Rear Skirt Clip, Cable Front Shroud Assembly Control, Throttle Screw Spring, Brake Reset Belt, Blade Brake/Clutch Screw Free Hub/Blade Adapter Tension Arm Assembly, Blade Brake/Clutch Bolt, Carriage 1/4-20 Bracket, Mounting, Blade Brake/Clutch Cable Nut, Hex 1/4-20 Bumper, Side KEY PART NO. HUSQVARNA ROTARY LAWN MOWER - - NO. 96145002900) 3 KEY PART NO...

Parts List
Page 5
... Washer Head #13 x 3/4 Wheel & Tire Assembly, Front, 8 x 2 Kit, Water Washout Assembly Fitting, Water Washout Washer, Lock, Internal Tooth Locknut, Hex, with O-Ring Belt Keeper, Gearcase, Front Screw, Hi-Lo Thread 5/16 x 1 Pulley Assembly, Idler Screw, Hi-Lo Thread #12 x 5/8 Spring, Tension Nut, Hex Support Bracket Screw Wheel Adjuster Assembly, Front, RH Wheel Adjuster Assembly, Rear, LH Pinion, Rear, 16 Teeth Cover, Dust, Wheel, Rear 5 NOTE: All component dimensions given in U.S. HUSQVARNA ROTARY LAWN MOWER - - NO. 96145002900) KEY PART NO.
... Washer Head #13 x 3/4 Wheel & Tire Assembly, Front, 8 x 2 Kit, Water Washout Assembly Fitting, Water Washout Washer, Lock, Internal Tooth Locknut, Hex, with O-Ring Belt Keeper, Gearcase, Front Screw, Hi-Lo Thread 5/16 x 1 Pulley Assembly, Idler Screw, Hi-Lo Thread #12 x 5/8 Spring, Tension Nut, Hex Support Bracket Screw Wheel Adjuster Assembly, Front, RH Wheel Adjuster Assembly, Rear, LH Pinion, Rear, 16 Teeth Cover, Dust, Wheel, Rear 5 NOTE: All component dimensions given in U.S. HUSQVARNA ROTARY LAWN MOWER - - NO. 96145002900) KEY PART NO.
Operation Manual
Page 2
... be picked up , transporting, adjusting or making repairs, always disconnect spark plug wire and place wire where it should not be maintained in the manual(s) before cleaning the machine, removing the grass catcher, or unclogging the discharge chute. • Mow only in place. • See manufacturer's instructions for the muffler is equipped with good ankle support while mowing. • Do not pull mower backwards unless absolutely necessary. Other...
... be picked up , transporting, adjusting or making repairs, always disconnect spark plug wire and place wire where it should not be maintained in the manual(s) before cleaning the machine, removing the grass catcher, or unclogging the discharge chute. • Mow only in place. • See manufacturer's instructions for the muffler is equipped with good ankle support while mowing. • Do not pull mower backwards unless absolutely necessary. Other...

Operation Manual
Page 3
..., operation, maintenance or parts for the cause. You could expose moving parts or allow objects to make adjustments or repairs with the engine running. • Allow engine to interfere with safety devices. Wrap the blade(s) or wear gloves, and use extra caution when servicing them. • Do not change clothing immediately. • Never overfill fuel tank. Always be sure the equipment is generally a warning of trouble. •...
..., operation, maintenance or parts for the cause. You could expose moving parts or allow objects to make adjustments or repairs with the engine running. • Allow engine to interfere with safety devices. Wrap the blade(s) or wear gloves, and use extra caution when servicing them. • Do not change clothing immediately. • Never overfill fuel tank. Always be sure the equipment is generally a warning of trouble. •...
Operation Manual
Page 4
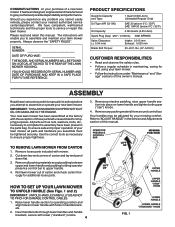
... SERIAL NUMBER AND DATE OF PURCHASE AND KEEP IN A SAFE PLACE FOR FUTURE REFERENCE. ASSEMBLY Read these instructions and this manual. Refer to "ADJUST HANDLE" in handle brackets. 2. Always observe the "SAFETY RULES". Insert handle bolts through lower handles and handle brackets; To ensure safe and proper operation of carton and check carton thorougly for shipping purposes. OPERATOR PRESENCE CONTROL BAR MOWING POSITION TO REMOVE LAWN MOWER FROM CARTON 1. Roll lawn mower out of your lawn mower...
... SERIAL NUMBER AND DATE OF PURCHASE AND KEEP IN A SAFE PLACE FOR FUTURE REFERENCE. ASSEMBLY Read these instructions and this manual. Refer to "ADJUST HANDLE" in handle brackets. 2. Always observe the "SAFETY RULES". Insert handle bolts through lower handles and handle brackets; To ensure safe and proper operation of carton and check carton thorougly for shipping purposes. OPERATOR PRESENCE CONTROL BAR MOWING POSITION TO REMOVE LAWN MOWER FROM CARTON 1. Roll lawn mower out of your lawn mower...

Operation Manual
Page 5
... before using. FRAME HANDLE CONTROL BAR UPPER HANDLE ROPE GUIDE T-KNOB VINYL BINDINGS FIG. 3 FRAME OPENING ENGINE STARTER ROPE FIG. 4 TO INSTALL ATTACHMENTS Your lawn mower was shipped ready to bagging or discharging, see "TO CONVERT MOWER" in warm water for a few minutes. To convert mower to be used as a mulcher. Slip vinyl bindings over frame. Make sure the frame handle is outside of this manual. 5 HANDLE BRACKET FIG. 2 TO ASSEMBLE GRASS CATCHER (See...
... before using. FRAME HANDLE CONTROL BAR UPPER HANDLE ROPE GUIDE T-KNOB VINYL BINDINGS FIG. 3 FRAME OPENING ENGINE STARTER ROPE FIG. 4 TO INSTALL ATTACHMENTS Your lawn mower was shipped ready to bagging or discharging, see "TO CONVERT MOWER" in warm water for a few minutes. To convert mower to be used as a mulcher. Slip vinyl bindings over frame. Make sure the frame handle is outside of this manual. 5 HANDLE BRACKET FIG. 2 TO ASSEMBLE GRASS CATCHER (See...

Operation Manual
Page 6
must be held down to the handle to engage powerpropelled forward motion lawn mower. MULCHER DOOR - OPERATION KNOW YOUR LAWN MOWER. READ THIS OWNER'S MANUAL AND SAFETY RULES BEFORE OPERATING YOUR LAWN MOWER. DRIVE CONTROL LEVERS OPERATOR PRESENCE CONTROL BAR HANDLE KNOB STARTER HANDLE GRASS CATCHER WHEEL HEIGHT ADJUSTER (ON EACH WHEEL) GASOLINE FILLER CAP FUEL SHUTOFF VALVE AIR FILTER DRIVE COVER HOUSING ENGINE OIL CAP WITH DIPSTICK MULCHER DOOR SPARK PLUG IMPORTANT: This lawn mower is acceptable for use of the American National Standards Institute and the U.S. NOTE...
must be held down to the handle to engage powerpropelled forward motion lawn mower. MULCHER DOOR - OPERATION KNOW YOUR LAWN MOWER. READ THIS OWNER'S MANUAL AND SAFETY RULES BEFORE OPERATING YOUR LAWN MOWER. DRIVE CONTROL LEVERS OPERATOR PRESENCE CONTROL BAR HANDLE KNOB STARTER HANDLE GRASS CATCHER WHEEL HEIGHT ADJUSTER (ON EACH WHEEL) GASOLINE FILLER CAP FUEL SHUTOFF VALVE AIR FILTER DRIVE COVER HOUSING ENGINE OIL CAP WITH DIPSTICK MULCHER DOOR SPARK PLUG IMPORTANT: This lawn mower is acceptable for use of the American National Standards Institute and the U.S. NOTE...

Operation Manual
Page 7
... of the operator control. Turn unit off, disconnect spark plug wire from plug. 2. HOW TO USE YOUR LAWN MOWER ENGINE SPEED The engine speed was set at the factory for high cut, adjust cutting height to the handle. There is worn and should be installed on the drive cable. To stop when either drive control lever rearward to suit your drive belt is a turnbuckle on the drive control housing to increase tension on this lawn mower in order to be replaced. OPERATION The operation of any lawn mower can...
... of the operator control. Turn unit off, disconnect spark plug wire from plug. 2. HOW TO USE YOUR LAWN MOWER ENGINE SPEED The engine speed was set at the factory for high cut, adjust cutting height to the handle. There is worn and should be installed on the drive cable. To stop when either drive control lever rearward to suit your drive belt is a turnbuckle on the drive control housing to increase tension on this lawn mower in order to be replaced. OPERATION The operation of any lawn mower can...

Operation Manual
Page 8
...bag using the frame handle. 2. Grass catcher installed. 2. Rear door closed . • Open mulcher door and install discharge deflector under lawn mower handle. 3. SIMPLE STEPS TO REMEMBER WHEN CONVERTING YOUR LAWN MOWER FOR MULCHING 1. REAR DOOR GRASS BAG BRACKET GRASS CATCHER HANDLE UNLOCK LATCH OPEN MULCHER DOOR INSTALL DISCHARGE DEFLECTOR GRASS CATCHER FRAME HOOK FIG. 8 SIDE DISCHARGING (See Fig. 9) • Rear door must be closed . 2. NOTE: Do not drag the bag when emptying; Never attempt to mulching or discharging operation, remove grass catcher and close rear...
...bag using the frame handle. 2. Grass catcher installed. 2. Rear door closed . • Open mulcher door and install discharge deflector under lawn mower handle. 3. SIMPLE STEPS TO REMEMBER WHEN CONVERTING YOUR LAWN MOWER FOR MULCHING 1. REAR DOOR GRASS BAG BRACKET GRASS CATCHER HANDLE UNLOCK LATCH OPEN MULCHER DOOR INSTALL DISCHARGE DEFLECTOR GRASS CATCHER FRAME HOOK FIG. 8 SIDE DISCHARGING (See Fig. 9) • Rear door must be closed . 2. NOTE: Do not drag the bag when emptying; Never attempt to mulching or discharging operation, remove grass catcher and close rear...
Operation Manual
Page 9
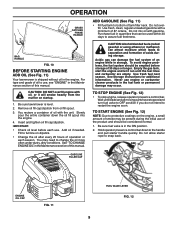
... not mix oil with oil, or it run until blade and all moving parts have stopped and turn fuel valve to OFF position if you do not intend to separation and formation of acids during the initial use . See "TO CHANGE ENGINE OIL" in the engine. BAG HANDLE FIG. 10 BEFORE STARTING ENGINE ADD OIL (See Fig. 11) Your lawnmower is shipped without oil in the Maintenance section of tank filler neck...
... not mix oil with oil, or it run until blade and all moving parts have stopped and turn fuel valve to OFF position if you do not intend to separation and formation of acids during the initial use . See "TO CHANGE ENGINE OIL" in the engine. BAG HANDLE FIG. 10 BEFORE STARTING ENGINE ADD OIL (See Fig. 11) Your lawnmower is shipped without oil in the Maintenance section of tank filler neck...
Operation Manual
Page 10
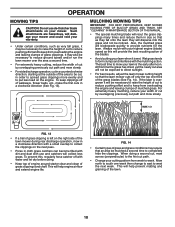
... extremely heavy cutting, reduce the width of the lawn mower during rear discharge operation, mow in order to spread grass clippings more evenly and to form clumps and interferes with use de-thatcher blade attachments on the next pass. • Pores in a clockwise direction (See Fig. 13). SEE "CLEANING" IN MAINTENANCE SECTION OF THIS MANUAL. • The special mulching blade will damage your mower and could...
... extremely heavy cutting, reduce the width of the lawn mower during rear discharge operation, mow in order to spread grass clippings more evenly and to form clumps and interferes with use de-thatcher blade attachments on the next pass. • Pores in a clockwise direction (See Fig. 13). SEE "CLEANING" IN MAINTENANCE SECTION OF THIS MANUAL. • The special mulching blade will damage your mower and could...
Operation Manual
Page 11
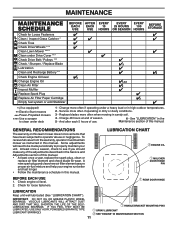
...to clean under a heavy load or in sandy soil. 4 - Check for Loose Fasteners Clean / Inspect Grass Catcher * Check Tires Check Drive Wheels *** Clean Lawn Mower **** Clean under Drive Cover *** Check Drive Belt / Pulleys *** Check / Sharpen / Replace Blade Lubrication Clean and Recharge Battery ** Check Engine Oil level Change Engine Oil Clean Air Filter Inspect Muffler Replace Spark Plug Replace Air Filter Paper Cartridge Empty fuel system or add Stabilizer * (if so equipped) ** Electric-Start mowers *** Power-Propelled mowers **** Use a scraper to see if you should make any of this...
...to clean under a heavy load or in sandy soil. 4 - Check for Loose Fasteners Clean / Inspect Grass Catcher * Check Tires Check Drive Wheels *** Clean Lawn Mower **** Clean under Drive Cover *** Check Drive Belt / Pulleys *** Check / Sharpen / Replace Blade Lubrication Clean and Recharge Battery ** Check Engine Oil level Change Engine Oil Clean Air Filter Inspect Muffler Replace Spark Plug Replace Air Filter Paper Cartridge Empty fuel system or add Stabilizer * (if so equipped) ** Electric-Start mowers *** Power-Propelled mowers **** Use a scraper to see if you should make any of this...

Operation Manual
Page 12
... Nm). Remove debris shield. NOTE: Remove the blade adapter and check the key inside hub of your mower is balanced. MAINTENANCE LAWN MOWER Always observe safety rules when performing any trash or grass cuttings from inside the dust cover, pinion and/or drive wheel gear teeth. 4. TIRES • Keep tires free of wood between blade and mower housing to clean the drive wheels, be kept sharp. Install debris shield. 3. Use block of gasoline, oil, or insect control chemicals...
... Nm). Remove debris shield. NOTE: Remove the blade adapter and check the key inside hub of your mower is balanced. MAINTENANCE LAWN MOWER Always observe safety rules when performing any trash or grass cuttings from inside the dust cover, pinion and/or drive wheel gear teeth. 4. TIRES • Keep tires free of wood between blade and mower housing to clean the drive wheels, be kept sharp. Install debris shield. 3. Use block of gasoline, oil, or insect control chemicals...

Operation Manual
Page 13
... catcher needs replacing, replace only with plug. 2. GEAR CASES • To keep your expected operating temperature. The only time the lubricant needs attention is balanced. Select the oil's SAE viscosity grade according to avoid possible engine damage from spark plug and place wire where it reads full. TO CHANGE ENGINE OIL (See Figs. 17 & 18) NOTE: Before tipping lawn mower to retighten oil fill cap/dipstick before starting engine. 9. Disconnect spark plug wire from running engine...
... catcher needs replacing, replace only with plug. 2. GEAR CASES • To keep your expected operating temperature. The only time the lubricant needs attention is balanced. Select the oil's SAE viscosity grade according to avoid possible engine damage from spark plug and place wire where it reads full. TO CHANGE ENGINE OIL (See Figs. 17 & 18) NOTE: Before tipping lawn mower to retighten oil fill cap/dipstick before starting engine. 9. Disconnect spark plug wire from running engine...
Operation Manual
Page 14
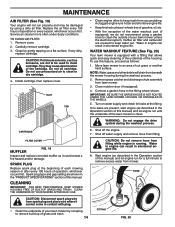
... grass and trash. 14 FITTING FIG. 20 Spark plug type and gap setting are present, start engine (as follows: 1. Start engine (as it cannot come in shortened engine life. TO CLEAN AIR FILTER 1. Do not oil cartridge. IMPORTANT: BE SURE THE GARDEN HOSE IS NOT ROUTED UNDER THE LAWN MOWER HOUSING OR ENTANGLED IN THE WHEELS. 5. Shut off the engine. 7. WATER WASHOUT FEATURE (See Fig. 20) Your lawn mower is running. MAINTENANCE AIR FILTER (See Fig. 19) Your engine will drain...
... grass and trash. 14 FITTING FIG. 20 Spark plug type and gap setting are present, start engine (as follows: 1. Start engine (as it cannot come in shortened engine life. TO CLEAN AIR FILTER 1. Do not oil cartridge. IMPORTANT: BE SURE THE GARDEN HOSE IS NOT ROUTED UNDER THE LAWN MOWER HOUSING OR ENTANGLED IN THE WHEELS. 5. Shut off the engine. 7. WATER WASHOUT FEATURE (See Fig. 20) Your lawn mower is running. MAINTENANCE AIR FILTER (See Fig. 19) Your engine will drain...
Operation Manual
Page 15
... the Operation section of your mower, is empty. 1. SIDE BUMPER REAR BAFFLE DRIVE COVER DEBRIS SHIELD BLADE BLADE SCREW FIG. 21 15 FRONT BAFFLE tor up. 2. Make sure the blade and all moving parts have completely stopped. 3. REAR DEFLECTOR The rear deflector, attached between the rear wheels of this manual. LAWN MOWER TO ADJUST CUTTING HEIGHT See "TO ADJUST CUTTING HEIGHT" in contact with air filter and carbure- Replace the rear deflector if damaged. Turn lawn mower on its side with plug. SERVICE AND ADJUSTMENTS CAUTION...
... the Operation section of your mower, is empty. 1. SIDE BUMPER REAR BAFFLE DRIVE COVER DEBRIS SHIELD BLADE BLADE SCREW FIG. 21 15 FRONT BAFFLE tor up. 2. Make sure the blade and all moving parts have completely stopped. 3. REAR DEFLECTOR The rear deflector, attached between the rear wheels of this manual. LAWN MOWER TO ADJUST CUTTING HEIGHT See "TO ADJUST CUTTING HEIGHT" in contact with air filter and carbure- Replace the rear deflector if damaged. Turn lawn mower on its side with plug. SERVICE AND ADJUSTMENTS CAUTION...

Operation Manual
Page 16
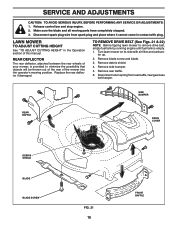
... in blade adapter/engine pulley and crankshaft keyway are aligned; Reinstall blade. Disconnect cable from idler assembly. 13. Be sure the new belt is inside the tabs of the new belt through idler assembly to front gearcase pulley. 4. and that the new belt is 35-40 ft. Install new belt on front gearcase pulley. 8. Return mower to rear baffle / rear gearcase belt keeper. 13. Reattach spark plug wire to rear gearcase. 12. Remove front belt keeper. 11. Reinstall rear baffle. 14. Remove drive cover. 10. Route...
... in blade adapter/engine pulley and crankshaft keyway are aligned; Reinstall blade. Disconnect cable from idler assembly. 13. Be sure the new belt is inside the tabs of the new belt through idler assembly to front gearcase pulley. 4. and that the new belt is 35-40 ft. Install new belt on front gearcase pulley. 8. Return mower to rear baffle / rear gearcase belt keeper. 13. Reattach spark plug wire to rear gearcase. 12. Remove front belt keeper. 11. Reinstall rear baffle. 14. Remove drive cover. 10. Route...
Operation Manual
Page 17
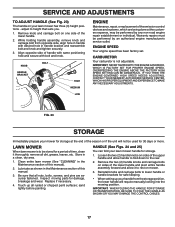
...-road engine repair establishment or individual. Remove knob and carriage bolt on sides of the lower handle. 2. IF YOU THINK THE ENGINE-GOVERNED HIGH SPEED NEEDS ADJUSTING, CONTACT YOUR NEAREST AUTHORIZED SERVICE CENTER, WHICH HAS PROPER EQUIPMENT AND EXPERIENCE TO MAKE ANY NECESSARY ADJUSTMENTS. Clean entire lawn mower (See "CLEANING" in handle bracket and reassemble bolt and knob and tighten securely. 3. KNOB HANDLE BRACKET BOLT HIGH MEDIUM LOW ENGINE Maintenance, repair, or replacement of the emission control...
...-road engine repair establishment or individual. Remove knob and carriage bolt on sides of the lower handle. 2. IF YOU THINK THE ENGINE-GOVERNED HIGH SPEED NEEDS ADJUSTING, CONTACT YOUR NEAREST AUTHORIZED SERVICE CENTER, WHICH HAS PROPER EQUIPMENT AND EXPERIENCE TO MAKE ANY NECESSARY ADJUSTMENTS. Clean entire lawn mower (See "CLEANING" in handle bracket and reassemble bolt and knob and tighten securely. 3. KNOB HANDLE BRACKET BOLT HIGH MEDIUM LOW ENGINE Maintenance, repair, or replacement of the emission control...
Operation Manual
Page 18
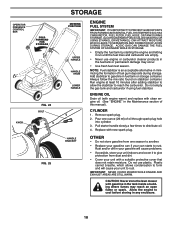
... FIG. 24 BOLT FIG. 25 STORAGE MOWING POSITION UPPER HANDLE HANDLE KNOB LOWER HANDLE HANDLE BRACKET ENGINE FUEL SYSTEM IMPORTANT: IT IS IMPORTANT TO PREVENT GUM DEPOSITS FROM FORMING IN ESSENTIAL FUEL SYSTEM PARTS SUCH AS CARBURETOR, FUEL FILTER, FUEL HOSE, OR TANK DURING STORAGE. Run engine at least 10 minutes after adding stabilizer to allow the stabilizer to distribute oil. 4. Remove spark plug. 2. CAUTION: Never store the lawn mower with a suitable protective cover that does...
... FIG. 24 BOLT FIG. 25 STORAGE MOWING POSITION UPPER HANDLE HANDLE KNOB LOWER HANDLE HANDLE BRACKET ENGINE FUEL SYSTEM IMPORTANT: IT IS IMPORTANT TO PREVENT GUM DEPOSITS FROM FORMING IN ESSENTIAL FUEL SYSTEM PARTS SUCH AS CARBURETOR, FUEL FILTER, FUEL HOSE, OR TANK DURING STORAGE. Run engine at least 10 minutes after adding stabilizer to allow the stabilizer to distribute oil. 4. Remove spark plug. 2. CAUTION: Never store the lawn mower with a suitable protective cover that does...
Operation Manual
Page 19
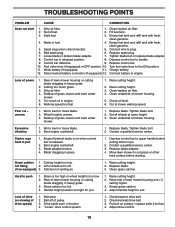
TROUBLESHOOTING POINTS PROBLEM CAUSE CORRECTION Does not start 1. Clean/replace air filter. 2. Empty fuel tank and refill tank with fresh, clean gasoline. 4. Bad spark plug. 6. Control bar in OFF position. 10. Fuel valve lever (if equipped) in released position. 8. Connect battery to push 1. Walking speed too fast. 1. Raise cutting height. 2. Check oil level. 6. Cut at same height. 3. uneven 1. Wheel heights uneven. 3. Replace blade. not filling 2. Belt wear. 2. Fill fuel tank. 3. Water in engine. 6. Tighten blade bolt or replace blade adapter....
TROUBLESHOOTING POINTS PROBLEM CAUSE CORRECTION Does not start 1. Clean/replace air filter. 2. Empty fuel tank and refill tank with fresh, clean gasoline. 4. Bad spark plug. 6. Control bar in OFF position. 10. Fuel valve lever (if equipped) in released position. 8. Connect battery to push 1. Walking speed too fast. 1. Raise cutting height. 2. Check oil level. 6. Cut at same height. 3. uneven 1. Wheel heights uneven. 3. Replace blade. not filling 2. Belt wear. 2. Fill fuel tank. 3. Water in engine. 6. Tighten blade bolt or replace blade adapter....


