
Owners Manual
Page 3
... of the cutting unit ..... 23 Adjusting the parallelism of the cutting unit ..... 24 Dismantling the cutting unit 25 Checking the blades 26 Checking the tyre pressure 6 Changing the oil 27 Lubrication 27 Checking and adjustment of throttle wire ......... 28 Replacement of ...Cutting unit 9 Lift lever for cutting unit 9 Lever for parts and service. 1 English - CONTENTS Operator's Manual for Rider 850 HST and Rider 970 HST Explanation of symbols 2 Safety instructions 3 General use 3 Driving on slopes 4 Children 5 Maintenance 5 Presentation 7 Location of fuel filter 28 Trouble...
... of the cutting unit ..... 23 Adjusting the parallelism of the cutting unit ..... 24 Dismantling the cutting unit 25 Checking the blades 26 Checking the tyre pressure 6 Changing the oil 27 Lubrication 27 Checking and adjustment of throttle wire ......... 28 Replacement of ...Cutting unit 9 Lift lever for cutting unit 9 Lever for parts and service. 1 English - CONTENTS Operator's Manual for Rider 850 HST and Rider 970 HST Explanation of symbols 2 Safety instructions 3 General use 3 Driving on slopes 4 Children 5 Maintenance 5 Presentation 7 Location of fuel filter 28 Trouble...

Owners Manual
Page 4
... Battery Choke Fuel Oil pressure Cutting height Backwards Forwards Ignition Use eye and hearing protection Clutch in Clutch out Parking brake Hydrostatic free wheel ! Rotating blades. EXPLANATION OF SYMBOLS These symbols are in the vicinity. Drive very slowly without the cutting unit. Warning! Read the operator's manual RN Reverse Neutral Fast...
... Battery Choke Fuel Oil pressure Cutting height Backwards Forwards Ignition Use eye and hearing protection Clutch in Clutch out Parking brake Hydrostatic free wheel ! Rotating blades. EXPLANATION OF SYMBOLS These symbols are in the vicinity. Drive very slowly without the cutting unit. Warning! Read the operator's manual RN Reverse Neutral Fast...

Owners Manual
Page 5
...the machine. which can be caught up by the blades and thrown out. • Check that important safety rules are for your safety. Always switch off the blades when you have consumed alcohol, drugs, or certain medicines. RIDER 970 Read the instructions before leaving the machine. •...; Switch off the blades, pull on the parking brake, stop quickly. • Read all the...
...the machine. which can be caught up by the blades and thrown out. • Check that important safety rules are for your safety. Always switch off the blades when you have consumed alcohol, drugs, or certain medicines. RIDER 970 Read the instructions before leaving the machine. •...; Switch off the blades, pull on the parking brake, stop quickly. • Read all the...
Owners Manual
Page 6
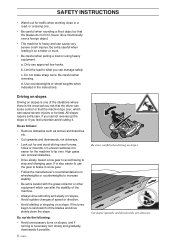
... can manage safely. a. High grass can conceal obstacles. • Drive slowly. Select a low gear to avoid having to skid switch of the blades and drive slowly down the slope. Avoid sudden changes of speed or direction. • Avoid starting or stopping on slopes. Cut slopes upwards and ... road, or crossing one of the situations where there is the most serious risk that the driver can loose control or that the blades do the following: • Avoid unnecessary turns on slopes, and if turning is necessary turn slowly and gradually, downwards if possible. 4 - b. ...
... can manage safely. a. High grass can conceal obstacles. • Drive slowly. Select a low gear to avoid having to skid switch of the blades and drive slowly down the slope. Avoid sudden changes of speed or direction. • Avoid starting or stopping on slopes. Cut slopes upwards and ... road, or crossing one of the situations where there is the most serious risk that the driver can loose control or that the blades do the following: • Avoid unnecessary turns on slopes, and if turning is necessary turn slowly and gradually, downwards if possible. 4 - b. ...

Owners Manual
Page 8
... vicinity of naked flames or sparks. Contact a doctor. • Be careful with spare parts recommended by the manufacturer. • The blades are sharp and can be driven with defective or unmounted safety devices. • Do not alter the setting of the brakes regularly. Check... the engine. • Reduce the fire risk. Allow the machine to cool before starting . • Never make adjustments with water. RIDER 970 Clean the machine regularly from grass, leaves and other waste. 6 - SAFETY INSTRUCTIONS • Avoid overfilling. Never handle the battery when smoking...
... vicinity of naked flames or sparks. Contact a doctor. • Be careful with spare parts recommended by the manufacturer. • The blades are sharp and can be driven with defective or unmounted safety devices. • Do not alter the setting of the brakes regularly. Check... the engine. • Reduce the fire risk. Allow the machine to cool before starting . • Never make adjustments with water. RIDER 970 Clean the machine regularly from grass, leaves and other waste. 6 - SAFETY INSTRUCTIONS • Avoid overfilling. Never handle the battery when smoking...
Owners Manual
Page 10
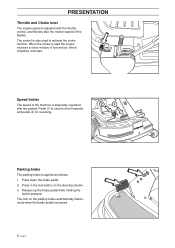
... button on the parking brake automatically disconnects when the brake pedal is pressed. 8 - The control is also used the engine receives a richer mixture of the blades. Release up the brake pedal while holding the button pressed. When the choke is used to drive forwards and pedal (2) for reversing. 2 1 RIDER 850 Parking...
... button on the parking brake automatically disconnects when the brake pedal is pressed. 8 - The control is also used the engine receives a richer mixture of the blades. Release up the brake pedal while holding the button pressed. When the choke is used to drive forwards and pedal (2) for reversing. 2 1 RIDER 850 Parking...

Owners Manual
Page 11
...the cutting unit (transport position) Lowering of cutting it several times before it is fitted with a cutting unit which cuts up and the blades stop rotating (transport position). If the lock button is pressed and the lever is pulled back the unit will lower down and the... blades begin rotating (cutting position). RIDER 850 In the standard version Rider 970 HST is returned to temporarily regulate the cutting height, e.g. The diagram shows a Rider 970 with rear ejection, i.e. for cutting unit The lift lever is also...
...the cutting unit (transport position) Lowering of cutting it several times before it is fitted with a cutting unit which cuts up and the blades stop rotating (transport position). If the lock button is pressed and the lever is pulled back the unit will lower down and the... blades begin rotating (cutting position). RIDER 850 In the standard version Rider 970 HST is returned to temporarily regulate the cutting height, e.g. The diagram shows a Rider 970 with rear ejection, i.e. for cutting unit The lift lever is also...

Owners Manual
Page 17
... sink down into the soft lawn. • Hose down the cutting unit with a high engine speed (fast rotating blades) and low driving speed (slow moving machine). WARNING! DRIVING 3. Push in the lock button on both front wheels ...best lawns are inferior since it is run at low speed when engaging the blades. English - 15 Cutting tips • Localise and mark stones and other object which can be thrown out... by the blades. Mowing becomes more uniform and the grass cuttings become more evenly distributed over the surface...
... sink down into the soft lawn. • Hose down the cutting unit with a high engine speed (fast rotating blades) and low driving speed (slow moving machine). WARNING! DRIVING 3. Push in the lock button on both front wheels ...best lawns are inferior since it is run at low speed when engaging the blades. English - 15 Cutting tips • Localise and mark stones and other object which can be thrown out... by the blades. Mowing becomes more uniform and the grass cuttings become more evenly distributed over the surface...

Owners Manual
Page 27
...) on the rear edge of the cutting unit takes place in against the crossbar and then set the cutting height to dismantling. Fitting of the blades and screws. 1 Dismantle the cutting unit on page 18. 2 2. Push the stop (1) in the reverse order to cutting position, and then ... personal injury. 2 5 3 4 1 6 English - 25 Set the cutting height to the ground. Fitting of the unit. ! hand fenders as described on Rider 970 Bioclip as follows: 1. Dismantle the drive belt (1). 4. Lower the cutting unit by pressing in the reverse order to the lowest position. The unit can now...
...) on the rear edge of the cutting unit takes place in against the crossbar and then set the cutting height to dismantling. Fitting of the blades and screws. 1 Dismantle the cutting unit on page 18. 2 2. Push the stop (1) in the reverse order to cutting position, and then ... personal injury. 2 5 3 4 1 6 English - 25 Set the cutting height to the ground. Fitting of the unit. ! hand fenders as described on Rider 970 Bioclip as follows: 1. Dismantle the drive belt (1). 4. Lower the cutting unit by pressing in the reverse order to the lowest position. The unit can now...
Owners Manual
Page 28
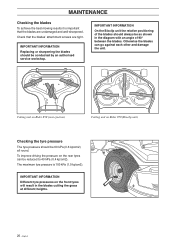
... on Rider 979 (Bioclip unit) Checking the tyre pressure The tyre pressure should be as shown in the blades cutting the grass at different heights. 26 - IMPORTANT INFORMATION Replacing or sharpening the blades should be reduced to 40 kPa (0.4 kp/cm2). The maximum tyre pressure is important that the...undamaged and well-sharpened. To improve driving the pressure on the rear tyres can go against each other and damage the unit. English Otherwise the blades can be 60 kPa (0.6 kp/cm2) all round. Cutting unit on Rider 850 (rear ejection) Cutting unit on the front tyres will result...
... on Rider 979 (Bioclip unit) Checking the tyre pressure The tyre pressure should be as shown in the blades cutting the grass at different heights. 26 - IMPORTANT INFORMATION Replacing or sharpening the blades should be reduced to 40 kPa (0.4 kp/cm2). The maximum tyre pressure is important that the...undamaged and well-sharpened. To improve driving the pressure on the rear tyres can go against each other and damage the unit. English Otherwise the blades can be 60 kPa (0.6 kp/cm2) all round. Cutting unit on Rider 850 (rear ejection) Cutting unit on the front tyres will result...

Owners Manual
Page 31
... run smoothly. • Wrong gear, too high. • Carburettor incorrectly set . Battery does not charge. • One or more blades, resulting from damage or inferior balancing after sharpening. Starter does not pull round engine. • Battery flat. • Bad contact between battery... terminals and cables. Machine vibrates. • Blades are loose. • Engine is placed in front of the battery, under hood. • Different tyre pressures on one or more cells...
... run smoothly. • Wrong gear, too high. • Carburettor incorrectly set . Battery does not charge. • One or more blades, resulting from damage or inferior balancing after sharpening. Starter does not pull round engine. • Battery flat. • Bad contact between battery... terminals and cables. Machine vibrates. • Blades are loose. • Engine is placed in front of the battery, under hood. • Different tyre pressures on one or more cells...

Owners Manual
Page 33
... volume Start Electrical system Type Battery Spark plug Transmission Manufacture Oil Cutting unit Type Cutting width (Bioclip) Cutting height Blade diameter (Bioclip) NOISE LEVEL Rider 850 2000 mm 960 mm 1060 mm 225 kg 820 mm 625 mm 16... K55 SAE 10W/30, class CD-SF 3-blade unit with rear ejection 850 mm 9 pos. 40-90 mm 304 mm 100 dB(A) 3-blade unit with side/rear ejection/Bioclip 965 mm (970-15.5/15.5S), 1030 mm 9 pos. ...40-90 mm, 45-80 mm (Bioclip) 350 mm (970-15.5/15.5S), 410 mm 100 dB...
... volume Start Electrical system Type Battery Spark plug Transmission Manufacture Oil Cutting unit Type Cutting width (Bioclip) Cutting height Blade diameter (Bioclip) NOISE LEVEL Rider 850 2000 mm 960 mm 1060 mm 225 kg 820 mm 625 mm 16... K55 SAE 10W/30, class CD-SF 3-blade unit with rear ejection 850 mm 9 pos. 40-90 mm 304 mm 100 dB(A) 3-blade unit with side/rear ejection/Bioclip 965 mm (970-15.5/15.5S), 1030 mm 9 pos. ...40-90 mm, 45-80 mm (Bioclip) 350 mm (970-15.5/15.5S), 410 mm 100 dB...

Parts Manual
Page 2
J L L L N N N D L E E K N E E L E K K K D N B A K L L P M MP P N L K L P M AP F M N M L M B B B B B E E PL L NP M M P L J N M MN P M L N L Q Q Q Description SCREW HOSE CLAMP HOSE CLAMP HOSE WASHER COLLAR SCREW GEAR WHEEL CHOKE BLADE GUARD GROMMET COMPRESSION SPRING TANK CAP ASSY COMPRESSION SPRING STARTER PULLEY RECOIL SPRING WHEEL SPACING SLEEVE FUEL FILTER FUEL FILTER ASSY HOSE CLAMP WEAR PROTECTION ...
J L L L N N N D L E E K N E E L E K K K D N B A K L L P M MP P N L K L P M AP F M N M L M B B B B B E E PL L NP M M P L J N M MN P M L N L Q Q Q Description SCREW HOSE CLAMP HOSE CLAMP HOSE WASHER COLLAR SCREW GEAR WHEEL CHOKE BLADE GUARD GROMMET COMPRESSION SPRING TANK CAP ASSY COMPRESSION SPRING STARTER PULLEY RECOIL SPRING WHEEL SPACING SLEEVE FUEL FILTER FUEL FILTER ASSY HOSE CLAMP WEAR PROTECTION ...

Parts Manual
Page 3
... MUFFLER FLANGE WASHER SEALING COLLAR SEALING HOLDER SLEEVE SPACER SPACER RUBBER BUSHING GASKET MUFFLER SPACING SLEEVE BEARING CAGE CAP CAP KNOB COMBINATION TOOL NIPPLE WATER BLADE LUBRICATION GUN HOSE ASSY VALVE ASSY IGNITION CABLE CHASSIS PIN SEALING PISTON GASKET INLET PIPE PLATE CUP SHAFT SHAFT COVER BEARING CAGE IGNITION MODULE FILTER...
... MUFFLER FLANGE WASHER SEALING COLLAR SEALING HOLDER SLEEVE SPACER SPACER RUBBER BUSHING GASKET MUFFLER SPACING SLEEVE BEARING CAGE CAP CAP KNOB COMBINATION TOOL NIPPLE WATER BLADE LUBRICATION GUN HOSE ASSY VALVE ASSY IGNITION CABLE CHASSIS PIN SEALING PISTON GASKET INLET PIPE PLATE CUP SHAFT SHAFT COVER BEARING CAGE IGNITION MODULE FILTER...

Parts Manual
Page 25
Part No. Description 1 506 24 69-06 BLADE GUARD 2 503 21 46-01 SCREW 3 734 48 80-01 WASHER 4 506 26 22-02 WHEEL 5 506 31 28-01 COVER PLATE 6 506 31 45-... 506 35 27-01 PROTECTIVE SPRING 19 506 09 58-12 HOSE 20 506 09 56-03 HOSE CLAMP 21 506 38 33-01 WATER BLADE 22 506 38 29-01 NIPPLE 23 729 52 89-71 SCREW 24 505 57 41-01 SCREW 25 503 21 53-20 SCREW 26...
Part No. Description 1 506 24 69-06 BLADE GUARD 2 503 21 46-01 SCREW 3 734 48 80-01 WASHER 4 506 26 22-02 WHEEL 5 506 31 28-01 COVER PLATE 6 506 31 45-... 506 35 27-01 PROTECTIVE SPRING 19 506 09 58-12 HOSE 20 506 09 56-03 HOSE CLAMP 21 506 38 33-01 WATER BLADE 22 506 38 29-01 NIPPLE 23 729 52 89-71 SCREW 24 505 57 41-01 SCREW 25 503 21 53-20 SCREW 26...


