
Owners Manual
Page 3
...use and maintain the machine before using it. For servicing other than described in this manual contact an authorised dealer for adjustment of cutting height 10 Seat,Rider 850 HST 10 Seat, Rider 970 HST 11 Fuelling 11 Driving 12 Before starting 12 Starting the engine 12 Driving the machine 14... Cutting tips 15 Stopping the engine 16 Maintenance 17 Maintenance schedule 17 Dismantling of the machine hoods 18 Checking the engine's oil level...
...use and maintain the machine before using it. For servicing other than described in this manual contact an authorised dealer for adjustment of cutting height 10 Seat,Rider 850 HST 10 Seat, Rider 970 HST 11 Fuelling 11 Driving 12 Before starting 12 Starting the engine 12 Driving the machine 14... Cutting tips 15 Stopping the engine 16 Maintenance 17 Maintenance schedule 17 Dismantling of the machine hoods 18 Checking the engine's oil level...

Owners Manual
Page 4
... vicinity. Starting instructions Read the instructions Check the engine's oil level Check the hydrostat's oil level Lift up the cutting unit Put the gear shift/hydrostat pedal in neutral Brake If the engine is running. Warning! Drive very slowly without the...before driving Speed limiter pedal forwards Neutral Speed limiter pedal reverse Switch off the engine and take off Battery Choke Fuel Oil pressure Cutting height Backwards Forwards Ignition Use eye and hearing protection Clutch in Clutch out Parking brake Hydrostatic free wheel ! Brake Warning Soundlevel Warning...
... vicinity. Starting instructions Read the instructions Check the engine's oil level Check the hydrostat's oil level Lift up the cutting unit Put the gear shift/hydrostat pedal in neutral Brake If the engine is running. Warning! Drive very slowly without the...before driving Speed limiter pedal forwards Neutral Speed limiter pedal reverse Switch off the engine and take off Battery Choke Fuel Oil pressure Cutting height Backwards Forwards Ignition Use eye and hearing protection Clutch in Clutch out Parking brake Hydrostatic free wheel ! Brake Warning Soundlevel Warning...

Owners Manual
Page 5
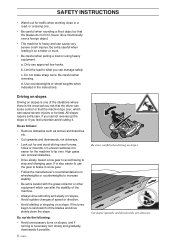
...the area from stones etc. RIDER 850 RIDER 850 Never carry passengers. ! This symbol implies that there are familiar with the controls and how to cut. • Stop the machine if anyone . • Slow down before starting the machine. Always switch off the blades, pull on the machine... before leaving the machine. • Switch off hands and feet, and eject objects. RIDER 970 Read the instructions before starting to stop the engine and take out the keys before starting it. General use: • Make yourself familiar with ...
...the area from stones etc. RIDER 850 RIDER 850 Never carry passengers. ! This symbol implies that there are familiar with the controls and how to cut. • Stop the machine if anyone . • Slow down before starting the machine. Always switch off the blades, pull on the machine... before leaving the machine. • Switch off hands and feet, and eject objects. RIDER 970 Read the instructions before starting to stop the engine and take out the keys before starting it. General use: • Make yourself familiar with ...
Owners Manual
Page 6
... recommendations on wheelweights or counterweights to stop and changing gear. Do as follows: • Remove obstacles such as stones and branches etc. • Cut upwards and downwards, not sideways. • Look out for and avoid driving over a foreign object. • The machine is necessary turn slowly ... Never drive intentionally over furrows, holes or mounds. All slopes require extra care. If the tyres begin to what you feel uncertain avoid cutting it on slopes is one . • Be careful when rounding a fixed object so that the machine tips over, which can cause ...
... recommendations on wheelweights or counterweights to stop and changing gear. Do as follows: • Remove obstacles such as stones and branches etc. • Cut upwards and downwards, not sideways. • Look out for and avoid driving over a foreign object. • The machine is necessary turn slowly ... Never drive intentionally over furrows, holes or mounds. All slopes require extra care. If the tyres begin to what you feel uncertain avoid cutting it on slopes is one . • Be careful when rounding a fixed object so that the machine tips over, which can cause ...

Owners Manual
Page 7
...the machine with fuel in the vicinity of naked flames or sparks. If leakage has occurred in a boiler room or where there is rectified. RIDER 970 Never fill up with fuel indoors. Never assume that the machine slides. • Do not try to corners, bushes, trees or other objects ...in containers approved for small children. • Never allow children to expand since the heat from the mowing area. SAFETY INSTRUCTIONS • Do not cut wet grass. The machine can occur if the driver does not pay attention to run over the edge of the machine. • Never allow children...
...the machine with fuel in the vicinity of naked flames or sparks. If leakage has occurred in a boiler room or where there is rectified. RIDER 970 Never fill up with fuel indoors. Never assume that the machine slides. • Do not try to corners, bushes, trees or other objects ...in containers approved for small children. • Never allow children to expand since the heat from the mowing area. SAFETY INSTRUCTIONS • Do not cut wet grass. The machine can occur if the driver does not pay attention to run over the edge of the machine. • Never allow children...

Owners Manual
Page 8
... the machine to cool before starting the engine. Rinse immediately with the engine running. • The parts on the skin can cause cutting injuries. Never drive the machine in an enclosed space. If necessary repair the machine before placing it in it has evaporated before starting .... • Never make adjustments with water. RIDER 970 Clean the machine regularly from grass, leaves and other waste. 6 - Spilling acid on the grass collector can become worn, damaged and ...
... the machine to cool before starting the engine. Rinse immediately with the engine running. • The parts on the skin can cause cutting injuries. Never drive the machine in an enclosed space. If necessary repair the machine before placing it in it has evaporated before starting .... • Never make adjustments with water. RIDER 970 Clean the machine regularly from grass, leaves and other waste. 6 - Spilling acid on the grass collector can become worn, damaged and ...
Owners Manual
Page 9
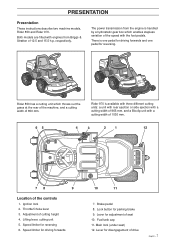
... for reversing 6. Lever for disengagement of 12.5 and 15.5 h.p. Fuel tank cap 11. RIDER 850 RIDER 850 RIDER 970 Rider 850 has a cutting unit which enables stepless variation of seat 10. Brake pedal 8. Rider 970 is one pedal for driving forwards and one pedal for driving forwards 10 11 7. Throttle/Choke lever 3. Adjustment...
... for reversing 6. Lever for disengagement of 12.5 and 15.5 h.p. Fuel tank cap 11. RIDER 850 RIDER 850 RIDER 970 Rider 850 has a cutting unit which enables stepless variation of seat 10. Brake pedal 8. Rider 970 is one pedal for driving forwards and one pedal for driving forwards 10 11 7. Throttle/Choke lever 3. Adjustment...

Owners Manual
Page 11
... in transport or cutting position. Lifting of the cutting unit (transport position) Lowering of cutting it several times before it is used to set the cutting unit in the lawn. The diagram shows a Rider 970 with rear ejection, i.e. If the lever is fitted with a cutting unit which cuts up and the ... is pulled back the unit will lower down and the blades begin rotating (cutting position). Rider 970 is moved forward the unit will lift up the grass finely by means of the cutting unit (cutting position) 9 English - If the lock button is pressed and the lever is also available...
... in transport or cutting position. Lifting of the cutting unit (transport position) Lowering of cutting it several times before it is used to set the cutting unit in the lawn. The diagram shows a Rider 970 with rear ejection, i.e. If the lever is fitted with a cutting unit which cuts up and the ... is pulled back the unit will lower down and the blades begin rotating (cutting position). Rider 970 is moved forward the unit will lift up the grass finely by means of the cutting unit (cutting position) 9 English - If the lock button is pressed and the lever is also available...

Owners Manual
Page 12
Seat, Rider 850 HST The seat has a jointed attachment on the front edge and can be adjusted lengthways. PRESENTATION Lever for adjustment of cutting height With this lever the cutting height can be adjusted to the required position. 10 - English To adjust the lever under the seat it is moved forwards to the left, after which the seat can also be tipped forward. The seat can be moved forwards or backwards to 9 different positions (4-90 mm, 45-80 mm Bioclip).
Seat, Rider 850 HST The seat has a jointed attachment on the front edge and can be adjusted lengthways. PRESENTATION Lever for adjustment of cutting height With this lever the cutting height can be adjusted to the required position. 10 - English To adjust the lever under the seat it is moved forwards to the left, after which the seat can also be tipped forward. The seat can be moved forwards or backwards to 9 different positions (4-90 mm, 45-80 mm Bioclip).

Owners Manual
Page 14
... page 17). Apply the parking brake. In this position the engine receives a richer mixture so that the engine starts more easily. 1 2 3 12 - Lift up the cutting unit by pulling the lever backwards to the required position. Starting the engine 1. The parking brake lock disconnects automatically when the brake pedal is held...
... page 17). Apply the parking brake. In this position the engine receives a richer mixture so that the engine starts more easily. 1 2 3 12 - Lift up the cutting unit by pulling the lever backwards to the required position. Starting the engine 1. The parking brake lock disconnects automatically when the brake pedal is held...

Owners Manual
Page 15
... neutral position. IMPORTANT INFORMATION Do not run the engine indoors, in enclosed or poorly ventilated areas. The exhaust fumes contain toxic carbon monoxide. WARNING! For cutting 3/4 to start , wait about 5 seconds at a time. Turn the ignition key to full throttle. ! DRIVING Warm engine: 4. Set the throttle control midway between position 1 and...
... neutral position. IMPORTANT INFORMATION Do not run the engine indoors, in enclosed or poorly ventilated areas. The exhaust fumes contain toxic carbon monoxide. WARNING! For cutting 3/4 to start , wait about 5 seconds at a time. Turn the ignition key to full throttle. ! DRIVING Warm engine: 4. Set the throttle control midway between position 1 and...

Owners Manual
Page 17
...by the blades. WARNING! For this reason do not increase the throttle until the required cutting result are obtained. • The cutting results are equal on the lift lever and lower down the cutting unit with a high engine speed (fast rotating blades) and low driving speed (slow ...mowing a wet lawn. Clear the lawn from stones and other fixed objects to avoid collision. • Start with a high cutting height and reduce down until the cutting unit has been lowered to select a higher driving speed without noticeably affecting the mowing results. • The best lawns are ...
...by the blades. WARNING! For this reason do not increase the throttle until the required cutting result are obtained. • The cutting results are equal on the lift lever and lower down the cutting unit with a high engine speed (fast rotating blades) and low driving speed (slow ...mowing a wet lawn. Clear the lawn from stones and other fixed objects to avoid collision. • Start with a high cutting height and reduce down until the cutting unit has been lowered to select a higher driving speed without noticeably affecting the mowing results. • The best lawns are ...

Owners Manual
Page 18
... engine to idle for a minute to the STOP position. MAX 15° 2. STOP START Release lever In order to the end position. Lift up the cutting unit by pulling the lever back to move the machine when the engine is switched off the release lever must be pressed down and forwards...
... engine to idle for a minute to the STOP position. MAX 15° 2. STOP START Release lever In order to the end position. Lift up the cutting unit by pulling the lever back to move the machine when the engine is switched off the release lever must be pressed down and forwards...
Owners Manual
Page 19
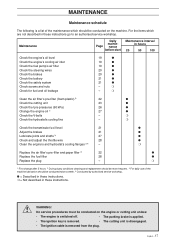
... 2) During dusty conditions cleaning and replacement should be more frequent. 3) For daily use of the machine lubrication should be conducted on the engine or cutting unit unless: • The engine is switched off. • The parking brake is applied. • The ignition key is removed. • The... cutting unit is disengaged. • The ignition cable is a list of the maintenance which are not described in these instructions go to an authorised service...
... 2) During dusty conditions cleaning and replacement should be more frequent. 3) For daily use of the machine lubrication should be conducted on the engine or cutting unit unless: • The engine is switched off. • The parking brake is applied. • The ignition key is removed. • The... cutting unit is disengaged. • The ignition cable is a list of the maintenance which are not described in these instructions go to an authorised service...
Owners Manual
Page 23
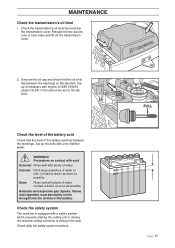
... seat. Check the safety system The machine is equipped with only distilled water. ! WARNING! Top up the cells with a safety system which prevents starting the cutting unit or driving the machine unless someone is sitting in the same hole as for the dip stick.
... seat. Check the safety system The machine is equipped with only distilled water. ! WARNING! Top up the cells with a safety system which prevents starting the cutting unit or driving the machine unless someone is sitting in the same hole as for the dip stick.

Owners Manual
Page 25
... located behind the front wheels on a level surface. 2. Checking the cutting unit's parallelism Check the parallelism of the cutting unit's ground pressure is conducted as follows: 1. MAINTENANCE Checking and adjustment of the cutting unit's ground pressure Rider 970 To achieve the best cutting results the cutting unit should be placed between 12 and 15 kg. The...
... located behind the front wheels on a level surface. 2. Checking the cutting unit's parallelism Check the parallelism of the cutting unit's ground pressure is conducted as follows: 1. MAINTENANCE Checking and adjustment of the cutting unit's ground pressure Rider 970 To achieve the best cutting results the cutting unit should be placed between 12 and 15 kg. The...

Owners Manual
Page 26
... as described on page 18. 2. Screw in the fork (3) to raise the front edge of the hood. On completion of the hood. 5. Raise the cutting unit at the front edge by pulling out the rear pin (1). Fit the right-hand fender and the front hood. Screw out the fork (3) to... should be re-checked. Fit the right-hand fender and the front hood. 1 32 24 - MAINTENANCE Adjustment of the cutting unit's parallelism Adjustment of Rider 970 1. Lift the rear edge of the cutting unit is made with the adjusting nuts on page 18. 2. Tighten the nuts against each other after adjusting. 6. Tighten...
... as described on page 18. 2. Screw in the fork (3) to raise the front edge of the hood. On completion of the hood. 5. Raise the cutting unit at the front edge by pulling out the rear pin (1). Fit the right-hand fender and the front hood. Screw out the fork (3) to... should be re-checked. Fit the right-hand fender and the front hood. 1 32 24 - MAINTENANCE Adjustment of the cutting unit's parallelism Adjustment of Rider 970 1. Lift the rear edge of the cutting unit is made with the adjusting nuts on page 18. 2. Tighten the nuts against each other after adjusting. 6. Tighten...

Owners Manual
Page 27
...it is now locked vertically. 3. hand fenders as described on Rider 970 Bioclip as follows: 1. Dismantle the drive belt (1). 4. Remove the lock pins (one on each side) on the rear edge of the blades and screws. 1 Dismantle the cutting unit on page 18. 2. WARNING! Make sure to the transport ... on Rider 850 HST as follows: 1. The unit can go off and cause personal injury. 2 5 3 4 1 6 English - 25 Fitting of the cutting unit takes place in the reverse order to dismantling. ! Push the lock-plate (4) forwards and press down the unit's front edge so that it releases...
...it is now locked vertically. 3. hand fenders as described on Rider 970 Bioclip as follows: 1. Dismantle the drive belt (1). 4. Remove the lock pins (one on each side) on the rear edge of the blades and screws. 1 Dismantle the cutting unit on page 18. 2. WARNING! Make sure to the transport ... on Rider 850 HST as follows: 1. The unit can go off and cause personal injury. 2 5 3 4 1 6 English - 25 Fitting of the cutting unit takes place in the reverse order to dismantling. ! Push the lock-plate (4) forwards and press down the unit's front edge so that it releases...
Owners Manual
Page 28
... kPa (0.4 kp/cm2). To improve driving the pressure on the rear tyres can go against each other and damage the unit. English Cutting unit on Rider 850 (rear ejection) Cutting unit on the front tyres will result in the diagram with an angle of the blades should be 60 kPa (0.6 kp/cm2... best mowing results it is 100 kPa (1.0 kp/cm2). Check that the blades are tight. Otherwise the blades can be as shown in the blades cutting the grass at different heights. 26 -
... kPa (0.4 kp/cm2). To improve driving the pressure on the rear tyres can go against each other and damage the unit. English Cutting unit on Rider 850 (rear ejection) Cutting unit on the front tyres will result in the diagram with an angle of the blades should be 60 kPa (0.6 kp/cm2... best mowing results it is 100 kPa (1.0 kp/cm2). Check that the blades are tight. Otherwise the blades can be as shown in the blades cutting the grass at different heights. 26 -

Owners Manual
Page 31
...• Different tyre pressures on one or more cells faulty • Bad contact between cable and battery terminal. • Lift lever for cutting unit in neutral. English - 29 Starter does not pull round engine. • Battery flat. • Bad contact between battery terminals and ... not charge. • One or more blades, resulting from damage or inferior balancing after sharpening. Uneven mowing. • Blades blunt. • Cutting unit skew. • Long or wet grass. • Grass blockage under the battery cover. • Ignition lock faulty. • Gear shift...
...• Different tyre pressures on one or more cells faulty • Bad contact between cable and battery terminal. • Lift lever for cutting unit in neutral. English - 29 Starter does not pull round engine. • Battery flat. • Bad contact between battery terminals and ... not charge. • One or more blades, resulting from damage or inferior balancing after sharpening. Uneven mowing. • Blades blunt. • Cutting unit skew. • Long or wet grass. • Grass blockage under the battery cover. • Ignition lock faulty. • Gear shift...


