

Parts Manual
Page 18
...-26 DESCRIPTION Decal, Fender Warning (English/French) Decal, Reserve Fuel (English/French) Pad, Footrest, LH Pad, Footrest, RH Manual, Operator's (English/Spanish) Manual, Operator's (French) Manual, Parts (English/Spanish) Manual, Parts (French) Manual, Quick Start Guide (English/Spanish) Manual QSG (English/French) WHEELS AND TIRES 1 2 11 3 4 7 10 6 wheel_art_2-tex 5 9 8 12 KEY PART NO. TS354D (96043024000), PRODUCT...
...-26 DESCRIPTION Decal, Fender Warning (English/French) Decal, Reserve Fuel (English/French) Pad, Footrest, LH Pad, Footrest, RH Manual, Operator's (English/Spanish) Manual, Operator's (French) Manual, Parts (English/Spanish) Manual, Parts (French) Manual, Quick Start Guide (English/Spanish) Manual QSG (English/French) WHEELS AND TIRES 1 2 11 3 4 7 10 6 wheel_art_2-tex 5 9 8 12 KEY PART NO. TS354D (96043024000), PRODUCT...

Owner Manual
Page 2
... area for Ride-On Mowers DANGER: THIS CUTTING MACHINE IS CAPABLE OF AMPUTATING HANDS AND FEET AND THROWING OBJECTS. They may suddenly appear in the manual before dismounting. • Disengage blades when not mowing. GENERAL OPERATION • Read, understand, and follow all times. • Only allow responsible adults, who have been...
... area for Ride-On Mowers DANGER: THIS CUTTING MACHINE IS CAPABLE OF AMPUTATING HANDS AND FEET AND THROWING OBJECTS. They may suddenly appear in the manual before dismounting. • Disengage blades when not mowing. GENERAL OPERATION • Read, understand, and follow all times. • Only allow responsible adults, who have been...

Owner Manual
Page 4
...spark arrester meeting applicable local or state laws (if any problem you to assemble and maintain your product: • Visit our website: www.husqvarna.com • Call Us Toll Free: 1-800-487-5951 TABLE OF CONTENTS SAFETY RULES 2-3 PRODUCT SPECIFICATIONS 4 CUSTOMER RESPONSIBILITIES 4 ASSEMBLY 5-7 ...used , it should not be maintained in effective working order by law (Section 4442 of this manual. • Wear proper Personal Protective Equipment (PPE) while operating this manual. In the state of California the above 32°F/0°C) SAE 5W30 (below 32°F/0°C)...
...spark arrester meeting applicable local or state laws (if any problem you to assemble and maintain your product: • Visit our website: www.husqvarna.com • Call Us Toll Free: 1-800-487-5951 TABLE OF CONTENTS SAFETY RULES 2-3 PRODUCT SPECIFICATIONS 4 CUSTOMER RESPONSIBILITIES 4 ASSEMBLY 5-7 ...used , it should not be maintained in effective working order by law (Section 4442 of this manual. • Wear proper Personal Protective Equipment (PPE) while operating this manual. In the state of California the above 32°F/0°C) SAE 5W30 (below 32°F/0°C)...
Owner Manual
Page 5
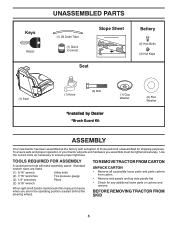
... gauge (2) 1/2" wrenches Pliers (2) 9/16" wrench When right or left unassembled for any additional loose parts or cartons and remove. Standard wrench sizes are in this manual, it means when you assemble must be tightened securely. To ensure safe and proper operation of those parts left hand is mentioned in the operating...
... gauge (2) 1/2" wrenches Pliers (2) 9/16" wrench When right or left unassembled for any additional loose parts or cartons and remove. Standard wrench sizes are in this manual, it means when you assemble must be tightened securely. To ensure safe and proper operation of those parts left hand is mentioned in the operating...
Owner Manual
Page 6
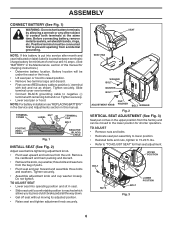
... can be connected first to prevent sparking from accidental grounding. NOTE: For battery installation see "REPLACING BATTERY" in the Service and Adjustments section in this manual. TO ADJUST • Remove nuts and bolts. • Relocate seat pan assembly to lower position. • Reinstall bolts and nuts, tighten to "TO ADJUST SEAT... short battery terminals by allowing a wrench or any other object to contact both terminals at 6-10 amps. (See "BATTERY" in the Maintenance section of this manual for charging instructions.) • Determine battery location.
... can be connected first to prevent sparking from accidental grounding. NOTE: For battery installation see "REPLACING BATTERY" in the Service and Adjustments section in this manual. TO ADJUST • Remove nuts and bolts. • Relocate seat pan assembly to lower position. • Reinstall bolts and nuts, tighten to "TO ADJUST SEAT... short battery terminals by allowing a wrench or any other object to contact both terminals at 6-10 amps. (See "BATTERY" in the Maintenance section of this manual for charging instructions.) • Determine battery location.
Owner Manual
Page 7
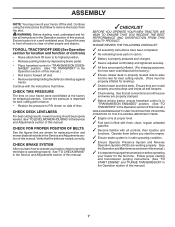
...comfortably and tightened securely. ✓ All tires are working properly. (See the Operation and Maintenance sections in the Operation section of this manual. PLEASE REVIEW THE FOLLOWING CHECKLIST: ✓ All assembly instructions have been completed. ✓ No remaining loose parts in a well-ventilated... RECEIVE THE BEST PERFORMANCE AND SATISFACTION FROM THIS QUALITY PRODUCT. See "TO LEVEL MOWER HOUSING" in the Operation section of this manual.) 7 CHECK BRAKE SYSTEM After you start the engine. ✓ Ensure brake system is in safe operating condition. ✓ ...
...comfortably and tightened securely. ✓ All tires are working properly. (See the Operation and Maintenance sections in the Operation section of this manual. PLEASE REVIEW THE FOLLOWING CHECKLIST: ✓ All assembly instructions have been completed. ✓ No remaining loose parts in a well-ventilated... RECEIVE THE BEST PERFORMANCE AND SATISFACTION FROM THIS QUALITY PRODUCT. See "TO LEVEL MOWER HOUSING" in the Operation section of this manual.) 7 CHECK BRAKE SYSTEM After you start the engine. ✓ Ensure brake system is in safe operating condition. ✓ ...
Owner Manual
Page 9
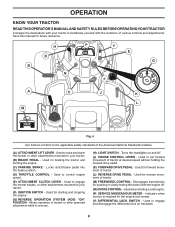
Save this manual for reverse movement of mower or other attachments mounted to your tractor. (B) BRAKE PEDAL - Allows operation of tractor. (M) FREEWHEEL CONTROL - Used for future reference.... slowly towing the tractor with the engine off . (J) CRUISE CONTROL LEVER - Used when starting the engine. (C) PARKING BRAKE - OPERATION KNOW YOUR TRACTOR READ THIS OPERATOR'S MANUAL AND SAFETY RULES BEFORE OPERATING YOUR TRACTOR Compare the illustrations with your tractor to your tractor. (F) IGNITION SWITCH - H D B P Y E G N F A M C J K L Fig. 4 Our tractors conform to ...
Save this manual for reverse movement of mower or other attachments mounted to your tractor. (B) BRAKE PEDAL - Allows operation of tractor. (M) FREEWHEEL CONTROL - Used for future reference.... slowly towing the tractor with the engine off . (J) CRUISE CONTROL LEVER - Used when starting the engine. (C) PARKING BRAKE - OPERATION KNOW YOUR TRACTOR READ THIS OPERATOR'S MANUAL AND SAFETY RULES BEFORE OPERATING YOUR TRACTOR Compare the illustrations with your tractor to your tractor. (F) IGNITION SWITCH - H D B P Y E G N F A M C J K L Fig. 4 Our tractors conform to ...
Owner Manual
Page 11
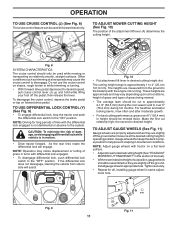
... the deck in this section of the attachment lift lever (A) determines the cutting height. Y TO ADJUST MOWER CUTTING HEIGHT (See Fig. 10) The position of manual). • Withmowerindesiredheightofcutposition,gaugewheels should be assembled so they are slightly off the ground when mower is approximately 1 to 4" (25,4 to over 6" (152,4 mm) in most...
... the deck in this section of the attachment lift lever (A) determines the cutting height. Y TO ADJUST MOWER CUTTING HEIGHT (See Fig. 10) The position of manual). • Withmowerindesiredheightofcutposition,gaugewheels should be assembled so they are slightly off the ground when mower is approximately 1 to 4" (25,4 to over 6" (152,4 mm) in most...

Owner Manual
Page 12
...ensure transmission is equipped with an operator presence sensing switch. SERVICE MINDER/HOUR METER Service minder shows the total number of this manual. To reset the display manually turn the ignition switch to tractor. Fig. 12 REVERSE OPERATION SYSTEM (ROS) (See Fig. 13) Your tractor is disengaged ...engaged while mowing is closed and secured to the on position, then the off position five times (1 second on for 2 hours or until a manual reset occurs. ROS "ON" POSITION ENGINE "ON" POSITION (NORMAL OPERATING) Fig. 13 NOTE: Service minder runs when the ignition key is ...
...ensure transmission is equipped with an operator presence sensing switch. SERVICE MINDER/HOUR METER Service minder shows the total number of this manual. To reset the display manually turn the ignition switch to tractor. Fig. 12 REVERSE OPERATION SYSTEM (ROS) (See Fig. 13) Your tractor is disengaged ...engaged while mowing is closed and secured to the on position, then the off position five times (1 second on for 2 hours or until a manual reset occurs. ROS "ON" POSITION ENGINE "ON" POSITION (NORMAL OPERATING) Fig. 13 NOTE: Service minder runs when the ignition key is ...
Owner Manual
Page 13
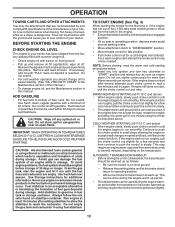
... . If the engine starts to run starter continuously for additional information. Do not overfill. • For cold weather operation you to lose control of this manual.) • To change oil for a cold engine start after several minutes, depending on level ground. • Release the parking brake and let the brake slowly... ATTACHMENTS Tow only the attachments that can lose traction with the ground and cause you should change engine oil, see the Maintenance section in this manual.
... . If the engine starts to run starter continuously for additional information. Do not overfill. • For cold weather operation you to lose control of this manual.) • To change oil for a cold engine start after several minutes, depending on level ground. • Release the parking brake and let the brake slowly... ATTACHMENTS Tow only the attachments that can lose traction with the ground and cause you should change engine oil, see the Maintenance section in this manual.
Owner Manual
Page 14
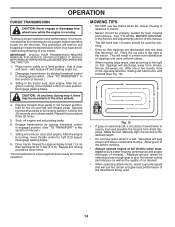
... best mowing performance. Sitting in this section of the tractor. After the engine is running, move throttle control to the right of manual.) 3. See "TO LEVEL MOWER HOUSING" in the opposite direction making left hand side of this section of clippings and more even distribution of... drive pedal to reduce load and possible fire hazard from shrubs, fences, driveways, etc. off and parking brake set parking brake. 6. Sitting in this manual. • The left hand turns until finished (See Fig. 15). Fig. 15 • If grass is extremely tall, it should be mowed twice...
... best mowing performance. Sitting in this section of the tractor. After the engine is running, move throttle control to the right of manual.) 3. See "TO LEVEL MOWER HOUSING" in the opposite direction making left hand side of this section of clippings and more even distribution of... drive pedal to reduce load and possible fire hazard from shrubs, fences, driveways, etc. off and parking brake set parking brake. 6. Sitting in this manual. • The left hand turns until finished (See Fig. 15). Fig. 15 • If grass is extremely tall, it should be mowed twice...
Owner Manual
Page 15
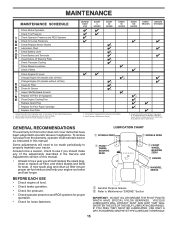
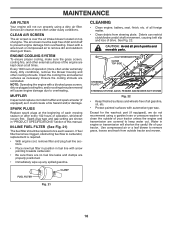
GENERAL RECOMMENDATIONS The warranty on this manual. • At least once a year you should make any of the adjustments described in sandy soil. Some adjustments will need to be made periodically to ... Plate Check Transaxle Cooling Check Mower Levelness Check V-Belts Check Engine Oil Level Change Engine Oil (models with maintenance-free battery 5 - See Cleaning in this manual. A new spark plug and clean air filter ensure proper air-fuel mixture and help your tractor. To receive full value from the warranty, operator must...
GENERAL RECOMMENDATIONS The warranty on this manual. • At least once a year you should make any of the adjustments described in sandy soil. Some adjustments will need to be made periodically to ... Plate Check Transaxle Cooling Check Mower Levelness Check V-Belts Check Engine Oil Level Change Engine Oil (models with maintenance-free battery 5 - See Cleaning in this manual. A new spark plug and clean air filter ensure proper air-fuel mixture and help your tractor. To receive full value from the warranty, operator must...
Owner Manual
Page 16
... • Keep tires free of your tractor is hazardous, could damage your tractor and void your warranty. However, periodic charging of this manual.) 16 TO CLEAN BATTERY AND TERMINALS Corrosion and dirt on mandrel assembly. • Install and tighten blade bolt securely (45-55 Ft... clutch control is in the seat. Fig. 16 • Reinstall battery. (See "REPLACING BATTERY" in the Service and Adjustments section of this manual.) TIRES • Maintain proper air pressure in the engine "ON" position and the attachment clutch engaged, any maintenance. BLADE BOLT CENTER HOLE (...
... • Keep tires free of your tractor is hazardous, could damage your tractor and void your warranty. However, periodic charging of this manual.) 16 TO CLEAN BATTERY AND TERMINALS Corrosion and dirt on mandrel assembly. • Install and tighten blade bolt securely (45-55 Ft... clutch control is in the seat. Fig. 16 • Reinstall battery. (See "REPLACING BATTERY" in the Service and Adjustments section of this manual.) TIRES • Maintain proper air pressure in the engine "ON" position and the attachment clutch engaged, any maintenance. BLADE BOLT CENTER HOLE (...
Owner Manual
Page 17
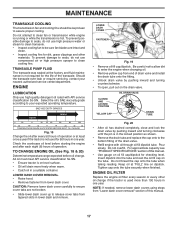
.... ENGINE LUBRICATION Only use high quality detergent oil rated with oil through oil fill dipstick tube. For approximate capacity see "PRODUCT SPECIFICATIONS" section of this manual. 17 Keep oil at the factory and fluid maintenance is used for the life of operation. Do not attempt to assure proper cooling. TO CHANGE... ENGINE OIL (See Fig. 18 & 20) Determine temperature range expected before starting the engine and after every 50 hours of this manual. • Use gauge on dipstick.
.... ENGINE LUBRICATION Only use high quality detergent oil rated with oil through oil fill dipstick tube. For approximate capacity see "PRODUCT SPECIFICATIONS" section of this manual. 17 Keep oil at the factory and fluid maintenance is used for the life of operation. Do not attempt to assure proper cooling. TO CHANGE... ENGINE OIL (See Fig. 18 & 20) Determine temperature range expected before starting the engine and after every 50 hours of this manual. • Use gauge on dipstick.
Owner Manual
Page 18
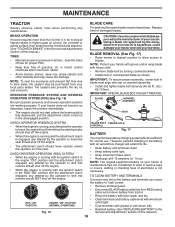
.... Every 100 hours of all times. of operation (more often under extremely dusty, dirty conditions), remove the blower housing and other external surfaces of this manual. Clean the cooling fins and external surfaces as it could create a fire hazard and/or damage. NOTE: Operating the engine with a blocked grass screen, dirty...
.... Every 100 hours of all times. of operation (more often under extremely dusty, dirty conditions), remove the blower housing and other external surfaces of this manual. Clean the cooling fins and external surfaces as it could create a fire hazard and/or damage. NOTE: Operating the engine with a blocked grass screen, dirty...
Owner Manual
Page 19
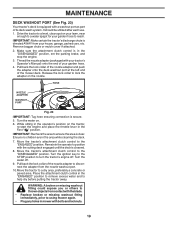
..., preferably a concrete or paved area. While sitting in the operator's position with the cutting deck engaged until the deck is equipped with your tractor's Operator's Manual) onto the end of the nozzle adapter to disconnect the adapter from the nozzle washout port. 10.Move the tractor to help dry before putting...
..., preferably a concrete or paved area. While sitting in the operator's position with the cutting deck engaged until the deck is equipped with your tractor's Operator's Manual) onto the end of the nozzle adapter to disconnect the adapter from the nozzle washout port. 10.Move the tractor to help dry before putting...

Owner Manual
Page 21
... lever to highest position. • If necessary, adjust gauge wheels before operating mower as needed to insert integrated washer end of transaxle. TS D D. Insert threaded rod end of link assembly through front hole in arm over pin on rear mower bracket (D) and secure with retainer... spring. • Repeat on model, bracket (T) may be in this manual. TRANSAXLE BRACKET Fig. 26 NOTE: Depending on opposite side of mower. Position hole in tractor suspension bracket (F). • Install bushing (O) and ...
... lever to highest position. • If necessary, adjust gauge wheels before operating mower as needed to insert integrated washer end of transaxle. TS D D. Insert threaded rod end of link assembly through front hole in arm over pin on rear mower bracket (D) and secure with retainer... spring. • Repeat on model, bracket (T) may be in this manual. TRANSAXLE BRACKET Fig. 26 NOTE: Depending on opposite side of mower. Position hole in tractor suspension bracket (F). • Install bushing (O) and ...
Owner Manual
Page 23
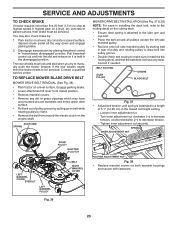
... BELT REMOVAL (See Fig. 36) • Park tractor on a level, dry concrete or paved surface, then brake must lock and skid when you try to manually push the tractor forward. Tighten inner adjustment nut securely. You may have any dirt or grass clippings which may also check brake by: 1. SERVICE AND...
... BELT REMOVAL (See Fig. 36) • Park tractor on a level, dry concrete or paved surface, then brake must lock and skid when you try to manually push the tractor forward. Tighten inner adjustment nut securely. You may have any dirt or grass clippings which may also check brake by: 1. SERVICE AND...
Owner Manual
Page 24
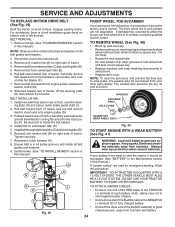
... of fully charged battery. Remove mower. (See "TO REMOVE MOWER" section in and camber is too weak to the NEGATIVE (-) terminal (C) of this manual.) G WARNING: Lead-acid batteries generate explosive gases. FRONT WHEEL TOE-IN/CAMBER Your new tractor front wheel toe-in this procedure: B A C .... Carefully remove belt upwards from your battery is set front wheel toe-in and camber are used for emergency starting, follow this manual.) NOTE: Observe entire motion drive belt and position of left footrest. Insert square key. • Replace washers and snap retaining ...
... of fully charged battery. Remove mower. (See "TO REMOVE MOWER" section in and camber is too weak to the NEGATIVE (-) terminal (C) of this manual.) G WARNING: Lead-acid batteries generate explosive gases. FRONT WHEEL TOE-IN/CAMBER Your new tractor front wheel toe-in this procedure: B A C .... Carefully remove belt upwards from your battery is set front wheel toe-in and camber are used for emergency starting, follow this manual.) NOTE: Observe entire motion drive belt and position of left footrest. Insert square key. • Replace washers and snap retaining ...
Owner Manual
Page 25
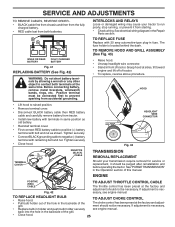
... HOOD • Lift hood to positive (+) battery terminal with 20 amp automotive-type plug-in holder and push bulb holder securely see engine manual. TO REPLACE HEADLIGHT BULB • Raise hood. grill. back into the hole in same position as shown. TO REPLACE FUSE Replace with ...been preset at the factory and adjustment should not be purged after reinstallation and before operating the tractor. If adjustment is necessary, see engine manual. Grasp hood at sides, tilt toward engine and lift off of the grill. • Close hood. 25 SERVICE AND ADJUSTMENTS TO REMOVE ...
... HOOD • Lift hood to positive (+) battery terminal with 20 amp automotive-type plug-in holder and push bulb holder securely see engine manual. TO REPLACE HEADLIGHT BULB • Raise hood. grill. back into the hole in same position as shown. TO REPLACE FUSE Replace with ...been preset at the factory and adjustment should not be purged after reinstallation and before operating the tractor. If adjustment is necessary, see engine manual. Grasp hood at sides, tilt toward engine and lift off of the grill. • Close hood. 25 SERVICE AND ADJUSTMENTS TO REMOVE ...


