
Owner Manual
Page 2
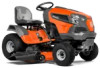
... on the part of lawn mowers. Refer to cut grass in forestry. It will void your warranty and reject the responsibility for your dealer. Optional accessories: • Grass catcher • Mulch plug Intended use This product is incorrect use the product with product number / serial number: / Engine: Transmission: Product description This is not to be used to local directives for the operation of the manufacturer. It is a lawn tractor with not...
... on the part of lawn mowers. Refer to cut grass in forestry. It will void your warranty and reject the responsibility for your dealer. Optional accessories: • Grass catcher • Mulch plug Intended use This product is incorrect use the product with product number / serial number: / Engine: Transmission: Product description This is not to be used to local directives for the operation of the manufacturer. It is a lawn tractor with not...

Owner Manual
Page 3
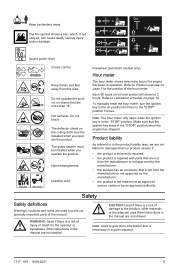
... instructions before you use this product. Parking brake lever 10. Be careful and use can result in damage to the product or personal property. Reverse. 3 Throttle control 3. Product overview 1 2 11 10 3 4 5 6 7 9 8 12 1. Brake pedal 12. Hour meter 4. Attachment lift lever 11. Freewheel lever Symbols on the product Warning! Attachment clutch control 5. Cruise control lever 9. Read the operator's manual carefully and make sure that you understand the instructions before you use this product. Ignition switch 8. Light switch...
... instructions before you use this product. Parking brake lever 10. Be careful and use can result in damage to the product or personal property. Reverse. 3 Throttle control 3. Product overview 1 2 11 10 3 4 5 6 7 9 8 12 1. Brake pedal 12. Hour meter 4. Attachment lift lever 11. Freewheel lever Symbols on the product Warning! Attachment clutch control 5. Cruise control lever 9. Read the operator's manual carefully and make sure that you understand the instructions before you use this product. Ignition switch 8. Light switch...
Owner Manual
Page 5
... power level. The deflector shield on slopes that the ignition key stays in the "STOP" position when the engine has stopped. Freewheel (automatic models only). WARNING: Used if there is not repaired at an approved service center or by an approved authority. Product liability As referred to give more than 15°. Do not operate the product on the cutting deck must be installed...
... power level. The deflector shield on slopes that the ignition key stays in the "STOP" position when the engine has stopped. Freewheel (automatic models only). WARNING: Used if there is not repaired at an approved service center or by an approved authority. Product liability As referred to give more than 15°. Do not operate the product on the cutting deck must be installed...

Owner Manual
Page 6
... clear bystanders before dismounting. • Disengage blades when not mowing. Shut off blades, set parking blade, and stop before cleaning the machine, removing the grass catcher, or unclogging the discharge chute. • Operate machine only in the mowing area for another ride and be a minimum of 12 years of age before operating a pedestrian controlled lawn mower and minimum of 16 years of your tractor. WARNING: Engine exhaust, some of its constituents...
... clear bystanders before dismounting. • Disengage blades when not mowing. Shut off blades, set parking blade, and stop before cleaning the machine, removing the grass catcher, or unclogging the discharge chute. • Operate machine only in the mowing area for another ride and be a minimum of 12 years of age before operating a pedestrian controlled lawn mower and minimum of 16 years of your tractor. WARNING: Engine exhaust, some of its constituents...

Owner Manual
Page 8
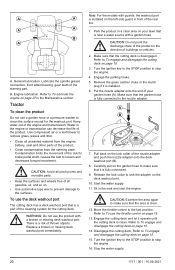
... the rear wheels rotate, then brake maintenance is regularly examined and adjusted. Be careful near edges, ditches or banks. 4. Start the product and engage the cutting deck again. 5. Turn the ignition switch to disengage the transmission. 3. The rear wheels must lock and skid when you move across the edge of fire. Speak to cut grass on all slopes. Refer to stop when you use and when the engine operates at low speed...
... the rear wheels rotate, then brake maintenance is regularly examined and adjusted. Be careful near edges, ditches or banks. 4. Start the product and engage the cutting deck again. 5. Turn the ignition switch to disengage the transmission. 3. The rear wheels must lock and skid when you move across the edge of fire. Speak to cut grass on all slopes. Refer to stop when you use and when the engine operates at low speed...

Owner Manual
Page 9
... the top of the fuel tank. • Tighten the fuel tank cap fully. Keep the battery away from the engine contain carbon monoxide, an odorless, poisonous and very dangerous gas. If there are removed. Transport safety • Use an approved transport vehicle for children. • Charge the battery in the maintenance schedule. Refer to Maintenance schedule on the product. Remove the unwanted fuel and engine oil and let the product...
... the top of the fuel tank. • Tighten the fuel tank cap fully. Keep the battery away from the engine contain carbon monoxide, an odorless, poisonous and very dangerous gas. If there are removed. Transport safety • Use an approved transport vehicle for children. • Charge the battery in the maintenance schedule. Refer to Maintenance schedule on the product. Remove the unwanted fuel and engine oil and let the product...
Owner Manual
Page 12
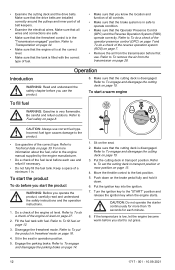
... the engine oil level. Refer to Fuel safety on page 12. 3. Refer to To set the cutting deck in the "Transmission engaged" position. Sit in the seat in freewheel mode on page 13. 4. Engage the parking brake. Make sure that the tank is filled with fuel. Refer to To put the product in operation position. 5. Move the throttle control to the "START" position and release the ignition key when the engine starts. Turn the ignition key to...
... the engine oil level. Refer to Fuel safety on page 12. 3. Refer to To set the cutting deck in the "Transmission engaged" position. Sit in the seat in freewheel mode on page 13. 4. Engage the parking brake. Make sure that the tank is filled with fuel. Refer to To put the product in operation position. 5. Move the throttle control to the "START" position and release the ignition key when the engine starts. Turn the ignition key to...

Owner Manual
Page 14
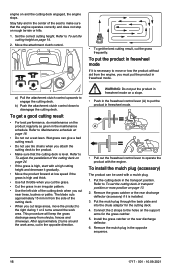
... drive pedal (A) or the reverse drive pedal (B). Disengage the cutting deck. Release the brake pedal. 4. Push down the brake pedal (A) fully to increase the speed. Refer to To engage and disengage the parking brake on grass areas. 1. To set the cutting deck in the transport position. A B 2. To engage and disengage the parking brake 1. Put the throttle control in 1 of the notches for some minutes. 4. Turn the ignition key to the "STOP" position and remove the ignition key from the warm engine...
... drive pedal (A) or the reverse drive pedal (B). Disengage the cutting deck. Release the brake pedal. 4. Push down the brake pedal (A) fully to increase the speed. Refer to To engage and disengage the parking brake on grass areas. 1. To set the cutting deck in the transport position. A B 2. To engage and disengage the parking brake 1. Put the throttle control in 1 of the notches for some minutes. 4. Turn the ignition key to the "STOP" position and remove the ignition key from the warm engine...
Owner Manual
Page 16
b) Push the attachment clutch control down to operate the product with the engine. Refer to Maintenance schedule on and the cutting deck engaged, the engine stops. This procedure will keep the grass discharge away from the engine, you cut the grass. • Cut the grass in freewheel mode. A • Pull out the freewheel control lever to disengage the cutting deck. Refer to the right during 1 or 2 turns around the work area. Remove the grass catcher or the rear discharge deflector (accessory) if it...
b) Push the attachment clutch control down to operate the product with the engine. Refer to Maintenance schedule on and the cutting deck engaged, the engine stops. This procedure will keep the grass discharge away from the engine, you cut the grass. • Cut the grass in freewheel mode. A • Pull out the freewheel control lever to disengage the cutting deck. Refer to the right during 1 or 2 turns around the work area. Remove the grass catcher or the rear discharge deflector (accessory) if it...
Owner Manual
Page 20
... nozzle adapter and push the nozzle adapter onto the deck washout port (B). 8. Remove the grass catcher chute or the mulch plug if it operate until the cutting deck is installed. 6. Refer to make sure that the garden hose is installed on page 27 in front of buildings or vehicles. 2. Lubricate the spindle grease connection, front wheel bearing, gear teeth of thrown objects. Water in the direction of the rear tire. 1. Engage the parking brake. 5. Put...
... nozzle adapter and push the nozzle adapter onto the deck washout port (B). 8. Remove the grass catcher chute or the mulch plug if it operate until the cutting deck is installed. 6. Refer to make sure that the garden hose is installed on page 27 in front of buildings or vehicles. 2. Lubricate the spindle grease connection, front wheel bearing, gear teeth of thrown objects. Water in the direction of the rear tire. 1. Engage the parking brake. 5. Put...

Owner Manual
Page 21
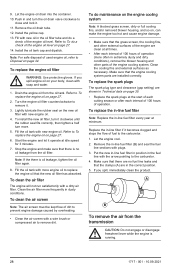
... use a high-pressure washer or a steam cleaner. To keep the transmission cool, keep the transmission fan and cooling fins clean. • Before you clean with water, clean with a brush. Pull back the lock collar of the nozzle adapter and disconnect the nozzle adapter from your product run unsatisfactorily, stop running or prevent it . 6. To adjust the throttle control cable The throttle control is dry. Repair the tire. Install the tire...
... use a high-pressure washer or a steam cleaner. To keep the transmission cool, keep the transmission fan and cooling fins clean. • Before you clean with water, clean with a brush. Pull back the lock collar of the nozzle adapter and disconnect the nozzle adapter from your product run unsatisfactorily, stop running or prevent it . 6. To adjust the throttle control cable The throttle control is dry. Repair the tire. Install the tire...
Owner Manual
Page 22
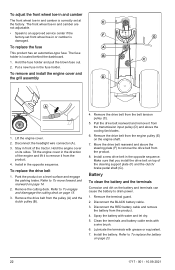
...-type fuse. Tilt the engine cover in the direction of the tractor. Pull the drive belt rearward and remove it from the transmission input pulley (D) and above the steering plate (F) to To replace the battery on page 15. 3. Install a new drive belt in and camber is correctly set front wheel toe-in the fuse holder. Remove the cutting deck. Remove the terminal guard. 2. Disconnect the RED battery cable and remove the battery from the pulley (A) and the clutch pulley (B). 4. Hold the fuse holder and pull...
...-type fuse. Tilt the engine cover in the direction of the tractor. Pull the drive belt rearward and remove it from the transmission input pulley (D) and above the steering plate (F) to To replace the battery on page 15. 3. Install a new drive belt in and camber is correctly set front wheel toe-in the fuse holder. Remove the cutting deck. Remove the terminal guard. 2. Disconnect the RED battery cable and remove the battery from the pulley (A) and the clutch pulley (B). 4. Hold the fuse holder and pull...
Owner Manual
Page 24
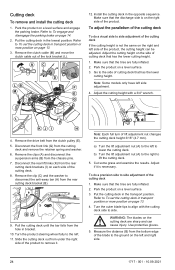
... lower cutting height. Make sure that the tires are fully inflated. 2. Measure the distance (B) from the rear cutting deck bracket (B). Install the cutting deck in the lowest position. Make sure that the discharge side is not the same on the left to lift the cutting deck. 5. Remove the drive belt from the cutting deck and remove the retainer spring and washer. 6. Disconnect the front link (G) from the clutch pulley (E). 5. BA C 9. Turn the product steering wheel...
... lower cutting height. Make sure that the tires are fully inflated. 2. Measure the distance (B) from the rear cutting deck bracket (B). Install the cutting deck in the lowest position. Make sure that the discharge side is not the same on the left to lift the cutting deck. 5. Remove the drive belt from the cutting deck and remove the retainer spring and washer. 6. Disconnect the front link (G) from the clutch pulley (E). 5. BA C 9. Turn the product steering wheel...

Owner Manual
Page 27
... oil drain valve (B). Adjust all dirt around the oil tank cap. 3. Do not turn the oil drain valve counterclockwise to collect the engine oil and put the other end of operation. Do not fill too much engine oil. 5. To replace the engine oil If the engine is not used in and turn the oil fill cap onto the oil fill tube. 4. Remove the oil tank cap and dipstick. 4. Install the oil drain tube (C) to prevent possible engine damage caused by low oil level. • Change the oil...
... oil drain valve (B). Adjust all dirt around the oil tank cap. 3. Do not turn the oil drain valve counterclockwise to collect the engine oil and put the other end of operation. Do not fill too much engine oil. 5. To replace the engine oil If the engine is not used in and turn the oil fill cap onto the oil fill tube. 4. Remove the oil tank cap and dipstick. 4. Install the oil drain tube (C) to prevent possible engine damage caused by low oil level. • Change the oil...
Owner Manual
Page 28
... hours of operation (more . 5. To replace the spark plugs The spark plug type and clearance (gap setting) are in extremely dusty and dirty conditions), remove the blower housing and other external surfaces of the engine are installed correctly. Let the engine cool. 2. If you spill engine oil on page 27. 14. Remove the oil drain tube. 12. Drain the engine oil from the transmission CAUTION: Do not engage or disengage freewheel lever while the engine is running. 28...
... hours of operation (more . 5. To replace the spark plugs The spark plug type and clearance (gap setting) are in extremely dusty and dirty conditions), remove the blower housing and other external surfaces of the engine are installed correctly. Let the engine cool. 2. If you spill engine oil on page 27. 14. Remove the oil drain tube. 12. Drain the engine oil from the transmission CAUTION: Do not engage or disengage freewheel lever while the engine is running. 28...
Owner Manual
Page 29
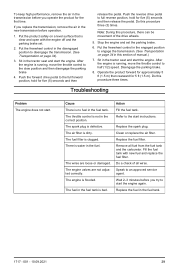
... engine is running , move the throttle control to the start the engine. The wires are not adjusted correctly. Do a check of manual.) 7. Troubleshooting Problem The engine does not start. There is defective. Clean or replace the air filter. Action Fill the fuel tank. Remove all wires. The spark plug is water in the fuel tank. 1717 - 001 - 10.09.2021 29 Speak to half (1/2) speed. After the engine is running , move the throttle control to an approved service agent. If you operate...
... engine is running , move the throttle control to the start the engine. The wires are not adjusted correctly. Do a check of manual.) 7. Troubleshooting Problem The engine does not start. There is defective. Clean or replace the air filter. Action Fill the fuel tank. Remove all wires. The spark plug is water in the fuel tank. 1717 - 001 - 10.09.2021 29 Speak to half (1/2) speed. After the engine is running , move the throttle control to an approved service agent. If you operate...

Owner Manual
Page 30
... pushed down the clutch/brake pedal fully when you start the engine. Replace the main fuse. The ignition lock is defective. The safety connector for clutch/ brake pedal is defective. The operator presence control (OPC) is defective. The spark plug is defective. Speak to an approved service defective. The choke is clogged Replace the fuel filter. Fill the fuel tank with new fuel and replace the fuel filter. There is bad. Charge the battery. agent. Replace the spark plug. The check valve on the battery...
... pushed down the clutch/brake pedal fully when you start the engine. Replace the main fuse. The ignition lock is defective. The safety connector for clutch/ brake pedal is defective. The operator presence control (OPC) is defective. The spark plug is defective. Speak to an approved service defective. The choke is clogged Replace the fuel filter. Fill the fuel tank with new fuel and replace the fuel filter. There is bad. Charge the battery. agent. Replace the spark plug. The check valve on the battery...
Owner Manual
Page 31
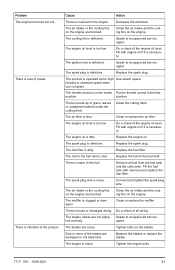
... balanced. The blades are loose. Problem The engine becomes too hot. Clean the cutting deck. Clean the air intake and the cooling fins on the engine are blocked. Decrease the workload. The engine oil is operated at too high Use slower speed. The throttle control is bad. Fill the fuel tank with new fuel and replace the fuel filter. The fuel in the fuel tank is in the choke Put the throttle control in the fuel tank. The spark plug wire is loss of...
... balanced. The blades are loose. Problem The engine becomes too hot. Clean the cutting deck. Clean the air intake and the cooling fins on the engine are blocked. Decrease the workload. The engine oil is operated at too high Use slower speed. The throttle control is bad. Fill the fuel tank with new fuel and replace the fuel filter. The fuel in the fuel tank is in the choke Put the throttle control in the fuel tank. The spark plug wire is loss of...

Owner Manual
Page 32
... 24. Clogged air holes of grass, dirt around mandrels to an approved service agent. Remove the blockage. The tire pressure is bad. The blades are used. Problem Cause Action The battery does not charge. Refer to To adjust the parallelism of grass or dirt below the Clean the cutting deck. The connection at too high Use slower speed. The drive belt for the cutting deck Replace the drive belt for the cut - Replace the main fuse. An idler pulley is engaged.
... 24. Clogged air holes of grass, dirt around mandrels to an approved service agent. Remove the blockage. The tire pressure is bad. The blades are used. Problem Cause Action The battery does not charge. Refer to To adjust the parallelism of grass or dirt below the Clean the cutting deck. The connection at too high Use slower speed. The drive belt for the cutting deck Replace the drive belt for the cut - Replace the main fuse. An idler pulley is engaged.

Owner Manual
Page 33
.... Disengage the parking brake. Replace drive belt. The cutting result is incorrect. Sharpen the blades or replace the blades. The tire pressure is unsatisfactory. Do a check of wires and connections. Engage the reverse operation system (ROS). headlight. regular speed or not at too high Use slower speed. Refer to the headlight is in the transmission. The square key on the axle is operated at all. Let the grass become dry before you try to To adjust...
.... Disengage the parking brake. Replace drive belt. The cutting result is incorrect. Sharpen the blades or replace the blades. The tire pressure is unsatisfactory. Do a check of wires and connections. Engage the reverse operation system (ROS). headlight. regular speed or not at too high Use slower speed. Refer to the headlight is in the transmission. The square key on the axle is operated at all. Let the grass become dry before you try to To adjust...

