
Owner Manual
Page 2
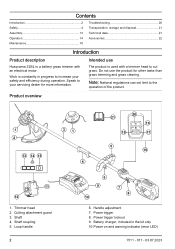
...for more information. Do not use The product is a battery grass trimmer with a trimmer head to your safety and efficiency during operation. Shaft coupling 5. Power trigger 8. Power trigger lockout 9. Battery charger, included in progress to the operation of the product. Trimmer head 2. Handle adjustment 7. Contents Introduction 2 Safety 4 Assembly 13 Operation 14 Maintenance 18 Troubleshooting 20 Transportation, storage and disposal 21 Technical data 21 Accessories 22 Introduction Product description Husqvarna 320iL is used with an electrical motor.
...for more information. Do not use The product is a battery grass trimmer with a trimmer head to your safety and efficiency during operation. Shaft coupling 5. Power trigger 8. Power trigger lockout 9. Battery charger, included in progress to the operation of the product. Trimmer head 2. Handle adjustment 7. Contents Introduction 2 Safety 4 Assembly 13 Operation 14 Maintenance 18 Troubleshooting 20 Transportation, storage and disposal 21 Technical data 21 Accessories 22 Introduction Product description Husqvarna 320iL is used with an electrical motor.
Owner Manual
Page 3
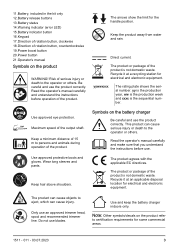
... hair above shoulders. The product or package of the output shaft. Symbols on the product refer to the operator or others . Do not use an approved trimmer head, spool and recommended trimmer line. Risk of the product. yywwxxxx The rating plate shows the serial number. This product can cause injury. Use approved eye protection. The product can cause objects to eject...
... hair above shoulders. The product or package of the output shaft. Symbols on the product refer to the operator or others . Do not use an approved trimmer head, spool and recommended trimmer line. Risk of the product. yywwxxxx The rating plate shows the serial number. This product can cause injury. Use approved eye protection. The product can cause objects to eject...
Owner Manual
Page 4
... is not repaired at an approved service center or by the manufacturer. • the product has an accessory that is necessary in a given situation. Do not use the appliance in damp or wet locations. • Do not use of the manual. They can...instructions in electric shock, fire and/or serious injury. The use in moving parts. Safety Safety definitions Warnings, cautions and notes are not obeyed. All people and pets should always be caught in rain. • Keep children away. Failure to your mains-operated (corded) power tool or battery-operated (cordless) power tool...
... is not repaired at an approved service center or by the manufacturer. • the product has an accessory that is necessary in a given situation. Do not use the appliance in damp or wet locations. • Do not use of the manual. They can...instructions in electric shock, fire and/or serious injury. The use in moving parts. Safety Safety definitions Warnings, cautions and notes are not obeyed. All people and pets should always be caught in rain. • Keep children away. Failure to your mains-operated (corded) power tool or battery-operated (cordless) power tool...

Owner Manual
Page 5
...; Follow all times. • Stay alert. Exposure to prevent the product being started by an authorized service center unless indicated elsewhere in use a tool without its safety guard. Keep the handles dry, clean, and free from the battery. Wear protective hair covering to contain long hair. • Use safety glasses. Always remove the battery before connecting to repair the appliance or the battery pack (as applicable...
...; Follow all times. • Stay alert. Exposure to prevent the product being started by an authorized service center unless indicated elsewhere in use a tool without its safety guard. Keep the handles dry, clean, and free from the battery. Wear protective hair covering to contain long hair. • Use safety glasses. Always remove the battery before connecting to repair the appliance or the battery pack (as applicable...
Owner Manual
Page 6
... covers, guards and handles must ensure that is completely attached to impact or are kept clear of the product and/or the battery to given regulations. See chapter on the motor. • Dress properly. When several operators are not damaged or cracked. • Inspect the working in this product are doing and use common sense when operating a power tool. that the trimmer head...
... covers, guards and handles must ensure that is completely attached to impact or are kept clear of the product and/or the battery to given regulations. See chapter on the motor. • Dress properly. When several operators are not damaged or cracked. • Inspect the working in this product are doing and use common sense when operating a power tool. that the trimmer head...

Owner Manual
Page 7
.... • Your warranty may not cover damage or liability caused by the use of non-authorized accessories or replacement parts. • Under no circumstances may the design of injury at all usage which it . Do the safety checks, maintenance and service instructions described in this manual. • Children should ask an expert. Never allow children to the operator or others . Note...
.... • Your warranty may not cover damage or liability caused by the use of non-authorized accessories or replacement parts. • Under no circumstances may the design of injury at all usage which it . Do the safety checks, maintenance and service instructions described in this manual. • Children should ask an expert. Never allow children to the operator or others . Note...
Owner Manual
Page 8
... out by the cutting attachment. Use gloves when working in the cutting attachment while you operate the product, stop the product, remove the battery and make sure that the cutting equipment does not rotate before you cut. Never lean over the cutting attachment guard. Always remove your hands and feet away from a ladder, stool or any unwanted vibrations occur, tap out new line to give the...
... out by the cutting attachment. Use gloves when working in the cutting attachment while you operate the product, stop the product, remove the battery and make sure that the cutting equipment does not rotate before you cut. Never lean over the cutting attachment guard. Always remove your hands and feet away from a ladder, stool or any unwanted vibrations occur, tap out new line to give the...
Owner Manual
Page 9
... sure that operators use a visor, you work on the trimmer guard is a risk of a day. WARNING: Hearing protectors limit the ability to noise can result from the product and check that the product is not damaged. Cutting attachment WARNING: Remove the battery and make sure the cutting attachment stops completely before operating this machine. • Release the power trigger after each working operation to Accessories...
... sure that operators use a visor, you work on the trimmer guard is a risk of a day. WARNING: Hearing protectors limit the ability to noise can result from the product and check that the product is not damaged. Cutting attachment WARNING: Remove the battery and make sure the cutting attachment stops completely before operating this machine. • Release the power trigger after each working operation to Accessories...
Owner Manual
Page 10
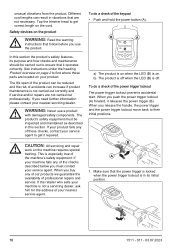
... of these parts are located on your nearest servicing dealer. When you buy any of the checks described below you use a product with damaged safety components. To do a check of your service agent. B A 1. Tap the trimmer head to get correct length on . CAUTION: All servicing and repair work on the product WARNING: Read the warning instructions that it repaired. See instructions under the heading Product...
... of these parts are located on your nearest servicing dealer. When you buy any of the checks described below you use a product with damaged safety components. To do a check of your service agent. B A 1. Tap the trimmer head to get correct length on . CAUTION: All servicing and repair work on the product WARNING: Read the warning instructions that it repaired. See instructions under the heading Product...

Owner Manual
Page 11
... into the air slots of the battery. • Do not use the product. 4. If you touch the cutting attachment. 1. This can cause a short circuit of the battery. • Keep the battery away from microwaves and high pressure. • Do not try to keys, coins, screws or other devices. • Risk of electrical shock. Replace the cutting attachment guard if it . Start the product. Push the power trigger lockout...
... into the air slots of the battery. • Do not use the product. 4. If you touch the cutting attachment. 1. This can cause a short circuit of the battery. • Keep the battery away from microwaves and high pressure. • Do not try to keys, coins, screws or other devices. • Risk of electrical shock. Replace the cutting attachment guard if it . Start the product. Push the power trigger lockout...
Owner Manual
Page 12
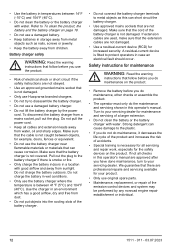
... to disassemble the battery charger. • Do not use original spare parts. • Maintenance, replacement, or repair of a larger extension. • Do not clean the battery or the battery charger with good airflow and away from a mains socket, pull out the plug. Make sure that the cord of electrical shock or short circuit if the safety instructions are not obeyed. • Use an approved grounded...
... to disassemble the battery charger. • Do not use original spare parts. • Maintenance, replacement, or repair of a larger extension. • Do not clean the battery or the battery charger with good airflow and away from a mains socket, pull out the plug. Make sure that the cord of electrical shock or short circuit if the safety instructions are not obeyed. • Use an approved grounded...

Owner Manual
Page 13
... the assembly instructions. To assemble the two-piece shaft 1. B A 2. SAVE THESE INSTRUCTIONS Assembly Introduction This section describes how to an applicable position. 5. WARNING: Before you operate the product. 1511 - 011 - 03.07.2023 13 Turn the knob to make the internal drive shafts connect. 3. Attach the loop handle onto the shaft between the arrows. 2. Note: If you cannot push the shaft fully into the shaft coupling, turn shaft to...
... the assembly instructions. To assemble the two-piece shaft 1. B A 2. SAVE THESE INSTRUCTIONS Assembly Introduction This section describes how to an applicable position. 5. WARNING: Before you operate the product. 1511 - 011 - 03.07.2023 13 Turn the knob to make the internal drive shafts connect. 3. Attach the loop handle onto the shaft between the arrows. 2. Note: If you cannot push the shaft fully into the shaft coupling, turn shaft to...
Owner Manual
Page 14
... attach the cutting attachment guard • Attach the cutting attachment guard (A) to the wall. B A D 2. C Operation Introduction WARNING: Read and understand the safety chapter before you use an electric screwdriver to install the battery charger to the shaft (C) with the 2 screws (A). Examine the slope of the ground and if there are obstacles such as stones, branches and ditches. • Do a general inspection of terrain. Connect the power cord...
... attach the cutting attachment guard • Attach the cutting attachment guard (A) to the wall. B A D 2. C Operation Introduction WARNING: Read and understand the safety chapter before you use an electric screwdriver to install the battery charger to the shaft (C) with the 2 screws (A). Examine the slope of the ground and if there are obstacles such as stones, branches and ditches. • Do a general inspection of terrain. Connect the power cord...

Owner Manual
Page 15
Do not pull the power cord. Put the plug in the battery charger if it is dirty or wet. 1. Connect the battery charger to the product. 3. Make sure that the battery is fully charged. 2. Use gloves when it is fully charged. Replace the trimmer head and cutting attachment guard if they are hit or if they have cracks. • Make sure that all nuts and screws are...
Do not pull the power cord. Put the plug in the battery charger if it is dirty or wet. 1. Connect the battery charger to the product. 3. Make sure that the battery is fully charged. 2. Use gloves when it is fully charged. Replace the trimmer head and cutting attachment guard if they are hit or if they have cracks. • Make sure that all nuts and screws are...
Owner Manual
Page 16
... work area. CAUTION: Cut grass. WARNING: Clean the trimmer head cover each time you cut the grass 1. Use the power trigger to the ground. Do not push the trimmer line into the grass. 3. Do not push the trimmer head to control the speed. 2. To clear grass 1. Tilt the trimmer head. 3. Other objects that the trimmer line is parallel to the ground when you assemble new trimmer line to the ground and above the ground. 2. To operate the product To...
... work area. CAUTION: Cut grass. WARNING: Clean the trimmer head cover each time you cut the grass 1. Use the power trigger to the ground. Do not push the trimmer line into the grass. 3. Do not push the trimmer head to control the speed. 2. To clear grass 1. Tilt the trimmer head. 3. Other objects that the trimmer line is parallel to the ground when you assemble new trimmer line to the ground and above the ground. 2. To operate the product To...
Owner Manual
Page 17
... stops the product if the product is used. Standard mode saves energy and gives maximum operation time. To change the direction of rotation of the trimmer head You can change the direction of rotation to set the direction of rotation at full speed or at high speed. The power boost function is on the battery and pull the battery out. 1511 - 011 - 03.07.2023...
... stops the product if the product is used. Standard mode saves energy and gives maximum operation time. To change the direction of rotation of the trimmer head You can change the direction of rotation to set the direction of rotation at full speed or at high speed. The power boost function is on the battery and pull the battery out. 1511 - 011 - 03.07.2023...
Owner Manual
Page 18
... damaged. Replace the cutting attachment guard if it is a list of the maintenance steps that the screws and nuts are not damaged and free from dirt. Make sure that you do on the product. Daily X X X X X X X X X X X X X Weekly Monthly X X 18 1511 - 011 - 03.07.2023 Maintenance schedule WARNING: Remove the battery before you do maintenance on the product. Make sure that the power trigger and the power trigger lockout...
... damaged. Replace the cutting attachment guard if it is a list of the maintenance steps that the screws and nuts are not damaged and free from dirt. Make sure that you do on the product. Daily X X X X X X X X X X X X X Weekly Monthly X X 18 1511 - 011 - 03.07.2023 Maintenance schedule WARNING: Remove the battery before you do maintenance on the product. Make sure that the power trigger and the power trigger lockout...
Owner Manual
Page 19
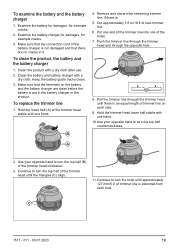
... for damages, for example cracks. 2. Keep the battery guide tracks clean. 3. Cut approximately 5.5 m/18 ft of the holes. 7. Use your opposite hand to turn the top half (B) of the trimmer head stable with a dry cloth. Hold the lower half (A) of the trimmer head clockwise. 3. B 4. Put one end of the trimmer line into one of new trimmer line. 6. Pull the trimmer line through the opposite hole. Make sure that...
... for damages, for example cracks. 2. Keep the battery guide tracks clean. 3. Cut approximately 5.5 m/18 ft of the holes. 7. Use your opposite hand to turn the top half (B) of the trimmer head stable with a dry cloth. Hold the lower half (A) of the trimmer head clockwise. 3. B 4. Put one end of the trimmer line into one of new trimmer line. 6. Pull the trimmer line through the opposite hole. Make sure that...

Owner Manual
Page 21
...Motor 320iL 1511 - 011 - 03.07.2023 21 Do not keep the battery in an area where static electricity can lock. • Clean the product and do a full servicing before you can occur. Possible faults Faulty battery Possible procedure Speak to prevent movement. • Remove the battery for electrical and electronic equipment. Put the battery...Put the battery charger in the package tightly to your dealer for a long time. • Attach the product... • Use the battery charger only when the surrounding temperature is dry and free from the battery charger during ...
...Motor 320iL 1511 - 011 - 03.07.2023 21 Do not keep the battery in an area where static electricity can lock. • Clean the product and do a full servicing before you can occur. Possible faults Faulty battery Possible procedure Speak to prevent movement. • Remove the battery for electrical and electronic equipment. Put the battery...Put the battery charger in the package tightly to your dealer for a long time. • Attach the product... • Use the battery charger only when the surrounding temperature is dry and free from the battery charger during ...
Owner Manual
Page 22
Motor type Speed of output shaft, rpm Cutting width, in./mm Weight Weight without battery, lb/kg Weight with BLi22, lb/kg Water protection level All weather use 320iL BLDC (brushless) 40 V 5000-6000 16/406 7.7/3.5 10.6/4.8 No Approved batteries for the product Battery Type Battery capacity, Ah Nominal voltage, V Weight, lb/kg BLi22 Lithium-ion 4.2 36 2.9/1.3 BLi30 Lithium-ion 7.5 36 4.2/1.9 40-B140 Lithium-ion...
Motor type Speed of output shaft, rpm Cutting width, in./mm Weight Weight without battery, lb/kg Weight with BLi22, lb/kg Water protection level All weather use 320iL BLDC (brushless) 40 V 5000-6000 16/406 7.7/3.5 10.6/4.8 No Approved batteries for the product Battery Type Battery capacity, Ah Nominal voltage, V Weight, lb/kg BLi22 Lithium-ion 4.2 36 2.9/1.3 BLi30 Lithium-ion 7.5 36 4.2/1.9 40-B140 Lithium-ion...


