

Maintenance Manual
Page 7
...Parts Catalog 457 Assemblies 459 Assembly 1: Covers and Operator Panel 460 Assembly 2: Tractor Assembly, Automatic Sheet Feeder, and Stacker 463 Assembly 3: Printer Mechanical Assembly and Base 465 Assembly 4: Mechanical Assembly I 467 Assembly 5: Mechanical Assembly II 470 Assembly 6: Mechanical Assembly III 473 Assembly 7:... Contents 7 Platen Pinch Roller Assembly 411 Carriage Drive Motor Assembly 415 Carriage Drive Belt 420 Paper Bail Assembly 422 Manual Sheet Feed Tray 425 Upper Feed Roller Shaft Assembly 426 Platen Assembly 429 Printhead Mask 432 Lower Feed Roller Assembly ...
...Parts Catalog 457 Assemblies 459 Assembly 1: Covers and Operator Panel 460 Assembly 2: Tractor Assembly, Automatic Sheet Feeder, and Stacker 463 Assembly 3: Printer Mechanical Assembly and Base 465 Assembly 4: Mechanical Assembly I 467 Assembly 5: Mechanical Assembly II 470 Assembly 6: Mechanical Assembly III 473 Assembly 7:... Contents 7 Platen Pinch Roller Assembly 411 Carriage Drive Motor Assembly 415 Carriage Drive Belt 420 Paper Bail Assembly 422 Manual Sheet Feed Tray 425 Upper Feed Roller Shaft Assembly 426 Platen Assembly 429 Printhead Mask 432 Lower Feed Roller Assembly ...

Maintenance Manual
Page 18
... Model 003 of the printer. This document is shipped with the printer; v IBM 4247 Printer Models 001, 002 Programming Reference, SA24-4410. it may be ordered from both the service and customer documentation are included. v Electrical Safety for the automatic sheet feeder (ASF). This guide shows the key functions of the information contained in "Appendix A. This manual...
... Model 003 of the printer. This document is shipped with the printer; v IBM 4247 Printer Models 001, 002 Programming Reference, SA24-4410. it may be ordered from both the service and customer documentation are included. v Electrical Safety for the automatic sheet feeder (ASF). This guide shows the key functions of the information contained in "Appendix A. This manual...

Maintenance Manual
Page 19
...IBM 4247 Printer, Models A00, 001, 002, and the new 003. The installation of the attachment cards is no longer necessary because the modules have identical labels displaying all of the Model 003 printers have been replaced with flash memory. This memory needs to be noted in the Model 003 This Maintenance Information Manual... is now auto-ranging, capable of the customer setup during the initial printer installation. There are ...
...IBM 4247 Printer, Models A00, 001, 002, and the new 003. The installation of the attachment cards is no longer necessary because the modules have identical labels displaying all of the Model 003 printers have been replaced with flash memory. This memory needs to be noted in the Model 003 This Maintenance Information Manual... is now auto-ranging, capable of the customer setup during the initial printer installation. There are ...

Maintenance Manual
Page 45
...information: Programs" on page 201. 1) Power off (O) the printer. 2) Load the printer with at least 22 inches (55.9 cm) of blank letter or legal size paper in the manual sheet feed to print the configuration. 3) Power on (|) the printer. 4) Press the Stop key to the signal cable ordering ...The following items are no blank fanfold forms available, install two sheets of blank, fanfold forms in the IBM 4247 Printer Models 001, 002 User's Guide, SA24-4408 or IBM 4247 Printer Model 003 User's Guide, S544-5780 for the configuration to step 7 on page 46. Ensure the host system and...
...information: Programs" on page 201. 1) Power off (O) the printer. 2) Load the printer with at least 22 inches (55.9 cm) of blank letter or legal size paper in the manual sheet feed to print the configuration. 3) Power on (|) the printer. 4) Press the Stop key to the signal cable ordering ...The following items are no blank fanfold forms available, install two sheets of blank, fanfold forms in the IBM 4247 Printer Models 001, 002 User's Guide, SA24-4408 or IBM 4247 Printer Model 003 User's Guide, S544-5780 for the configuration to step 7 on page 46. Ensure the host system and...
Maintenance Manual
Page 94
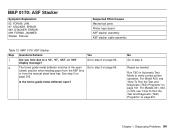
... board ASF stacker assembly ASF stacker cable assembly Table 13. The forms guide metal deflector must be in Automatic Test Mode to verify correct printer operation. Repair as needed. Are you here due to step 2. No Go to a '02', '97', '087', or '099' display message? MAP 0170: ASF Stacker Step ... and Diagnostic (T&D) Programs" on page 96. 2. Chapter 1. Go to step 3 on page 95. (down) position when feeding paper from the ASF bins or from the manual sheet feed tray. Is the forms guide metal deflector open Go to step 6 on page 201. For Models 001, 002, or...
... board ASF stacker assembly ASF stacker cable assembly Table 13. The forms guide metal deflector must be in Automatic Test Mode to verify correct printer operation. Repair as needed. Are you here due to step 2. No Go to a '02', '97', '087', or '099' display message? MAP 0170: ASF Stacker Step ... and Diagnostic (T&D) Programs" on page 96. 2. Chapter 1. Go to step 3 on page 95. (down) position when feeding paper from the ASF bins or from the manual sheet feed tray. Is the forms guide metal deflector open Go to step 6 on page 201. For Models 001, 002, or...
Maintenance Manual
Page 95
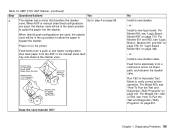
...the paper into the stacker. Install a new stacker cable. Feed forms alternately from the ASF or the manual sheet feed tray and observe the stacker vane. For Models 001, 002, or 003, see "Logic Board Model A00" on page 366. - Chapter 1. For Model A00, see "How...(T&D) Programs" on page 378. Diagnosing Problems 95 Table 13. When ASF or manual sheet feed configurations are used , the stacker vane will be in the down position to verify correct printer operation. or - Or "Logic Board Model 003" on page 370. or - No Install a new stacker. - vane. Install...
...the paper into the stacker. Install a new stacker cable. Feed forms alternately from the ASF or the manual sheet feed tray and observe the stacker vane. For Models 001, 002, or 003, see "Logic Board Model A00" on page 366. - Chapter 1. For Model A00, see "How...(T&D) Programs" on page 378. Diagnosing Problems 95 Table 13. When ASF or manual sheet feed configurations are used , the stacker vane will be in the down position to verify correct printer operation. or - Or "Logic Board Model 003" on page 370. or - No Install a new stacker. - vane. Install...
Maintenance Manual
Page 142
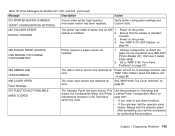
...MANUAL OR CHANGE CONFIGURATION Printer requires a paper source not installed. 1. Power off and on page 98. 097 FUNCTION NOT AVAILABLE MENU LOCKED The Operator Panel has been locked. Use the procedure in the Test Menu cannot be used. v If the customer had the operator panel locked. Chapter 1. If message remains, see IBM 4247 Printer... (see error. Error Messages for Models 001, 002, and 003 (continued) Message Description Action 070 PRINTER BOARD CHANGED VERIFY CONFIGURATION SETTINGS Occurs when printer logic board or microcode version has been replaced. Table 18. ...
...MANUAL OR CHANGE CONFIGURATION Printer requires a paper source not installed. 1. Power off and on page 98. 097 FUNCTION NOT AVAILABLE MENU LOCKED The Operator Panel has been locked. Use the procedure in the Test Menu cannot be used. v If the customer had the operator panel locked. Chapter 1. If message remains, see IBM 4247 Printer... (see error. Error Messages for Models 001, 002, and 003 (continued) Message Description Action 070 PRINTER BOARD CHANGED VERIFY CONFIGURATION SETTINGS Occurs when printer logic board or microcode version has been replaced. Table 18. ...

Maintenance Manual
Page 143
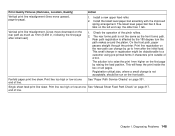
... change the attachment card to load forms into a manual sheet feed, under the platen, fanfold path. The coax attachment card is not compatible Printer base code must be reloaded for Models 001, 002, and 003 (continued) Message Description Action 098 HOLD PRINT TIMEOUT PRESS LOAD 003 FORMS EJECTED condition exceeded Press Load. 60 seconds...
... change the attachment card to load forms into a manual sheet feed, under the platen, fanfold path. The coax attachment card is not compatible Printer base code must be reloaded for Models 001, 002, and 003 (continued) Message Description Action 098 HOLD PRINT TIMEOUT PRESS LOAD 003 FORMS EJECTED condition exceeded Press Load. 60 seconds...
Maintenance Manual
Page 148
... spring arrangement. Single sheet feed print line skew. On the front path, paper passes straight through the printer. See "Paper Path Service Checks" on page 317. Print line too high or low at one See "Manual Sheet Feed Path Check" on page 301. Chapter 1. Diagnosing Problems 148 Install a new upper feed roller...
... spring arrangement. Single sheet feed print line skew. On the front path, paper passes straight through the printer. See "Paper Path Service Checks" on page 317. Print line too high or low at one See "Manual Sheet Feed Path Check" on page 301. Chapter 1. Diagnosing Problems 148 Install a new upper feed roller...

Maintenance Manual
Page 150
Printing starts to print 1 line, then printer hangs. Printhead crashes into left or right side frame, or the margins shift. ASF paper does not load or feed. Fanfold paper jams. Manual sheet feed jams. ASF feed jams. Fanfold paper print line skew. Print line too high or low on ... Feed Path Check" on page 366. Description of line. Printhead carriage only moves approximately 1 inch. Manual sheet feed paper does not load or feed. For Model A00, see page "Logic Board - Model 003" on page 317. No paper movement. See "MAP 0140: Printhead Drive" on page 285. See "...
Printing starts to print 1 line, then printer hangs. Printhead crashes into left or right side frame, or the margins shift. ASF paper does not load or feed. Fanfold paper jams. Manual sheet feed jams. ASF feed jams. Fanfold paper print line skew. Print line too high or low on ... Feed Path Check" on page 366. Description of line. Printhead carriage only moves approximately 1 inch. Manual sheet feed paper does not load or feed. For Model A00, see page "Logic Board - Model 003" on page 317. No paper movement. See "MAP 0140: Printhead Drive" on page 285. See "...
Maintenance Manual
Page 173
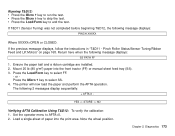
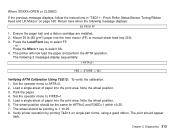
If T&D11 (Sensor Tuning) was not completed before beginning T&D12, the following message displays: SS PATH FF 1. The printer will now load the paper and perform the AFTA operation. YES NO Verifying AFTA Calibration Using T&D12: To verify the calibration: 1. Mount 20 ... display sequentially: + AFTA X - Ensure the paper bail and a ribbon cartridge are installed. 2. Load a single-sheet of paper into the front tractor (FF) or manual sheet feed tray (SS). 3. Press the Load/Form key to run the test. Pinch Roller Status/Sensor Tuning/Ribbon Feed and Lift Motors" on page...
If T&D11 (Sensor Tuning) was not completed before beginning T&D12, the following message displays: SS PATH FF 1. The printer will now load the paper and perform the AFTA operation. YES NO Verifying AFTA Calibration Using T&D12: To verify the calibration: 1. Mount 20 ... display sequentially: + AFTA X - Ensure the paper bail and a ribbon cartridge are installed. 2. Load a single-sheet of paper into the front tractor (FF) or manual sheet feed tray (SS). 3. Press the Load/Form key to run the test. Pinch Roller Status/Sensor Tuning/Ribbon Feed and Lift Motors" on page...
Maintenance Manual
Page 186
... on page 189. 6. The following message will print NLQ by inserting and removing a form from a paper path, and checking for printers with microcode level 2.09 or higher. Diagnostics 186 Paper Path Sensor Test This test provides information on page 168, then return here. ...Follow the steps in step 4, below. 1. The printer displays the following, giving you the option of the front fanfold presence sensor, rear fanfold presence sensor, and manual cutsheet presence sensor. 2. In this time: Y SENSOR TUNE N 2. Verify sensor operation ...
... on page 189. 6. The following message will print NLQ by inserting and removing a form from a paper path, and checking for printers with microcode level 2.09 or higher. Diagnostics 186 Paper Path Sensor Test This test provides information on page 168, then return here. ...Follow the steps in step 4, below. 1. The printer displays the following, giving you the option of the front fanfold presence sensor, rear fanfold presence sensor, and manual cutsheet presence sensor. 2. In this time: Y SENSOR TUNE N 2. Verify sensor operation ...
Maintenance Manual
Page 197
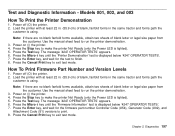
...Print key to exit test mode. Power off (O) the printer. 2. The message '4247 OPERATOR TESTS' appears. 6. Press the Enter key, and wait for the test to make the printer Not Ready (only the Power LED is lighted). 5. Use the manual sheet feed to print. 8. Press the Enter key, and...is using . Load the printer with at least 22 in. (55.9 cm) of blank, fanfold forms in the same tractor and forms path the customer is using . Power off (O) the printer. 2. Diagnostics 197 Power on (|) the printer. 4. Models 001, 002, and 003 How To Print the Printer Demonstration 1. Press the ...
...Print key to exit test mode. Power off (O) the printer. 2. The message '4247 OPERATOR TESTS' appears. 6. Press the Enter key, and wait for the test to make the printer Not Ready (only the Power LED is lighted). 5. Use the manual sheet feed to print. 8. Press the Enter key, and...is using . Load the printer with at least 22 in. (55.9 cm) of blank, fanfold forms in the same tractor and forms path the customer is using . Power off (O) the printer. 2. Diagnostics 197 Power on (|) the printer. 4. Models 001, 002, and 003 How To Print the Printer Demonstration 1. Press the ...

Maintenance Manual
Page 198
... To print a custom set on the operator panel display in the Print Error Log. Diagnostics 198 The current printer configuration is shown on earlier Models 001 and 002: a. The message '4247 OPERATOR TESTS' appears, and the Online LED goes out. 4. To print a custom set to exit test.... Use the Printer Configuration Test to print the configuration. 2. If fewer than 8 Code Descriptions are lighted). 3. b. Chapter 2. Press the Enter key and wait. When the on the Model 003 and later Models of the custom sets being used by the customer; Use the manual sheet feed to...
... To print a custom set on the operator panel display in the Print Error Log. Diagnostics 198 The current printer configuration is shown on earlier Models 001 and 002: a. The message '4247 OPERATOR TESTS' appears, and the Online LED goes out. 4. To print a custom set to exit test.... Use the Printer Configuration Test to print the configuration. 2. If fewer than 8 Code Descriptions are lighted). 3. b. Chapter 2. Press the Enter key and wait. When the on the Model 003 and later Models of the custom sets being used by the customer; Use the manual sheet feed to...

Maintenance Manual
Page 199
... tractor the customer is 256. While holding the Test key, press the Quiet key. 6. Load the printer with graphics or images Printing Error Logs and Print Usage Metrics: Use the following data: v Power-on... the Enter key. The maximum Count that will register for the usage metrics to print. 10. Use the manual sheet feed to 'Print Error Log', 'Clear Error Log', or 'Print Usage Metrics.' The message 'Error ... print the error log or usage metrics. 2. Press the Menu key. 8. '4247 OPERATOR TESTS' is lighted). 5. wait for the following procedure to print or clear the error log, ...
... tractor the customer is 256. While holding the Test key, press the Quiet key. 6. Load the printer with graphics or images Printing Error Logs and Print Usage Metrics: Use the following data: v Power-on... the Enter key. The maximum Count that will register for the usage metrics to print. 10. Use the manual sheet feed to 'Print Error Log', 'Clear Error Log', or 'Print Usage Metrics.' The message 'Error ... print the error log or usage metrics. 2. Press the Menu key. 8. '4247 OPERATOR TESTS' is lighted). 5. wait for the following procedure to print or clear the error log, ...

Maintenance Manual
Page 201
... tests the stacker and ASF circuits. 6. Hold the Stop and Test keys at the same time. 7. Diagnostics 201 Power off (O) the printer before installing or removing the parallel or stacker/ASF options loop-back connectors. 4. If the connectors are tuned with paper in two modes: ...release the Stop and Test keys. Automatic Test Mode, which runs all paper from the paper paths. Automatic mode requires manual intervention for example, to verify correct printer operation. Remove all the tests sequentially, is installed, disconnect the ASF connector. If an ASF stacker assembly is used ...
... tests the stacker and ASF circuits. 6. Hold the Stop and Test keys at the same time. 7. Diagnostics 201 Power off (O) the printer before installing or removing the parallel or stacker/ASF options loop-back connectors. 4. If the connectors are tuned with paper in two modes: ...release the Stop and Test keys. Automatic Test Mode, which runs all paper from the paper paths. Automatic mode requires manual intervention for example, to verify correct printer operation. Remove all the tests sequentially, is installed, disconnect the ASF connector. If an ASF stacker assembly is used ...
Maintenance Manual
Page 213
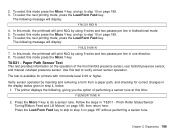
... SS PATH FF 1. Park the paper. 4. Diagnostics 213 Press the Load/Form key to FIXED=1. 5. The printer will now load the paper and perform the AFTA operation. The wheel should be the same for AFTA=0 and ...select FF. - Note the wheel position. 6. Load a single-sheet of paper into the print area. Verify printer operation by printing T&D14 on page 168. If the previous message displays, follow the instructions in "T&D11 - or... lb (80 g/m2) paper into the front tractor (FF) or manual sheet feed tray (SS). 3. Where XXXXX=OPEN or CLOSED. Set the operator menu to select SS. 4.
... SS PATH FF 1. Park the paper. 4. Diagnostics 213 Press the Load/Form key to FIXED=1. 5. The printer will now load the paper and perform the AFTA operation. The wheel should be the same for AFTA=0 and ...select FF. - Note the wheel position. 6. Load a single-sheet of paper into the print area. Verify printer operation by printing T&D14 on page 168. If the previous message displays, follow the instructions in "T&D11 - or... lb (80 g/m2) paper into the front tractor (FF) or manual sheet feed tray (SS). 3. Where XXXXX=OPEN or CLOSED. Set the operator menu to select SS. 4.
Maintenance Manual
Page 221
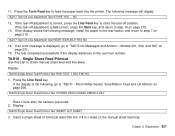
...step 10 on page 208. Single Sheet Feed Printout Use this test to feed the paper back into the printer. Diagnostics 221 The following , go to "T&D11 - Models 001, 002, and 003" on the manual sheet feed tray. Display: T&D18 Single Sheet Feed Printout Test RUN TEST ? Pinch Roller/Sensor Tune/...Ribbon Feed and Lift Motors" on page 219. 13. NO 12. T&D17 Tear-Off Line Adjustment Test REAR TEAR ADJ? Press the Form Feed key to check manual sheet feed...
...step 10 on page 208. Single Sheet Feed Printout Use this test to feed the paper back into the printer. Diagnostics 221 The following , go to "T&D11 - Models 001, 002, and 003" on the manual sheet feed tray. Display: T&D18 Single Sheet Feed Printout Test RUN TEST ? Pinch Roller/Sensor Tune/...Ribbon Feed and Lift Motors" on page 219. 13. NO 12. T&D17 Tear-Off Line Adjustment Test REAR TEAR ADJ? Press the Form Feed key to check manual sheet feed...
Maintenance Manual
Page 224
... operation of performing a sensor tune at this is selected, follow the steps in step 5. 1. The printer displays the following, which gives you the option of the front fanfold presence sensor, rear fanfold presence sensor, and manual cutsheet presence sensor. 10. Press the Line Feed key. To perform a sensor tune, press the Line...
... operation of performing a sensor tune at this is selected, follow the steps in step 5. 1. The printer displays the following, which gives you the option of the front fanfold presence sensor, rear fanfold presence sensor, and manual cutsheet presence sensor. 10. Press the Line Feed key. To perform a sensor tune, press the Line...

Maintenance Manual
Page 296
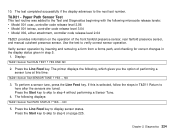
While the message is in the Front Push, Rear Push, and Manual Sheet Feed paper paths. The 3 paper presence sensors are often customer-use T&D11 - or If the printer displayed a '02/099 FORMS JAM' message after you perform T&D11, follow these steps to verify that when loading forms to ... Pinch Roller/Sensor Tune/Ribbon Feed and Lift Motors. Before you load forms, proceed to "Paper Presence Sensor Check". or - Note: If the printer displays a 01/001 END OF FORMS message after the operator loaded forms, the forms may have been loaded too far onto the tractor or blocked...
While the message is in the Front Push, Rear Push, and Manual Sheet Feed paper paths. The 3 paper presence sensors are often customer-use T&D11 - or If the printer displayed a '02/099 FORMS JAM' message after you perform T&D11, follow these steps to verify that when loading forms to ... Pinch Roller/Sensor Tune/Ribbon Feed and Lift Motors. Before you load forms, proceed to "Paper Presence Sensor Check". or - Note: If the printer displays a 01/001 END OF FORMS message after the operator loaded forms, the forms may have been loaded too far onto the tractor or blocked...


