Datasheet
Page 1
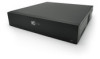
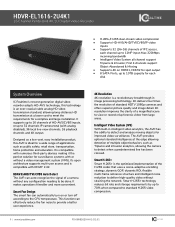
... of applications such as public safety, retail store, transportation, home protection and education. HDVR-EL1616-2U4K1 16 Channel Penta-brid 4K 2U Digital Video Recorder ● H.265+/H.265 dual-stream video compression ● Supports HD-AVS/AHD/TVI/CVBS/IP video inputs ● Supports 32 (16+16) channels of IPC access, each disk System Overview IC Realtime's newest generation digital video recorder adopts HD-AVS technology, this AVR is a revolutionary breakthrough...
... of applications such as public safety, retail store, transportation, home protection and education. HDVR-EL1616-2U4K1 16 Channel Penta-brid 4K 2U Digital Video Recorder ● H.265+/H.265 dual-stream video compression ● Supports HD-AVS/AHD/TVI/CVBS/IP video inputs ● Supports 32 (16+16) channels of IPC access, each disk System Overview IC Realtime's newest generation digital video recorder adopts HD-AVS technology, this AVR is a revolutionary breakthrough...
Datasheet
Page 2
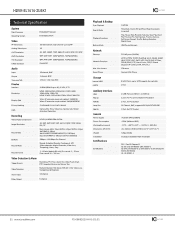
... Mode Network Ethernet Network Functions Max. User Access Smart Phone Storage Internal HDD eSATA Auxiliary Interface USB RS232 RS485 Loop Out RS422 General Power Supply Power Consumption Working Environment Dimensions (W×D×H) Weight Installation Certifications Certifications 1/4/9/16 Time /Date, Alarm, MD and Exact Search (accurate to second) Play, Pause, Stop, Rewind, Fast play, Slow Play, Next File, Previous File, Next Camera, Previous Camera, Full Screen, Repeat, Shuffle, Backup Selection, Digital Zoom USB Device/Network 2 RJ-45 ports...
... Mode Network Ethernet Network Functions Max. User Access Smart Phone Storage Internal HDD eSATA Auxiliary Interface USB RS232 RS485 Loop Out RS422 General Power Supply Power Consumption Working Environment Dimensions (W×D×H) Weight Installation Certifications Certifications 1/4/9/16 Time /Date, Alarm, MD and Exact Search (accurate to second) Play, Pause, Stop, Rewind, Fast play, Slow Play, Next File, Previous File, Next Camera, Previous Camera, Full Screen, Repeat, Shuffle, Backup Selection, Digital Zoom USB Device/Network 2 RJ-45 ports...
Product Manual
Page 2
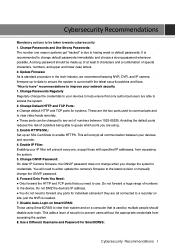
... Ports You Need: ● Only forward the HTTP and TCP ports that you change the ONVIF password. 6. Enable IP Filter: Enabling your devices and recorder. 4. Change Passwords and Use Strong Passwords: The number one reason systems get "hacked" is due to view video feeds remotely. ● These ports can be taken towards cybersecurity 1. Update Firmware As is standard procedure in the tech-industry, we recommend keeping NVR, DVR, and IP camera firmware up-to-date...
... Ports You Need: ● Only forward the HTTP and TCP ports that you change the ONVIF password. 6. Enable IP Filter: Enabling your devices and recorder. 4. Change Passwords and Use Strong Passwords: The number one reason systems get "hacked" is due to view video feeds remotely. ● These ports can be taken towards cybersecurity 1. Update Firmware As is standard procedure in the tech-industry, we recommend keeping NVR, DVR, and IP camera firmware up-to-date...

Product Manual
Page 9
...5.2.6 Live View Display ...60 5.2.7 Configuring Tour Settings 65 5.3 Entering Main Menu ...68 5.4 Controlling PTZ Cameras...71 5.4.1 Configuring PTZ Connection Settings 71 5.4.2 Working with PTZ Control Panel 73 5.4.3 Configuring PTZ Functions 75 5.4.4 Calling PTZ Functions ...77 5.4.5 Calling OSD Menu ...79 5.5 Configuring Camera Settings ...80 5.5.1 Configuring Image Settings 80 5.5.2 Configuring Encode Settings 83 5.5.3 Configuring Snapshot Settings 85 5.5.4 Configuring Overlay Settings 86 5.5.5 Configuring Covered Area Settings 87 5.5.6 Configuring Channel Type 88 5.5.7 Upgrading...
...5.2.6 Live View Display ...60 5.2.7 Configuring Tour Settings 65 5.3 Entering Main Menu ...68 5.4 Controlling PTZ Cameras...71 5.4.1 Configuring PTZ Connection Settings 71 5.4.2 Working with PTZ Control Panel 73 5.4.3 Configuring PTZ Functions 75 5.4.4 Calling PTZ Functions ...77 5.4.5 Calling OSD Menu ...79 5.5 Configuring Camera Settings ...80 5.5.1 Configuring Image Settings 80 5.5.2 Configuring Encode Settings 83 5.5.3 Configuring Snapshot Settings 85 5.5.4 Configuring Overlay Settings 86 5.5.5 Configuring Covered Area Settings 87 5.5.6 Configuring Channel Type 88 5.5.7 Upgrading...

Product Manual
Page 10
....1 Searching the Transaction Records 196 5.14.2 Configuring POS Settings 197 5.15 Configuring Backup Settings 198 5.15.1 Finding USB Device ...198 5.15.2 Backing up Files...199 5.16 Network Management ...200 5.16.1 Configuring Network Settings 200 5.16.2 Configuring Network Testing Settings 217 5.17 Configuring Account Settings 222 5.17.1 Configuring User Account 222 5.17.2 Configuring Group Account 228 5.17.3 Configuring Onvif Users 232 5.18 Audio Management ...233 5.18.1 Configuring Audio Files...
....1 Searching the Transaction Records 196 5.14.2 Configuring POS Settings 197 5.15 Configuring Backup Settings 198 5.15.1 Finding USB Device ...198 5.15.2 Backing up Files...199 5.16 Network Management ...200 5.16.1 Configuring Network Settings 200 5.16.2 Configuring Network Testing Settings 217 5.17 Configuring Account Settings 222 5.17.1 Configuring User Account 222 5.17.2 Configuring Group Account 228 5.17.3 Configuring Onvif Users 232 5.18 Audio Management ...233 5.18.1 Configuring Audio Files...

Product Manual
Page 13
... as search, backward play, network monitor, record search, and download. Support various playback modes: slow play, fast play, backward play and frame by frame play. Support time title overlay so that you can realize network remote access function. The dual-network port has the multi-address, fault tolerance, load balance setup mode. Record & Playback Support each channel real-time record independently, and simultaneously support the functions such as USB storage disk, portable HDD, and burner). Client-end user can download the file...
... as search, backward play, network monitor, record search, and download. Support various playback modes: slow play, fast play, backward play and frame by frame play. Support time title overlay so that you can realize network remote access function. The dual-network port has the multi-address, fault tolerance, load balance setup mode. Record & Playback Support each channel real-time record independently, and simultaneously support the functions such as USB storage disk, portable HDD, and burner). Client-end user can download the file...

Product Manual
Page 20
...port 1. Receives audio signal output from the external alarm Alarm input port 1-16 source. There are two types: NO (Normally Open) and NC (Normally Closed). These ports receive the signal from the devices such as the sound box. 6 HDMI port 7 USB port High definition audio and video signal output port. Connects to external devices such as microphone. Group 2: port 5 to Ethernet port. Ground. 2 Video input port Connects to analog camera to audio input port which receives the audio signal from devices such as USB storage device, keyboard and mouse. 8 Network port Connects...
...port 1. Receives audio signal output from the external alarm Alarm input port 1-16 source. There are two types: NO (Normally Open) and NC (Normally Closed). These ports receive the signal from the devices such as the sound box. 6 HDMI port 7 USB port High definition audio and video signal output port. Connects to external devices such as microphone. Group 2: port 5 to Ethernet port. Ground. 2 Video input port Connects to analog camera to audio input port which receives the audio signal from devices such as USB storage device, keyboard and mouse. 8 Network port Connects...
Product Manual
Page 36
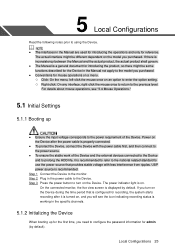
... for recording, the system starts recording after the power cable is properly connected. To protect the Device, connect the Device with the power cable first, and then connect to the power source. To ensure the stable work of the Device and the external devices connected to the Device and to prolong the HDD life, it is displayed by default). Power on . Step 3 Press the power button to turn on the Device during the time period...
... for recording, the system starts recording after the power cable is properly connected. To protect the Device, connect the Device with the power cable first, and then connect to the power source. To ensure the stable work of the Device and the external devices connected to the Device and to prolong the HDD life, it is displayed by default). Power on . Step 3 Press the power button to turn on the Device during the time period...

Product Manual
Page 127
... fast playback, click playback. Hide POS Hide. Slow Playback. During playing back, click to set the speed of the Device. Adjust volume of the current recorded video. During single-channel playback, click information on the screen. See Figure 5-95. to display or hide POS 5.9.3.2 Selecting Search Type You can search the recorded videos, splice, or snapshots from HDD or external storage device. From R/W HDD: Recorded videos or snapshots playback from HDD of slow playback as...
... fast playback, click playback. Hide POS Hide. Slow Playback. During playing back, click to set the speed of the Device. Adjust volume of the current recorded video. During single-channel playback, click information on the screen. See Figure 5-95. to display or hide POS 5.9.3.2 Selecting Search Type You can search the recorded videos, splice, or snapshots from HDD or external storage device. From R/W HDD: Recorded videos or snapshots playback from HDD of slow playback as...

Product Manual
Page 199
... devices connected to delay turning off recording after the alarm is cancelled. Set a length of alarm. Configure the time period from end of event detection to the stop of time for the Device to the selected output port. External Alarm: Enable alarm activation through the connected alarm box. Wireless Siren: Enable alarm activation through devices connected by default. The recording for the Device to be the channel of access...
... devices connected to delay turning off recording after the alarm is cancelled. Set a length of alarm. Configure the time period from end of event detection to the stop of time for the Device to the selected output port. External Alarm: Enable alarm activation through the connected alarm box. Wireless Siren: Enable alarm activation through devices connected by default. The recording for the Device to be the channel of access...

Product Manual
Page 202
... the selected output port. External Alarm: Enable alarm activation through the connected alarm box. Wireless Siren: Enable alarm activation through the alarm devices connected to 300 seconds, and the default value is active. The selected channel(s) starts recording after the alarm is enabled motion detect alarms in Main Menu > STORAGE > SCHEDULE > Snapshot. Enable the alarm function. Click Setting to record. Configure the time period...
... the selected output port. External Alarm: Enable alarm activation through the connected alarm box. Wireless Siren: Enable alarm activation through the alarm devices connected to 300 seconds, and the default value is active. The selected channel(s) starts recording after the alarm is enabled motion detect alarms in Main Menu > STORAGE > SCHEDULE > Snapshot. Enable the alarm function. Click Setting to record. Configure the time period...
Product Manual
Page 223
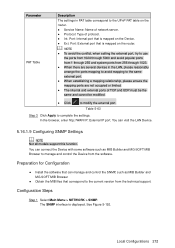
... on the Device. Ext. Local Configurations 212 Port: Internal port that is displayed. Table 5-63 Step 3 Click Apply to modify the external port. Preparation for Configuration Install the software that correspond to the current version from the software. Configuration Steps Step 1 Select Main Menu > NETWORK > SNMP. PAT Table To avoid the conflict, when setting the external port, try to use the ports from 1024...
... on the Device. Ext. Local Configurations 212 Port: Internal port that is displayed. Table 5-63 Step 3 Click Apply to modify the external port. Preparation for Configuration Install the software that correspond to the current version from the software. Configuration Steps Step 1 Select Main Menu > NETWORK > SNMP. PAT Table To avoid the conflict, when setting the external port, try to use the ports from 1024...
Product Manual
Page 250
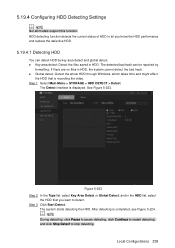
...; Key area detect: Detect the files saved in the HDD list, select the HDD that is recording the video. and in HDD. The Detect interface is completed, see Figure 5-224. During detecting, click Pause to pause detecting, click Continue to restart detecting, and click Stop Detect to detect. 5.19.4 Configuring HDD Detecting Settings Not all models support this function. See Figure...
...; Key area detect: Detect the files saved in the HDD list, select the HDD that is recording the video. and in HDD. The Detect interface is completed, see Figure 5-224. During detecting, click Pause to pause detecting, click Continue to restart detecting, and click Stop Detect to detect. 5.19.4 Configuring HDD Detecting Settings Not all models support this function. See Figure...

Product Manual
Page 281
... camera 1 settings, network settings, storage settings, system settings, account settings, and view information. 2 None Displays system date and time. 3 When you point to , the current user account is displayed. Displays Cell Phone Client and Device SN QR Code. Cell Phone Client: Use your mobile phone to scan the QR code to add the device into the platform. Then you can refer to "5 Local Configurations." See "5.1.4.5 Configuring P2P Settings." 6 Displays the web main menu. Figure 6-2 No. 6.3 Introducing Web...
... camera 1 settings, network settings, storage settings, system settings, account settings, and view information. 2 None Displays system date and time. 3 When you point to , the current user account is displayed. Displays Cell Phone Client and Device SN QR Code. Cell Phone Client: Use your mobile phone to scan the QR code to add the device into the platform. Then you can refer to "5 Local Configurations." See "5.1.4.5 Configuring P2P Settings." 6 Displays the web main menu. Figure 6-2 No. 6.3 Introducing Web...

Product Manual
Page 284
... audio under playback state. There are following possibilities: Video quality setup is too low. Program read error, bit data is too small. There are following possibilities: Front panel PTZ error. PTZ decoder setup, connection or installation is not correct. Cable connection is not correct. PTZ setup is not correct. PTZ decoder and DVR protocol is not compatible. PTZ decoder and DVR address...
... audio under playback state. There are following possibilities: Video quality setup is too low. Program read error, bit data is too small. There are following possibilities: Front panel PTZ error. PTZ decoder setup, connection or installation is not correct. Cable connection is not correct. PTZ setup is not correct. PTZ decoder and DVR protocol is not compatible. PTZ decoder and DVR address...

Product Manual
Page 285
.... MAC address conflict. PC or DVR network card is not compatible with DVR program. 14. Keyboard cannot control DVR There are following possibilities: DVR serial port setup is not correct. Address is not correct. When there are following possibilities: Alarm setup is not correct. Alarm output has been open manually. Input device error or connection is only mosaic no right to Windows 2000 sp4...
.... MAC address conflict. PC or DVR network card is not compatible with DVR program. 14. Keyboard cannot control DVR There are following possibilities: DVR serial port setup is not correct. Address is not correct. When there are following possibilities: Alarm setup is not correct. Alarm output has been open manually. Input device error or connection is only mosaic no right to Windows 2000 sp4...

Product Manual
Page 286
... are following possibilities: Check camera power supplying, data cable connection and other address. I connect the general analog camera to the device, there is no video output. I connect the standard definition analog camera or the coaxial camera to the device, there is no video output. There are two loops connect to one alarm device. 20. Please make sure the device supports general standard definition analog camera. 28. Forgot local menu operation password or network password Please contact your system. 19...
... are following possibilities: Check camera power supplying, data cable connection and other address. I connect the general analog camera to the device, there is no video output. I connect the standard definition analog camera or the coaxial camera to the device, there is no video output. There are two loops connect to one alarm device. 20. Please make sure the device supports general standard definition analog camera. 28. Forgot local menu operation password or network password Please contact your system. 19...

Product Manual
Page 288
.... Please use the cell phone to scan the QR code on the device P2P interface (Main Menu > Network > P2P), or you remove the audio/video signal cable, RS-232 or RS-485 cable. Do not connect the TV to select corresponding channel type (such as IP address, manufacturer, port, user name, password, and remote channel number). FAQ 277 You can use the shutdown function in error.) 35. Please keep the sound ventilation. ...
.... Please use the cell phone to scan the QR code on the device P2P interface (Main Menu > Network > P2P), or you remove the audio/video signal cable, RS-232 or RS-485 cable. Do not connect the TV to select corresponding channel type (such as IP address, manufacturer, port, user name, password, and remote channel number). FAQ 277 You can use the shutdown function in error.) 35. Please keep the sound ventilation. ...

Product Manual
Page 291
... (3) to calculate total capacity (accumulation) qT that is needed for all channels in the DVR during alarm video recording (including motion detection). Step 1 According to Formula (1) to video recording (video recording type and video file storage time). Appendix 2 HDD Capacity Calculation Calculate total capacity needed by each DVR according to calculate storage capacity qi that is the capacity of each channel needed for each hour, unit MB. Formula (2): mi...
... (3) to calculate total capacity (accumulation) qT that is needed for all channels in the DVR during alarm video recording (including motion detection). Step 1 According to Formula (1) to video recording (video recording type and video file storage time). Appendix 2 HDD Capacity Calculation Calculate total capacity needed by each DVR according to calculate storage capacity qi that is the capacity of each channel needed for each hour, unit MB. Formula (2): mi...

Product Manual
Page 300
Appendix 4 Compatible CD/DVD Burner List Please upgrade the DVR firmware to latest version to set USB burner. And you can use the USB cable with the model recommended to ensure the accuracy of the table below. Manufacturer Model Port Type Type Sony DRX-S50U USB DVD-RW Sony DRX-S70U USB DVD-RW Sony AW-G170S SATA DVD-RW Samsung TS-H653A SATA DVD-RW Panasonic SW-9588-C SATA DVD-RW Sony DRX-S50U USB DVD-RW BenQ 5232WI USB DVD-RW Compatible CD/DVD Burner List 289
Appendix 4 Compatible CD/DVD Burner List Please upgrade the DVR firmware to latest version to set USB burner. And you can use the USB cable with the model recommended to ensure the accuracy of the table below. Manufacturer Model Port Type Type Sony DRX-S50U USB DVD-RW Sony DRX-S70U USB DVD-RW Sony AW-G170S SATA DVD-RW Samsung TS-H653A SATA DVD-RW Panasonic SW-9588-C SATA DVD-RW Sony DRX-S50U USB DVD-RW BenQ 5232WI USB DVD-RW Compatible CD/DVD Burner List 289


