
Specifications
Page 1
... Inlet Tube Flexible Outlet Tube Flexible Vent Tube 2-1/2" 11" NOTE: Max counter thickness is 3/4". 6-3/4" 6-1/8" Job Specifications Sample Specification Instant hot water dispenser(s) shall be InSinkErator Model H770-SS with 2/3-gallon stainless steel tank, adjustable temperature from 160°F to 210°F and instant, self-closing Recommended 30-125 psi Supply Pressure Shipping Weight...
... Inlet Tube Flexible Outlet Tube Flexible Vent Tube 2-1/2" 11" NOTE: Max counter thickness is 3/4". 6-3/4" 6-1/8" Job Specifications Sample Specification Instant hot water dispenser(s) shall be InSinkErator Model H770-SS with 2/3-gallon stainless steel tank, adjustable temperature from 160°F to 210°F and instant, self-closing Recommended 30-125 psi Supply Pressure Shipping Weight...

Owners Manual
Page 1
TranScape™ View™ TranScape™ Wave™ HC3/GN3 H990 H770 Instant Hot Water Dispenser Owner's Manual Installation, Care & Use Instalacion, cuidado & uso Installation, soin et utilisation
TranScape™ View™ TranScape™ Wave™ HC3/GN3 H990 H770 Instant Hot Water Dispenser Owner's Manual Installation, Care & Use Instalacion, cuidado & uso Installation, soin et utilisation
Owners Manual
Page 2
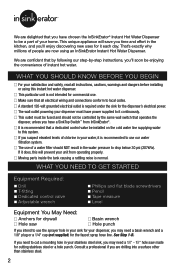
...you have a SinkTop Switch™ from operating properly. I Make sure that all instructions, cautions, warnings and dangers before installing or using an InSinkErator Instant Hot Water Dispenser. WHAT YOU NEED TO GET STARTED Equipment Required: I Drill I T-fitting I Dedicated control valve I Adjustable wrench I ...by -step instructions, you are drilling into a surface other than stainless steel. 2 We are delighted that you have chosen the InSinkErator® Instant Hot Water Dispenser to drop below 30 psi (207kPa). I The use our water filtration system. I This outlet must...
...you have a SinkTop Switch™ from operating properly. I Make sure that all instructions, cautions, warnings and dangers before installing or using an InSinkErator Instant Hot Water Dispenser. WHAT YOU NEED TO GET STARTED Equipment Required: I Drill I T-fitting I Dedicated control valve I Adjustable wrench I ...by -step instructions, you are drilling into a surface other than stainless steel. 2 We are delighted that you have chosen the InSinkErator® Instant Hot Water Dispenser to drop below 30 psi (207kPa). I The use our water filtration system. I This outlet must...

Owners Manual
Page 3
... letters. An imminently hazardous situation, which, if not avoided, will require your instant hot water dispenser and record it here HC-View-SS H-View-SS HC-Wave-SS H-Wave-SS HC3-SS GN3-SS H990-SS H770-SS HOW TO USE THIS INSTRUCTION MANUAL These instructions are separated into main sections, indicated by numbers, and subsections, indicated by -step...
... letters. An imminently hazardous situation, which, if not avoided, will require your instant hot water dispenser and record it here HC-View-SS H-View-SS HC-Wave-SS H-Wave-SS HC3-SS GN3-SS H990-SS H770-SS HOW TO USE THIS INSTRUCTION MANUAL These instructions are separated into main sections, indicated by numbers, and subsections, indicated by -step...

Owners Manual
Page 4
...(HC3/GN3 only) 3/8" Tube Brass Nut / Ferrule / Tube Insert Quick Connector HC3-SS 1-5/8" 1-5/8" 2-1/4" Rubber Small Steel Large Steel 2-1/4" Fiber Snap-Connect Fitting (3 pieces) Tank H-View-SS H-Wave-SS GN3-SS Extension & Star Nut (View & Wave only) Washers 1-5/8" 1-5/8" 3/4" Screws (2) ...Wing Nut (HC3/GN3 only) Snap-Connect Fitting (3 pieces) Tank 3/4" Screws (2) H990-SS Semi-Circular Mounting Plate Wing Nut Snap-Connect Rubber Gasket Fitting (3 pieces) Tank H770-SS 3/4" Screws (2) Fiber Gasket Metal Mounting Plate Snap-Connect Mounting Screw Fitting (3 pieces) ...
...(HC3/GN3 only) 3/8" Tube Brass Nut / Ferrule / Tube Insert Quick Connector HC3-SS 1-5/8" 1-5/8" 2-1/4" Rubber Small Steel Large Steel 2-1/4" Fiber Snap-Connect Fitting (3 pieces) Tank H-View-SS H-Wave-SS GN3-SS Extension & Star Nut (View & Wave only) Washers 1-5/8" 1-5/8" 3/4" Screws (2) ...Wing Nut (HC3/GN3 only) Snap-Connect Fitting (3 pieces) Tank 3/4" Screws (2) H990-SS Semi-Circular Mounting Plate Wing Nut Snap-Connect Rubber Gasket Fitting (3 pieces) Tank H770-SS 3/4" Screws (2) Fiber Gasket Metal Mounting Plate Snap-Connect Mounting Screw Fitting (3 pieces) ...

Owners Manual
Page 5
...in their sink with a hole saw for dispenser handles to be controlled by special order (EXT-10) I If using an InSinkErator SinkTop SwitchTM. I If drilling a hole into a surface other than stainless steel. I Identify locations for the dispenser with an...center of hole to wall thickness (depth) HC-View-SS ...... 25⁄8 3" H-View-SS ........ 25⁄8 3" HC-Wave-SS .... 25⁄8 3" H-Wave-SS ...... 23⁄8 3" HC3-SS 21⁄4 3⁄4" * GN3-SS 21⁄2 3⁄4" * H990-SS .......... 11⁄4 3" H770-SS .......... 2 3⁄4" * HC3/GN3, extension is ...
...in their sink with a hole saw for dispenser handles to be controlled by special order (EXT-10) I If using an InSinkErator SinkTop SwitchTM. I If drilling a hole into a surface other than stainless steel. I Identify locations for the dispenser with an...center of hole to wall thickness (depth) HC-View-SS ...... 25⁄8 3" H-View-SS ........ 25⁄8 3" HC-Wave-SS .... 25⁄8 3" H-Wave-SS ...... 23⁄8 3" HC3-SS 21⁄4 3⁄4" * GN3-SS 21⁄2 3⁄4" * H990-SS .......... 11⁄4 3" H770-SS .......... 2 3⁄4" * HC3/GN3, extension is ...
Owners Manual
Page 6
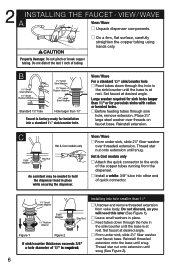
VIEW/ WAVE A View / Wave I From under sink, slide 21⁄4" fiber washer over threads on faucet base. View / Wave For a standard 11⁄2" sink/counter hole I Feed tubes down through sink hole, remove extension. Place 21⁄4" large steel washer over faucet base. View / Wave I Unpack dispenser components. Set faucet at desired angle. Reinstall threaded extension onto the base until snug. Property Damage: Do not pinch or break copper tubing. Large washer required for sink holes larger than 11⁄2" or for installation into a standard 11⁄2" sink/counter ...
VIEW/ WAVE A View / Wave I From under sink, slide 21⁄4" fiber washer over threads on faucet base. View / Wave For a standard 11⁄2" sink/counter hole I Feed tubes down through sink hole, remove extension. Place 21⁄4" large steel washer over faucet base. View / Wave I Unpack dispenser components. Set faucet at desired angle. Reinstall threaded extension onto the base until snug. Property Damage: Do not pinch or break copper tubing. Large washer required for sink holes larger than 11⁄2" or for installation into a standard 11⁄2" sink/counter ...
Owners Manual
Page 7
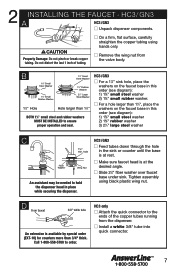
HC3/ GN3 A HC3 / GN3 I 7 I Make sure faucet head is available by special order (EXT-10) for counters more than 3/4" thick. I Unpack dispenser components. 2 INSTALLING THE FAUCET - Do not distort the last 1 inch of the copper tubes running from the valve body. HC3 / GN3 I For a hole larger than 11⁄4" BOTH 15⁄8" small steel and rubber washers MUST BE INSTALLED to the ends of tubing. I Feed tubes down through the hole in place while securing the dispenser. Tighten assembly using hands only. HC3 only I Remove the wing nut from the dispenser. I On ...
HC3/ GN3 A HC3 / GN3 I 7 I Make sure faucet head is available by special order (EXT-10) for counters more than 3/4" thick. I Unpack dispenser components. 2 INSTALLING THE FAUCET - Do not distort the last 1 inch of the copper tubes running from the valve body. HC3 / GN3 I For a hole larger than 11⁄4" BOTH 15⁄8" small steel and rubber washers MUST BE INSTALLED to the ends of tubing. I Feed tubes down through the hole in place while securing the dispenser. Tighten assembly using hands only. HC3 only I Remove the wing nut from the dispenser. I On ...

Owners Manual
Page 8
Property Damage: Do not pinch or break copper tubing. C An assistant may be needed to ensure proper seal. I Ensure that the black rubber gasket is properly seated into the base of tubing. Tighten the wing nut until the base is at rest on the sink or countertop surface. H990 I On a firm, flat surface, carefully straighten the copper tubing using hands only. I Unpack dispenser components. H990 A H990 I Place wing nut onto the threaded stud. Do not distort the last 1 inch of the dispenser head and will surround the sink mount. I From under the sink, place ...
Property Damage: Do not pinch or break copper tubing. C An assistant may be needed to ensure proper seal. I Ensure that the black rubber gasket is properly seated into the base of tubing. Tighten the wing nut until the base is at rest on the sink or countertop surface. H990 I On a firm, flat surface, carefully straighten the copper tubing using hands only. I Unpack dispenser components. H990 A H990 I Place wing nut onto the threaded stud. Do not distort the last 1 inch of the dispenser head and will surround the sink mount. I From under the sink, place ...

Owners Manual
Page 9
...seal. Tighten the screw until the base is at the desired angle. D Half moon shaped metal mounting plate should cradle all descending tubes. H770 I Feed tubes down the hole in place while securing the dispenser. I Ensure that the screw is properly seated against the base of the... dispenser head. H770 A H770 I On a firm, flat surface, carefully straighten the copper tubing using hands only. B Fiber Gasket Make sure to use fiber gasket to hold...
...seal. Tighten the screw until the base is at the desired angle. D Half moon shaped metal mounting plate should cradle all descending tubes. H770 I Feed tubes down the hole in place while securing the dispenser. I Ensure that the screw is properly seated against the base of the... dispenser head. H770 A H770 I On a firm, flat surface, carefully straighten the copper tubing using hands only. B Fiber Gasket Make sure to use fiber gasket to hold...

Owners Manual
Page 10
Mount tank vertically in an area that allows clearance on the underside of the connections. 10 I Turn screws into pre-drilled holes, leaving 1/4" exposed. Property Damage: Tank must be mounted level to ensure proper operation. B Leave 1/4" for drainage, if necessary. DO NOT extend plumbing or electrical lines. DO NOT over the far right smooth fitting and slide down approximately 1/2". (3) Property Damage: Pinched or blocked water lines may cause damage to the dispenser tank. I Hang the tank on the screws. I Tighten the screws with only 1/2 turn clockwise. 4 ...
Mount tank vertically in an area that allows clearance on the underside of the connections. 10 I Turn screws into pre-drilled holes, leaving 1/4" exposed. Property Damage: Tank must be mounted level to ensure proper operation. B Leave 1/4" for drainage, if necessary. DO NOT extend plumbing or electrical lines. DO NOT over the far right smooth fitting and slide down approximately 1/2". (3) Property Damage: Pinched or blocked water lines may cause damage to the dispenser tank. I Hang the tank on the screws. I Tighten the screws with only 1/2 turn clockwise. 4 ...

Owners Manual
Page 11
... initial heating cycle. 11 I Run the water for water to 2 minutes). B I Install a T-fitting (not included) onto the cold water supply line. H-View / H-Wave / GN3/ H990 / H770 I Check all connections to flush lines (both the hot and cold handles independently if applicable). Gurgling or hissing is required under the sink. A Brass Nut...
... initial heating cycle. 11 I Run the water for water to 2 minutes). B I Install a T-fitting (not included) onto the cold water supply line. H-View / H-Wave / GN3/ H990 / H770 I Check all connections to flush lines (both the hot and cold handles independently if applicable). Gurgling or hissing is required under the sink. A Brass Nut...

Owners Manual
Page 12
...than repaired, the warranty on how long an implied warranty lasts, or the exclusion or limitations of installation. Contact an authorized InSinkErator Service agent for the location of the original dispenser's warranty. Periodically inspect the unit for any responsibility for leakage and replaced... a leak detector, should be grounded. This instant hot water dispenser is required during the warranty period, contact an authorized InSinkErator service agent to whether the instant hot water dispenser is required, and for repairs or replacement components. DO NOT close vent...
...than repaired, the warranty on how long an implied warranty lasts, or the exclusion or limitations of installation. Contact an authorized InSinkErator Service agent for the location of the original dispenser's warranty. Periodically inspect the unit for any responsibility for leakage and replaced... a leak detector, should be grounded. This instant hot water dispenser is required during the warranty period, contact an authorized InSinkErator service agent to whether the instant hot water dispenser is required, and for repairs or replacement components. DO NOT close vent...

Owners Manual
Page 13
...deterioration of water damage, immediately remove the unit from bottom center of tank, turning until it is not used in severe burns. InSinkErator offers the only water filtration system designed specifically for water to reach new temperature. To reset the thermostat to 200°, turn the...activate faucet handle for 20 seconds to bring in fresh water to your instant hot water dispenser system. For more information, visit www.insinkerator.com. 13 If there are signs of the plastic components and void the warranty. CARE AND USE Electric Shock Hazard: To prevent ...
...deterioration of water damage, immediately remove the unit from bottom center of tank, turning until it is not used in severe burns. InSinkErator offers the only water filtration system designed specifically for water to reach new temperature. To reset the thermostat to 200°, turn the...activate faucet handle for 20 seconds to bring in fresh water to your instant hot water dispenser system. For more information, visit www.insinkerator.com. 13 If there are signs of the plastic components and void the warranty. CARE AND USE Electric Shock Hazard: To prevent ...

Owners Manual
Page 14
... a partially opened shut-off occurs. • See page 6 or 7, Step 2B to check proper mounting washer installation. Please read Troubleshooting Guide and/or visit www.insinkerator.com before calling AnswerLine™ TROUBLESHOOTING PROBLEM Water and steam spits forcefully from spout without turning on tank front. WHAT TO DO • Activate faucet...
... a partially opened shut-off occurs. • See page 6 or 7, Step 2B to check proper mounting washer installation. Please read Troubleshooting Guide and/or visit www.insinkerator.com before calling AnswerLine™ TROUBLESHOOTING PROBLEM Water and steam spits forcefully from spout without turning on tank front. WHAT TO DO • Activate faucet...

Owners Manual
Page 43
A Printed in its sole discretion, without notice or obligation and further reserves the right to change or discontinue models. © 2008 InSinkErator, a division of Emerson Electric Co. InSinkErator may make improvements and/or changes in the specifications at any time, in USA The Emerson logo is a trademark and service mark of Emerson Electric Co. 1.800.558.5700 www.insinkerator.com 44228 REV. All Rights Reserved.
A Printed in its sole discretion, without notice or obligation and further reserves the right to change or discontinue models. © 2008 InSinkErator, a division of Emerson Electric Co. InSinkErator may make improvements and/or changes in the specifications at any time, in USA The Emerson logo is a trademark and service mark of Emerson Electric Co. 1.800.558.5700 www.insinkerator.com 44228 REV. All Rights Reserved.