
Warranty (English)
Page 1
... WHAT DOES THE WARRANTY NOT COVER? This warranty does not cover: • Customer instruction • Installation • Set up adjustments • Cosmetic damage • Damage due to the store you must be purchased from an online web site, mail ...use • Modification of any part of the product, including the antenna • Plasma display panel damaged by this warranty that you own your purchase of the product in its original packaging or packaging that the product shall be free of defects in -home warranty service for a period of one (1) year from the date of Insignia...
... WHAT DOES THE WARRANTY NOT COVER? This warranty does not cover: • Customer instruction • Installation • Set up adjustments • Cosmetic damage • Damage due to the store you must be purchased from an online web site, mail ...use • Modification of any part of the product, including the antenna • Plasma display panel damaged by this warranty that you own your purchase of the product in its original packaging or packaging that the product shall be free of defects in -home warranty service for a period of one (1) year from the date of Insignia...
Warranty (English)
Page 2
... or batteries • Products where the factory applied serial number has been altered or removed REPAIR REPLACEMENT AS PROVIDED UNDER THIS WARRANTY IS YOUR EXCLUSIVE REMEDY. This warranty also does not cover: • Damage due to incorrect operation or maintenance • Connection to service the product • Products sold as is a trademark of Best Buy Enterprise Services, Inc. Insignia, 7601 Penn Avenue South, Richfield, Minnesota...
... or batteries • Products where the factory applied serial number has been altered or removed REPAIR REPLACEMENT AS PROVIDED UNDER THIS WARRANTY IS YOUR EXCLUSIVE REMEDY. This warranty also does not cover: • Damage due to incorrect operation or maintenance • Connection to service the product • Products sold as is a trademark of Best Buy Enterprise Services, Inc. Insignia, 7601 Penn Avenue South, Richfield, Minnesota...
User Manual (English)
Page 3
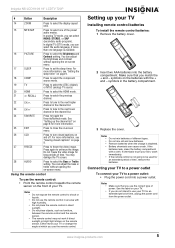
... 5 Installing remote control batteries 5 Connecting your TV to a power outlet 5 Connecting an outside antenna 6 Connecting cable TV 6 Connecting to an external signal source 6 Connecting a computer 7 Using your TV 7 Turning your TV on and off 7 Selecting the TV signal source 7 Setting up the channel list 8 Changing channels 8 Selecting a digital sub-channel 8 Adjusting the volume 8 Displaying status information 8 Checking the DTV signal strength 8 Adding a channel label 8 Freezing the picture 9 Setting the clock 9 Setting the sleep timer 9 Viewing closed captions 9 Setting...
... 5 Installing remote control batteries 5 Connecting your TV to a power outlet 5 Connecting an outside antenna 6 Connecting cable TV 6 Connecting to an external signal source 6 Connecting a computer 7 Using your TV 7 Turning your TV on and off 7 Selecting the TV signal source 7 Setting up the channel list 8 Changing channels 8 Selecting a digital sub-channel 8 Adjusting the volume 8 Displaying status information 8 Checking the DTV signal strength 8 Adding a channel label 8 Freezing the picture 9 Setting the clock 9 Setting the sleep timer 9 Viewing closed captions 9 Setting...
User Manual (English)
Page 4
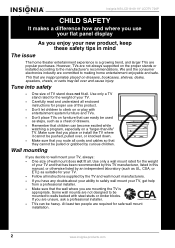
...; Follow all enclosed instructions for proper use your flat panel display As you enjoy your new product, keep these safety tips in this manual, or otherwise listed by this TV manufacturer, listed in mind The issue The home theater entertainment experience is appropriate. If you are not always supported on the proper stands or installed according to making home entertainment enjoyable and safe...
...; Follow all enclosed instructions for proper use your flat panel display As you enjoy your new product, keep these safety tips in this manual, or otherwise listed by this TV manufacturer, listed in mind The issue The home theater entertainment experience is appropriate. If you are not always supported on the proper stands or installed according to making home entertainment enjoyable and safe...

User Manual (English)
Page 5
... periods of time. 14 Refer all instructions. 5 Do not use your TV near any way, such as the power-supply cord or plug is damaged, liquid has been spilled or objects have a qualified electrician install a separate circuit breaker. Protect the power cord from your TV. 11 Only use of electric shock is connected to your TV. Pay particular attention to plugs, wall outlets, and...
... periods of time. 14 Refer all instructions. 5 Do not use your TV near any way, such as the power-supply cord or plug is damaged, liquid has been spilled or objects have a qualified electrician install a separate circuit breaker. Protect the power cord from your TV. 11 Only use of electric shock is connected to your TV. Pay particular attention to plugs, wall outlets, and...

User Manual (English)
Page 6
... as close to the point of your parental control password. 6 - Mobile telephone warning To avoid interference with the 0-9 number buttons and ENTER button to select digital channels. 7 VOL + Press to increase the volume. 8 MUTE Press to mute the sound. Features Front 1 2 3 4 5 6 7 # Button Description 1 VOL+ Press to show the on the screen as a fixed blue, green, or red point. In Menu mode, functions as the ENTER button. 7 POWER Press to turn on setting...
... as close to the point of your parental control password. 6 - Mobile telephone warning To avoid interference with the 0-9 number buttons and ENTER button to select digital channels. 7 VOL + Press to increase the volume. 8 MUTE Press to mute the sound. Features Front 1 2 3 4 5 6 7 # Button Description 1 VOL+ Press to show the on the screen as a fixed blue, green, or red point. In Menu mode, functions as the ENTER button. 7 POWER Press to turn on setting...
User Manual (English)
Page 7
... of power. For more than one of time, remove the batteries. Connecting your TV to select one language is available. 16 PICTURE Press to be used for more information, see "Viewing closed captions on the remote sensor. Setting up the channel list" on page 9. 18 COMP Press to select the component source mode. 19 TV Press to select the ATSC (digital), or NTSC (analog) TV source. 20 HDMI Press to select the HDMI mode...
... of power. For more than one of time, remove the batteries. Connecting your TV to select one language is available. 16 PICTURE Press to be used for more information, see "Viewing closed captions on the remote sensor. Setting up the channel list" on page 9. 18 COMP Press to select the component source mode. 19 TV Press to select the ATSC (digital), or NTSC (analog) TV source. 20 HDMI Press to select the HDMI mode...
User Manual (English)
Page 8
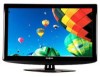
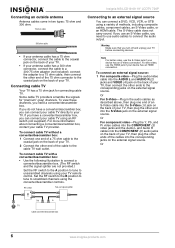
... box. (The RF switch and the signal splitter are not provided.) Set the RF switch to the A position to tune to unscrambled channels using an RF switch (not supplied). Or 6 www.insignia-products.com To view these channels, you need a converter/descrambler box. If you use an S-Video cable, you need to use the HDMI jack if your TV. For best video, use audio cables to connect the audio output. Insignia NS-LCD19-09 19" LCDTV 720P Connecting an outside antenna Antenna cables come in the audio cables...
... box. (The RF switch and the signal splitter are not provided.) Set the RF switch to the A position to tune to unscrambled channels using an RF switch (not supplied). Or 6 www.insignia-products.com To view these channels, you need a converter/descrambler box. If you use an S-Video cable, you need to use the HDMI jack if your TV. For best video, use audio cables to connect the audio output. Insignia NS-LCD19-09 19" LCDTV 720P Connecting an outside antenna Antenna cables come in the audio cables...
User Manual (English)
Page 9
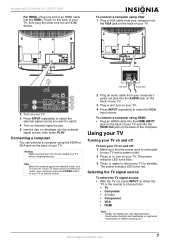
... external signal source you want to standby. www.insignia-products.com 7 To connect a computer using VGA: 1 Plug a VGA cable from your computer into the VGA jack on the back of your TV. 1 ANTENNA / CABLE DIGITAL / ANALOG 2 3 VGA AUDIO PR PB 4 SPDIF 5 6 2 Turn on your TV to watch. 4 Turn on external signal source. 5 Insert a disc or videotape into the external signal source, then press PLAY. The power indicator LED turns red. Connecting a computer You can connect a computer using HDMI: • Plug an HDMI cable into the HDMI INPUT jack...
... external signal source you want to standby. www.insignia-products.com 7 To connect a computer using VGA: 1 Plug a VGA cable from your computer into the VGA jack on the back of your TV. 1 ANTENNA / CABLE DIGITAL / ANALOG 2 3 VGA AUDIO PR PB 4 SPDIF 5 6 2 Turn on your TV to watch. 4 Turn on external signal source. 5 Insert a disc or videotape into the external signal source, then press PLAY. The power indicator LED turns red. Connecting a computer You can connect a computer using HDMI: • Plug an HDMI cable into the HDMI INPUT jack...

User Manual (English)
Page 10
... have more than one channel. The on -screen display menu opens with Setup highlighted. 2 Press to enter the sub-menu, then press or to highlight Channel Labels. Insignia NS-LCD19-09 19" LCDTV 720P Setting up the channel list After you select your TV source, if you selected antenna or cable you need to highlight DTV Signal. For example, if the main channel number is 8, the sub-channel number might be 8-1, 8-2, or 8-3. Checking...
... have more than one channel. The on -screen display menu opens with Setup highlighted. 2 Press to enter the sub-menu, then press or to highlight Channel Labels. Insignia NS-LCD19-09 19" LCDTV 720P Setting up the channel list After you select your TV source, if you selected antenna or cable you need to highlight DTV Signal. For example, if the main channel number is 8, the sub-channel number might be 8-1, 8-2, or 8-3. Checking...
User Manual (English)
Page 11
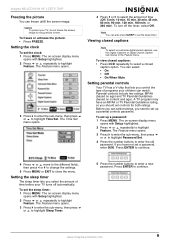
... Sleep Timer. 5 Press the number buttons to set the sleep timer. Caution To protect your TV turns off the timer, select Off. Viewing closed captions Note To select or customize digital closed caption option. Insignia NS-LCD19-09 19" LCDTV 720P Freezing the picture You can select ratings, you need to set up a password: 1 Press MENU. To freeze or unfreeze the picture: • Press FREEZE. Setting the clock To set controls for long periods of programs your children can also press SLEEP...
... Sleep Timer. 5 Press the number buttons to set the sleep timer. Caution To protect your TV turns off the timer, select Off. Viewing closed captions Note To select or customize digital closed caption option. Insignia NS-LCD19-09 19" LCDTV 720P Freezing the picture You can select ratings, you need to set up a password: 1 Press MENU. To freeze or unfreeze the picture: • Press FREEZE. Setting the clock To set controls for long periods of programs your children can also press SLEEP...

User Manual (English)
Page 12
Insignia NS-LCD19-09 19" LCDTV 720P 6 Press the number buttons to enter the new password again, to continue. Press ENTER to confirm. Caution Write down your password. Setting the Parental Control level To set the Parental Control level: 1 Press MENU. The on-screen display menu opens with Setup highlighted. 2 Press or repeatedly to continue. Press ENTER to highlight Feature. General audiences. Not suitable for children under 13 years...
Insignia NS-LCD19-09 19" LCDTV 720P 6 Press the number buttons to enter the new password again, to continue. Press ENTER to confirm. Caution Write down your password. Setting the Parental Control level To set the Parental Control level: 1 Press MENU. The on-screen display menu opens with Setup highlighted. 2 Press or repeatedly to continue. Press ENTER to highlight Feature. General audiences. Not suitable for children under 13 years...

User Manual (English)
Page 13
... to close the on-screen display menu. Favorite Channel mode-Lets you add or delete channels from the channel list" on page 8. Settings-Restores the video settings to skin tones. (R50 ~ G50) Backlight-Adjusts the backlight level (0 ~ 10). Digital Audio Output-Selects the audio mode for a cleaner and clearer image. Decreases the color level to add more dark to dark areas of the picture. (0 ~ 100) Sharpness-Increases the sharpness for the digital audio optical jack. •...
... to close the on-screen display menu. Favorite Channel mode-Lets you add or delete channels from the channel list" on page 8. Settings-Restores the video settings to skin tones. (R50 ~ G50) Backlight-Adjusts the backlight level (0 ~ 10). Digital Audio Output-Selects the audio mode for a cleaner and clearer image. Decreases the color level to add more dark to dark areas of the picture. (0 ~ 100) Sharpness-Increases the sharpness for the digital audio optical jack. •...

User Manual (English)
Page 14
... "Setting parental controls" on page 9. The default password is not too bright. Digital Caption-Sets the digital caption type. Closed Caption Options-Customizes closed caption settings. Lets you set the password for digital broadcasting systems. You can block the screen. • Increase the volume. • Make sure that the sound is not muted. • Make sure that the correct audio mode is selected. • Adjust the contrast, color, and brightness settings. • Make sure that the antenna is connected to...
... "Setting parental controls" on page 9. The default password is not too bright. Digital Caption-Sets the digital caption type. Closed Caption Options-Customizes closed caption settings. Lets you set the password for digital broadcasting systems. You can block the screen. • Increase the volume. • Make sure that the sound is not muted. • Make sure that the correct audio mode is selected. • Adjust the contrast, color, and brightness settings. • Make sure that the antenna is connected to...

User Manual (English)
Page 15
... dots on your TV using one of the speakers Control buttons do not work Snowy picture or noise VGA picture is not responsible for assistance when installing the wall-mount bracket. AA ~ ZZ, AAA, BBB Ultra band - 65 ~ 94, 100 ~ 135 Power source AC 100~240 V 50/60 Hz Power consumption symbols in Step 1. Analog standard NTSC Digital standard ATSC, 8-VSB, Clear-QAM Screen 19-inch Channel coverage VHF: 2-13...
... dots on your TV using one of the speakers Control buttons do not work Snowy picture or noise VGA picture is not responsible for assistance when installing the wall-mount bracket. AA ~ ZZ, AAA, BBB Ultra band - 65 ~ 94, 100 ~ 135 Power source AC 100~240 V 50/60 Hz Power consumption symbols in Step 1. Analog standard NTSC Digital standard ATSC, 8-VSB, Clear-QAM Screen 19-inch Channel coverage VHF: 2-13...
User Manual (English)
Page 16
... are designed to Part 15 of Dolby Laboratories. 14 www.insignia-products.com Insignia NS-LCD19-09 19" LCDTV 720P Component input HDMI input VGA input Dimensions (with base) Weight Accessories Y:1 V(p-p), 75 ohm, including sync Pr/Cr:±0.35 V(p-p), 75 ohm Pb/Cb:±0.35 V(p-p), 75 ohm Audio:500 mV(rms) Suggested resolutions:1080i, 720p, 480p, 480i 1 HDMI input terminal HDCP compliant E-EDID compliant Suggested scan rates:1080i, 720p...
... are designed to Part 15 of Dolby Laboratories. 14 www.insignia-products.com Insignia NS-LCD19-09 19" LCDTV 720P Component input HDMI input VGA input Dimensions (with base) Weight Accessories Y:1 V(p-p), 75 ohm, including sync Pr/Cr:±0.35 V(p-p), 75 ohm Pb/Cb:±0.35 V(p-p), 75 ohm Audio:500 mV(rms) Suggested resolutions:1080i, 720p, 480p, 480i 1 HDMI input terminal HDCP compliant E-EDID compliant Suggested scan rates:1080i, 720p...

User Manual (English)
Page 17
... authorized Insignia repair center or store personnel, Insignia will have an Insignia-approved repair person dispatched to the original purchaser of the product in ). Insignia NS-LCD19-09 19" LCDTV 720P One year limited warranty Insignia Products ("Insignia") warrants to you, the original purchaser of this new NS-LCD19-09 ("Product"), that the Product shall be free of defects in -home warranty service for a television with a screen 25 inches or...
... authorized Insignia repair center or store personnel, Insignia will have an Insignia-approved repair person dispatched to the original purchaser of the product in ). Insignia NS-LCD19-09 19" LCDTV 720P One year limited warranty Insignia Products ("Insignia") warrants to you, the original purchaser of this new NS-LCD19-09 ("Product"), that the Product shall be free of defects in -home warranty service for a television with a screen 25 inches or...


