
Product Guide
Page 3
... manual: CAUTION Cautions warn the user about board layout, component installation, BIOS update, and regulatory requirements for Intel® Desktop Board DQ35MP. Preface This Product Guide gives information about how to prevent damage to update the BIOS 4 Configuring for RAID (Intel® Matrix Storage Technology): information about configuring your system for RAID. 5 Configuring for Intel® Rapid Recover Technology: information about configuring your system for Intel Rapid Recover Technology A Error Messages and Indicators: information about BIOS error messages and beep codes...
... manual: CAUTION Cautions warn the user about board layout, component installation, BIOS update, and regulatory requirements for Intel® Desktop Board DQ35MP. Preface This Product Guide gives information about how to prevent damage to update the BIOS 4 Configuring for RAID (Intel® Matrix Storage Technology): information about configuring your system for RAID. 5 Configuring for Intel® Rapid Recover Technology: information about configuring your system for Intel Rapid Recover Technology A Error Messages and Indicators: information about BIOS error messages and beep codes...
Product Guide
Page 5
... Hi-Speed USB 2.0 Support 21 Enhanced IDE Interface 21 Serial ATA...21 Serial ATA RAID 21 Intel® Rapid Recover Technology 22 Expandability...22 BIOS ...22 Serial ATA and IDE Auto Configuration 22 PCI* and PCI Express* Auto Configuration 22 Security Passwords 23 Hard Disk Drive Passwords 23 Hard Disk Drive Password Feature During BIOS POST 24 Trusted Platform Module (TPM 24 Hardware Management Features 24 Hardware Monitoring and Fan Speed Control 25 Chassis Intrusion 25 Power Management Features 25 ACPI ...26 Hardware Support 26 Power Connectors 26 Fan Headers 26 LAN Wake...
... Hi-Speed USB 2.0 Support 21 Enhanced IDE Interface 21 Serial ATA...21 Serial ATA RAID 21 Intel® Rapid Recover Technology 22 Expandability...22 BIOS ...22 Serial ATA and IDE Auto Configuration 22 PCI* and PCI Express* Auto Configuration 22 Security Passwords 23 Hard Disk Drive Passwords 23 Hard Disk Drive Password Feature During BIOS POST 24 Trusted Platform Module (TPM 24 Hardware Management Features 24 Hardware Monitoring and Fan Speed Control 25 Chassis Intrusion 25 Power Management Features 25 ACPI ...26 Hardware Support 26 Power Connectors 26 Fan Headers 26 LAN Wake...
Product Guide
Page 6
... the Serial Port Header 53 Connecting to the Alternate Front Panel Power LED Header 54 Connecting to the Front Panel Header 54 Connecting to the USB 2.0 Headers 55 Connecting to the Audio System 55 Connecting Chassis Fan and Power Supply Cables 56 Connecting Chassis Fan Cables 56 Connecting Supply Power Cables 57 Setting the BIOS Configuration Jumper 58 Clearing or Changing Passwords 60 Clearing BIOS Security Passwords 60 Clearing or Changing Hard Disk Drive Passwords 61 Replacing the Battery 61 3 Updating the BIOS Updating the BIOS with the Intel® Express BIOS Update Utility...
... the Serial Port Header 53 Connecting to the Alternate Front Panel Power LED Header 54 Connecting to the Front Panel Header 54 Connecting to the USB 2.0 Headers 55 Connecting to the Audio System 55 Connecting Chassis Fan and Power Supply Cables 56 Connecting Chassis Fan Cables 56 Connecting Supply Power Cables 57 Setting the BIOS Configuration Jumper 58 Clearing or Changing Passwords 60 Clearing BIOS Security Passwords 60 Clearing or Changing Hard Disk Drive Passwords 61 Replacing the Battery 61 3 Updating the BIOS Updating the BIOS with the Intel® Express BIOS Update Utility...

Product Guide
Page 7
...Processor Cover 37 11. Dual Channel Memory Configuration with Four DIMMs 41 16. Desktop Board DQ35MP Mounting Screw Hole Locations 34 7. Contents 4 Configuring for RAID (Intel® Matrix Storage Technology) Configuring the BIOS for Intel Matrix Storage Technology 71 Creating Your RAID Set 71 Loading the Intel Matrix Storage Technology RAID Drivers and Software 72 Setting Up a "RAID Ready" System 72 5 Configuring for Intel® Rapid Recover Technology Enabling Intel Rapid Recover Technology 73 Creating a Recovery Volume 74 Creating a Recovery Volume Using the RAID Option ROM...
...Processor Cover 37 11. Dual Channel Memory Configuration with Four DIMMs 41 16. Desktop Board DQ35MP Mounting Screw Hole Locations 34 7. Contents 4 Configuring for RAID (Intel® Matrix Storage Technology) Configuring the BIOS for Intel Matrix Storage Technology 71 Creating Your RAID Set 71 Loading the Intel Matrix Storage Technology RAID Drivers and Software 72 Setting Up a "RAID Ready" System 72 5 Configuring for Intel® Rapid Recover Technology Enabling Intel Rapid Recover Technology 73 Creating a Recovery Volume 74 Creating a Recovery Volume Using the RAID Option ROM...
Product Guide
Page 8
... IDE Cable 49 22. Serial Port Header Signal Names 53 9. Alternate Front Panel Power LED Header 54 10. Beep Codes 77 14. Lead-Free Board Markings 84 17. Intel Desktop Board DQ35MP Product Guide 19. Internal Headers 51 24. Connecting Power Supply Cables 57 27. Feature Summary 9 2. EMC Regulations 85 18. Product Certification Markings 87 viii Location of the BIOS Configuration Jumper Block 58 28. Intel AMT Status Indicator 20 5. Connecting a Serial ATA Cable 50 23. Back Panel Audio Connectors 55 25. Location of the Chassis Fan Headers...
... IDE Cable 49 22. Serial Port Header Signal Names 53 9. Alternate Front Panel Power LED Header 54 10. Beep Codes 77 14. Lead-Free Board Markings 84 17. Intel Desktop Board DQ35MP Product Guide 19. Internal Headers 51 24. Connecting Power Supply Cables 57 27. Feature Summary 9 2. EMC Regulations 85 18. Product Certification Markings 87 viii Location of the BIOS Configuration Jumper Block 58 28. Intel AMT Status Indicator 20 5. Connecting a Serial ATA Cable 50 23. Back Panel Audio Connectors 55 25. Location of the Chassis Fan Headers...

Product Guide
Page 9
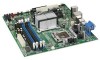
...dual channel DDR2 SDRAM interface • Support for two devices continued 9 Table 1. 1 Desktop Board Features This chapter briefly describes the features of : • Intel® Q35 Express Chipset Graphics and Memory Controller Hub (GMCH) • Intel® 82801IDO I/O Controller Hub (ICH9DO) • Intel® Graphics Media Accelerator 3100 graphics controller • One PCI Express* x16 connector supporting PCI Express graphics cards Audio LAN Support Expansion Capabilities • 4-channel (2 + 2) onboard audio subsystem featuring: ― Intel® High Definition Audio...
...dual channel DDR2 SDRAM interface • Support for two devices continued 9 Table 1. 1 Desktop Board Features This chapter briefly describes the features of : • Intel® Q35 Express Chipset Graphics and Memory Controller Hub (GMCH) • Intel® 82801IDO I/O Controller Hub (ICH9DO) • Intel® Graphics Media Accelerator 3100 graphics controller • One PCI Express* x16 connector supporting PCI Express graphics cards Audio LAN Support Expansion Capabilities • 4-channel (2 + 2) onboard audio subsystem featuring: ― Intel® High Definition Audio...

Product Guide
Page 18
Intel Desktop Board DQ35MP Product Guide Legacy Input/Output (I/O) Controller The I/O controller features the following: • One serial port interface via an onboard header • Low pin count (LPC) interface • Serial IRQ interface compatible with serialized IRQ support for PCI systems • Intelligent power management, including a programmable wake up event interface • PCI power management support LAN Subsystem The LAN subsystem includes: • Intel ICH9DO • Intel 82566DM Gigabit (10/100/1000 Mb/s) Ethernet LAN controller with support for...
Intel Desktop Board DQ35MP Product Guide Legacy Input/Output (I/O) Controller The I/O controller features the following: • One serial port interface via an onboard header • Low pin count (LPC) interface • Serial IRQ interface compatible with serialized IRQ support for PCI systems • Intelligent power management, including a programmable wake up event interface • PCI power management support LAN Subsystem The LAN subsystem includes: • Intel ICH9DO • Intel 82566DM Gigabit (10/100/1000 Mb/s) Ethernet LAN controller with support for...

Product Guide
Page 21
...; RAID 5 - Disabling Hi-Speed USB in the BIOS reverts all USB 2.0 ports to three internal headers) via ICH9DO, connecting one device per channel. Desktop Board Features Hi-Speed USB 2.0 Support The Desktop Board supports up to 12 USB 2.0 ports (six ports routed to the back panel and six ports routed to USB 1.1 operation. This may be required to two IDE devices (such as hard drives) • ATAPI-style devices (such as an eSATA channel. One channel is configured as CD-ROM drives) • Older PIO Mode devices •...
...; RAID 5 - Disabling Hi-Speed USB in the BIOS reverts all USB 2.0 ports to three internal headers) via ICH9DO, connecting one device per channel. Desktop Board Features Hi-Speed USB 2.0 Support The Desktop Board supports up to 12 USB 2.0 ports (six ports routed to the back panel and six ports routed to USB 1.1 operation. This may be required to two IDE devices (such as hard drives) • ATAPI-style devices (such as an eSATA channel. One channel is configured as CD-ROM drives) • Older PIO Mode devices •...

Product Guide
Page 22
... PCI Express x1 connectors • One PCI Express x16 connector • One PCI bus connector BIOS The BIOS provides the Power-On Self-Test (POST), the BIOS Setup program, the PCI/PCI Express and IDE auto-configuration utilities, and the video BIOS. Intel Desktop Board DQ35MP Product Guide Intel® Rapid Recover Technology Intel Rapid Recover Technology enables fast and easy recovery of your system for that add-in your computer. It allows you to be updated by specifying manual configuration in card. 22 If the master hard drive should...
... PCI Express x1 connectors • One PCI Express x16 connector • One PCI bus connector BIOS The BIOS provides the Power-On Self-Test (POST), the BIOS Setup program, the PCI/PCI Express and IDE auto-configuration utilities, and the video BIOS. Intel Desktop Board DQ35MP Product Guide Intel® Rapid Recover Technology Intel Rapid Recover Technology enables fast and easy recovery of your system for that add-in your computer. It allows you to be updated by specifying manual configuration in card. 22 If the master hard drive should...

Product Guide
Page 23
... a password. Valid passwords are two levels of the User hard disk drive password will cause a hard disk to view and change all Setup options. If only the supervisor password is set , you can be used on resume from read and write accesses to unlock a locked drive. If only the supervisor password is set , you must enter either password to access Setup. For instructions on resetting the password, see Clearing BIOS Security Passwords on page 61. 23 The password prompt is displayed...
... a password. Valid passwords are two levels of the User hard disk drive password will cause a hard disk to view and change all Setup options. If only the supervisor password is set , you can be used on resume from read and write accesses to unlock a locked drive. If only the supervisor password is set , you must enter either password to access Setup. For instructions on resetting the password, see Clearing BIOS Security Passwords on page 61. 23 The password prompt is displayed...

Product Guide
Page 26
..., the power supply removes all non-standby voltages. The Desktop Board has a 4-pin processor fan header and two 3-pin chassis fan headers. 26 When resuming from an AC power failure, the computer returns to a tachometer input of the power connectors. The Desktop Board has two power connectors. Hardware Support Power Connectors ATX12V-compliant power supplies can adjust the fan speed or switch the fan on or off as follows: • The fans are on page 57 for the location of the hardware monitoring and control device...
..., the power supply removes all non-standby voltages. The Desktop Board has a 4-pin processor fan header and two 3-pin chassis fan headers. 26 When resuming from an AC power failure, the computer returns to a tachometer input of the power connectors. The Desktop Board has two power connectors. Hardware Support Power Connectors ATX12V-compliant power supplies can adjust the fan speed or switch the fan on or off as follows: • The fans are on page 57 for the location of the hardware monitoring and control device...

Product Guide
Page 27
... ACPI in the BIOS and allows Intel AMT to be remotely turned on the LAN implementation, the board supports LAN wake capabilities with this feature can damage the power supply and/or effect ACPI S3 sleep state functionality. Failure to provide adequate standby current when using this Desktop Board must be able to provide enough standby current to its last known awake state. 27 LAN wake capabilities enable remote wake-up device...
... ACPI in the BIOS and allows Intel AMT to be remotely turned on the LAN implementation, the board supports LAN wake capabilities with this feature can damage the power supply and/or effect ACPI S3 sleep state functionality. Failure to provide adequate standby current when using this Desktop Board must be able to provide enough standby current to its last known awake state. 27 LAN wake capabilities enable remote wake-up device...

Product Guide
Page 31
... Follow these guidelines before you how to: • Install the I/O shield • Install and remove the Desktop Board • Install and remove a processor • Install and remove memory • Install and remove a PCI Express x16 card • Connect the IDE and Serial ATA cables • Connect to the internal headers • Connect to the audio system • Connect chassis fan and power supply cables • Set the BIOS configuration jumper • Clear passwords • Replace the battery Before You Begin CAUTIONS The procedures in this chapter assume familiarity with...
... Follow these guidelines before you how to: • Install the I/O shield • Install and remove the Desktop Board • Install and remove a processor • Install and remove memory • Install and remove a PCI Express x16 card • Connect the IDE and Serial ATA cables • Connect to the internal headers • Connect to the audio system • Connect chassis fan and power supply cables • Set the BIOS configuration jumper • Clear passwords • Replace the battery Before You Begin CAUTIONS The procedures in this chapter assume familiarity with...

Product Guide
Page 55
... Intel Express Installer DVD-ROM, the multi-channel audio feature can be enabled. Installing and Replacing Desktop Board Components Connecting to the USB 2.0 Headers Before connecting to the USB 2.0 headers, observe the precautions in "Before You Begin" on page 51 for the location of the three USB 2.0 headers. Each USB header can be used to the cable. Use a shielded cable that have an unshielded cable attached to a USB port might not meet FCC Class B requirements, even if no device or a low-speed USB device...
... Intel Express Installer DVD-ROM, the multi-channel audio feature can be enabled. Installing and Replacing Desktop Board Components Connecting to the USB 2.0 Headers Before connecting to the USB 2.0 headers, observe the precautions in "Before You Begin" on page 51 for the location of the three USB 2.0 headers. Each USB header can be used to the cable. Use a shielded cable that have an unshielded cable attached to a USB port might not meet FCC Class B requirements, even if no device or a low-speed USB device...

Product Guide
Page 56
Location of the chassis fan headers. Connecting Chassis Fan and Power Supply Cables Connecting Chassis Fan Cables Connect chassis fan cables to this output. Figure 25. Figure 25 shows the location of the Chassis Fan Headers 56 Poor audio quality may occur if passive (non-amplified) speakers are connected to the 3-pin chassis fan headers on the Desktop Board. Intel Desktop Board DQ35MP Product Guide NOTE The back panel audio line out connector is designed to power either headphones or amplified speakers only.
Location of the chassis fan headers. Connecting Chassis Fan and Power Supply Cables Connecting Chassis Fan Cables Connect chassis fan cables to this output. Figure 25. Figure 25 shows the location of the Chassis Fan Headers 56 Poor audio quality may occur if passive (non-amplified) speakers are connected to the 3-pin chassis fan headers on the Desktop Board. Intel Desktop Board DQ35MP Product Guide NOTE The back panel audio line out connector is designed to power either headphones or amplified speakers only.

Product Guide
Page 60
... screen requesting that the board is installed in "Before You Begin" on the computer. Press to the computer. Intel Desktop Board DQ35MP Product Guide Clearing or Changing Passwords This section describes how to clear or change the following passwords: • BIOS security passwords (user and supervisor) • Hard disk drive passwords (User and Master) Clearing BIOS Security Passwords This procedure assumes that you confirm clearing the password. Setup displays the Maintenance menu. 8. Remove the computer cover. 12. Turn off all peripheral devices connected...
... screen requesting that the board is installed in "Before You Begin" on the computer. Press to the computer. Intel Desktop Board DQ35MP Product Guide Clearing or Changing Passwords This section describes how to clear or change the following passwords: • BIOS security passwords (user and supervisor) • Hard disk drive passwords (User and Master) Clearing BIOS Security Passwords This procedure assumes that you confirm clearing the password. Setup displays the Maintenance menu. 8. Remove the computer cover. 12. Turn off all peripheral devices connected...
Product Guide
Page 67
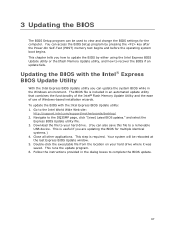
... key after the Power-On Self-Test (POST) memory test begins and before the operating system boot begins. This chapter tells you how to your hard drive where it was saved. The BIOS file is required. Updating the BIOS with the Intel Express BIOS Update utility: 1. Navigate to the Intel World Wide Web site: http://support.intel.com/support/motherboards/desktop/ 2. Close all other applications. You can access the BIOS Setup program by either using the Intel Express BIOS Update utility...
... key after the Power-On Self-Test (POST) memory test begins and before the operating system boot begins. This chapter tells you how to your hard drive where it was saved. The BIOS file is required. Updating the BIOS with the Intel Express BIOS Update utility: 1. Navigate to the Intel World Wide Web site: http://support.intel.com/support/motherboards/desktop/ 2. Close all other applications. You can access the BIOS Setup program by either using the Intel Express BIOS Update utility...

Product Guide
Page 68
... using either the Iflash Memory Update Utility or the ISO Image BIOS update file. Intel Desktop Board DQ35MP Product Guide Updating the BIOS with the ISO Image BIOS Update File The ISO Image BIOS update allows for the update of an Intel® Desktop Board BIOS to the latest production release regardless of the operating system installed on the Intel World Wide Web site at: http://support.intel.com/support/motherboards/desktop Navigate to remove the BIOS configuration jumper. The ISO Image BIOS update file is a compressed file...
... using either the Iflash Memory Update Utility or the ISO Image BIOS update file. Intel Desktop Board DQ35MP Product Guide Updating the BIOS with the ISO Image BIOS Update File The ISO Image BIOS update allows for the update of an Intel® Desktop Board BIOS to the latest production release regardless of the operating system installed on the Intel World Wide Web site at: http://support.intel.com/support/motherboards/desktop Navigate to remove the BIOS configuration jumper. The ISO Image BIOS update file is a compressed file...

Product Guide
Page 72
.... Setting Up a "RAID Ready" System The Intel Matrix Storage Technology Console software offers the flexibility to upgrade from the Windows installation CD. 2. When prompted, insert the diskette labeled Intel Matrix Storage Technology RAID Driver into a USB floppy drive. Click on the "Load Drivers" option and insert the Intel Express Installer CD/DVD into your desktop board or after downloading it from this section: "Configuring the BIOS for Intel Matrix Storage Technology" and "Loading the Intel Matrix Storage Technology RAID Drivers and Software". Begin Windows Setup by booting from...
.... Setting Up a "RAID Ready" System The Intel Matrix Storage Technology Console software offers the flexibility to upgrade from the Windows installation CD. 2. When prompted, insert the diskette labeled Intel Matrix Storage Technology RAID Driver into a USB floppy drive. Click on the "Load Drivers" option and insert the Intel Express Installer CD/DVD into your desktop board or after downloading it from this section: "Configuring the BIOS for Intel Matrix Storage Technology" and "Loading the Intel Matrix Storage Technology RAID Drivers and Software". Begin Windows Setup by booting from...

Product Guide
Page 73
... data on a system. To enable Intel Rapid Recover Technology, complete following steps: 1. When using the Continuous Update policy, changes made to the recovery drive when it . Enter the BIOS menu by copying the data on request. Go to "Creating a Recovery Volume." 73 Enabling Intel Rapid Recover Technology NOTE Intel Rapid Recover Technology does not support RAID 5. Follow the instructions in the system BIOS menu. Exit and save settings. CAUTION If Configure SATA as , ensure it...
... data on a system. To enable Intel Rapid Recover Technology, complete following steps: 1. When using the Continuous Update policy, changes made to the recovery drive when it . Enter the BIOS menu by copying the data on request. Go to "Creating a Recovery Volume." 73 Enabling Intel Rapid Recover Technology NOTE Intel Rapid Recover Technology does not support RAID 5. Follow the instructions in the system BIOS menu. Exit and save settings. CAUTION If Configure SATA as , ensure it...


