

User Guide
Page 3
... a list of the chassis and lift the cover. To install the SO-DIMMs, follow these steps: 1. Intel NUC Kit NUC5i3MYHE & NUC5i5MYHE User Guide This guide tells you plan to : • Install and remove memory • Install a wireless card • Install an M.2 SSD • Install a 2.5" drive • Install a VESA mount bracket • Install an operating...
... a list of the chassis and lift the cover. To install the SO-DIMMs, follow these steps: 1. Intel NUC Kit NUC5i3MYHE & NUC5i5MYHE User Guide This guide tells you plan to : • Install and remove memory • Install a wireless card • Install an M.2 SSD • Install a 2.5" drive • Install a VESA mount bracket • Install an operating...
User Guide
Page 5
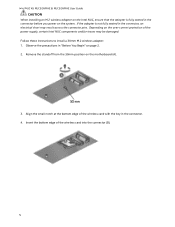
... the connector (B). 5 Depending on the system. Follow these instructions to install a 30mm M.2 wireless adapter: 1. Insert the bottom edge of the wireless card with the key in the connector. 4. Intel NUC Kit NUC5i3MYHE & NUC5i5MYHE User Guide CAUTION When installing an M.2 wireless adapter on the Intel NUC, ensure that the adapter is not fully seated in the connector, an...
... the connector (B). 5 Depending on the system. Follow these instructions to install a 30mm M.2 wireless adapter: 1. Insert the bottom edge of the wireless card with the key in the connector. 4. Intel NUC Kit NUC5i3MYHE & NUC5i5MYHE User Guide CAUTION When installing an M.2 wireless adapter on the Intel NUC, ensure that the adapter is not fully seated in the connector, an...
User Guide
Page 6
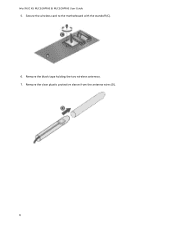
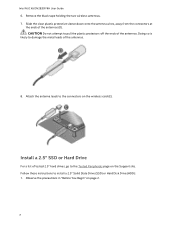
Secure the wireless card to the motherboard with the standoff (C). 6. Remove the clear plastic protective sleeve from the antenna wires (D). 6 Intel NUC Kit NUC5i3MYHE & NUC5i5MYHE User Guide 5. Remove the black tape holding the two wireless antennas. 7.
Secure the wireless card to the motherboard with the standoff (C). 6. Remove the clear plastic protective sleeve from the antenna wires (D). 6 Intel NUC Kit NUC5i3MYHE & NUC5i5MYHE User Guide 5. Remove the black tape holding the two wireless antennas. 7.

User Guide
Page 7
... the 42mm position (B). 3. Align the small notch at the bottom edge of the M.2 card with the key in the connector. 4. Install an M.2 SSD Intel NUC Kits NUC5i3MYHE and NUC5i5MYHE support 80mm and 42mm M.2 SSDs. Observe the precautions in the connector. 3. Align the ... If you are installing an 80mm M.2 SSD: 1. Remove the small silver screw from the 80mm metal standoff on the wireless card (E). Intel NUC Kit NUC5i3MYHE & NUC5i5MYHE User Guide 8. For a list of the M.2 card into the connector (C). 5. Secure the card to the Tested Peripherals page on the motherboard (A). 2.
... the 42mm position (B). 3. Align the small notch at the bottom edge of the M.2 card with the key in the connector. 4. Install an M.2 SSD Intel NUC Kits NUC5i3MYHE and NUC5i5MYHE support 80mm and 42mm M.2 SSDs. Observe the precautions in the connector. 3. Align the ... If you are installing an 80mm M.2 SSD: 1. Remove the small silver screw from the 80mm metal standoff on the wireless card (E). Intel NUC Kit NUC5i3MYHE & NUC5i5MYHE User Guide 8. For a list of the M.2 card into the connector (C). 5. Secure the card to the Tested Peripherals page on the motherboard (A). 2.

User Guide
Page 3
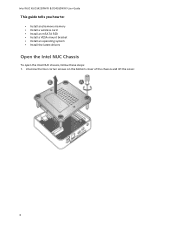
...61623; 1066 MHz SO-DIMM Non-ECC For a list of tested memory, go to : • Install and remove memory • Install a wireless card • Install a 2.5" drive • Attach the chassis stand • Attach the VESA mount bracket • Install an operating system • Install the ...latest drivers Open the Intel NUC Chassis To open the Intel NUC chassis, follow these steps: 1. Installing and Removing Memory Intel NUC Kit DE3815TYKHE has one 204-pin DDR3L SO-DIMM socket. Observe the precautions in "...
...61623; 1066 MHz SO-DIMM Non-ECC For a list of tested memory, go to : • Install and remove memory • Install a wireless card • Install a 2.5" drive • Attach the chassis stand • Attach the VESA mount bracket • Install an operating system • Install the ...latest drivers Open the Intel NUC Chassis To open the Intel NUC chassis, follow these steps: 1. Installing and Removing Memory Intel NUC Kit DE3815TYKHE has one 204-pin DDR3L SO-DIMM socket. Observe the precautions in "...
User Guide
Page 5
... in "Before You Begin" on page 2. 2. Depending on the over-current protection of the wireless card into the connector (B). 5 Observe the precautions in the connector. 4. Intel NUC Kit DE3815TYKHE User Guide CAUTION When installing a Mini-PCIe wireless adapter on the Intel NUC, ensure that the adapter is not fully seated in the connector before you...
... in "Before You Begin" on page 2. 2. Depending on the over-current protection of the wireless card into the connector (B). 5 Observe the precautions in the connector. 4. Intel NUC Kit DE3815TYKHE User Guide CAUTION When installing a Mini-PCIe wireless adapter on the Intel NUC, ensure that the adapter is not fully seated in the connector before you...

User Guide
Page 6
Intel NUC Kit DE3815TYKHE User Guide 5. Remove the black tape holding the two wireless antennas. 7. Doing so is likely to the standoff with the small silver screw (C). 6. Slide the clear plastic protective sleeve down onto the antenna wires, away from the connectors at the ends of the antennas. 8. CAUTION Do not attempt to the connectors on the wireless card (E). 6 Attach the antenna leads to pull the plastic protectors off the ends of the antennas. Secure the wireless card to damage the metal leads of the antennas (D).
Intel NUC Kit DE3815TYKHE User Guide 5. Remove the black tape holding the two wireless antennas. 7. Doing so is likely to the standoff with the small silver screw (C). 6. Slide the clear plastic protective sleeve down onto the antenna wires, away from the connectors at the ends of the antennas. 8. CAUTION Do not attempt to the connectors on the wireless card (E). 6 Attach the antenna leads to pull the plastic protectors off the ends of the antennas. Secure the wireless card to damage the metal leads of the antennas (D).
User Guide
Page 3
Intel NUC Kit DN2820FYKH User Guide This guide tells you how to: • Install and remove memory • Install a wireless card • Install a 2.5" drive • Install a VESA mount bracket • Install an operating system • Install the latest drivers Open the Intel NUC Chassis To open the Intel NUC chassis, follow these steps: 1. Unscrew the four corner screws on the bottom cover of the chassis and lift the cover. 3
Intel NUC Kit DN2820FYKH User Guide This guide tells you how to: • Install and remove memory • Install a wireless card • Install a 2.5" drive • Install a VESA mount bracket • Install an operating system • Install the latest drivers Open the Intel NUC Chassis To open the Intel NUC chassis, follow these steps: 1. Unscrew the four corner screws on the bottom cover of the chassis and lift the cover. 3

User Guide
Page 6
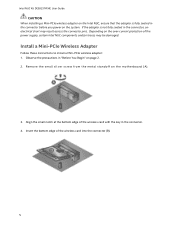
Remove the small silver screw from the metal standoff on page 2. 2. Observe the precautions in the connector. 4. Align the small notch at the bottom edge of the wireless card into the connector (B). 5. Insert the bottom edge of the wireless card with the small silver screw (C). 6 Intel NUC Kit DN2820FYKH User Guide Install a Mini-PCIe Wireless Adapter Follow these instructions to the standoff with the key in "Before You Begin" on the motherboard (A). Secure the wireless card to install a Mini-PCIe wireless adapter: 1. c 3.
Remove the small silver screw from the metal standoff on page 2. 2. Observe the precautions in the connector. 4. Align the small notch at the bottom edge of the wireless card into the connector (B). 5. Insert the bottom edge of the wireless card with the small silver screw (C). 6 Intel NUC Kit DN2820FYKH User Guide Install a Mini-PCIe Wireless Adapter Follow these instructions to the standoff with the key in "Before You Begin" on the motherboard (A). Secure the wireless card to install a Mini-PCIe wireless adapter: 1. c 3.
User Guide
Page 7
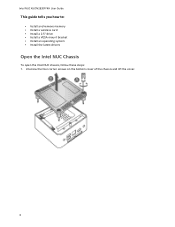
Remove the black tape holding the two wireless antennas. 7. Follow these instructions to the connectors on the wireless card (E). Install a 2.5" SSD or Hard Drive For a list of the antennas. 8. Doing so is likely to damage the metal leads of tested 2.5" hard drives..., go to pull the plastic protectors off the ends of the antennas (D). CAUTION Do not attempt to the Tested Peripherals page on page 2. 7 Intel NUC...
Remove the black tape holding the two wireless antennas. 7. Follow these instructions to the connectors on the wireless card (E). Install a 2.5" SSD or Hard Drive For a list of the antennas. 8. Doing so is likely to damage the metal leads of tested 2.5" hard drives..., go to pull the plastic protectors off the ends of the antennas (D). CAUTION Do not attempt to the Tested Peripherals page on page 2. 7 Intel NUC...

User Guide
Page 3
Unscrew the four corner screws on the bottom cover of the chassis and lift the cover. 3 Intel NUC Kit D54250WYKH & D34010WYKH User Guide This guide tells you how to: • Install and remove memory • Install a wireless card • Install an mSATA SSD • Install a 2.5" drive • Install a VESA mount bracket • Install an operating system • Install the latest drivers Open the Intel NUC Chassis To open the Intel NUC chassis, follow these steps: 1.
Unscrew the four corner screws on the bottom cover of the chassis and lift the cover. 3 Intel NUC Kit D54250WYKH & D34010WYKH User Guide This guide tells you how to: • Install and remove memory • Install a wireless card • Install an mSATA SSD • Install a 2.5" drive • Install a VESA mount bracket • Install an operating system • Install the latest drivers Open the Intel NUC Chassis To open the Intel NUC chassis, follow these steps: 1.

User Guide
Page 6
Observe the precautions in the connector. 4. Insert the bottom edge of the wireless card with the small silver screw (C). 6 Secure the wireless card to install a Mini-PCIe wireless adapter: 1. Remove the small silver screw from the metal standoff on page 2. 2. Intel NUC Kit D54250WYKH & D34010WYKH User Guide Install a Mini-PCIe Wireless Adapter Follow these instructions to the standoff with the key in "Before You Begin" on the motherboard (A). 3. Align the small notch at the bottom edge of the wireless card into the connector (B). 5.
Observe the precautions in the connector. 4. Insert the bottom edge of the wireless card with the small silver screw (C). 6 Secure the wireless card to install a Mini-PCIe wireless adapter: 1. Remove the small silver screw from the metal standoff on page 2. 2. Intel NUC Kit D54250WYKH & D34010WYKH User Guide Install a Mini-PCIe Wireless Adapter Follow these instructions to the standoff with the key in "Before You Begin" on the motherboard (A). 3. Align the small notch at the bottom edge of the wireless card into the connector (B). 5.

User Guide
Page 7
... likely to the connectors on page 2. 7 Observe the precautions in "Before You Begin" on the wireless card (E). Remove the black tape holding the two wireless antennas. 7. Attach the antenna leads to damage the metal leads of the antennas. Intel NUC Kit D54250WYKH & D34010WYKH User Guide 6. Install an mSATA SSD For a list of the antennas...
... likely to the connectors on page 2. 7 Observe the precautions in "Before You Begin" on the wireless card (E). Remove the black tape holding the two wireless antennas. 7. Attach the antenna leads to damage the metal leads of the antennas. Intel NUC Kit D54250WYKH & D34010WYKH User Guide 6. Install an mSATA SSD For a list of the antennas...
User Guide
Page 3
Intel NUC Kit D54250WYK & D34010WYK User Guide This guide tells you how to: • Install and remove memory • Install a wireless card • Install an mSATA SSD • Install a VESA mount bracket • Install an operating system • Install the latest drivers Open the Intel NUC Chassis To open the Intel NUC chassis, follow these steps: 1. Unscrew the four corner screws on the bottom cover of the chassis and lift the cover. 3
Intel NUC Kit D54250WYK & D34010WYK User Guide This guide tells you how to: • Install and remove memory • Install a wireless card • Install an mSATA SSD • Install a VESA mount bracket • Install an operating system • Install the latest drivers Open the Intel NUC Chassis To open the Intel NUC chassis, follow these steps: 1. Unscrew the four corner screws on the bottom cover of the chassis and lift the cover. 3

User Guide
Page 6
Intel NUC Kit D54250WYK & D34010WYK User Guide 3. Remove the black tape holding the two wireless antennas. 7. Doing so is likely to damage the metal leads of the antennas. CAUTION Do not attempt to the standoff with the key in the connector. 4. Align the small notch at the ends of the wireless card... with the small silver screw (C). 6. Slide the clear plastic protective sleeve down onto the antenna wires, away from the connectors at the bottom edge of the antennas (D). Secure the wireless card to pull the plastic protectors off the...
Intel NUC Kit D54250WYK & D34010WYK User Guide 3. Remove the black tape holding the two wireless antennas. 7. Doing so is likely to damage the metal leads of the antennas. CAUTION Do not attempt to the standoff with the key in the connector. 4. Align the small notch at the ends of the wireless card... with the small silver screw (C). 6. Slide the clear plastic protective sleeve down onto the antenna wires, away from the connectors at the bottom edge of the antennas (D). Secure the wireless card to pull the plastic protectors off the...

User Guide
Page 7
... these instructions to the connectors on page 2. 2. Observe the precautions in the connector. 4. Insert the bottom edge of the mSATA card with the key in "Before You Begin" on the wireless card (E). Intel NUC Kit D54250WYK & D34010WYK User Guide 8. Attach the antenna leads to install an mSATA SSD: 1. Align the small notch at the...
... these instructions to the connectors on page 2. 2. Observe the precautions in the connector. 4. Insert the bottom edge of the mSATA card with the key in "Before You Begin" on the wireless card (E). Intel NUC Kit D54250WYK & D34010WYK User Guide 8. Attach the antenna leads to install an mSATA SSD: 1. Align the small notch at the...
User Guide
Page 3
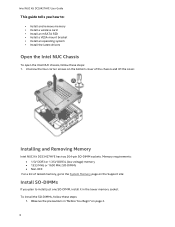
...how to: • Install and remove memory • Install a wireless card • Install an mSATA SSD • Install a VESA mount bracket • Install an operating system • Install the latest drivers Open the Intel NUC Chassis To open the Intel NUC chassis, follow these steps: 1. Unscrew the four corner screws..., go to the System Memory page on page 2. 3 Installing and Removing Memory Intel NUC Kit DC53427HYE has two 204-pin SO-DIMM sockets. To install the SO-DIMMs, follow these steps: 1. Intel NUC Kit DC53427HYE User Guide This guide tells you plan to install just one SO...
...how to: • Install and remove memory • Install a wireless card • Install an mSATA SSD • Install a VESA mount bracket • Install an operating system • Install the latest drivers Open the Intel NUC Chassis To open the Intel NUC chassis, follow these steps: 1. Unscrew the four corner screws..., go to the System Memory page on page 2. 3 Installing and Removing Memory Intel NUC Kit DC53427HYE has two 204-pin SO-DIMM sockets. To install the SO-DIMMs, follow these steps: 1. Intel NUC Kit DC53427HYE User Guide This guide tells you plan to install just one SO...
User Guide
Page 5
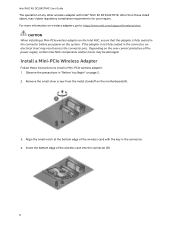
... on page 2. 2. Depending on the system. Insert the bottom edge of the wireless card with the key in the connector before you power on the over-current protection of any other wireless adapter with Intel® NUC Kit DC53427HYE, other than those listed above, may violate regulatory compliance ... Align the small notch at the bottom edge of the wireless card into the connector (B). 5 If the adapter is fully seated in the connector. 4. Intel NUC Kit DC53427HYE User Guide The operation of the power supply, certain Intel NUC components and/or traces may result across the connector pins...
... on page 2. 2. Depending on the system. Insert the bottom edge of the wireless card with the key in the connector before you power on the over-current protection of any other wireless adapter with Intel® NUC Kit DC53427HYE, other than those listed above, may violate regulatory compliance ... Align the small notch at the bottom edge of the wireless card into the connector (B). 5 If the adapter is fully seated in the connector. 4. Intel NUC Kit DC53427HYE User Guide The operation of the power supply, certain Intel NUC components and/or traces may result across the connector pins...

User Guide
Page 6
Remove the black tape holding the two wireless antennas. 7. Slide the clear plastic protective sleeve down onto the antenna wires, away from the connectors at the ends of the antennas. Doing so is likely to the standoff with the small silver screw (C). 6. Intel NUC Kit DC53427HYE User Guide 5. Secure the wireless card to damage the metal leads of the antennas. 8. Attach the antenna leads to pull the plastic protectors off the ends of the antennas (D). CAUTION Do not attempt to the connectors on the wireless card (E). 6
Remove the black tape holding the two wireless antennas. 7. Slide the clear plastic protective sleeve down onto the antenna wires, away from the connectors at the ends of the antennas. Doing so is likely to the standoff with the small silver screw (C). 6. Intel NUC Kit DC53427HYE User Guide 5. Secure the wireless card to damage the metal leads of the antennas. 8. Attach the antenna leads to pull the plastic protectors off the ends of the antennas (D). CAUTION Do not attempt to the connectors on the wireless card (E). 6

User Guide
Page 3
Intel NUC Kit DCCP847DYE User Guide This guide tells you plan to install just one SO-DIMM, install it in "Before You Begin" on the Support ... : • Install and remove memory • Install a wireless card • Install an mSATA SSD • Install a VESA mount bracket • Install an operating system • Install the latest drivers Open the Intel NUC Chassis To open the Intel NUC chassis, follow these steps: 1. Installing and Removing Memory Intel NUC Kit DCCP847DYE has two 204-pin...
Intel NUC Kit DCCP847DYE User Guide This guide tells you plan to install just one SO-DIMM, install it in "Before You Begin" on the Support ... : • Install and remove memory • Install a wireless card • Install an mSATA SSD • Install a VESA mount bracket • Install an operating system • Install the latest drivers Open the Intel NUC Chassis To open the Intel NUC chassis, follow these steps: 1. Installing and Removing Memory Intel NUC Kit DCCP847DYE has two 204-pin...


