
Intermec Features Demo User Guide
Page 12
...C:\Program Files\Intermec folder. 3 On your mobile computer, tap the installation file to a storage card or USB storage device. 2 Insert the storage card or USB storage device into your computer. 1 Copy the Features Demo installation file to install the Features Demo application. Install Features Demo With a Storage Card or USB Drive Use a storage card or USB drive to install Features Demo onto your Intermec computer. For help, see your PC is software application that allows you need: • a desktop PC with ActiveSync or Windows Mobile Device Center, you to easily deploy and manage...
...C:\Program Files\Intermec folder. 3 On your mobile computer, tap the installation file to a storage card or USB storage device. 2 Insert the storage card or USB storage device into your computer. 1 Copy the Features Demo installation file to install the Features Demo application. Install Features Demo With a Storage Card or USB Drive Use a storage card or USB drive to install Features Demo onto your Intermec computer. For help, see your PC is software application that allows you need: • a desktop PC with ActiveSync or Windows Mobile Device Center, you to easily deploy and manage...

Intermec Features Demo User Guide
Page 15
Intermec Features Demo User Guide 15 You can change the symbology settings to scan types of the most commonly supported bar code types. For the CV61, tap the 1D or 2D button (or the Postal button if your computer supports those symbologies by default) to select the bar code type. Settings Menu for All Computers Settings Menu for the bar code type you want to edit. Configure Bar Code Symbology Settings The Symbology Settings screen displays many of...
Intermec Features Demo User Guide 15 You can change the symbology settings to scan types of the most commonly supported bar code types. For the CV61, tap the 1D or 2D button (or the Postal button if your computer supports those symbologies by default) to select the bar code type. Settings Menu for All Computers Settings Menu for the bar code type you want to edit. Configure Bar Code Symbology Settings The Symbology Settings screen displays many of...
Intermec Terminal Emulator (ITE) User Guide
Page 18
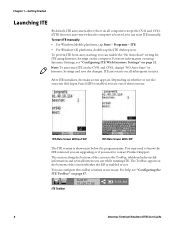
... booted, you see one of these screens: ITE Main Screen Without SIP ITE Main Screen With SIP The ITE version is shown just below the program name. The section along the bottom of the screen whether the SIP is the Toolbar, which includes useful information and several buttons you need to contact Product Support. You can enable the "No Auto-Start" setting for ITE using Intermec Settings, see "Configuring...
... booted, you see one of these screens: ITE Main Screen Without SIP ITE Main Screen With SIP The ITE version is shown just below the program name. The section along the bottom of the screen whether the SIP is the Toolbar, which includes useful information and several buttons you need to contact Product Support. You can enable the "No Auto-Start" setting for ITE using Intermec Settings, see "Configuring...
Intermec Terminal Emulator (ITE) User Guide
Page 43
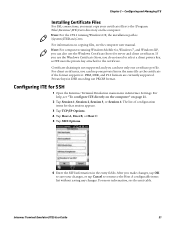
... uses the private key attached to select a client private key, as the certificate if the format supports it. Note: For computers running Windows CE, the installation path is not supported and you must copy your changes, or tap Cancel to return to the \Program Files\Intermec\ITE\Certs directory on page 21. 2 Tap Session 1, Session 2, Session 3, or Session 4. For help, see the computer user manual. For more information...
... uses the private key attached to select a client private key, as the certificate if the format supports it. Note: For computers running Windows CE, the installation path is not supported and you must copy your changes, or tap Cancel to return to the \Program Files\Intermec\ITE\Certs directory on page 21. 2 Tap Session 1, Session 2, Session 3, or Session 4. For help, see the computer user manual. For more information...
Intermec Terminal Emulator (ITE) User Guide
Page 57
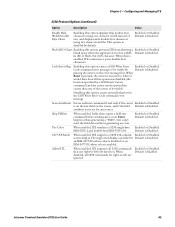
... command before sending data on an Enter keypress (thus generating a "0020" error code) send the field data without generating an error. Default is Disabled. Intermec Terminal Emulator (ITE) User Guide 45 blank space when the application receives a Shift- Lock Error Msg Enabling this option prevents ITE from showing a Enabled or Disabled. Scan AutoEnter Forces an Enter command if and only if the cursor Enabled or Disabled. Default is Enabled. attribute is Disabled. screen display. placing the...
... command before sending data on an Enter keypress (thus generating a "0020" error code) send the field data without generating an error. Default is Disabled. Intermec Terminal Emulator (ITE) User Guide 45 blank space when the application receives a Shift- Lock Error Msg Enabling this option prevents ITE from showing a Enabled or Disabled. Scan AutoEnter Forces an Enter command if and only if the cursor Enabled or Disabled. Default is Enabled. attribute is Disabled. screen display. placing the...
Intermec Terminal Emulator (ITE) User Guide
Page 85
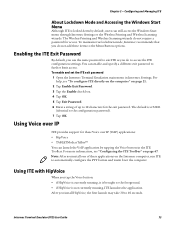
... the application. Chapter 2 - Intermec Terminal Emulator (ITE) User Guide 73 For help, see "Configuring the ITE Toolbar" on the Intermec computer, run ITE to the foreground. • if HipVoice is brought to automatically configure the PTT button and warm boot the computer. You can still access the Windows Start menu through Intermec Settings or the Wireless Printing and Wireless Scanning wizards. The default is locked down by tapping the Voice button in Intermec Settings. Note...
... the application. Chapter 2 - Intermec Terminal Emulator (ITE) User Guide 73 For help, see "Configuring the ITE Toolbar" on the Intermec computer, run ITE to the foreground. • if HipVoice is brought to automatically configure the PTT button and warm boot the computer. You can still access the Windows Start menu through Intermec Settings or the Wireless Printing and Wireless Scanning wizards. The default is locked down by tapping the Voice button in Intermec Settings. Note...
Intermec Terminal Emulator (ITE) User Guide
Page 86
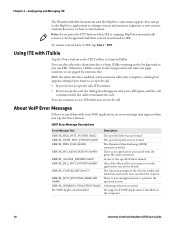
... occurred. Configuring and Managing ITE The Windows Mobile Start menu and the HipVoice start menu appear. You can not be found. The Dynamic Data Exchange (DDE) transaction failed. Access to use ITE. You can go to the HipVoice application to ITE, tap Start > ITE. There is denied. Using ITE with iTalkie Tap the Voice button in the call . The function prompted the user for additional information, but the user canceled...
... occurred. Configuring and Managing ITE The Windows Mobile Start menu and the HipVoice start menu appear. You can not be found. The Dynamic Data Exchange (DDE) transaction failed. Access to use ITE. You can go to the HipVoice application to ITE, tap Start > ITE. There is denied. Using ITE with iTalkie Tap the Voice button in the call . The function prompted the user for additional information, but the user canceled...
Intermec Terminal Emulator (ITE) User Guide
Page 115
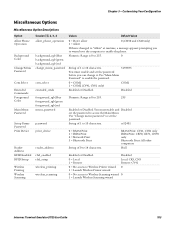
... COM1 Enabled or Disabled. Numeric. String of 0 to 255. 255 Enabled or Disabled. You must enable and set the password. Customizing Your Configuration Miscellaneous Options Miscellaneous Option Descriptions Option Allow Phone Operation Background Color Change Menu Password Com Select Extended Commands Foreground Color Main Menu Password Setup Parms Password Print Device Reader Address RFID Enabled RFID Setup Wireless Printing Wireless Scanning Session [1], 2, 3, 4 allow_phone_operation background_rgb|blue background_rgb|green background_rgb|red change_menu_password...
... COM1 Enabled or Disabled. Numeric. String of 0 to 255. 255 Enabled or Disabled. You must enable and set the password. Customizing Your Configuration Miscellaneous Options Miscellaneous Option Descriptions Option Allow Phone Operation Background Color Change Menu Password Com Select Extended Commands Foreground Color Main Menu Password Setup Parms Password Print Device Reader Address RFID Enabled RFID Setup Wireless Printing Wireless Scanning Session [1], 2, 3, 4 allow_phone_operation background_rgb|blue background_rgb|green background_rgb|red change_menu_password...

Intermec Terminal Emulator (ITE) User Guide
Page 118
... settings are stored. Range is 1 to start when you press the Trusted App toolbar button. IP address of the work area (in pixels). Range is 125 to the maximum height 125 (CV41 running of up to 260 characters specifying the Blank application to 99. wd_send_timeout Numeric. Default Value \my documents\my pictures NA 106 Intermec Terminal Emulator (ITE) User Guide...
... settings are stored. Range is 1 to start when you press the Trusted App toolbar button. IP address of the work area (in pixels). Range is 125 to the maximum height 125 (CV41 running of up to 260 characters specifying the Blank application to 99. wd_send_timeout Numeric. Default Value \my documents\my pictures NA 106 Intermec Terminal Emulator (ITE) User Guide...

70 Series Mobile Computer User Manual
Page 8
... Using Microsoft ActiveSync 109 Install Applications Using a Storage Card 109 Launch Applications Automatically 110 Update the System Software 110 Update Individual or Multiple Computers Using the SmartSystems Console .110 Update Individual Mobile Computers Using a microSD Card 112 8 Troubleshoot and Maintain the Computer 113 About the Intermec Dashboard 114 Troubleshoot Your Mobile Computer 115 Troubleshoot the Wi-Fi Connection 115 Troubleshoot 802.1x Security 116 Check 802.11 Network Status 117 Troubleshoot Reading Bar Codes 119 Use ScanDiagnostic to Troubleshoot the Scanner...
... Using Microsoft ActiveSync 109 Install Applications Using a Storage Card 109 Launch Applications Automatically 110 Update the System Software 110 Update Individual or Multiple Computers Using the SmartSystems Console .110 Update Individual Mobile Computers Using a microSD Card 112 8 Troubleshoot and Maintain the Computer 113 About the Intermec Dashboard 114 Troubleshoot Your Mobile Computer 115 Troubleshoot the Wi-Fi Connection 115 Troubleshoot 802.1x Security 116 Check 802.11 Network Status 117 Troubleshoot Reading Bar Codes 119 Use ScanDiagnostic to Troubleshoot the Scanner...

70 Series Mobile Computer User Manual
Page 61
... troubleshoot problems with Intermec Settings" on page 117. Wireless Readers Use the Wireless Readers application to connect to modify predefined camera scenes or create new scenes. You will see "Configure Camera Scenes" on and off and configure settings for a specific use . Wireless Printing Use the Wireless Printing application to connect to a Bluetooth scanner. You can choose predefined values for the Camera, Power, and Scanning. • Tap the Profile Setting you want to Troubleshoot the Scanner" on page 85. 70 Series Mobile Computer User Manual...
... troubleshoot problems with Intermec Settings" on page 117. Wireless Readers Use the Wireless Readers application to connect to modify predefined camera scenes or create new scenes. You will see "Configure Camera Scenes" on and off and configure settings for a specific use . Wireless Printing Use the Wireless Printing application to connect to a Bluetooth scanner. You can choose predefined values for the Camera, Power, and Scanning. • Tap the Profile Setting you want to Troubleshoot the Scanner" on page 85. 70 Series Mobile Computer User Manual...

70 Series Mobile Computer User Manual
Page 94
Configure the Computer Location Services Menu Location Services Options Server Virtual GPS Parameters You Can Configure Server settings (port and enable server) Virtual GPS settings RFID Menu RFID Options Enable RFID Service Application Connection Reader 1 Parameters You Can Configure Enable or disable RFID Service • Allow external BRI Connections • BRI TCP Port • Enable Logging • Enable Reader • Connected • Reader Model • RFID Module For more information on all parameters in Intermec Settings: • Tap Back or Cancel on the Tile...
Configure the Computer Location Services Menu Location Services Options Server Virtual GPS Parameters You Can Configure Server settings (port and enable server) Virtual GPS settings RFID Menu RFID Options Enable RFID Service Application Connection Reader 1 Parameters You Can Configure Enable or disable RFID Service • Allow external BRI Connections • BRI TCP Port • Enable Logging • Enable Reader • Connected • Reader Model • RFID Module For more information on all parameters in Intermec Settings: • Tap Back or Cancel on the Tile...

70 Series Mobile Computer User Manual
Page 97
... transfer data using Intermec Settings. The mobile computer contains an 802.11 radio to easily enable the radio and set up, including your wireless or wired data collection network. By default, the 802.11 radio is set the default security settings, see "About Wireless Security" on page 181. 1 Tap Start > Settings > System > Intermec Settings. 2 From the Intermec Settings main menu, tap Communications > 802.11 Radio > Radio Enabled. 3 Select the Radio Enabled check box and tap OK. For help, see Appendix C, "ScanNGo Wi-Fi Configuration Bar Codes" on page 92. 70 Series Mobile...
... transfer data using Intermec Settings. The mobile computer contains an 802.11 radio to easily enable the radio and set up, including your wireless or wired data collection network. By default, the 802.11 radio is set the default security settings, see "About Wireless Security" on page 181. 1 Tap Start > Settings > System > Intermec Settings. 2 From the Intermec Settings main menu, tap Communications > 802.11 Radio > Radio Enabled. 3 Select the Radio Enabled check box and tap OK. For help, see Appendix C, "ScanNGo Wi-Fi Configuration Bar Codes" on page 92. 70 Series Mobile...

70 Series Mobile Computer User Manual
Page 134
... to Scan button while aiming at the bar code you want to exit. 120 70 Series Mobile Computer User Manual The input device attached to the Set the Scanner Model command to enter data for your application. The data decoded by the scan module does not match the data encoded in a symbology other than the label's actual symbology. Check enabled bar code symbologies and enable read the bar The scanner window may...
... to Scan button while aiming at the bar code you want to exit. 120 70 Series Mobile Computer User Manual The input device attached to the Set the Scanner Model command to enter data for your application. The data decoded by the scan module does not match the data encoded in a symbology other than the label's actual symbology. Check enabled bar code symbologies and enable read the bar The scanner window may...

70 Series Mobile Computer User Manual
Page 206
...) 94 configuring WPA Personal (PSK) 95 configuring WPA2 Enterprise (802.1x) 94 configuring WPA2 Personal (PSK) 95 profile, choosing 93 using open (no security) associations 98 G gestures, supported 41 Good Read LED described 7 troubleshooting 119 GPS configuring 70 GPSID, overview 70 improving performance 72 modes, described 72 gpsOneXTRA, described 71 H handstrap replacement kit, described 9 hard reset, performing 124 health, monitoring computer 114 Hibernate (battery swap), described 25 holster, described 9 Home screen, described...
...) 94 configuring WPA Personal (PSK) 95 configuring WPA2 Enterprise (802.1x) 94 configuring WPA2 Personal (PSK) 95 profile, choosing 93 using open (no security) associations 98 G gestures, supported 41 Good Read LED described 7 troubleshooting 119 GPS configuring 70 GPSID, overview 70 improving performance 72 modes, described 72 gpsOneXTRA, described 71 H handstrap replacement kit, described 9 hard reset, performing 124 health, monitoring computer 114 Hibernate (battery swap), described 25 holster, described 9 Home screen, described...
70 Series Mobile Computer User Manual
Page 207
... battery status, described 14 status, described 7 location, status LEDs 7 locked computer, troubleshooting 121 M magstripe reader adapter, described 8 magstripe reader snap-on adapter, described 8 mass storage device, using computer as 38 memory, computer 132 microSD card installing in a CK70/CK71 35 installing in a CN70/CN70e 32 using to save pictures and videos 67 Microsoft security choosing 98 configuring 802.1x 100 configuring static WEP 101 configuring WPA Enterprise (802.1x) 99 configuring WPA Personal (PSK) 100 configuring...
... battery status, described 14 status, described 7 location, status LEDs 7 locked computer, troubleshooting 121 M magstripe reader adapter, described 8 magstripe reader snap-on adapter, described 8 mass storage device, using computer as 38 memory, computer 132 microSD card installing in a CK70/CK71 35 installing in a CN70/CN70e 32 using to save pictures and videos 67 Microsoft security choosing 98 configuring 802.1x 100 configuring static WEP 101 configuring WPA Enterprise (802.1x) 99 configuring WPA Personal (PSK) 100 configuring...

70 Series Mobile Computer User Manual
Page 208
... described 9 ScanDiagnostic Intermec application described 47 using to troubleshoot 120 scanner Bluetooth, connecting to 85 default settings 146 supported tethered and cordless 29 tethered scanner, connecting 89 troubleshooting 119 ScanNGo, radio configuration bar codes 182 SceneEditor application, described 47 configuring camera scenes 66 scenes camera setting configuring 66 described 63 screen aligning 45 backlight, configuring 27 brightness, configuring 27 gestures 41 no response, troubleshooting 121 specifications 133 Screen Off, power option, described 26 security, wireless 92-104 Sensor...
... described 9 ScanDiagnostic Intermec application described 47 using to troubleshoot 120 scanner Bluetooth, connecting to 85 default settings 146 supported tethered and cordless 29 tethered scanner, connecting 89 troubleshooting 119 ScanNGo, radio configuration bar codes 182 SceneEditor application, described 47 configuring camera scenes 66 scenes camera setting configuring 66 described 63 screen aligning 45 backlight, configuring 27 brightness, configuring 27 gestures 41 no response, troubleshooting 121 specifications 133 Screen Off, power option, described 26 security, wireless 92-104 Sensor...
Intermec Terminal Emulator (ITE) Programmer's Reference Manual
Page 150
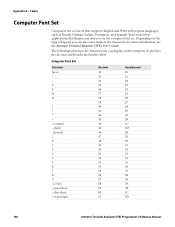
You can also enter many of keypad, you can display on the type of the characters. For more information, see the Intermec Terminal Emulator (ITE) User's Guide. It also lists the decimal and hexadecimal index values. Depending on the computer. Computer Font Set Character Space comma) - (dash) . (period) / 0 1 2 3 4...3B 3C 3D 138 Intermec Terminal Emulator (ITE) Programmer's Reference Manual The following table lists the characters you can develop applications that display any character in the computer font set that supports English and Western European languages, such as French,...
You can also enter many of keypad, you can display on the type of the characters. For more information, see the Intermec Terminal Emulator (ITE) User's Guide. It also lists the decimal and hexadecimal index values. Depending on the computer. Computer Font Set Character Space comma) - (dash) . (period) / 0 1 2 3 4...3B 3C 3D 138 Intermec Terminal Emulator (ITE) Programmer's Reference Manual The following table lists the characters you can develop applications that display any character in the computer font set that supports English and Western European languages, such as French,...

Intermec Terminal Emulator (ITE) Programmer's Reference Manual
Page 180
... multinational character set, 42 multiple area transfer mode, 80 N national replacement character sets, 49 NEL, 54 norcompress, 69 norrc command, 69 P parameter errors, for 5250 emulation, 39 Plessey, 111 prefixes, ansychronous, 39 printing, VT/ANSI, 60 private sequences, VT/ANSI, 69 product support, contacting, xi Program Tab, 9 proprietary sequences, VT/ANSI, 69 character mode, 69 line edit mode, 69 norrc command, 69 scanner lock mode, 69...
... multinational character set, 42 multiple area transfer mode, 80 N national replacement character sets, 49 NEL, 54 norcompress, 69 norrc command, 69 P parameter errors, for 5250 emulation, 39 Plessey, 111 prefixes, ansychronous, 39 printing, VT/ANSI, 60 private sequences, VT/ANSI, 69 product support, contacting, xi Program Tab, 9 proprietary sequences, VT/ANSI, 69 character mode, 69 line edit mode, 69 norrc command, 69 scanner lock mode, 69...

Basic Reader Interface Programmer's Reference Manual (BRI version 3.17)
Page 110
... is enabled or disabled. Sets the number of January 1, 1970 at 00:00:00. The user application should select Properties > Settings > ASCII Setup and check the "Send line ends with line feeds" check box to terminate a line. Range is 0 to zero whenever the reader is sent in seconds since the epoch of times a group unselect is 0. Default is attempted. The default value for a serial connection...
... is enabled or disabled. Sets the number of January 1, 1970 at 00:00:00. The user application should select Properties > Settings > ASCII Setup and check the "Send line ends with line feeds" check box to terminate a line. Range is 0 to zero whenever the reader is sent in seconds since the epoch of times a group unselect is 0. Default is attempted. The default value for a serial connection...


