Separate volume2
Page 1
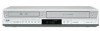
... 720p/1080i is no picture. For additional troubleshooting tips please refer to pages 51-53 in your owner's manual. What DVDs can play in another DVD player. c DVD-R, DVD+R, DVD-RW and DVD+RW can ...recordable media on the remote control and the front panel will not respond for your purchase of the JVC DR-MV7S VHS/DVD Player/Recorder. When your DR-MV7S is on my DR-MV7S it flashes... by following the instructions on , it can I use the remote control or front panel buttons. JVC Customer Care Center 1-800-252-5722 DR-MV7S Quick Guide FAQ's Thank you attempt to use to record on...
... 720p/1080i is no picture. For additional troubleshooting tips please refer to pages 51-53 in your owner's manual. What DVDs can play in another DVD player. c DVD-R, DVD+R, DVD-RW and DVD+RW can ...recordable media on the remote control and the front panel will not respond for your purchase of the JVC DR-MV7S VHS/DVD Player/Recorder. When your DR-MV7S is on my DR-MV7S it flashes... by following the instructions on , it can I use the remote control or front panel buttons. JVC Customer Care Center 1-800-252-5722 DR-MV7S Quick Guide FAQ's Thank you attempt to use to record on...
Instructions
Page 2
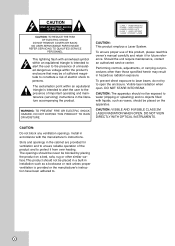
... manufacturer's instruction have been adhered to. 2 To ensure proper use of the product and to ensure reliable operation of this product, please read this owner's manual carefully and retain it from over heating. CAUTION: VISIBLE AND INVISIBLE CLASS 2M LASER RADIATION WHEN OPEN. The exclamation point within the product's enclosure that...
... manufacturer's instruction have been adhered to. 2 To ensure proper use of the product and to ensure reliable operation of this product, please read this owner's manual carefully and retain it from over heating. CAUTION: VISIBLE AND INVISIBLE CLASS 2M LASER RADIATION WHEN OPEN. The exclamation point within the product's enclosure that...
Instructions
Page 3
...receiver. • Connect the product into an outlet on a circuit different from that interference will not occur in the instruction manual. Any of these conditions could lose the authority to operate this product does cause harmful interference to radio or television reception, which...mechanical abuse, such as being twisted, kinked, pinched, closed in accordance with the instruction manual, may cause harmful interference to radio communications. Changes or modifications to this owner's manual to correct the interference by an authorized servicer. This product generates, uses, and can ...
...receiver. • Connect the product into an outlet on a circuit different from that interference will not occur in the instruction manual. Any of these conditions could lose the authority to operate this product does cause harmful interference to radio or television reception, which...mechanical abuse, such as being twisted, kinked, pinched, closed in accordance with the instruction manual, may cause harmful interference to radio communications. Changes or modifications to this owner's manual to correct the interference by an authorized servicer. This product generates, uses, and can ...
Instructions
Page 4
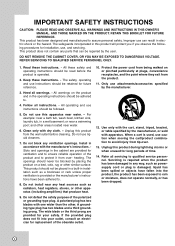
IMPORTANT SAFETY INSTRUCTIONS CAUTION: PLEASE READ AND OBSERVE ALL WARNINGS AND INSTRUCTIONS IN THIS OWNER'S MANUAL. AND THOSE MARKED ON THE PRODUCT. DO NOT REMOVE THE CABINET COVER, OR YOU MAY BE EXPOSED TO DANGEROUS VOLTAGE. REFER SERVICING TO QUALIFIED SERVICE ...
IMPORTANT SAFETY INSTRUCTIONS CAUTION: PLEASE READ AND OBSERVE ALL WARNINGS AND INSTRUCTIONS IN THIS OWNER'S MANUAL. AND THOSE MARKED ON THE PRODUCT. DO NOT REMOVE THE CABINET COVER, OR YOU MAY BE EXPOSED TO DANGEROUS VOLTAGE. REFER SERVICING TO QUALIFIED SERVICE ...
Instructions
Page 5
INTRODUCTION RECORDING About the Symbol Display 6 Symbol Used in this Manual 6 Notes on Discs 6 Moisture Condensation 6 Recordable and Playable Discs 7 Recommended recordable DVD discs . . . . . .7 Playable Discs 8 Regional Code 8 Restrictions on video recording 9 What is 'CPRM...25 Displaying Information While Watching TV . .25 Displaying Disc Information on-screen . . . . .25 PLAYBACK Playing a Tape 26 Playing a DVD or Video CD 26 VCR Playback Features 27 DVD or video CD Playback Features . . . .28-29 Special Playback Options 30 Playing a DivX Movie File 31 Playing an Audio CD or...
INTRODUCTION RECORDING About the Symbol Display 6 Symbol Used in this Manual 6 Notes on Discs 6 Moisture Condensation 6 Recordable and Playable Discs 7 Recommended recordable DVD discs . . . . . .7 Playable Discs 8 Regional Code 8 Restrictions on video recording 9 What is 'CPRM...25 Displaying Information While Watching TV . .25 Displaying Disc Information on-screen . . . . .25 PLAYBACK Playing a Tape 26 Playing a DVD or Video CD 26 VCR Playback Features 27 DVD or video CD Playback Features . . . .28-29 Special Playback Options 30 Playing a DivX Movie File 31 Playing an Audio CD or...
Instructions
Page 6
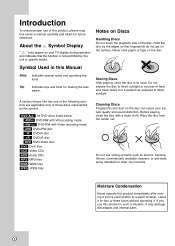
...future reference. Never stick paper or tape on Discs Handling Discs Do not touch the playback side of this product, please read this Manual Note: Indicates special notes and operating features. Symbol Used in its case. Do not expose the disc to direct sunlight or sources of... the following symbols are applicable only to direct sunlight. Storing Discs After playing, store the disc in this owner's manual carefully and retain for older vinyl records. Before playing, clean the disc with Video recording mode +RW DVD+RW disc -R DVD-R disc +R...
...future reference. Never stick paper or tape on Discs Handling Discs Do not touch the playback side of this product, please read this Manual Note: Indicates special notes and operating features. Symbol Used in its case. Do not expose the disc to direct sunlight or sources of... the following symbols are applicable only to direct sunlight. Storing Discs After playing, store the disc in this owner's manual carefully and retain for older vinyl records. Before playing, clean the disc with Video recording mode +RW DVD+RW disc -R DVD-R disc +R...
Instructions
Page 11
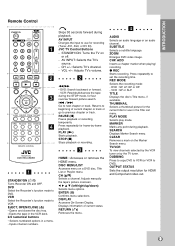
...the Title List menu. INTRODUCTION Remote Control a b c d a STANDBY/ON (1/`) Turns Recorder ON and OFF. DVD Select the Recorder's function mode to VCR. Ejects the tape in a menu. - JVC TV Control Buttons - STOP (x) Stops playback or recording. b B v V (left/right/up/down) Selects menu options. SUBTITLE Selects a subtitle language...image. STANDBY/ON: Turns the TV on a DVD disc, Title List or Playlist menu. Returns to beginning of current status. Adjusts manually the tape's picture onscreen. RETURN (O) Removes the menu. CLEAR Removes a mark on the Marker Search menu.
...the Title List menu. INTRODUCTION Remote Control a b c d a STANDBY/ON (1/`) Turns Recorder ON and OFF. DVD Select the Recorder's function mode to VCR. Ejects the tape in a menu. - JVC TV Control Buttons - STOP (x) Stops playback or recording. b B v V (left/right/up/down) Selects menu options. SUBTITLE Selects a subtitle language...image. STANDBY/ON: Turns the TV on a DVD disc, Title List or Playlist menu. Returns to beginning of current status. Adjusts manually the tape's picture onscreen. RETURN (O) Removes the menu. CLEAR Removes a mark on the Marker Search menu.
Instructions
Page 13
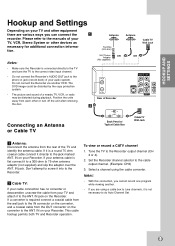
... the correct video input channel. • Do not connect the Recorder's AUDIO OUT jack to the manuals of the TV and identify the antenna cable. IN jack on your TV, VCR, Stereo System or other devices as necessary for additional connection informa- Don't attempt to screw it directly...8226; If you are various ways you can connect the a recorder. Notes: • With this connection, you cannot record one program while viewing another VCR. IN on your TV and attach it to a 300-ohm to the cable output channel. (Example: CH3) 3. Set the Recorder channel selector to ...
... the correct video input channel. • Do not connect the Recorder's AUDIO OUT jack to the manuals of the TV and identify the antenna cable. IN jack on your TV, VCR, Stereo System or other devices as necessary for additional connection informa- Don't attempt to screw it directly...8226; If you are various ways you can connect the a recorder. Notes: • With this connection, you cannot record one program while viewing another VCR. IN on your TV and attach it to a 300-ohm to the cable output channel. (Example: CH3) 3. Set the Recorder channel selector to ...
Instructions
Page 15
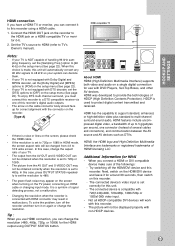
... HDCP (High Definition Contents Protection). HDCP is set to provide the technologies of the followings: - The connected device's video input is used to TV's Owner's manual). Additional Information for this recorder. - Set the TV's source to HDMI (refer to protect digital content transmitted and received.
... HDCP (High Definition Contents Protection). HDCP is set to provide the technologies of the followings: - The connected device's video input is used to TV's Owner's manual). Additional Information for this recorder. - Set the TV's source to HDMI (refer to protect digital content transmitted and received.
Instructions
Page 16
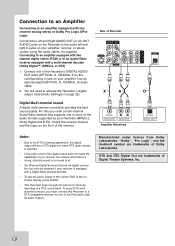
... a strong, distorted sound or no sound at all. • Six Channel Digital Surround Sound via one or more of a DTS sound track. Check the receiver manual and the logos on your Recorder (MPEG 2, Dolby Digital and DTS). Connecting to an amplifier equipped with two channel digital stereo (PCM) or to an...
... a strong, distorted sound or no sound at all. • Six Channel Digital Surround Sound via one or more of a DTS sound track. Check the receiver manual and the logos on your Recorder (MPEG 2, Dolby Digital and DTS). Connecting to an amplifier equipped with two channel digital stereo (PCM) or to an...
Instructions
Page 18
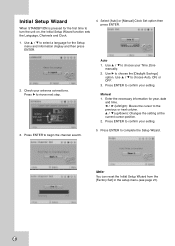
...unit on, the Initial Setup Wizard function sets the Language, Channels and Clock. 1. Press ENTER to confirm your setting. Select [Auto] or [Manual] Clock Set option then press ENTER. 2. Press ENTER to choose your antenna connections. Enter the necessary information for the Setup menu and information ...Factory Set] in the setup menu.(see page 21). 18 Auto 1. Use v / V to choose the [Daylight Savings] option. Manual 1. Check your Time Zone manually. 2. v / V (up/down): Changes the setting at the current cursor position. 2. Use v / V to confirm your setting. 5.
...unit on, the Initial Setup Wizard function sets the Language, Channels and Clock. 1. Press ENTER to confirm your setting. Select [Auto] or [Manual] Clock Set option then press ENTER. 2. Press ENTER to choose your antenna connections. Enter the necessary information for the Setup menu and information ...Factory Set] in the setup menu.(see page 21). 18 Auto 1. Use v / V to choose the [Daylight Savings] option. Manual 1. Check your Time Zone manually. 2. v / V (up/down): Changes the setting at the current cursor position. 2. Use v / V to confirm your setting. 5.
Instructions
Page 20
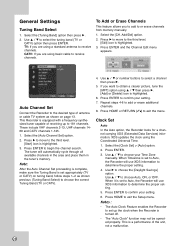
... setting. 4. Repeat steps 4-6 to exit the Setup menu. When Timezone is set to Auto, the Recorder will use XDS information to confirm your Time Zone manually. When it is turned off. • The "Auto Clock" function may not be operated properly. Press HOME to add or erase additional channels. 8. Select the... is highlighted. 3. If you to add to select the tuning band (TV or CATV) option then press ENTER. Use v / V to or erase channels from memory manually. 1. General Settings Tuning Band Select 1.
... setting. 4. Repeat steps 4-6 to exit the Setup menu. When Timezone is set to Auto, the Recorder will use XDS information to confirm your Time Zone manually. When it is turned off. • The "Auto Clock" function may not be operated properly. Press HOME to add or erase additional channels. 8. Select the... is highlighted. 3. If you to add to select the tuning band (TV or CATV) option then press ENTER. Use v / V to or erase channels from memory manually. 1. General Settings Tuning Band Select 1.
Instructions
Page 21
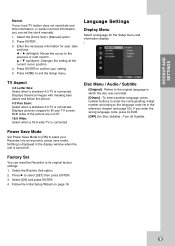
...are cut off . v / V (up/down): Changes the setting at the current cursor position. 4. Factory Set You can set the clock manually. 1. Nothing is displayed in which the disc was recorded. [Others] : To select another language, press number buttons to enter the corresponding 4-...digit number according to fill your TV screen. Select [OK] and press ENTER. 4. Select the [Clock Set] > [Manual] option. 2. Press ENTER. 3. b / B (left/right): Moves the cursor to its original factory settings. 1. Language Settings Display Menu Select a language...
...are cut off . v / V (up/down): Changes the setting at the current cursor position. 4. Factory Set You can set the clock manually. 1. Nothing is displayed in which the disc was recorded. [Others] : To select another language, press number buttons to enter the corresponding 4-...digit number according to fill your TV screen. Select [OK] and press ENTER. 4. Select the [Clock Set] > [Manual] option. 2. Press ENTER. 3. b / B (left/right): Moves the cursor to its original factory settings. 1. Language Settings Display Menu Select a language...
Instructions
Page 27
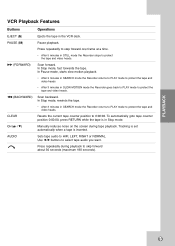
... mode, fast forwards the tape. In Stop mode, rewinds the tape. • After 3 minutes in the VCR deck. VCR Playback Features Buttons Operations EJECT (Z) PAUSE (X) M (FORWARD) m (BACKWARD) CLEAR CH (v+ / V-) AUDIO... Ejects the tape in SEARCH mode the Recorder returns to PLAY mode to protect the tape and video heads. Resets the current tape counter position to skip forward about 30 seconds (maximum 180 seconds). Press repeatedly during tape playback. Manually...
... mode, fast forwards the tape. In Stop mode, rewinds the tape. • After 3 minutes in the VCR deck. VCR Playback Features Buttons Operations EJECT (Z) PAUSE (X) M (FORWARD) m (BACKWARD) CLEAR CH (v+ / V-) AUDIO... Ejects the tape in SEARCH mode the Recorder returns to PLAY mode to protect the tape and video heads. Resets the current tape counter position to skip forward about 30 seconds (maximum 180 seconds). Press repeatedly during tape playback. Manually...
Instructions
Page 39
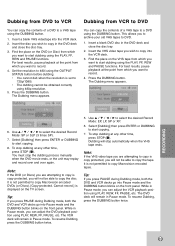
... using 480p resolution. 5. Find the place on the TV screen. You must stop dubbing at any other time, press STOP (x). Dubbing from DVD to VCR Dubbing from VCR to DVD You can copy the contents of a VHS tape to a DVD using the DUBBING button. 1. Use v / V / b / B to select the desired ...Record Mode: EP, LP, SP or XP. 6. To resume Dubbing, press the DUBBING button twice. 39 Insert a blank VHS videotape into the VCR deck. 3. RECORDING 6. To stop the dubbing process manually when the DVD movie ends, or the unit may replay and record over and over again.
... using 480p resolution. 5. Find the place on the TV screen. You must stop dubbing at any other time, press STOP (x). Dubbing from DVD to VCR Dubbing from VCR to DVD You can copy the contents of a VHS tape to a DVD using the DUBBING button. 1. Use v / V / b / B to select the desired ...Record Mode: EP, LP, SP or XP. 6. To resume Dubbing, press the DUBBING button twice. 39 Insert a blank VHS videotape into the VCR deck. 3. RECORDING 6. To stop the dubbing process manually when the DVD movie ends, or the unit may replay and record over and over again.
Instructions
Page 43
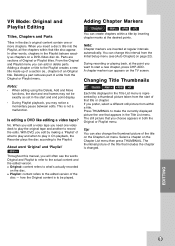
... edit by inserting chapter marks at the point you want to start and end point display. • During Playlist playback, you can also change this manual, you insert a disc's title into the Playlist, all the chapters within a title. VR Mode: Original and Playlist Editing Titles, Chapters and Parts Titles in the...
... edit by inserting chapter marks at the point you want to start and end point display. • During Playlist playback, you can also change this manual, you insert a disc's title into the Playlist, all the chapters within a title. VR Mode: Original and Playlist Editing Titles, Chapters and Parts Titles in the...
Instructions
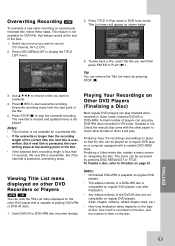
Page 49
Tip: You can be played on the type of disc, how much is displayed. Check the manual that always record at the starting point of the current title, the next title is overwritten. Finalizing a Video mode disc creates a menu screen for DVD+...
Tip: You can be played on the type of disc, how much is displayed. Check the manual that always record at the starting point of the current title, the next title is overwritten. Finalizing a Video mode disc creates a menu screen for DVD+...
Instructions
Page 51
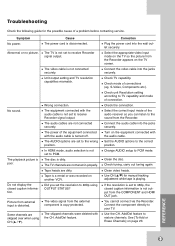
... over when using OUTPUT STATUS? Select the appropriate video input mode on the TV so the picture from the Recorder appears on another VCR. Connect the video cable into the jacks securely. Check unit Resolution setting according to TV capability and mode of the audio receiver so... not set to the correct position. Check tuning, carry out tuning again. The playback picture is dirty. Troubleshooting Check the following guide for manual tracking adjustment while tape is playing. Correction Plug the power cord into the wall outlet securely. Symptom No power. Abnormal or no picture....
... over when using OUTPUT STATUS? Select the appropriate video input mode on the TV so the picture from the Recorder appears on another VCR. Connect the video cable into the jacks securely. Check unit Resolution setting according to TV capability and mode of the audio receiver so... not set to the correct position. Check tuning, carry out tuning again. The playback picture is dirty. Troubleshooting Check the following guide for manual tracking adjustment while tape is playing. Correction Plug the power cord into the wall outlet securely. Symptom No power. Abnormal or no picture....
Separate volume1
Page 1
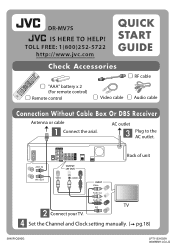
TOLL FREE: 1(800)252-5722 http://www.jvc.com QUICK START GUIDE Check Accessories RF cable "AAA" battery x 2 (For remote control) Remote control Video cable Audio cable Connection Without Cable Box Or DBS Receiver Antenna or cable AC outlet Connect the arial. OUT INPUT Video Audio (L) Audio (R) RF TV Connect your TV. DR-MV7S IS HERE TO HELP! Set the Channel and Clock setting manually. ( pg.18) 3840R-Q090G LPT1133-002A 0606MNH-LG-LG ANT. Plug to the AC outlet. IN OUTPUT (AV OUT) Back of unit RF.
TOLL FREE: 1(800)252-5722 http://www.jvc.com QUICK START GUIDE Check Accessories RF cable "AAA" battery x 2 (For remote control) Remote control Video cable Audio cable Connection Without Cable Box Or DBS Receiver Antenna or cable AC outlet Connect the arial. OUT INPUT Video Audio (L) Audio (R) RF TV Connect your TV. DR-MV7S IS HERE TO HELP! Set the Channel and Clock setting manually. ( pg.18) 3840R-Q090G LPT1133-002A 0606MNH-LG-LG ANT. Plug to the AC outlet. IN OUTPUT (AV OUT) Back of unit RF.
Separate volume1
Page 2
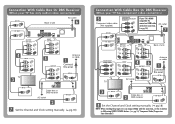
... of unit Antenna or cable Connect the arial. RF IN RF IN Cable box or DBS receiver RF OUT 8 Set the Channel and Clock setting manually. ( pg.18) NOTE: When watching the progressive scan images(480p) with other connection. ( pg. 15) AC outlet RF. Connection With Cable Box Or DBS Receiver...) Component video cable (Not supplied) ANT. RF IN RF IN Cable box or DBS receiver RF OUT AC outlet Set the Channel and Clock setting manually. ( pg.18) Connection With Cable Box Or DBS Receiver (When your TV has only audio/video connectors) ANT. OUT COMPONENT VIDEO INPUT Y PB PR TV...
... of unit Antenna or cable Connect the arial. RF IN RF IN Cable box or DBS receiver RF OUT 8 Set the Channel and Clock setting manually. ( pg.18) NOTE: When watching the progressive scan images(480p) with other connection. ( pg. 15) AC outlet RF. Connection With Cable Box Or DBS Receiver...) Component video cable (Not supplied) ANT. RF IN RF IN Cable box or DBS receiver RF OUT AC outlet Set the Channel and Clock setting manually. ( pg.18) Connection With Cable Box Or DBS Receiver (When your TV has only audio/video connectors) ANT. OUT COMPONENT VIDEO INPUT Y PB PR TV...

