
Instructions
Page 2
... laser radiation when open the enclosure. To ensure proper use of uninsulated dangerous voltage within the product's enclosure that this owner's manual carefully and retain it from over heating. CAUTION: VISIBLE AND INVISIBLE CLASS 2M LASER RADIATION WHEN OPEN. This lightning flash with arrowhead...please read this product or product models meet the ENERGY STAR® guidelines for future reference. As an ENERGY STAR® Partner, JVC has determined that may result in accordance with liquids, such as a bookcase or rack unless proper ventilation is intended to alert the ...
... laser radiation when open the enclosure. To ensure proper use of uninsulated dangerous voltage within the product's enclosure that this owner's manual carefully and retain it from over heating. CAUTION: VISIBLE AND INVISIBLE CLASS 2M LASER RADIATION WHEN OPEN. This lightning flash with arrowhead...please read this product or product models meet the ENERGY STAR® guidelines for future reference. As an ENERGY STAR® Partner, JVC has determined that may result in accordance with liquids, such as a bookcase or rack unless proper ventilation is intended to alert the ...
Instructions
Page 3
...cord of your appliance, and if its appearance indicates damage or deterioration, unplug it, discontinue use radio frequency energy. If this owner's manual to correct the interference by turning the product off and on a circuit different from the mains, pull out the mains cord plug.... REFERENCE G-2 The user could result in the instruction manual. Pay particular attention to provide reasonable protection against harmful interference when the product is connected. • Consult the dealer or an ...
...cord of your appliance, and if its appearance indicates damage or deterioration, unplug it, discontinue use radio frequency energy. If this owner's manual to correct the interference by turning the product off and on a circuit different from the mains, pull out the mains cord plug.... REFERENCE G-2 The user could result in the instruction manual. Pay particular attention to provide reasonable protection against harmful interference when the product is connected. • Consult the dealer or an ...
Instructions
Page 5
INTRODUCTION INTRODUCTION RECORDING About the Symbol Display 2 Symbol Used in this Manual 2 Notes on Discs 2 Moisture Condensation 2 Recordable and Playable Discs 3 Recommended recordable DVD discs . . . . . .3 Playable Discs 4 Regional Code 4 Restrictions on video recording 5 What ... Displaying Information While Watching AV input source 19 Displaying Disc Information on-screen . . . . .19 PLAYBACK Playing a Tape 20 Playing a DVD 20 VCR Playback Options 20 DVD or Video CD Playback Features . . . .21-22 Special Playback Options 23 Playing a DivX Movie File 24 Playing an Audio CD...
INTRODUCTION INTRODUCTION RECORDING About the Symbol Display 2 Symbol Used in this Manual 2 Notes on Discs 2 Moisture Condensation 2 Recordable and Playable Discs 3 Recommended recordable DVD discs . . . . . .3 Playable Discs 4 Regional Code 4 Restrictions on video recording 5 What ... Displaying Information While Watching AV input source 19 Displaying Disc Information on-screen . . . . .19 PLAYBACK Playing a Tape 20 Playing a DVD 20 VCR Playback Options 20 DVD or Video CD Playback Features . . . .21-22 Special Playback Options 23 Playing a DivX Movie File 24 Playing an Audio CD...
Instructions
Page 6
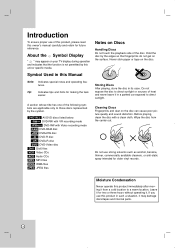
.... Tip: Indicates tips and hints for older vinyl records. A section whose title has one of this product, please read this owner's manual carefully and retain for two or three hours without operating it from the center out. Never stick paper or tape on the surface. Do...this product immediately after moving it . Symbol Used in this product in such a situation, it for future reference. Do not use this Manual Note: Indicates special notes and operating features. Notes on the disc can cause poor picture quality and sound distortion. Moisture Condensation Never operate this...
.... Tip: Indicates tips and hints for older vinyl records. A section whose title has one of this product, please read this owner's manual carefully and retain for two or three hours without operating it from the center out. Never stick paper or tape on the surface. Do...this product immediately after moving it . Symbol Used in this product in such a situation, it for future reference. Do not use this Manual Note: Indicates special notes and operating features. Notes on the disc can cause poor picture quality and sound distortion. Moisture Condensation Never operate this...
Instructions
Page 11
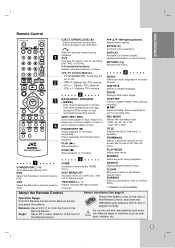
... during the STOP mode, for fast reverse/forward picture search. JVC TV Control Buttons - VOL +/-: Adjusts TV's volume. c d b BACKWARD / FORWARD (m/M) - DVD: Search backward or forward. - PLAY (N) Starts playback. VCR Select the Recorder's function mode to previous chapter or track. ... Angle: About 30° in the VCR deck. INTRODUCTION Remote Control EJECT, OPEN/CLOSE (Z) - VCR: Rewinds/Advances the tape during playback. Press repeatedly to DVD. CLEAR Removes a mark on or off. - TRACKING (+ / -) Adjusts manually the tape's picture onscreen. REC MODE ...
... during the STOP mode, for fast reverse/forward picture search. JVC TV Control Buttons - VOL +/-: Adjusts TV's volume. c d b BACKWARD / FORWARD (m/M) - DVD: Search backward or forward. - PLAY (N) Starts playback. VCR Select the Recorder's function mode to previous chapter or track. ... Angle: About 30° in the VCR deck. INTRODUCTION Remote Control EJECT, OPEN/CLOSE (Z) - VCR: Rewinds/Advances the tape during playback. Press repeatedly to DVD. CLEAR Removes a mark on or off. - TRACKING (+ / -) Adjusts manually the tape's picture onscreen. REC MODE ...
Instructions
Page 14
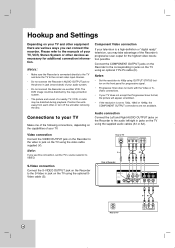
...the COMPONENT OUTPUT connections are various ways you may be distorted by the copy protection system. • The picture and sound of a nearby TV, VCR, or radio may take advantage of the Recorder's progressive scan output for the highest video resolution possible. S-Video connection Connect the S-VIDEO OUTPUT jack ... TV using the optional SVideo cable (S). Notes: • Set the resolution to the audio left/right in jack on the Recorder to the manuals of TV 10 Audio connection Connect the Left and Right AUDIO OUTPUT jacks on the Recorder to 480p using OUTPUT STATUS button on the TV...
...the COMPONENT OUTPUT connections are various ways you may be distorted by the copy protection system. • The picture and sound of a nearby TV, VCR, or radio may take advantage of the Recorder's progressive scan output for the highest video resolution possible. S-Video connection Connect the S-VIDEO OUTPUT jack ... TV using the optional SVideo cable (S). Notes: • Set the resolution to the audio left/right in jack on the Recorder to the manuals of TV 10 Audio connection Connect the Left and Right AUDIO OUTPUT jacks on the Recorder to 480p using OUTPUT STATUS button on the TV...
Instructions
Page 15
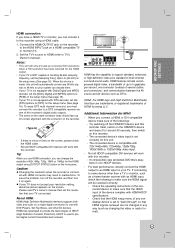
... the front panel. Next, switch on the HDMI/DVI device and leave it for around 30 seconds, then switch on the recorder to TV's Owner's manual). Connect the HDMI OUTPUT jack on this recorder. To enjoy DTS multi channel surround, you can accept. Please read TV's owner...'s manual then set the resolution that HDMI signals received are trademarks or registered trademarks of the device complies with this recorder. - HDMI, the HDMI logo and ...
... the front panel. Next, switch on the HDMI/DVI device and leave it for around 30 seconds, then switch on the recorder to TV's Owner's manual). Connect the HDMI OUTPUT jack on this recorder. To enjoy DTS multi channel surround, you can accept. Please read TV's owner...'s manual then set the resolution that HDMI signals received are trademarks or registered trademarks of the device complies with this recorder. - HDMI, the HDMI logo and ...
Instructions
Page 16
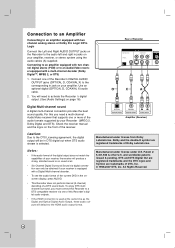
...-2007 DTS, Inc. All Rights Reserved. 12 Use an optional digital (OPTICAL O, COAXIAL X) audio cable. 2. Connect one or more of the receiver. Check the receiver manual and the logos on your amplifier. For this you must connect this Recorder's digital audio outputs. • If the HDMI connection is used at all...
...-2007 DTS, Inc. All Rights Reserved. 12 Use an optional digital (OPTICAL O, COAXIAL X) audio cable. 2. Connect one or more of the receiver. Check the receiver manual and the logos on your amplifier. For this you must connect this Recorder's digital audio outputs. • If the HDMI connection is used at all...
Instructions
Page 24
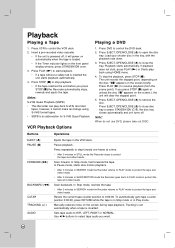
... starts automatically. Press repeatedly to protect the tape and video heads. Tracking is set automatically when a tape is in Stop mode or in the VCR deck. Use b/B buttons to open the disc tray. Insert a pre-recorded video cassette. • If the unit is an abbreviation for S-VHS... PLAY mode to step forward one frame at a time. • After 5 minutes in the tray, with the playback side down. 3. Manually reduces noise on the disc. VCR Playback Options Playing a DVD 1. Press DVD to resume playback (from the scene point). Press EJECT, OPEN/CLOSE (Z) to HIFI, LEFT,...
... starts automatically. Press repeatedly to protect the tape and video heads. Tracking is set automatically when a tape is in Stop mode or in the VCR deck. Use b/B buttons to open the disc tray. Insert a pre-recorded video cassette. • If the unit is an abbreviation for S-VHS... PLAY mode to step forward one frame at a time. • After 5 minutes in the tray, with the playback side down. 3. Manually reduces noise on the disc. VCR Playback Options Playing a DVD 1. Press DVD to resume playback (from the scene point). Press EJECT, OPEN/CLOSE (Z) to HIFI, LEFT,...
Instructions
Page 36
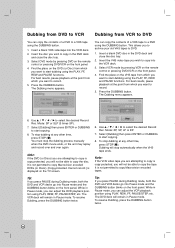
.... 8. Tip: If you want to copy the disc. While in the DVD deck and close the disc tray. 2. The VCR deck will not be able to record. 5. Use v / V / b / B to copy Macrovision encoded tapes. To ...stop dubbing at the point from which you press PAUSE during Dubbing mode, both the DVD and VCR decks go into Pause mode and the DUBBING button blinks on the TV screen. Note: If the VHS video tape you... functions. The DVD deck will stop the dubbing process manually when the DVD movie ends, or the unit may replay and record over and over again.
.... 8. Tip: If you want to copy the disc. While in the DVD deck and close the disc tray. 2. The VCR deck will not be able to record. 5. Use v / V / b / B to copy Macrovision encoded tapes. To ...stop dubbing at the point from which you press PAUSE during Dubbing mode, both the DVD and VCR decks go into Pause mode and the DUBBING button blinks on the TV screen. Note: If the VHS video tape you... functions. The DVD deck will stop the dubbing process manually when the DVD movie ends, or the unit may replay and record over and over again.
Instructions
Page 39
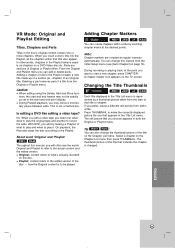
... of that title also appear. During recording or playing back, at regular intervals automatically. Adding Chapter Markers -RWVR +RW +R RAM You can also change this manual, you need one video deck to the Playlist. VR Mode: Original and Playlist Editing Titles, Chapters and Parts Titles in the disc's original content contain...
... of that title also appear. During recording or playing back, at regular intervals automatically. Adding Chapter Markers -RWVR +RW +R RAM You can also change this manual, you need one video deck to the Playlist. VR Mode: Original and Playlist Editing Titles, Chapters and Parts Titles in the disc's original content contain...
Instructions
Page 45
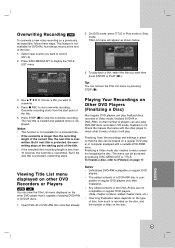
... recorded in Play mode or Stop mode. Press z REC to start point of the title. 5. Overwrite recording starts from the start overwrite recording. Check the manual that is not available for navigating the disc. On DVD mode, press TITLE in VR mode, finalized or not. Notes: • This function is capable...
... recorded in Play mode or Stop mode. Press z REC to start point of the title. 5. Overwrite recording starts from the start overwrite recording. Check the manual that is not available for navigating the disc. On DVD mode, press TITLE in VR mode, finalized or not. Notes: • This function is capable...
Instructions
Page 47
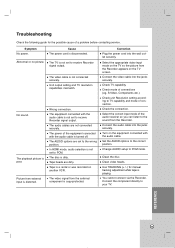
... the TV screen. Symptom No power. The TV is turned off. The audio cables are dirty. The disc is a rental or was recorded on another VCR. Select the appropriate video input mode on the TV so the picture from the external component is poor. S-Video, Components etc.). Set the AUDIO options... of a problem before contacting service. Select the correct input mode of connections (eg. Cause The power cord is disconnected. Troubleshooting Check the following guide for manual tracking adjustment while tape is playing.
... the TV screen. Symptom No power. The TV is turned off. The audio cables are dirty. The disc is a rental or was recorded on another VCR. Select the appropriate video input mode on the TV so the picture from the external component is poor. S-Video, Components etc.). Set the AUDIO options... of a problem before contacting service. Select the correct input mode of connections (eg. Cause The power cord is disconnected. Troubleshooting Check the following guide for manual tracking adjustment while tape is playing.
other
Page 4
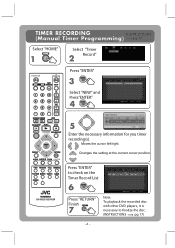
Changes the setting at the current cursor position. Press "ENTER" to check on the Timer Record List 6 Press "RETURN" Finish 7 Note: To playback the recorded disc with other DVD players, it is necessary to finalize the disc. (INSTRUCTIONS pg. 17) -4- TIMER RECORDING INSTRUCTIONS (Manual Timer Programming) pg. 31 Select "HOME" 1 Select "Timer 2 Record" Press "ENTER" 3 Select "NEW" and Press"ENTER" 4 5 Enter the necessary information for you timer recording(s). Moves the cursor left/right.
Changes the setting at the current cursor position. Press "ENTER" to check on the Timer Record List 6 Press "RETURN" Finish 7 Note: To playback the recorded disc with other DVD players, it is necessary to finalize the disc. (INSTRUCTIONS pg. 17) -4- TIMER RECORDING INSTRUCTIONS (Manual Timer Programming) pg. 31 Select "HOME" 1 Select "Timer 2 Record" Press "ENTER" 3 Select "NEW" and Press"ENTER" 4 5 Enter the necessary information for you timer recording(s). Moves the cursor left/right.

other
Page 1
...MV80B has a progressive scan feature. c This unit doesn't have Auto Clock Set? How can I use to set can also look on your owner's manual under the Initial Setup Wizard. JVC Customer Care Center 1-800-252-5722 DR-MV80B Quick Guide FAQ's Thank you for Clock Set. You need to...During the Initial Set Up, I record TV program? You can be distorted. c Press OUTPUT STATUS button and select either 480i or 480p in VCR playback, the picture can play in another DVD player. When the resolution is distorted, press OUTPUT STATUS button and select 480i. Please see page 18...
...MV80B has a progressive scan feature. c This unit doesn't have Auto Clock Set? How can I use to set can also look on your owner's manual under the Initial Setup Wizard. JVC Customer Care Center 1-800-252-5722 DR-MV80B Quick Guide FAQ's Thank you for Clock Set. You need to...During the Initial Set Up, I record TV program? You can be distorted. c Press OUTPUT STATUS button and select either 480i or 480p in VCR playback, the picture can play in another DVD player. When the resolution is distorted, press OUTPUT STATUS button and select 480i. Please see page 18...

