

User Manual
Page 1
7" Portable On-camera LCD Monitor User Manual Model: DT-X71FI HDSDI&HDMI, Waveform, Audio meter, Focus assist DT-X71HI 3GSDI&HDMI DT-X71CI HDMI Please read this User Manual throughout before using.
7" Portable On-camera LCD Monitor User Manual Model: DT-X71FI HDSDI&HDMI, Waveform, Audio meter, Focus assist DT-X71HI 3GSDI&HDMI DT-X71CI HDMI Please read this User Manual throughout before using.
User Manual
Page 2
Please read this user manual carefully. .1 All internal technologies of this product are the properties of their respective owners. .3 Due to constant effort of product development, SWIT Electronics reserves the right to make changes and improvements to the product described in this manual without written permission is disassembled by anyone other relative trademarks in this product...
Please read this user manual carefully. .1 All internal technologies of this product are the properties of their respective owners. .3 Due to constant effort of product development, SWIT Electronics reserves the right to make changes and improvements to the product described in this manual without written permission is disassembled by anyone other relative trademarks in this product...

User Manual
Page 3
... screen. For a third party power adapter, please make sure the voltage range, supplied power, and polarity of product warranty. 3. Please disconnect the power cable or take off the factory LCD film. Please do not press hard when cleaning the screen. 3. The chemical may damage the LCD. 4. Maintenance Monitor 1. Please don't try to avoid damage. Please don't lay this product on the unstable place. 2. Cleaning 1. Please keep the signal...
... screen. For a third party power adapter, please make sure the voltage range, supplied power, and polarity of product warranty. 3. Please disconnect the power cable or take off the factory LCD film. Please do not press hard when cleaning the screen. 3. The chemical may damage the LCD. 4. Maintenance Monitor 1. Please don't try to avoid damage. Please don't lay this product on the unstable place. 2. Cleaning 1. Please keep the signal...
User Manual
Page 4
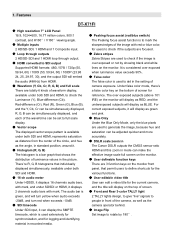
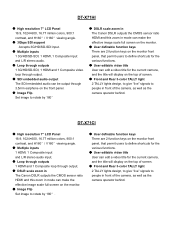
... HDMI, it can display the SMPTE people in front of the waveforms can be adjusted quicker and more under both panel, that individually There are totally 6 kinds of waveform display, a false color key on the monitor. Features DT-X71FI ◆ High resolution 7" LCD Panel 16:9, 1024×600, 16.77 million colors, 900:1 ◆ Peaking focus assist (red/blue switch) ◆contrast, and H160°/ V160°viewing...
... HDMI, it can display the SMPTE people in front of the waveforms can be adjusted quicker and more under both panel, that individually There are totally 6 kinds of waveform display, a false color key on the monitor. Features DT-X71FI ◆ High resolution 7" LCD Panel 16:9, 1024×600, 16.77 million colors, 900:1 ◆ Peaking focus assist (red/blue switch) ◆contrast, and H160°/ V160°viewing...
User Manual
Page 5
... resolution 7" LCD Panel 16:9, 1024×600, 16.77 million colors, 900:1 contrast, and H160°/ V160°viewing angle. ◆ Multiple inputs 1 HDMI, 1 Composite input and L/R stereo audio input. ◆ Loop through outputs 1 HDMI and 1 Composite loop through output. ◆ DSLR scale zoom in The Canon DSLR outputs the CMOS sensor ratio HDMI and this zoom in mode can make the effective image scale full screen...
... resolution 7" LCD Panel 16:9, 1024×600, 16.77 million colors, 900:1 contrast, and H160°/ V160°viewing angle. ◆ Multiple inputs 1 HDMI, 1 Composite input and L/R stereo audio input. ◆ Loop through outputs 1 HDMI and 1 Composite loop through output. ◆ DSLR scale zoom in The Canon DSLR outputs the CMOS sensor ratio HDMI and this zoom in mode can make the effective image scale full screen...
User Manual
Page 6
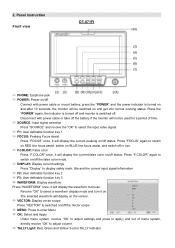
Disconnect with power cable or mount battery, press the "POWER" and the power indicator is switched off the Vector scope ⑿ MENU: Press to enter Menu ⒀ OK: Select and Apply Under menu system, revolve "OK" to adjust settings and press to select a waveform display mode and turn it will be switched on and get into normal working status. Panel Instruction Front view DT-X71FI ⑴ PHONE: Earphone jack ⑵ POWER: Power on BLUE line...
Disconnect with power cable or mount battery, press the "POWER" and the power indicator is switched off the Vector scope ⑿ MENU: Press to enter Menu ⒀ OK: Select and Apply Under menu system, revolve "OK" to adjust settings and press to select a waveform display mode and turn it will be switched on and get into normal working status. Panel Instruction Front view DT-X71FI ⑴ PHONE: Earphone jack ⑵ POWER: Power on BLUE line...
User Manual
Page 7
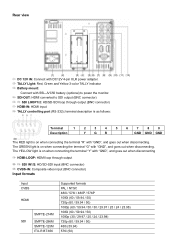
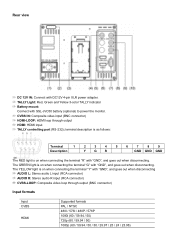
... goes out when disconnecting. Rear view ⑴ DC 12V IN: Connect with DC12V 4-pin XLR power adapter. ⑵ TALLY Light: Red, Green and Yellow 3-color TALLY indicator ⑶ Battery mount: Connect with SSL-JVC50 battery (optional) to power the monitor. ⑷ SDI-OUT: HDMI converted to SDI output (BNC connector) ⑸ ⑹ SDI LOOP1/2: HD/SD-SDI loop through output (BNC connector) ⑺ HDMI-IN: HDMI input ⑻ TALLY controlling port...
... goes out when disconnecting. Rear view ⑴ DC 12V IN: Connect with DC12V 4-pin XLR power adapter. ⑵ TALLY Light: Red, Green and Yellow 3-color TALLY indicator ⑶ Battery mount: Connect with SSL-JVC50 battery (optional) to power the monitor. ⑷ SDI-OUT: HDMI converted to SDI output (BNC connector) ⑸ ⑹ SDI LOOP1/2: HD/SD-SDI loop through output (BNC connector) ⑺ HDMI-IN: HDMI input ⑻ TALLY controlling port...
User Manual
Page 8
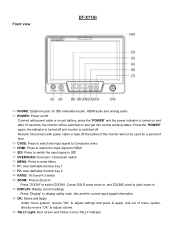
... ZOOM2: pixel to pixel zoom-in. ⑿ DISPLAY: Display current settings Press "Display" to display safety mark, title and the current input signal information ⒀ OK: Select and Apply Under menu system, revolve "OK" to adjust settings and press to adjust volume. ⒁ TALLY Light: Red, Green and Yellow 3-color TALLY indicator Front view DT-X71HI ⑴ PHONE: Earphone jack, for SDI embedded audio, HDMI audio and analog audio ⑵ POWER: Power on/off Connect with power cable or take...
... ZOOM2: pixel to pixel zoom-in. ⑿ DISPLAY: Display current settings Press "Display" to display safety mark, title and the current input signal information ⒀ OK: Select and Apply Under menu system, revolve "OK" to adjust settings and press to adjust volume. ⒁ TALLY Light: Red, Green and Yellow 3-color TALLY indicator Front view DT-X71HI ⑴ PHONE: Earphone jack, for SDI embedded audio, HDMI audio and analog audio ⑵ POWER: Power on/off Connect with power cable or take...
User Manual
Page 9
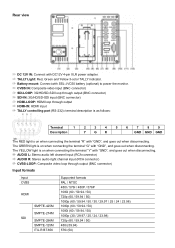
... connecting the terminal "G" with "GND", and goes out when disconnecting. The YELLOW light is on when connecting the terminal "R" with "GND", and goes out when disconnecting. Rear view ⑴ DC 12V IN: Connect with DC12V 4-pin XLR power adapter. ⑵ TALLY Light: Red, Green and Yellow 3-color TALLY indicator. ⑶ Battery mount: Connect with SSL-JVC50 battery (optional) to power the monitor. ⑷ CVBS IN: Composite video input (BNC connector...
... connecting the terminal "G" with "GND", and goes out when disconnecting. The YELLOW light is on when connecting the terminal "R" with "GND", and goes out when disconnecting. Rear view ⑴ DC 12V IN: Connect with DC12V 4-pin XLR power adapter. ⑵ TALLY Light: Red, Green and Yellow 3-color TALLY indicator. ⑶ Battery mount: Connect with SSL-JVC50 battery (optional) to power the monitor. ⑷ CVBS IN: Composite video input (BNC connector...
User Manual
Page 10
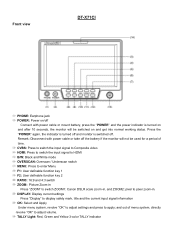
...; DISPLAY: Display current settings Press "Display" to display safety mark, title and the current input signal information ⒀ OK: Select and Apply Under menu system, revolve "OK" to adjust settings and press to adjust volume. ⒁ TALLY Light: Red, Green and Yellow 3-color TALLY indicator Front view DT-X71CI ⑴ PHONE: Earphone jack ⑵ POWER: Power on and get into normal working status. Remark: Disconnect with power cable or take off and monitor is turned...
...; DISPLAY: Display current settings Press "Display" to display safety mark, title and the current input signal information ⒀ OK: Select and Apply Under menu system, revolve "OK" to adjust settings and press to adjust volume. ⒁ TALLY Light: Red, Green and Yellow 3-color TALLY indicator Front view DT-X71CI ⑴ PHONE: Earphone jack ⑵ POWER: Power on and get into normal working status. Remark: Disconnect with power cable or take off and monitor is turned...
User Manual
Page 11
... The RED light is on when connecting the terminal "R" with "GND", and goes out when disconnecting. Rear view ⑴ DC 12V IN: Connect with DC12V 4-pin XLR power adapter. ⑵ TALLY Light: Red, Green and Yellow 3-color TALLY indicator ⑶ Battery mount: Connect with SSL-JVC50 battery (optional) to power the monitor. ⑷ CVBS IN: Composite video input (BNC connector) ⑸ HDMI-LOOP: HDMI loop through output (BNC connector) Input formats Input CVBS HDMI Supported formats...
... The RED light is on when connecting the terminal "R" with "GND", and goes out when disconnecting. Rear view ⑴ DC 12V IN: Connect with DC12V 4-pin XLR power adapter. ⑵ TALLY Light: Red, Green and Yellow 3-color TALLY indicator ⑶ Battery mount: Connect with SSL-JVC50 battery (optional) to power the monitor. ⑷ CVBS IN: Composite video input (BNC connector) ⑸ HDMI-LOOP: HDMI loop through output (BNC connector) Input formats Input CVBS HDMI Supported formats...
User Manual
Page 12
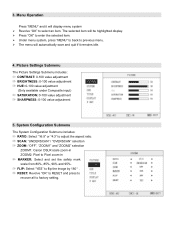
... image by 180°. ⑹ RESET: Revolve "OK" to RESET and press to recover all to previous menu. The selected item will display menu system Revolve "OK" to enter the selected item. The menu will automatically save and quit if it will be highlighted display. Press "OK" to select an item. Picture Settings Submenu The Picture Settings Submenu includes: ⑴ CONTRAST: 0-100 value adjustment ⑵ BRIGHTNESS...
... image by 180°. ⑹ RESET: Revolve "OK" to RESET and press to recover all to previous menu. The selected item will display menu system Revolve "OK" to enter the selected item. The menu will automatically save and quit if it will be highlighted display. Press "OK" to select an item. Picture Settings Submenu The Picture Settings Submenu includes: ⑴ CONTRAST: 0-100 value adjustment ⑵ BRIGHTNESS...
User Manual
Page 13
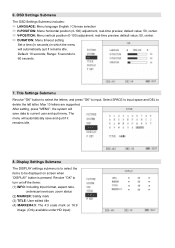
...; LANGUAGE: Menu language English / Chinese selection ⑵ H-POSITION: Menu horizontal position (0-100) adjustment, real-time preview, default value: 50, center. ⑶ V-POSITION: Menu vertical position (0-100) adjustment, real-time preview, default value: 50, center. ⑷ DURATION: Menu timeout setting Set a time (in seconds) in which the menu will automatically save data to current user and quit menu. Title Settings Submenu Revolve "OK" button to select the letters, and press "OK" to be displayed on 16:9 image. (Only...
...; LANGUAGE: Menu language English / Chinese selection ⑵ H-POSITION: Menu horizontal position (0-100) adjustment, real-time preview, default value: 50, center. ⑶ V-POSITION: Menu vertical position (0-100) adjustment, real-time preview, default value: 50, center. ⑷ DURATION: Menu timeout setting Set a time (in seconds) in which the menu will automatically save data to current user and quit menu. Title Settings Submenu Revolve "OK" button to select the letters, and press "OK" to be displayed on 16:9 image. (Only...
User Manual
Page 14
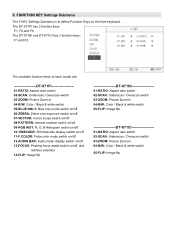
...-PATTERN: Internal colorbar switch on/off 09-RGB HIST: R, G, B Histogram switch on/off 10-TIMECODE: SDI timecode display switch on/off 11-F.COLOR: False color mode switch on/off 12-AUDIO BAR: Audio meter display switch on/off , and red/blue selection 14-FLIP: Image flip DT-X71HI 01-RATIO: Aspect ratio switch 02-SCAN: Underscan / Overscan switch 03-ZOOM: Picture Zoom-in 04-B/W: Color / Black & white switch 05-FLIP: Image flip DT-X71CI 01-RATIO...
...-PATTERN: Internal colorbar switch on/off 09-RGB HIST: R, G, B Histogram switch on/off 10-TIMECODE: SDI timecode display switch on/off 11-F.COLOR: False color mode switch on/off 12-AUDIO BAR: Audio meter display switch on/off , and red/blue selection 14-FLIP: Image flip DT-X71HI 01-RATIO: Aspect ratio switch 02-SCAN: Underscan / Overscan switch 03-ZOOM: Picture Zoom-in 04-B/W: Color / Black & white switch 05-FLIP: Image flip DT-X71CI 01-RATIO...
User Manual
Page 15
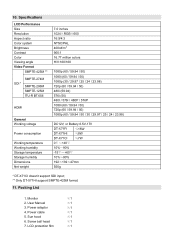
Screw ball head ×1 7. User Manual ×1 3. LCD protection film ×1 10. Packing List 1. Power cable ×1 5. Sun hood ×1 6. Monitor ×1 2. Power adaptor ×1 4. Specifications LCD Performance Size Resolution Aspect ratio Color system Brightness Contrast Color Viewing angle Video Format SMPTE-425M ** SDI * SMPTE-274M SMPTE-296M SMPTE-125M ITU-R BT.656 HDMI General Working voltage Power consumption Working temperature Working humidity Storage temperature Storage humidity Dimensions Net weight 7.0 inches 1024×RGB×600...
Screw ball head ×1 7. User Manual ×1 3. LCD protection film ×1 10. Packing List 1. Power cable ×1 5. Sun hood ×1 6. Monitor ×1 2. Power adaptor ×1 4. Specifications LCD Performance Size Resolution Aspect ratio Color system Brightness Contrast Color Viewing angle Video Format SMPTE-425M ** SDI * SMPTE-274M SMPTE-296M SMPTE-125M ITU-R BT.656 HDMI General Working voltage Power consumption Working temperature Working humidity Storage temperature Storage humidity Dimensions Net weight 7.0 inches 1024×RGB×600...

User Manual
Page 16
This model is manufactured, warranted and supported by SWIT Electronics Co., Ltd. / SWIT Electronics USA, LLC, and distributed in North America by JVC Professional Video Products. Address: 4300 Stevens Creek Blvd., Suite 230, San Jose, CA 95129 · Toll free: 1 866 986-SWIT (7948) • Tel: 408 260-8258 Fax: 408 228-8438 Email: [email protected] • Website: www.swit.us Version: 130129 To obtain service or for further information, please contact: SWIT Electronics USA, LLC.
This model is manufactured, warranted and supported by SWIT Electronics Co., Ltd. / SWIT Electronics USA, LLC, and distributed in North America by JVC Professional Video Products. Address: 4300 Stevens Creek Blvd., Suite 230, San Jose, CA 95129 · Toll free: 1 866 986-SWIT (7948) • Tel: 408 260-8258 Fax: 408 228-8438 Email: [email protected] • Website: www.swit.us Version: 130129 To obtain service or for further information, please contact: SWIT Electronics USA, LLC.

